1. Introduction
Thank you for choosing the FURRIFIC Single Headboard. This headboard is designed to enhance your bedroom with its adjustable LED lighting, integrated charging ports, and convenient storage solutions. This manual provides essential information for safe assembly, operation, and maintenance of your new headboard. Please read these instructions carefully before beginning assembly and retain them for future reference.
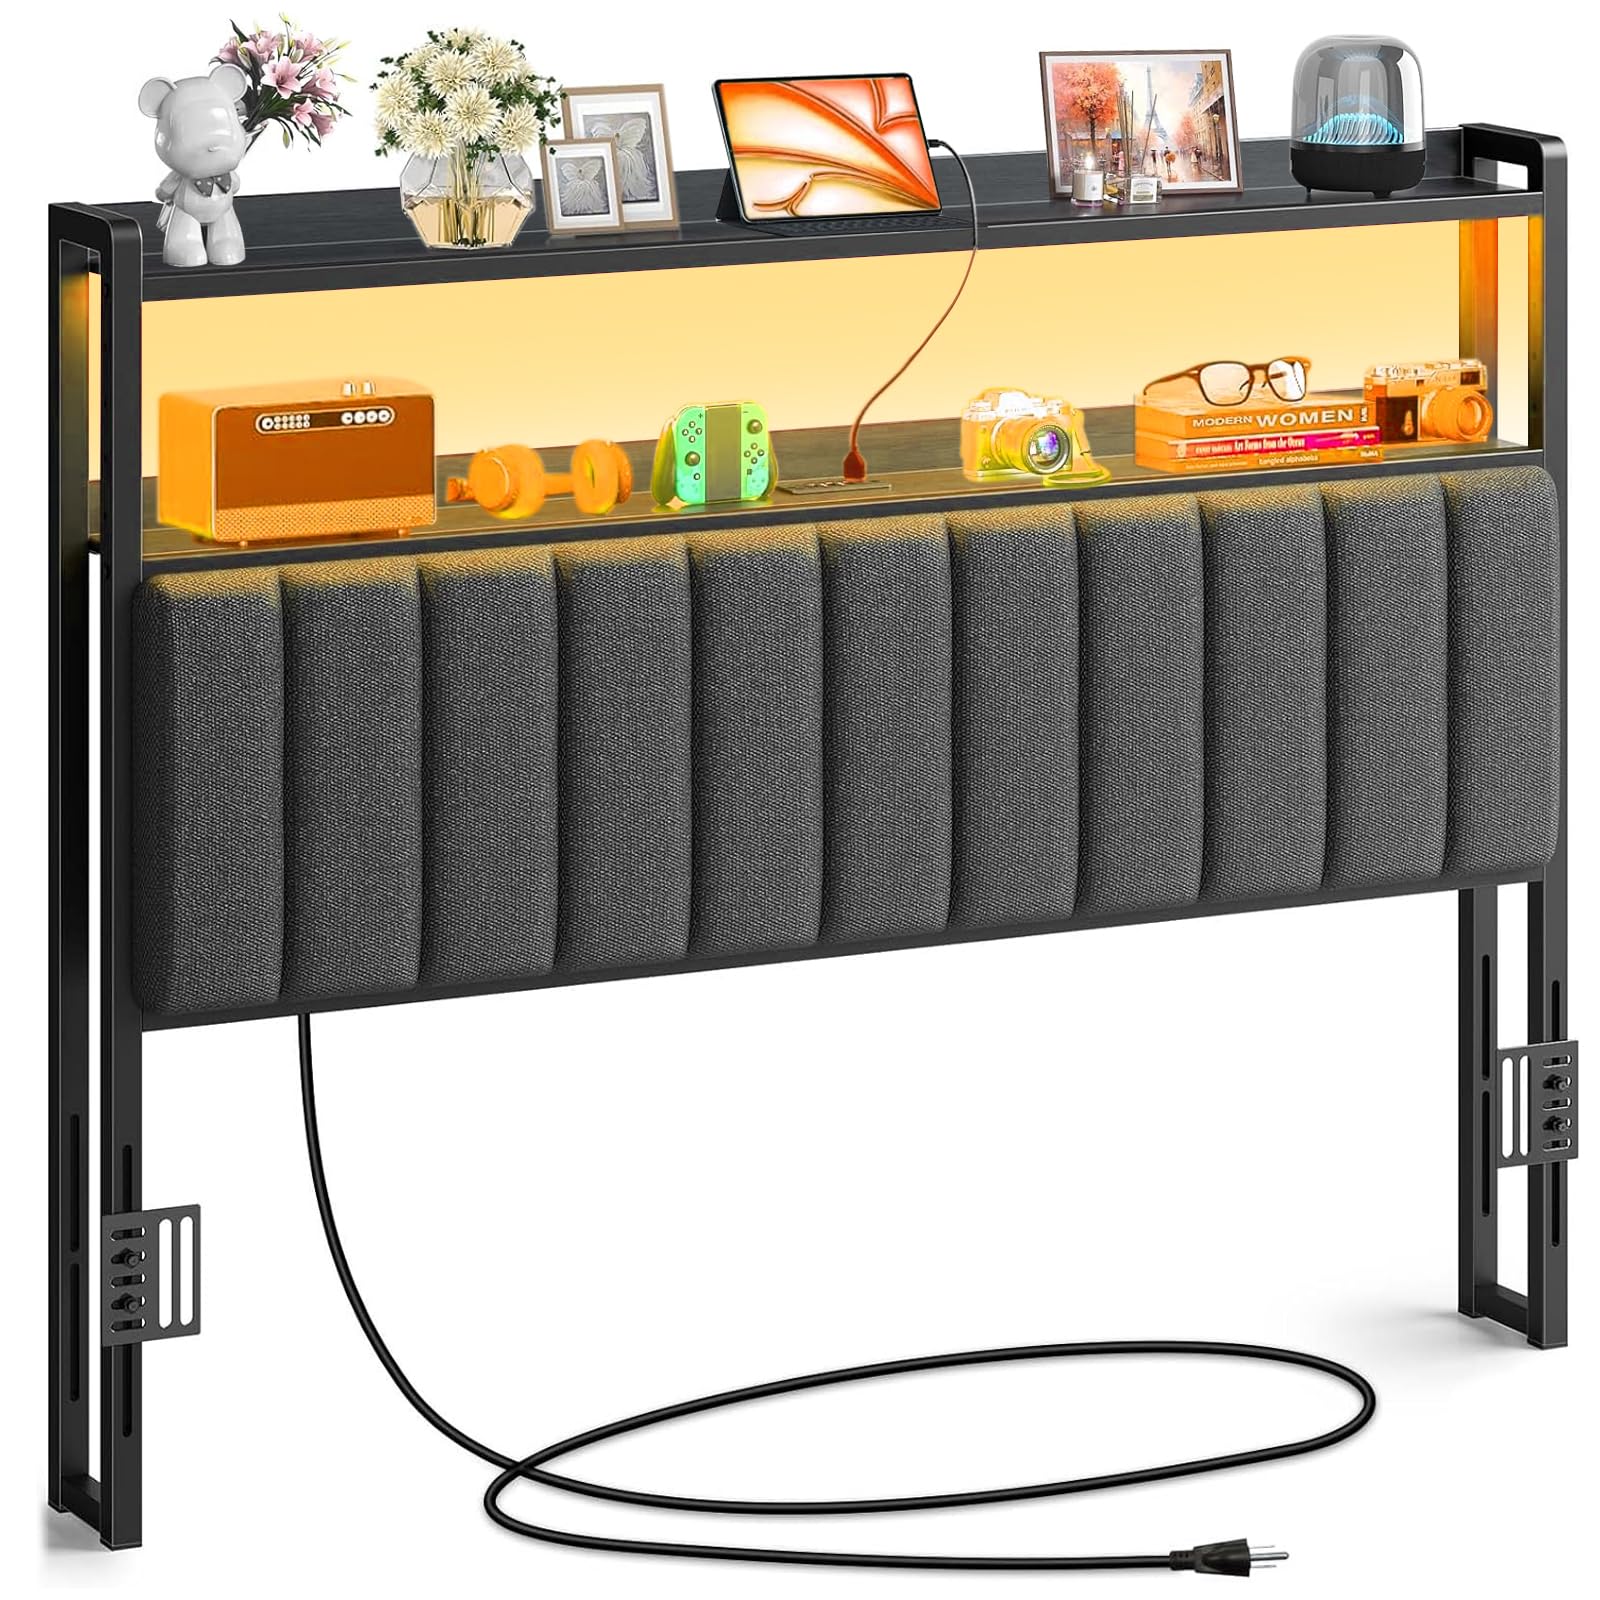
Image 1.1: Fully assembled FURRIFIC Single Headboard with LED lighting and storage shelf.
2. Safety Information
- Ensure all components are present and undamaged before assembly. Do not use if any parts are missing or broken.
- Assembly should be performed by at least two adults to prevent injury.
- Keep small parts away from children during assembly to avoid choking hazards.
- Do not overload the storage shelves. The maximum weight capacity per shelf is 60 lbs (27 kg).
- Ensure the headboard is securely attached to your bed frame before use.
- Only use the provided power cord and adapter. Do not modify the electrical components.
- Avoid exposing electrical components to water or excessive moisture.
- Unplug the headboard from the power outlet before cleaning or performing any maintenance.
3. Package Contents
Please verify that all the following components are included in your package:
- Padded Headboard Panel
- Headboard Frame (Left and Right Supports)
- Top Storage Shelf
- LED Light Strip (pre-installed)
- Integrated Charging Station (pre-installed)
- Power Cord (6.5 feet)
- Assembly Hardware (screws, bolts, Allen wrench)
- Instruction Manual
4. Assembly Instructions
Follow these steps carefully to assemble your FURRIFIC headboard. It is recommended to assemble on a soft, clean surface to prevent damage.
Step 4.1: Attach Side Supports to Padded Panel
Align the left and right metal support frames with the pre-drilled holes on the back of the padded headboard panel. Secure them using the provided screws and Allen wrench. Ensure the adjustable brackets on the supports face inwards towards the bed frame.

Image 4.1: Rear view of the headboard frame with adjustable mounting brackets and power cable.
Step 4.2: Install Top Storage Shelf
Place the top storage shelf onto the upper part of the assembled side supports. Secure it with the designated screws. Ensure the shelf is level and stable.
Step 4.3: Adjust Headboard Height
The headboard's height can be adjusted to match your bed frame. Loosen the bolts on the adjustable brackets located on the side supports. Slide the headboard up or down to your desired height, then securely tighten the bolts. The storage shelf height can also be adjusted between 4.5 and 8.2 inches (11-21 cm) by repositioning the shelf within the frame.

Image 4.2: Diagram illustrating the adjustable storage shelf height (11-21 cm) and overall headboard dimensions (101.3 cm width, 115 cm height).
Step 4.4: Attach to Bed Frame
Position the assembled headboard against your bed frame. Align the adjustable brackets with the mounting points on your bed frame. Use appropriate bolts (not always included, depending on bed frame) to securely fasten the headboard to the bed frame. Ensure it is stable and does not wobble.
Step 4.5: Connect Power
Plug the headboard's power cord into a standard 125V/12A wall outlet. The LED lights and charging ports are now ready for use.
5. Operating Instructions
5.1. LED Lighting System
The integrated LED light strip offers adjustable colors and modes to create your desired ambiance. The lights are controlled via a remote control (if included) or a dedicated mobile application.
- Power On/Off: Use the power button on the remote or app to turn the lights on or off.
- Color Selection: Choose from over 60,000 colors using the color wheel in the mobile app or preset buttons on the remote.
- Dynamic Modes: Select from 29 flashing modes, including microphone mode (lights react to sound), music mode (lights sync with music), and timing mode (set schedules for lights).
- Brightness Adjustment: Adjust the brightness level to your preference.

Image 5.1: The headboard featuring RGB LED lights with various color and mode options, controllable via a mobile application.
5.2. Integrated Charging Station
The headboard includes a convenient charging station with multiple ports for your electronic devices.
- AC Outlets: Two standard 125V/12A AC outlets are provided for powering lamps, laptops, or other small appliances.
- USB Ports: Two 5V/2.4A USB ports (including one Type-C port) are available for charging smartphones, tablets, and other USB-powered devices.
- Simply plug your devices into the appropriate ports. The charging station is active when the headboard is plugged into a wall outlet.

Image 5.2: Detail of the practical charging station, featuring two 125V/12A AC outlets and two 5V/2.4A USB ports (including Type-C).
5.3. Storage Shelf Usage
The top shelf provides convenient storage for books, phones, tablets, and other bedside essentials. Ensure items are placed securely and do not exceed the 60 lbs (27 kg) weight limit.

Image 5.3: The headboard's integrated storage shelf, illuminated by LED lights, holding various personal items.
6. Care and Maintenance
- Cleaning the Fabric: For the linen fabric, gently wipe with a damp cloth and mild soap if necessary. Blot dry immediately. Do not use harsh chemicals or abrasive cleaners.
- Cleaning the Frame and Shelf: Wipe metal and shelf surfaces with a soft, dry cloth. For stubborn marks, a slightly damp cloth can be used, followed by immediate drying.
- Electrical Components: Ensure the headboard is unplugged before cleaning around the LED lights or charging ports. Use a dry cloth to wipe these areas.
- Regular Checks: Periodically check all screws and bolts to ensure they remain tight. Retighten as needed to maintain stability.
7. Troubleshooting
- LED Lights Not Working:
- Ensure the headboard is properly plugged into a working wall outlet.
- Check the power connection to the LED strip.
- Verify the remote control batteries (if applicable) or check the mobile app connection. - Charging Ports Not Functioning:
- Confirm the headboard is plugged into a live power outlet.
- Try a different device or charging cable to rule out device/cable issues.
- Ensure the device is properly inserted into the port. - Headboard is Unstable:
- Check that all assembly screws and bolts are securely tightened.
- Ensure the headboard is properly attached to your bed frame using the adjustable brackets. - Excessive Noise:
- Tighten any loose connections or hardware.
If you encounter issues not listed here or if troubleshooting steps do not resolve the problem, please contact FURRIFIC customer support.
8. Specifications
| Model Number | MC295-M |
| Product Dimensions (W x H) | 100 cm x 115 cm (39.4 in x 45.3 in) |
| Material | Linen Fabric, Metal Frame, High-Density Foam |
| Color | Black |
| Item Weight | 13.8 Kilograms (30.4 lbs) |
| Storage Shelf Capacity | 60 lbs (27 kg) |
| Power Input | 125V/12A AC |
| USB Output | 5V/2.4A (USB-A and Type-C) |
| Power Cord Length | 6.5 feet |
| Assembly Required | Yes |
9. Warranty and Support
FURRIFIC products are designed for quality and durability. For information regarding warranty coverage, please refer to the warranty card included with your purchase or visit our official website. Our customer support team is available to assist you with any queries or concerns before or after your purchase. We aim to respond within 24 hours.
Contact Information:
Please refer to your purchase documentation or the FURRIFIC website for the most current contact details.