1. Product Overview
The REOLINK 16MP Dual Lens Elite Pro Floodlight PoE Security Camera offers advanced surveillance capabilities with its high-resolution dual-lens system and integrated floodlights. Designed for outdoor use, it provides a wide panoramic view and intelligent detection features, all powered conveniently via Power over Ethernet (PoE).
Key Features:
- High Pixel and Dual Lens: 16MP ultra-high definition picture quality with digital zoom. Two 8MP lenses seamlessly splice to achieve a 180° horizontal ultra-wide-angle view.
- Color Night Vision and Infrared Night Vision: Equipped with a 2800 lumens ultra-bright floodlight for full-color details in the dark. Supports both full-color and infrared night vision. Custom lighting modes allow adjustment of brightness, color temperature, and floodlight angle.
- Intelligent Detection and Two-Way Talk: Features human, vehicle, and animal detection alarms. Triggers a 105dB siren or user-entered voice upon motion detection. Real-time two-way voice communication and push alarm notifications are supported.
- Multi-platform and Storage Methods, Subscription-free: Supports multi-platform, multi-user access, and Motion Track intelligent playback. Offers 24/7 continuous recording to a microSD card (up to 512GB, not included), Reolink NVR, FTP, or NAS. Utilizes H.264/H.265 high-efficiency video compression.
- PoE+ (30W) & PoE (15.4W) Support: The included PoE injector supplies up to 30W output power for PoE+ devices and 15.4W for PoE devices, ensuring broad compatibility.
2. What's in the Box
Upon unboxing your REOLINK Elite Pro Floodlight PoE camera, you will find the following components:
- REOLINK Elite Pro Floodlight PoE Camera
- Mounting Plate
- Mounting Screws and Machine Screws for Junction Box Installation
- Junction Box Bracket
- Waterproof Lid
- Wrench for Camera Mount Adjustment
- Short Ethernet Cable
- Rubber/Silicone Screw Covers
- Quick Start Guide and other documentation

Image 2.1: REOLINK Elite Pro Floodlight PoE Camera with included accessories and mounting hardware.
3. Physical Features
The camera unit features a robust design with specific components for functionality and durability:
- Dual Lenses: Two 8MP lenses for 16MP resolution and 180° panoramic view.
- Infrared LEDs: For black and white night vision.
- Microphone: For audio input during live view and recording.
- Speaker: For two-way talk and siren output.
- MicroSD Card Slot: Located under a screwed-in cover, supports up to 512GB for local storage.
- Reset Button: Located next to the microSD card slot.
- Ball Head Mount: Allows for flexible positioning of the camera.
- Mounting Plate: Metal construction for secure installation.
- Ethernet Port: The sole connection for both power and data (PoE).
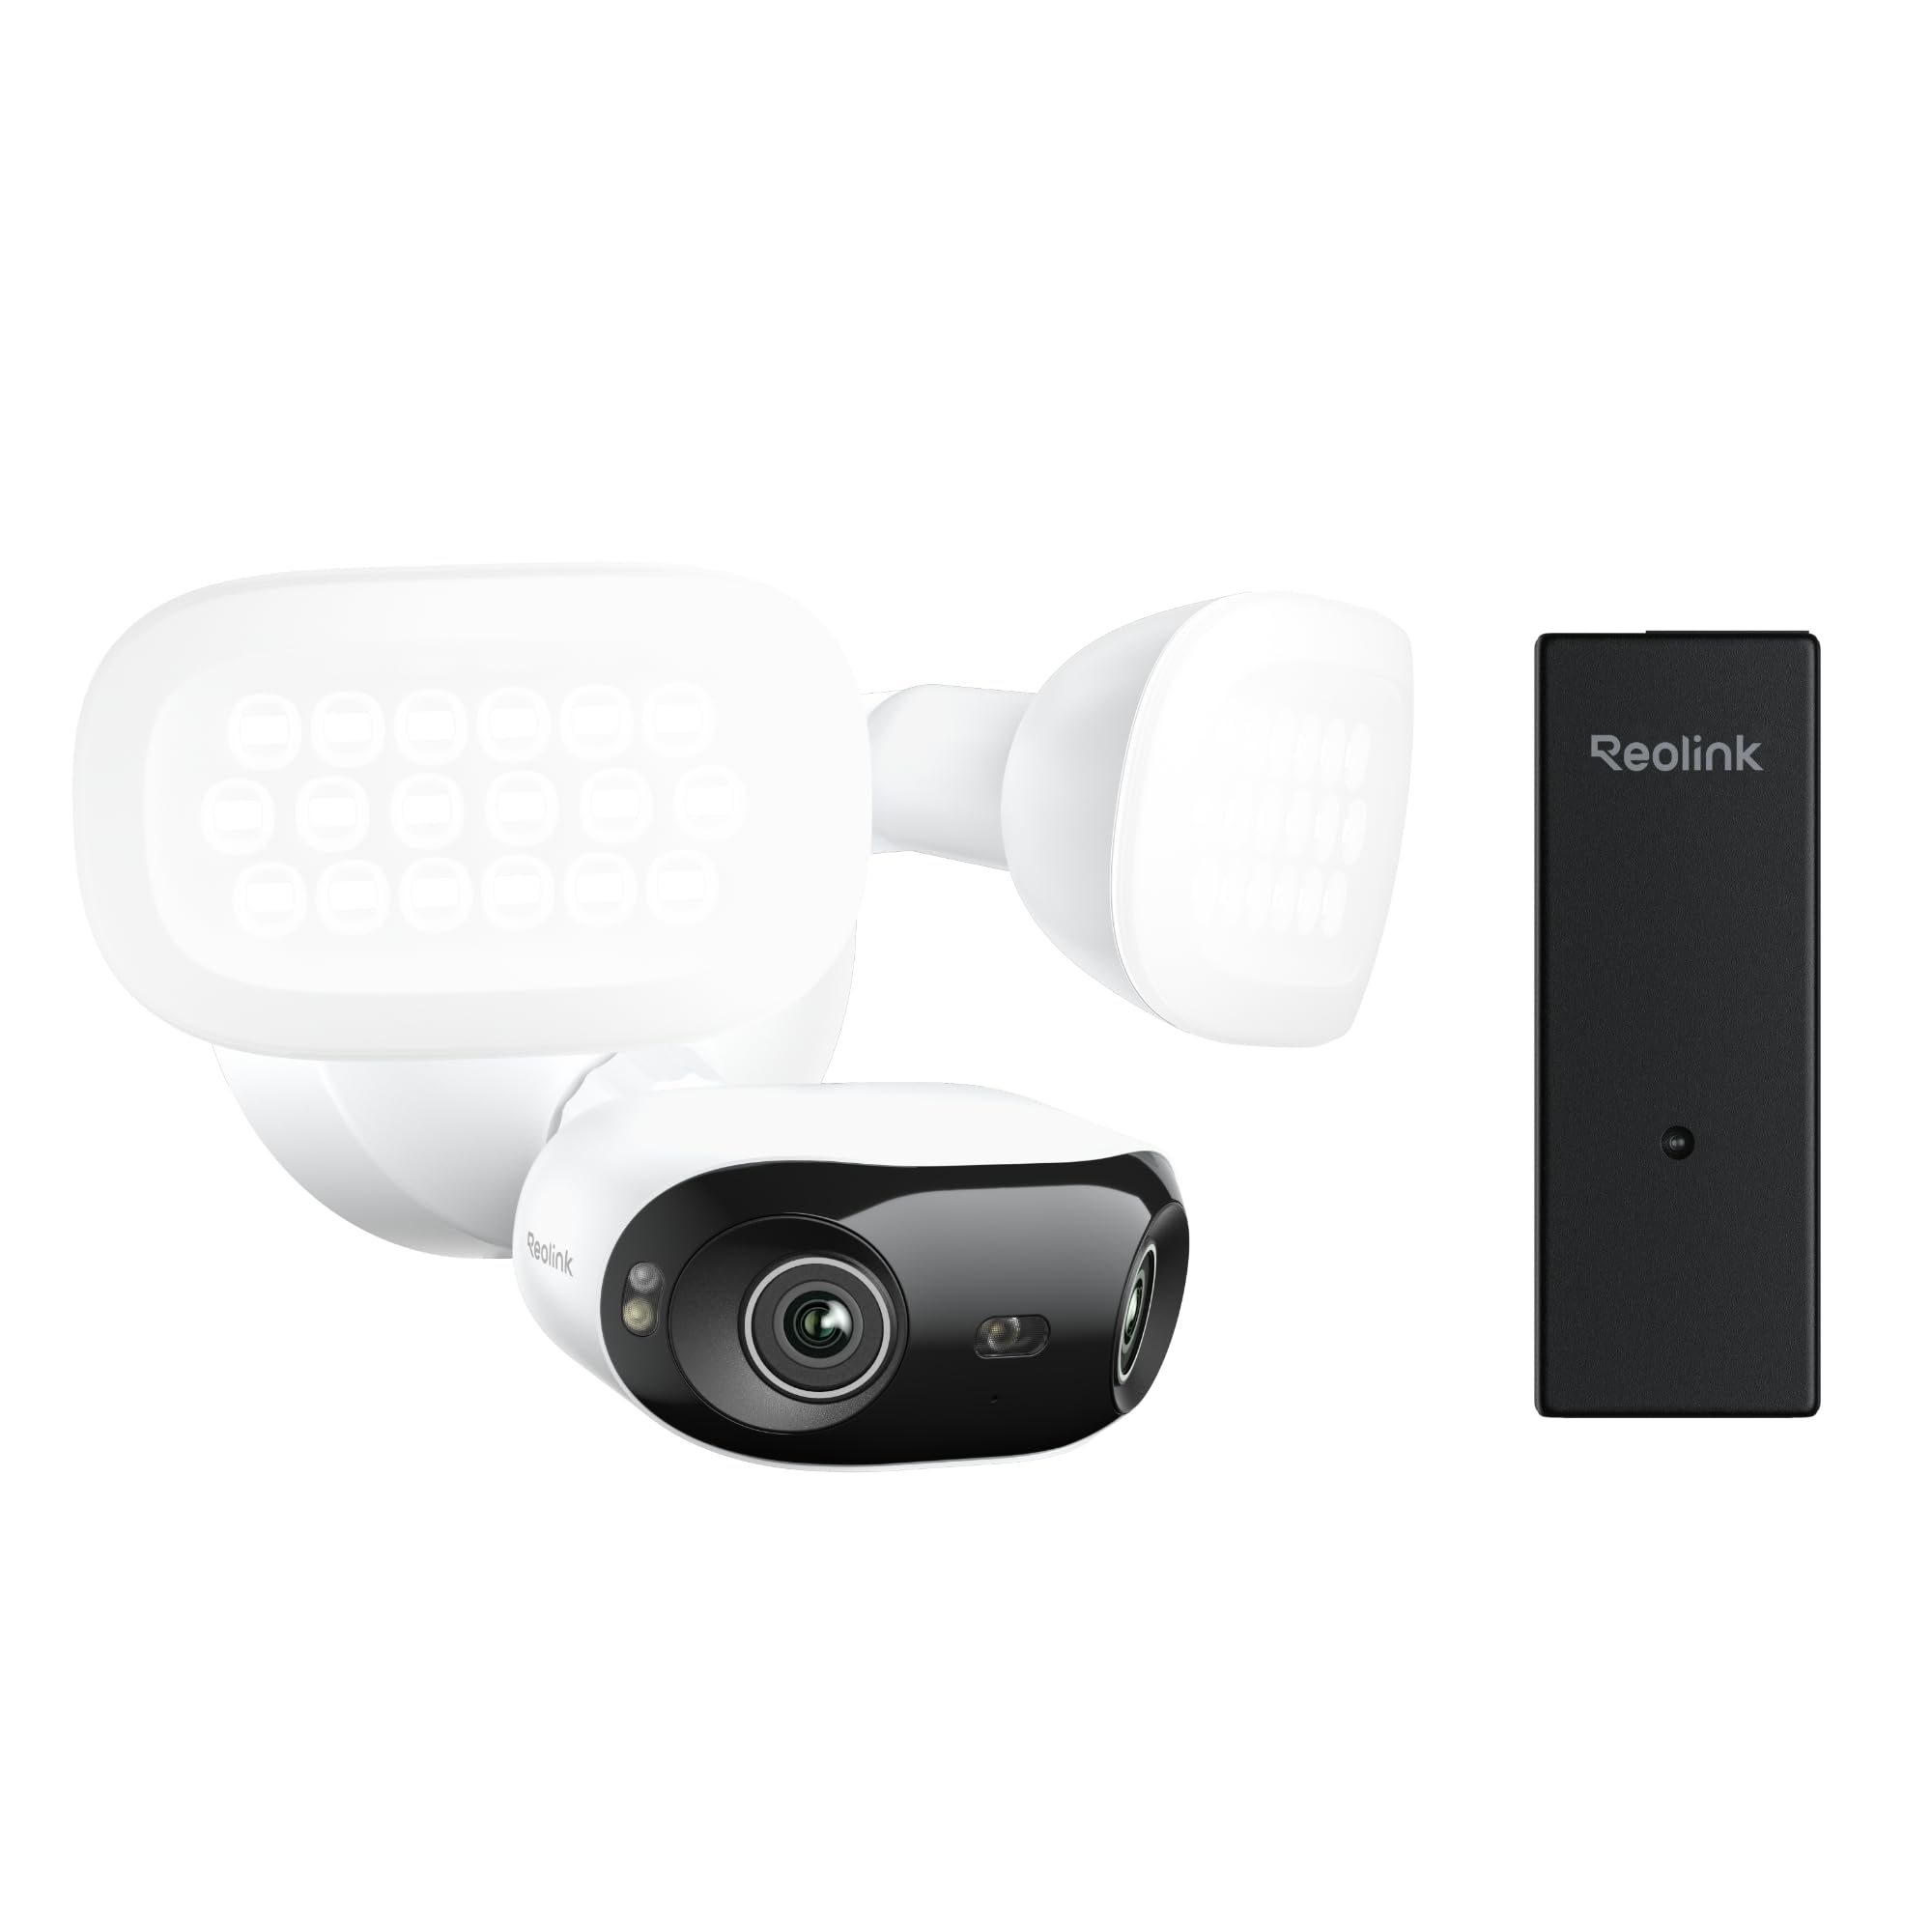
Image 3.1: Front view of the REOLINK Elite Pro Floodlight PoE Camera, highlighting the dual lenses and floodlights.

Image 3.2: The REOLINK Elite Pro Floodlight PoE Camera connected to a PoE injector, demonstrating the 'Plug and Play' setup.
4. Power and Connectivity
This camera is designed exclusively for Power over Ethernet (PoE) operation. It requires an Ethernet cable for both power supply and data transmission. There is no option for a 12V power adapter.
- PoE Injector/Switch: The camera must be powered by a PoE injector or a PoE switch.
- PoE+ (30W) & PoE (15.4W) Compatible: The included PoE injector supports both PoE+ (up to 30W) and standard PoE (15.4W) devices.
- Reolink NVR: Can also be powered and connected directly to the back of a Reolink NVR.

Image 4.1: The compact PoE injector included in the bundle, providing power and data over a single Ethernet cable.

Image 4.2: Close-up of the PoE injector's Gigabit Data and Gigabit Data+Power ports, supporting high-speed connections.
5. Installation
The REOLINK Elite Pro Floodlight PoE camera can be installed on a wall, ceiling, or under eaves. It can be mounted directly or to a junction box.
Installation Steps:
- Prepare for Installation: Before mounting, ensure you have planned the routing for your Ethernet cable. If drilling through a wall, a 3/4-inch hole is typically sufficient to clear the Ethernet port.
- Insert MicroSD Card: Unscrew the cover on the bottom of the camera to access the microSD card slot. Insert a compatible microSD card (up to 512GB) for local storage. Securely replace the cover.
- Mounting Plate Installation: Secure the metal mounting plate to your desired surface (wall, ceiling, or under eaves) using the provided mounting screws. If installing into a junction box, use the appropriate bracket and machine screws.
- Connect Ethernet Cable: Temporarily hang the floodlight camera from the mounting plate using the included lanyard. Connect the Ethernet cable to the camera's Ethernet port.
- Secure the Camera: Push any excess cable into the wall/mounting surface. Align the camera with the mounting plate and screw it in using the two included machine screws. Cover the screw holes with the provided rubber/silicone covers for weather protection.
- Adjust Floodlights and Camera: Adjust the floodlights to your desired angle. For the camera, move it to the optimal position and use the included wrench to tighten the collar of the ball joint, securing it in place.
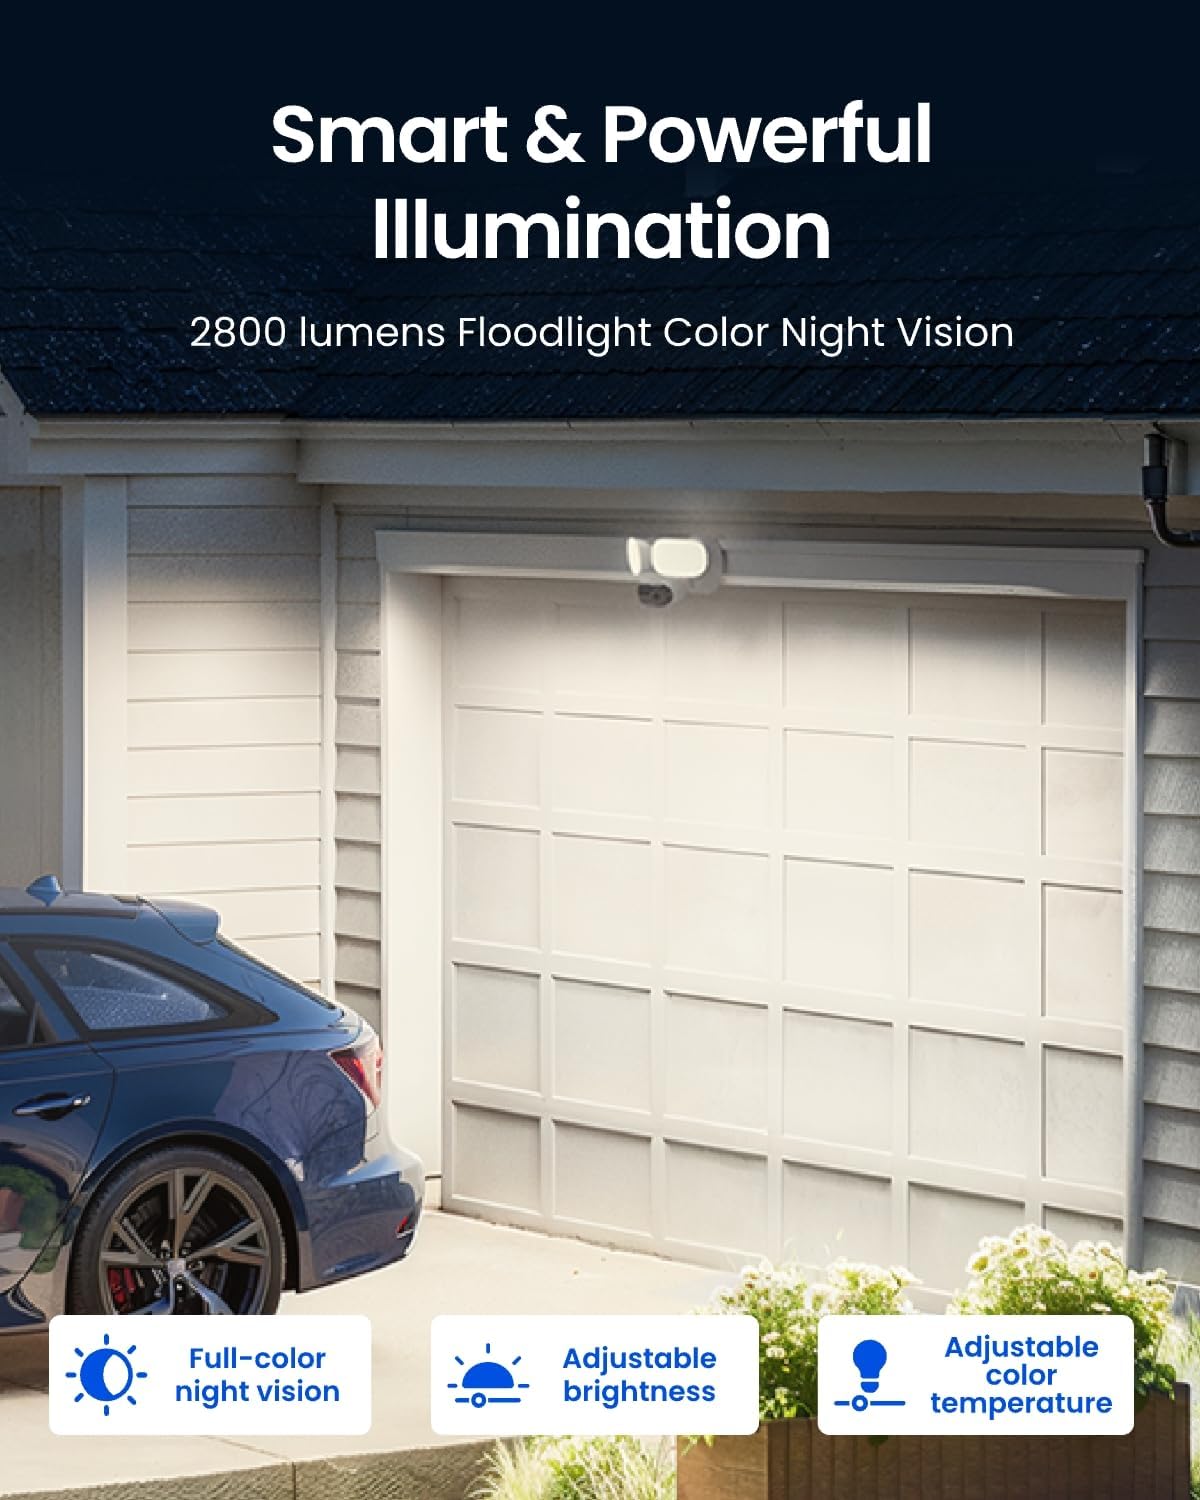
Image 5.1: The REOLINK Elite Pro Floodlight PoE Camera installed, showcasing its adjustable floodlights and camera unit.
6. Initial Setup (Reolink App)
To set up and manage your camera, use the Reolink app:
- Download Reolink App: Download and install the Reolink app on your smartphone.
- Connect to Network: Ensure your phone is connected to the same network as the camera (via the PoE injector/switch).
- Add Device: In the app settings, enable 'Add Devices Automatically'. The app should detect the uninitialized device.
- Initialize Device: Click on the detected device. You will be prompted to create a device password and name your camera.
- Format SD Card: If you installed a microSD card, the app will prompt you to format it. Confirm to proceed.
- Test Live View: Once initialized, click on the camera's snapshot in the app to access the live view and confirm functionality.
7. Operating Instructions
7.1 Live View & Playback
- Live View Controls: Pause live view, listen in, take snapshots, record live video, change live view quality (Clear, Balanced, Fluent), and switch to landscape mode.
- Playback: Access recorded events. You can sort events by type (Person, Vehicle, Animal, Line Crossing, Zone Intrusion, Loitering, Forgotten Object, Object Removal). Download recorded footage to your phone. Ensure 'Clear' or highest resolution mode is selected before downloading.
7.2 Smart Detection & Alerts
- Detection Types: Configure detection for persons, vehicles, and animals.
- Perimeter Protection: Set up Line Crossing Alerts, Zone Intrusion Alerts, and Zone Loitering Alerts.
- Smart Event Detection (Beta): Configure alerts for 'Forgotten Object' (object found in a defined area) and 'Object Removal' (object disappears from a defined area). You can set alarm delay and sensitivity for these events.
- Non-Detection Zones: Define areas where you do not wish to receive alerts.
- Motion Track: Utilize the Motion Track feature for enhanced event tracking.
- AI Search: Search recorded footage using AI to quickly find specific events or objects.
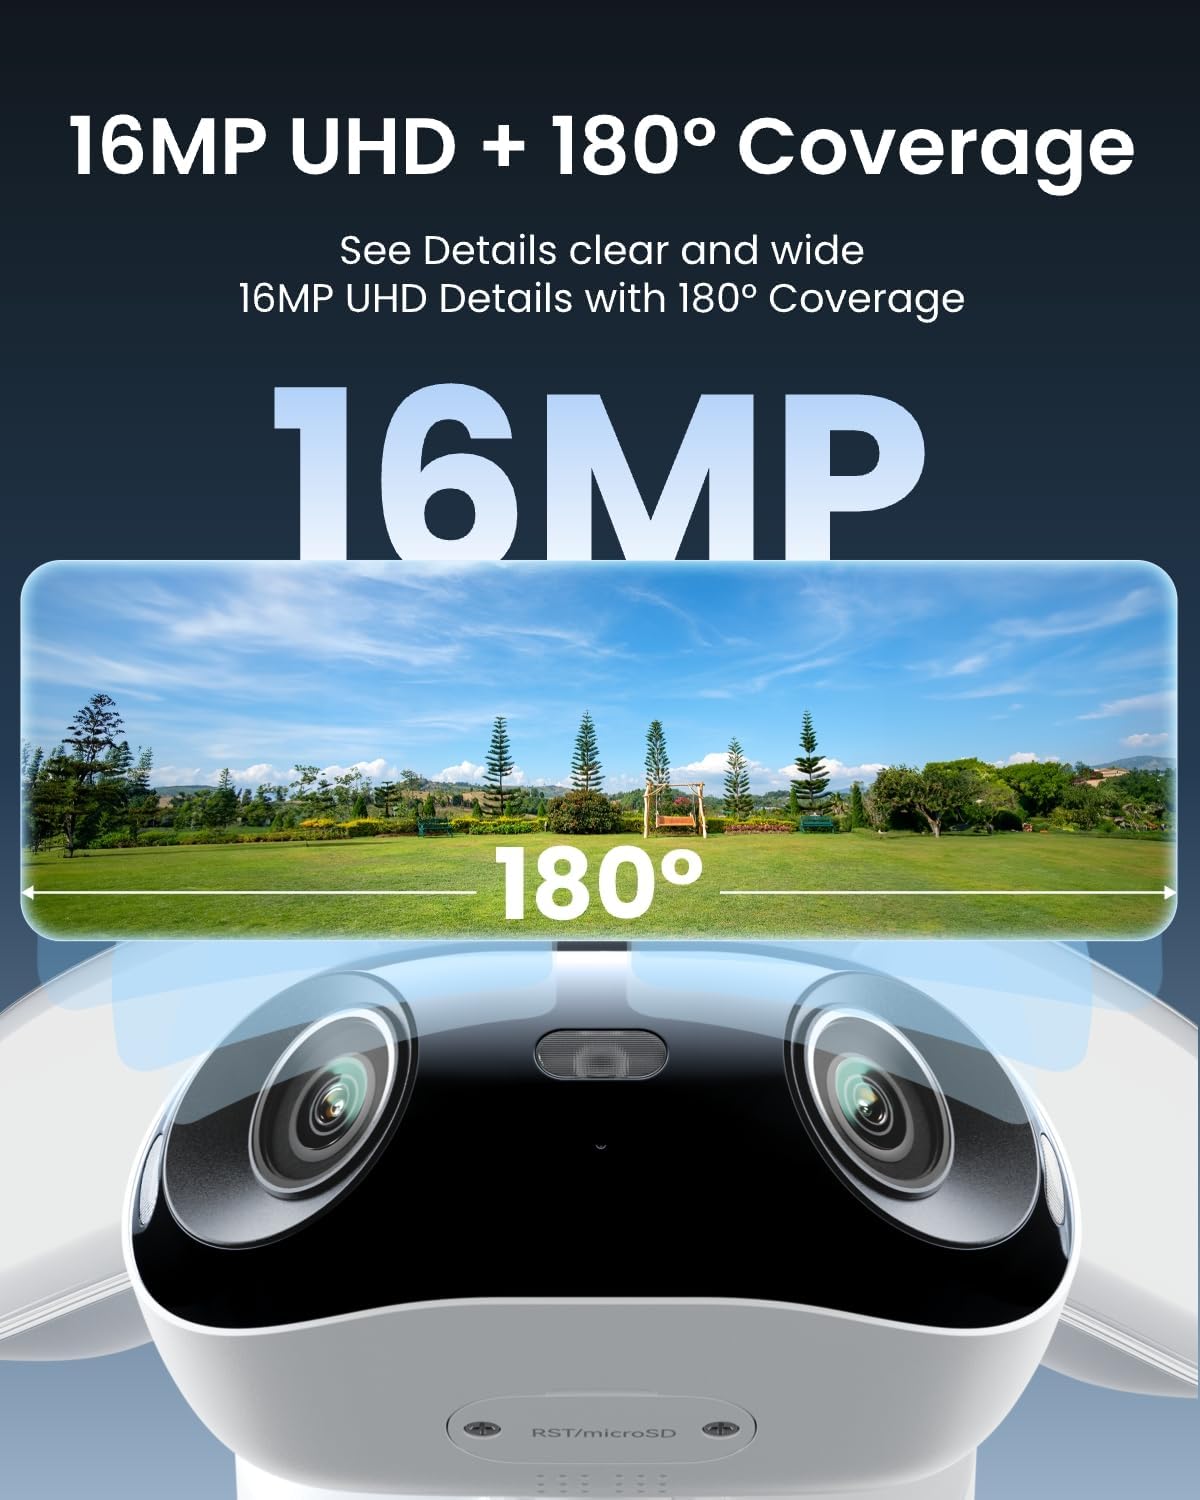
Image 7.1: Visual representation of the 16MP UHD resolution and 180° horizontal coverage provided by the dual lenses.
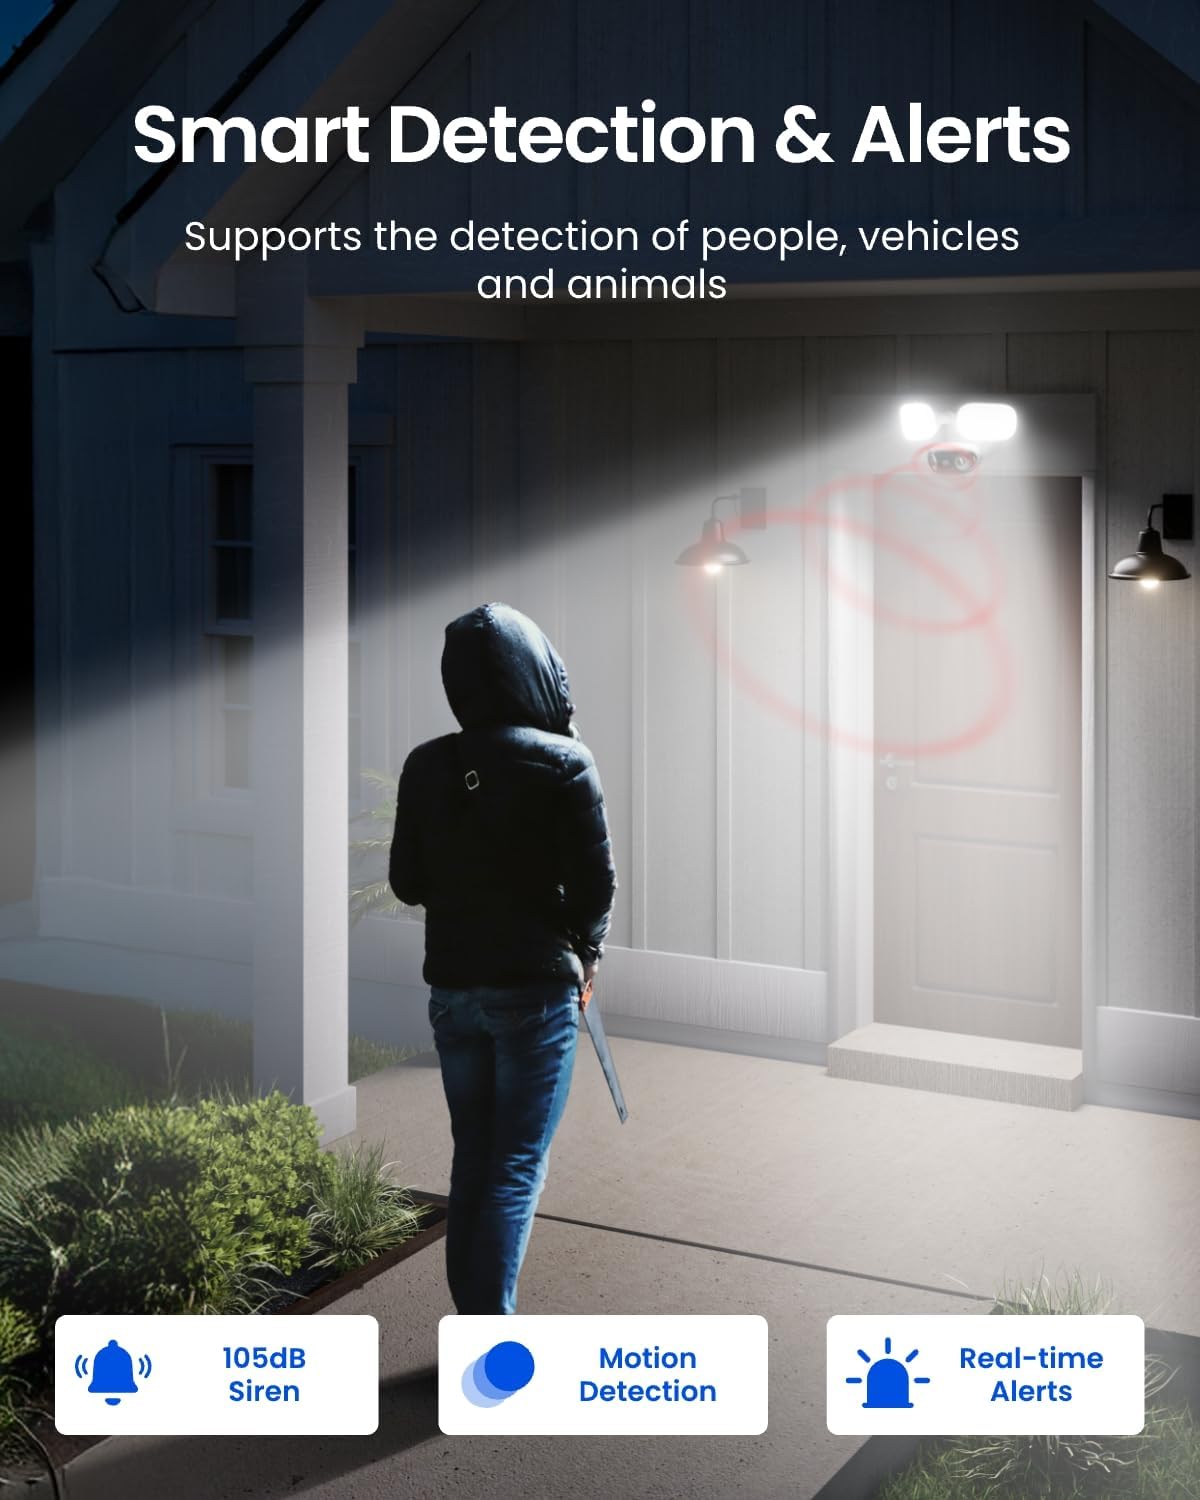
Image 7.2: Illustration of the camera's smart detection capabilities, including human detection triggering the floodlight and siren.

Image 7.3: The Reolink App interface demonstrating the local AI Video Search feature, allowing users to search for specific objects or events without subscription.
7.3 Floodlight Control
The floodlights offer various modes and customizable settings:
- Brightness & Color Temperature: Adjustable from 3000K (warm yellow) to 6500K (white light).
- Floodlight Modes:
- Close: Floodlight stays off unless motion is detected.
- Auto Mode: Automatically adapts brightness based on ambient lighting conditions for optimal night vision.
- Always On at Night: Floodlight remains on in Night Mode at a set brightness.
- Timer Mode: Keep on during scheduled time periods.
- Light Alert Settings: This setting overrides other floodlight settings when motion is detected.
- Spotlight: Automatically turns on the floodlight when the camera detects an event at night.
- Detection: Specify which smart events (person, vehicle, animal) trigger the light.
- Continuous Flashing: Option to make the floodlight flash.
- Stay On: Keep the light on for a set duration (e.g., 30 seconds, 1, 3, 5, 15 minutes) after detection.
- Brightness: Adjust the brightness level for triggered alerts.
7.4 Siren
The camera features a 105dB siren that can be manually triggered from the app or set to activate automatically upon smart event detection.
7.5 Notifications
- Push Notifications: Enable to receive motion notifications on your phone. You can customize detection types and schedules.
- Email Alerts: Receive emails with snapshots of motion events, including Motion Track images and timestamps. Configure alarm schedules and email intervals.
8. Maintenance
To ensure optimal performance and longevity of your REOLINK Elite Pro Floodlight PoE camera, regular maintenance is recommended:
- Clean Lenses: Periodically clean the camera lenses and floodlight covers with a soft, damp cloth to remove dust, dirt, or water spots that may obscure the view or reduce light output.
- Check Connections: Ensure all cable connections, especially the Ethernet cable, are secure and free from damage.
- Firmware Updates: Regularly check for and install firmware updates via the Reolink app to benefit from new features, improvements, and security patches.
- Inspect Mounting: Periodically check the mounting hardware to ensure the camera remains securely attached to its installation surface.
9. Troubleshooting
If you encounter issues with your REOLINK Elite Pro Floodlight PoE camera, consider the following troubleshooting steps:
- No Power/Connectivity:
- Verify the Ethernet cable is securely connected at both ends (camera and PoE injector/switch/NVR).
- Ensure the PoE injector/switch/NVR is powered on and functioning correctly.
- Check the status indicator lights on your PoE device for any errors.
- App Connection Issues:
- Ensure your smartphone is connected to the same local network as the camera during initial setup.
- Check your network connection and router settings.
- Restart the Reolink app or your smartphone.
- Poor Video Quality:
- Clean the camera lenses.
- Ensure sufficient lighting for optimal image capture, especially at night.
- Check the live view quality setting in the app (select 'Clear' for highest resolution).
- Detection Not Working:
- Review your detection zone settings and sensitivity levels in the Reolink app.
- Ensure 'Non-Detection Zones' are not covering critical areas.
- Check the 'Light Alert' settings if floodlights are not activating as expected.
- Reset Camera: If issues persist, you may perform a factory reset using the reset button located under the bottom cover.
10. Specifications
- Video Resolution: 16MP (7680x2160 pixels)
- Frame Rate: 20 FPS (frames per second)
- Field of View: 180° Horizontal, 55° Vertical
- Floodlight Brightness: 2800 Lumens
- Floodlight Color Temperature: Adjustable from 3000K (warm yellow) to 6500K (white light)
- Night Vision: Color Night Vision (with floodlight), Infrared Night Vision (black & white)
- Audio: Two-Way Talk, Built-in Microphone and Speaker, Noise Reduction
- Detection: Human, Vehicle, Animal Detection, Perimeter Protection (Line Crossing, Zone Intrusion, Loitering), Smart Event Detection (Forgotten Object, Object Removal)
- Siren: 105dB
- Storage: MicroSD card (up to 512GB, not included), Reolink NVR, FTP, NAS
- Video Compression: H.264/H.265
- Power: Power over Ethernet (PoE/PoE+)
- Weather Resistance: IP66 Rated
- Compatibility: Google Assistant, Amazon Alexa
11. Warranty & Support
REOLINK products typically come with a limited warranty. For specific warranty details, registration, and technical support, please refer to the official REOLINK website or contact their customer service directly. Keep your purchase receipt for warranty claims.
- Online Support: Visit the REOLINK Support Center for FAQs, troubleshooting guides, and firmware downloads.
- Customer Service: Contact REOLINK customer service for personalized assistance.


