1. Introduction and Overview
Thank you for choosing the GROOVYPETS T810PRO Wireless Dog Fence and Remote Training Collar. This system offers dual functionality for effective pet containment and training, providing a safe and controlled environment for your dog. It features an 1100-yard remote training range, a portable wireless fence with an adjustable boundary, and a waterproof e-collar designed for active dogs.
The T810PRO is equipped with a full-color LCD display, a built-in compass, and a flashlight for enhanced usability. It includes three distinct training modes with adjustable correction levels to suit your dog's temperament and training needs.

Image 1.1: The GROOVYPETS T810PRO system in use, showcasing its wireless leash and freedom for dogs.
2. Product Components
The GROOVYPETS T810PRO package includes the following items:
- Remote Transmitter (x1)
- Receiver Collar with Strap (x1)
- Type-C Charging Cable (x1)
- Short Contact Points (x2)
- Long Contact Points (x2)
- Test Light (x1)
- User Manual (x1)

Image 2.1: All components included in the T810PRO package.
2.1 Remote Transmitter Layout
Familiarize yourself with the buttons and features of the remote transmitter:
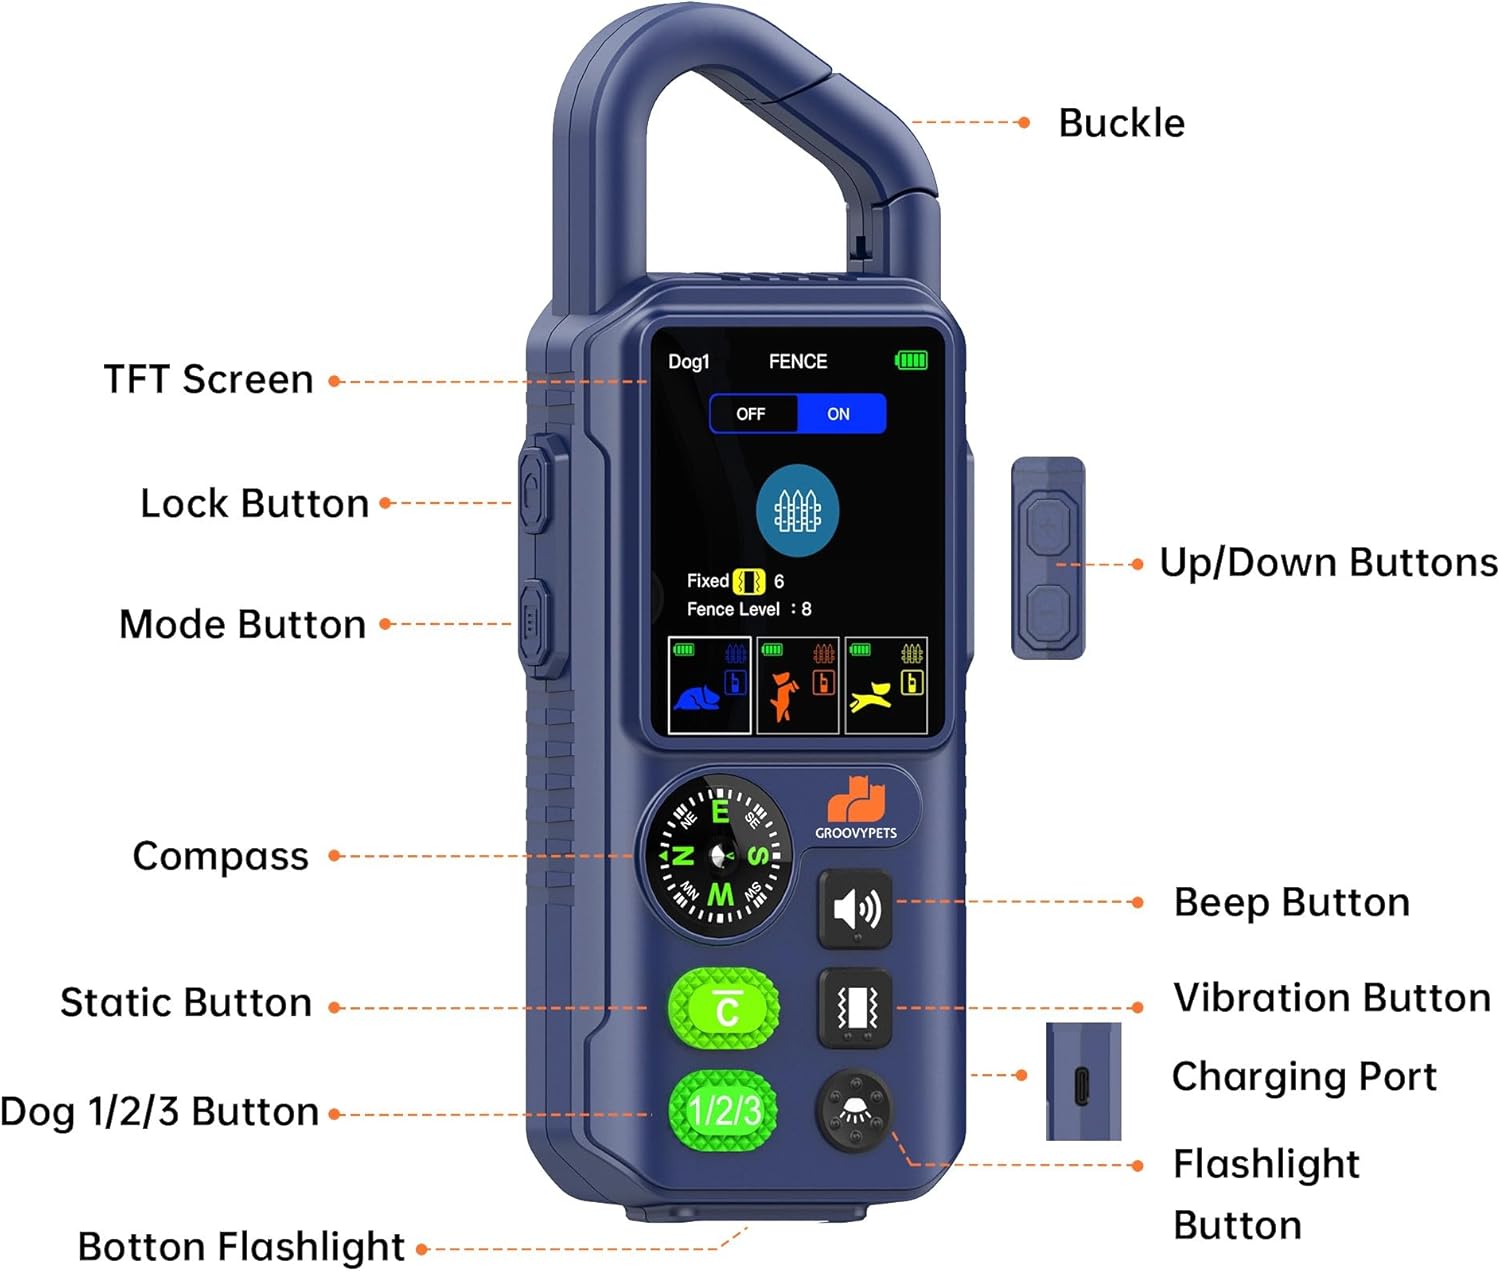
Image 2.2: Detailed view of the remote transmitter with labeled parts including TFT Screen, Lock Button, Mode Button, Compass, Static Button, Dog 1/2/3 Button, Beep Button, Vibration Button, Charging Port, Flashlight Button, and Up/Down Buttons.
3. Setup
3.1 Initial Charging
Before first use, fully charge both the remote transmitter and the receiver collar. Use the provided Type-C charging cable. The charging port is located on the side of the remote and on the receiver collar.
- Connect the Type-C cable to the charging port.
- Plug the other end into a compatible USB power source (e.g., power adapter, computer, power bank).
- The indicator light on the devices will show charging status and turn solid when fully charged.

Image 3.1: Charging the T810PRO remote and collar using a Type-C cable.
3.2 Fitting the Receiver Collar
Proper fit of the receiver collar is crucial for effective operation and your dog's comfort. The collar is adjustable and suitable for dogs weighing 6-120 lbs.
- Place the receiver collar around your dog's neck, ensuring the contact points touch the skin.
- Adjust the strap so it is snug but not too tight. You should be able to fit one or two fingers comfortably between the strap and your dog's neck.
- If your dog has long fur, you may need to trim the fur around the contact points or use the longer contact points provided to ensure proper skin contact.
- Regularly check the fit to prevent pressure sores.

Image 3.2: Proper fitting of the adjustable training collar.
4. Operating Instructions
4.1 Remote Training Modes
The T810PRO offers three training modes: Beep, Vibration, and Static Correction. Each mode has adjustable intensity levels to match your dog's sensitivity and training progress.
- Beep Mode: Provides an audible tone. Often used as a warning before other corrections.
- Vibration Mode: Delivers a gentle vibration. Useful for sensitive dogs or as a precursor to static correction. Adjustable levels 1-6.
- Static Correction Mode: Provides a static pulse. Used for more stubborn behaviors. Adjustable levels 1-6.
To switch between modes and adjust levels, use the 'Mode' button and 'Up/Down' buttons on the remote transmitter. Always start with the lowest effective level and gradually increase if necessary.

Image 4.1: Illustration of smart correction with adjustable levels.
4.2 Wireless Fence Mode
The wireless fence mode allows you to create a circular boundary for your dog without burying wires. The boundary radius is adjustable from 10 to 200 yards.
- Activate the fence mode on the remote transmitter.
- Set the desired radius using the 'Up/Down' buttons. The remote will display the current fence level.
- When your dog approaches the boundary, the collar will first emit a warning beep, followed by vibration, and then static correction if the dog continues to move past the boundary.
- Train your dog to understand the boundary by walking them around the perimeter and reinforcing positive behavior when they stay within the safe zone.

Image 4.2: Portable fence with adjustable boundary.
4.3 Smart Features: Compass and Flashlight
The remote transmitter includes a built-in compass and flashlight for added convenience and safety, especially during outdoor activities or night walks.
- Compass: Provides directional guidance.
- Flashlight: Illuminates your path or helps locate your dog in low-light conditions. The receiver collar also has an LED light for visibility.

Image 4.3: Dual light safety system with receiver collar LED and transmitter flashlight.
4.4 Safety Lock Feature
The remote transmitter is equipped with a safety lock button to prevent accidental static corrections. Always engage the lock when not actively training or when carrying the remote.

Image 4.4: Safety lock prevents accidental static correction.
5. Maintenance
Proper maintenance ensures the longevity and optimal performance of your GROOVYPETS T810PRO system.
- Cleaning: Regularly wipe down the remote transmitter and receiver collar with a damp cloth. Avoid using harsh chemicals.
- Contact Points: Periodically check the contact points on the receiver collar for dirt or debris. Ensure they are clean and making proper contact with your dog's skin.
- Charging: Recharge the devices when the battery indicator is low. Avoid overcharging for extended periods.
- Storage: Store the system in a cool, dry place when not in use.
6. Troubleshooting
If you encounter issues with your T810PRO system, refer to the following common problems and solutions:
| Problem | Possible Cause | Solution |
|---|---|---|
| Collar not responding to remote | Low battery; Not paired; Out of range | Charge both devices; Re-pair the collar and remote; Ensure devices are within operational range. |
| No static correction | Poor contact with skin; Static level too low; Contact points dirty | Adjust collar fit; Increase static level; Clean contact points; Use longer contact points for long-haired dogs. |
| Wireless fence boundary inconsistent | Environmental interference; Remote position changed | Avoid areas with large metal objects or strong electromagnetic fields; Keep the remote in a stable, central location. |
| Remote display not working | Low battery; Device malfunction | Charge the remote; Contact customer support if issue persists. |
If these solutions do not resolve the issue, please contact GROOVYPETS customer support for further assistance.
7. Specifications
| Feature | Detail |
|---|---|
| Model Number | T810PRO |
| Brand | GROOVYPETS |
| Remote Training Range | Up to 1100 yards (3300 feet) |
| Wireless Fence Range | 10 to 200 yards radius (adjustable) |
| Waterproof Rating | IPX7 (E-collar) |
| Training Modes | 3 (Beep, Vibration, Static Correction) |
| Correction Levels | 6 levels for Vibration and Static Correction |
| Display | Full-color LCD |
| Additional Features | Built-in Compass, Flashlight (remote), LED light (collar) |
| Dog Size Compatibility | 6-120 lbs, 6 months and older |
| Power Source | Rechargeable batteries (Type-C charging) |
| UPC | 646648805692 |
8. Safety Information
Please read and follow all safety instructions to ensure the well-being of your dog and the proper functioning of the device.
- This device is intended for use with healthy dogs 6 months and older, weighing between 6-120 lbs. Do not use on aggressive, sick, or injured dogs.
- Avoid leaving the receiver collar on your dog for more than 12 consecutive hours to prevent pressure sores. Reposition the collar every 1-2 hours if worn for extended periods.
- Never attach a leash to the receiver collar. Use a separate, non-metallic collar for leash attachment.
- Always supervise your dog when using the wireless fence or remote training features, especially during initial training.
- Ensure the contact points are clean and making proper contact with your dog's skin.
- Do not allow children to operate the device without adult supervision.
- If your dog shows signs of discomfort or skin irritation, discontinue use and consult a veterinarian.
9. Warranty and Support
GROOVYPETS is committed to providing high-quality products. For any questions, concerns, or technical support regarding your T810PRO system, please contact our customer service team. Details for contacting support can typically be found on our official website or through your purchase platform.
Please retain your proof of purchase for any warranty claims.
