1. Introduction
This manual provides detailed instructions for the safe and efficient operation of your Generic Double-Head Horizontal Key Cutting Machine Duplicator, Model KJT38KJJM7LPR1NRP8. This machine is designed for quick and precise key duplication, featuring micro-adjustable depth settings and high-quality carbide cutting tools for extended service life. It includes a two-sided rotating swivel clamp for versatile key handling.
2. Safety Instructions
- Always wear appropriate personal protective equipment, including safety glasses, when operating the machine.
- Ensure the machine is placed on a stable, level surface before operation.
- Keep hands and loose clothing away from moving parts, especially the cutting tools, during operation.
- Disconnect power before performing any maintenance, cleaning, or when changing cutting tools.
- Do not operate the machine in wet or damp conditions.
- Keep the work area clean and well-lit.
- Only use the machine for its intended purpose of key duplication.
- In case of malfunction, immediately turn off the machine and consult a qualified technician.
3. Parts Introduction
Familiarize yourself with the components of your key cutting machine:

- Work light: Illuminates the cutting area.
- Indicator light: Shows power status.
- Motor: Powers the cutting mechanism.
- Power switch: Turns the main power on/off.
- Motor switch: Activates/deactivates the motor.
- Fine-Tuning Guide Needle: Allows for precise depth adjustment.
- Clamp group: Secures the keys during cutting.
- Manual rotation handle: Used for manual adjustments.
- Milling Cutter (Left): The cutting tool on the left side.
- Guide needle: Follows the original key's profile.
- Milling Cutter (Right): The cutting tool on the right side.
- Manual Push Handle: Used to move the key carriage.
- Clamp handle: Used to tighten or loosen the key clamps.
4. Setup
Follow these steps to set up your key cutting machine for operation:

- Step 1: Install and tighten the left and right clamp operating handles. Ensure they are securely fastened.
- Step 2: Connect the machine to a 110V power source.
- Step 3: Turn on the left power switch. The work light and indicator light will illuminate, indicating the machine is powered.
- Step 4: Install the original key in one clamp and the key blank in the corresponding clamp. Calibrate their positions using the included level to ensure accuracy.
- Step 5: Long press the Motor switch for 4-5 seconds to start the motor. Push the key carriage into the clamp group and manually rotate the circular handle to slowly adjust the cutting speed as needed. Repeated cutting may be required for improved precision.
5. Operating Instructions
Operating the key cutting machine involves precise adjustments and careful handling.
5.1 Key Clamping and Alignment
- The right fixture features a four-side rotary clamping function, offering maximum flexibility for various key types.
- The left fixture has a two-side rotary clamping function, with engraved dark key marking lines on its surfaces for secure and precise key clamping.
- Ensure both the original key and the key blank are firmly secured in their respective clamps to prevent movement during cutting.
5.2 Depth Adjustment and Cutting
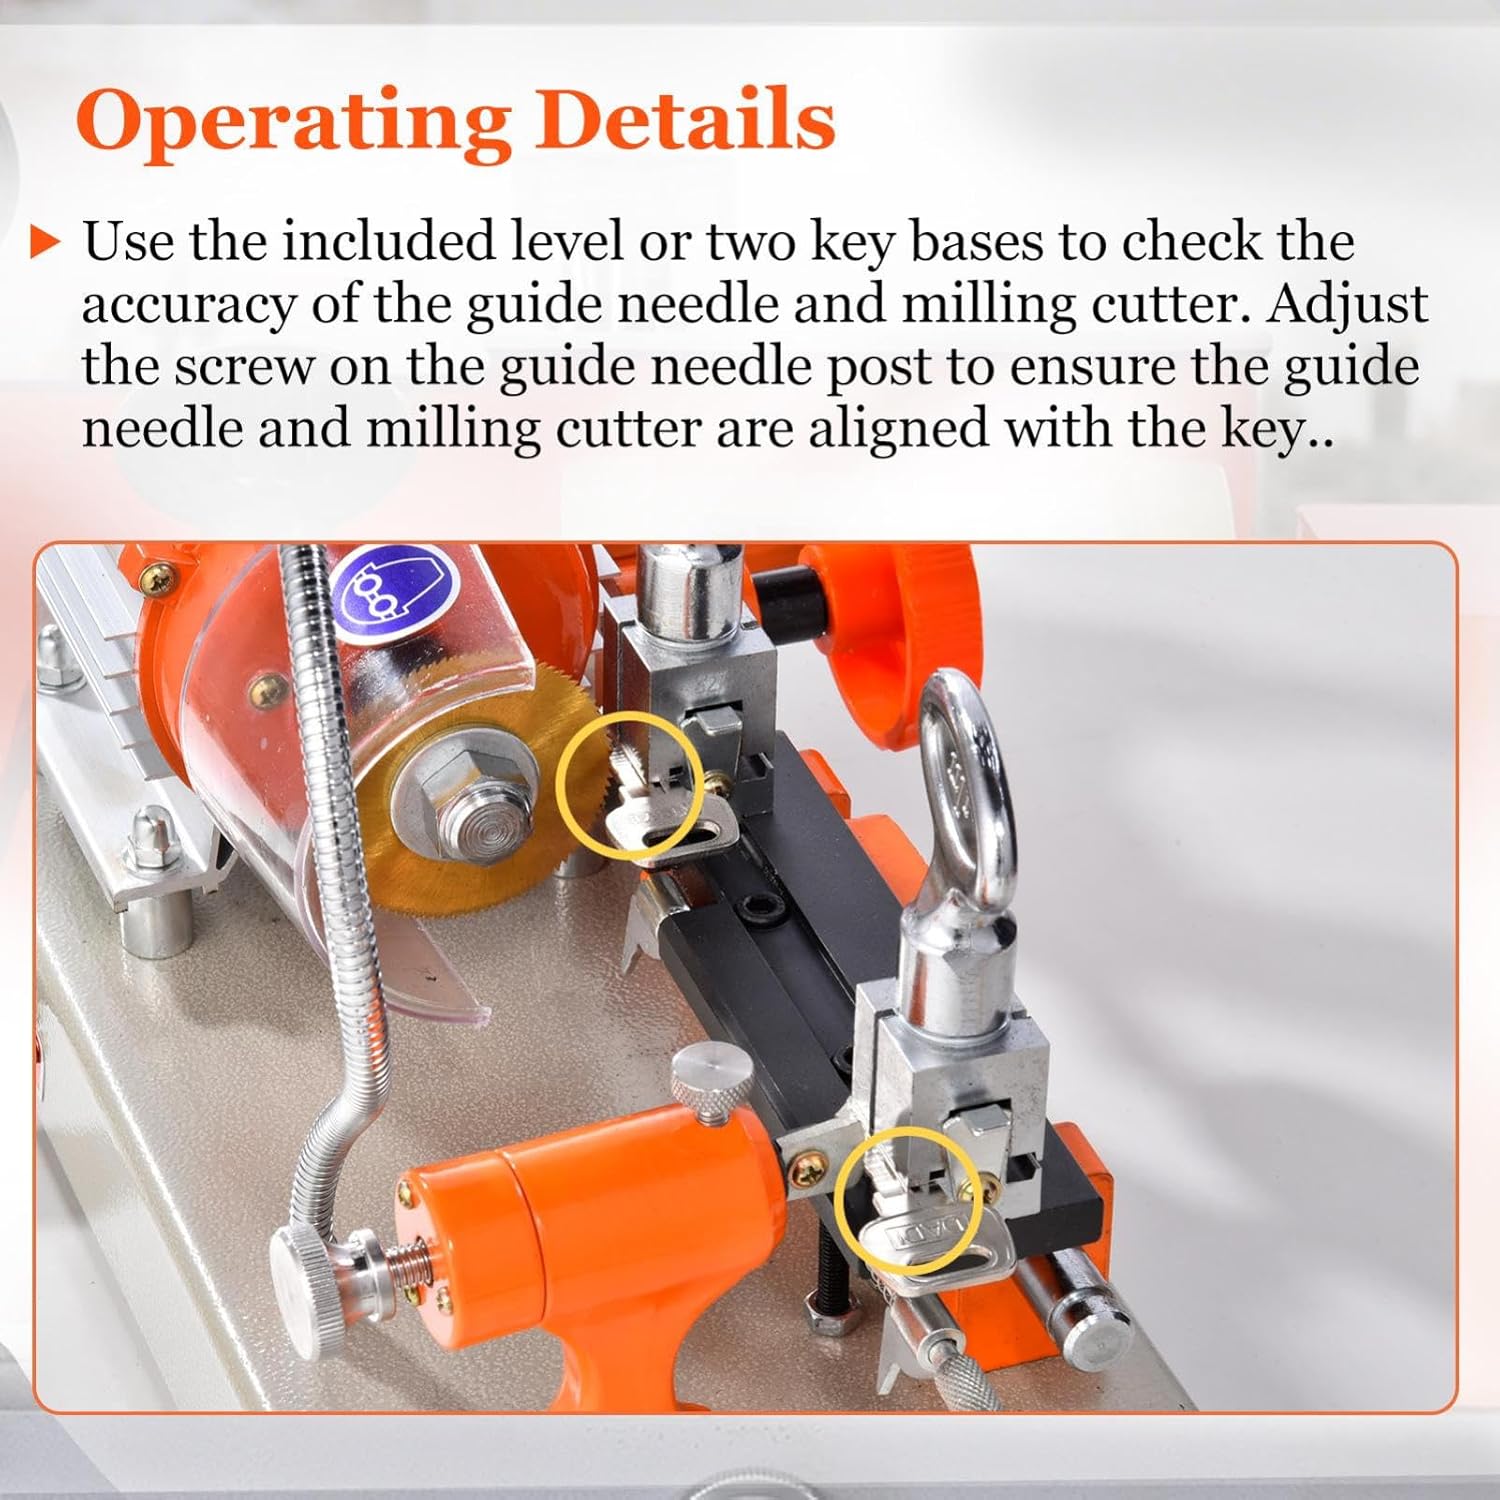
Use the included level or two key bases to check the accuracy of the guide needle and milling cutter. Adjust the screw on the guide needle post to ensure the guide needle and milling cutter are precisely aligned with the key.

The micro-adjustable pouring needle device allows for precise depth adjustment, ensuring accurate duplication. Slowly guide the key blank towards the milling cutter, allowing the guide needle to trace the original key's profile.

The machine is equipped with a robust copper core motor providing 180W of power, ensuring efficient and reliable operation. The titanium-plated alloy cutter is designed for durability and precision.

5.3 Compatible Key Types

This machine is compatible with standard straight shape, cross shape, and flag shape keys. This includes one-tooth keys, cross keys, double-sided keys, flag-shaped keys, and leaf-shaped keys. The left end can handle one-key locks and traverse-lock keys, while the right end can handle blade locks and flagpole keys.
Note: This machine is not suitable for tubular keys, keys with drilling holes, or keys requiring milling grooves.
6. Maintenance
- Regularly clean the machine, especially the cutting area and clamps, to remove metal shavings and dust. Use a brush or compressed air.
- Periodically inspect the cutting tools for wear or damage. Replace worn cutters to maintain cutting precision.
- Lubricate moving parts as recommended by the manufacturer (refer to specific instructions if provided with the product).
- Store the machine in a dry, clean environment when not in use.
7. Troubleshooting
- Machine does not power on: Check the power cord connection and ensure the power switch is in the 'ON' position. Verify the power outlet is functional.
- Motor does not start: Ensure the motor switch is pressed for the required duration (4-5 seconds). Check for any obstructions.
- Inaccurate key duplication: Verify that the original key and blank are securely clamped. Re-calibrate the guide needle and milling cutter alignment using the included level. Check for worn cutting tools.
- Excessive vibration or noise: Ensure all components are securely tightened. Check for any loose parts or foreign objects.
- If issues persist, discontinue use and contact customer support.
8. Specifications
| Brand | Generic |
| Model Number | KJT38KJJM7LPR1NRP8 |
| Color | Double-head horizontal |
| Fixture Material | Iron |
| Motor Material | Aluminum wire motor (Copper core motor with 180W power) |
| Knife Way | Automatic knife |
| Machine Power | 90W (Motor power stated as 180W in description) |
| Voltage | 110V |
| Item Weight | 29.2 Pounds |
| Included Components | Host, Instruction manual |

9. Warranty Information
Specific warranty details for this product are not provided in the available information. Please refer to your purchase documentation or contact the seller directly for warranty terms and conditions.
10. Customer Support
For technical assistance, troubleshooting, or inquiries regarding your Generic Double-Head Horizontal Key Cutting Machine Duplicator, please contact the seller or manufacturer through the platform where the purchase was made. Ensure you have your model number (KJT38KJJM7LPR1NRP8) and purchase details ready when contacting support.