1. Important Safety Information
Before operating the Windone RM7 Electric Dirt Bike, please read and understand all safety warnings and instructions. Failure to follow these instructions may result in serious injury or property damage.
- Always wear a helmet and appropriate safety gear (gloves, knee pads, elbow pads) when riding.
- Ensure the bike is fully assembled and all components are securely fastened before each ride.
- Check brake functionality before each use. If brake levers feel stiff or fluid is low, refill brake fluid immediately.
- Familiarize yourself with local laws and regulations regarding electric dirt bike usage, including age and licensing requirements.
- Do not operate the bike under the influence of alcohol or drugs.
- Avoid riding in extreme weather conditions or on excessively slippery surfaces.
- The bike is designed to be IPX6 waterproof for daily water wading, but avoid submerging it.
2. Package Contents
Upon unboxing, verify that all components are present and undamaged. If any parts are missing or damaged, please contact Windone customer support at support@windone.com.
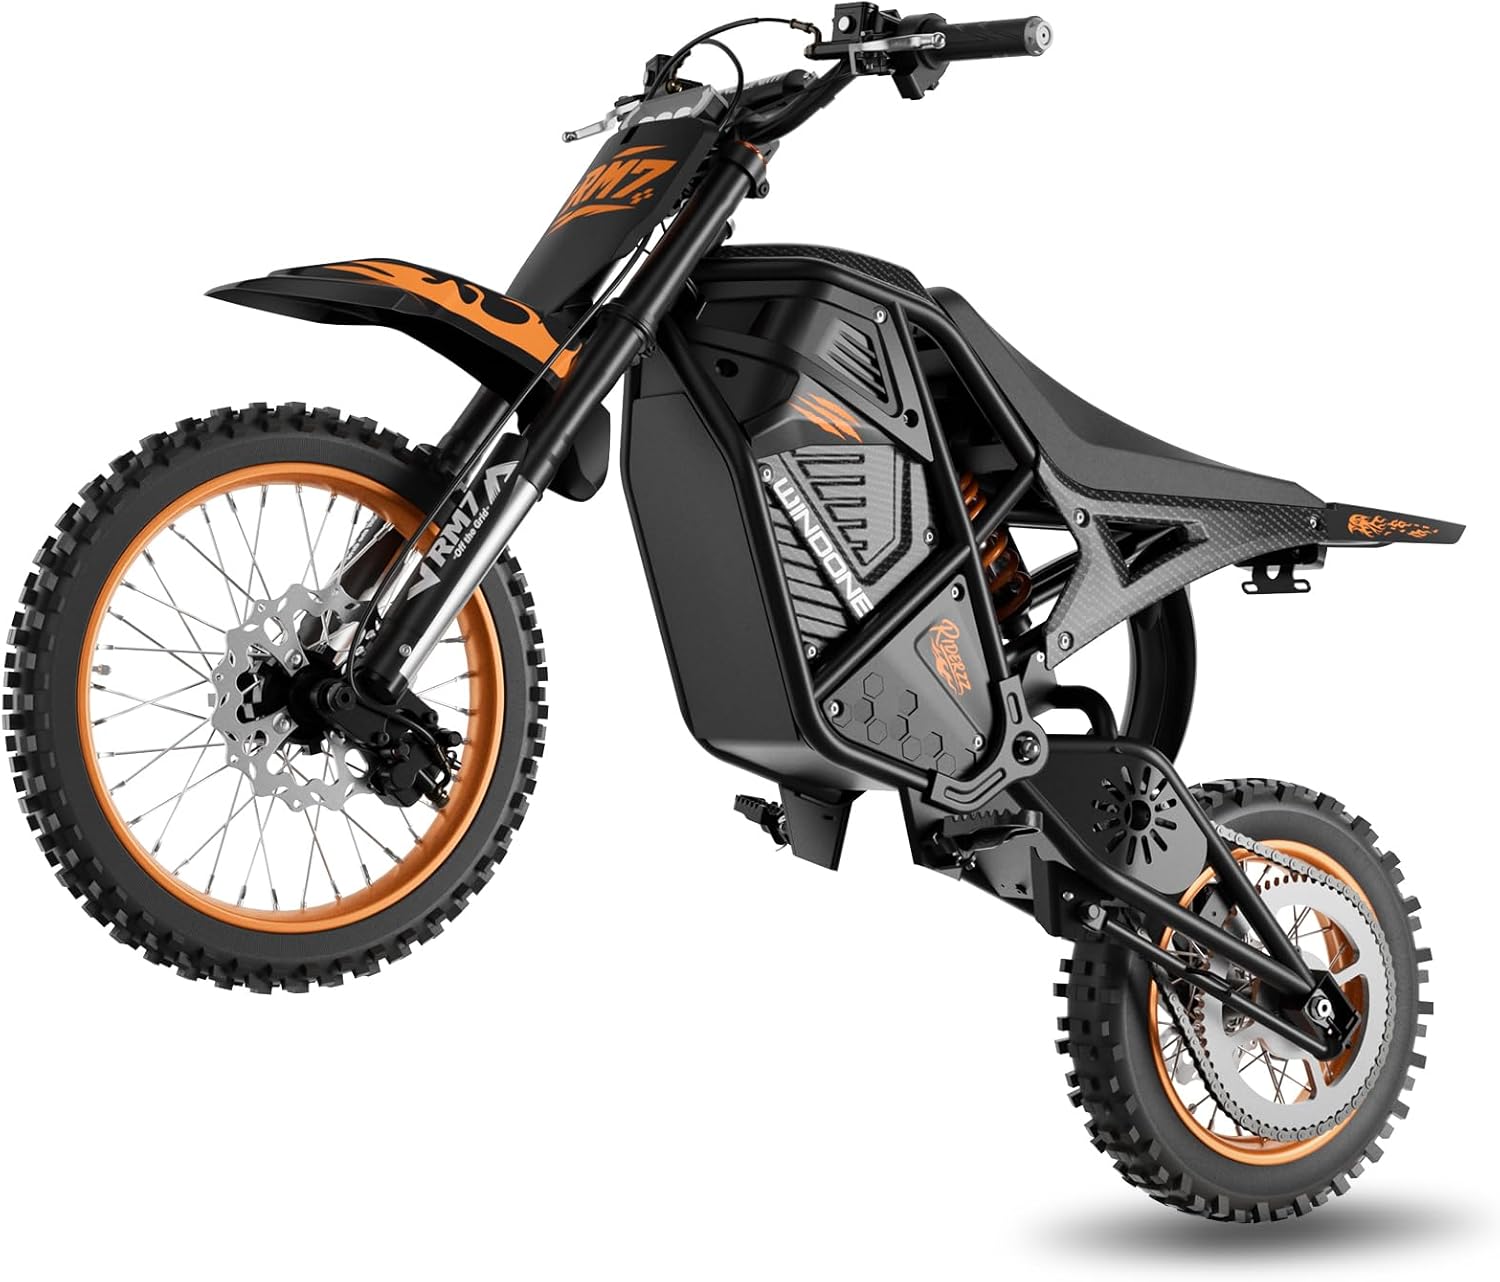
Figure 1: Windone RM7 Electric Dirt Bike, fully assembled.
The package should include:
- Windone RM7 Electric Dirt Bike (partially assembled)
- Front Wheel
- Front Fender
- Front Cover
- Rear Shock Absorber
- Handlebar
- Left and Right Pedals
- Charger
- Tool Kit
- User Manuals
- Keys
- L-shaped brackets and clamp covers for installation
Video 1: Official installation guide for the Windone RM7 Electric Dirt Bike, demonstrating unboxing and assembly steps.
3. Setup and Assembly
Follow these steps to assemble your Windone RM7 Electric Dirt Bike. It is recommended to have assistance due to the bike's weight.
3.1. Rear Shock Absorber Installation
- Remove the protective rod from the rear suspension area. Gently lift the rear seat to access the screws.
- Ensure the air cylinder on the rear shock absorber is facing downward.
- Align the rear shock absorber with the screw holes on the bike frame.
- Insert and securely tighten the screws.
3.2. Handlebar Installation
- Place the handlebar onto the mount, ensuring it is centered and aligned.
- Secure the handlebar with the provided clamp covers. Do not fully tighten the screws yet.
- Adjust the handlebar angle to a comfortable riding position based on your height.
- Fully tighten the four screws on the clamp covers.
- Adjust the angle of the brake levers on both sides to suit your personal preference, then tighten their screws.
3.3. Headlight Installation
- Install the two L-shaped brackets onto the front fork, paying attention to their orientation. Securely tighten the screws.
- Attach the headlight to the upper L-shaped brackets, ensuring the wire extends from the bottom.
- Insert and tighten the screws to secure the headlight.
3.4. Front Wheel Installation
- It is easier to install the front wheel if the bike is flipped over.
- Remove the nuts from the front fork. Be careful not to lose any parts.
- Slide the front fork from right to left through the right fork hole, then through the shorter spacer, the front wheel, the longer spacer, and finally the left fork.
- Ensure the longer spacer is closer to the brake disc.
- Tighten the nuts securely. Regularly check these nuts during future rides.
3.5. Front Fender Installation
- Remove the three screws securing the front fender.
- Align the fender with the holes and tighten the screws securely.
- Organize the wires at the front of the bike and tuck them into the slot behind the front cover.
- Align the front cover with the holes on the front fender.
- Reinsert the screws through the holes in the front cover and tighten them securely.
3.6. Brake Installation
- Remove the brake buckle.
- Unscrew the two screws on the brake.
- Align the brake's mounting holes with the holes on the left front fork.
- Ensure the brake disc slides between the brake pads.
- Tighten the two screws securely.
- Secure the brake cable to the bracket on the left front fork and tighten it in place.
3.7. Pedal Installation
- Identify the left and right pedals based on the screw positions on the bike.
- Attach each pedal with its screws and tighten them securely.
4. Battery Information and Charging
4.1. Battery Removal
- First, turn off the bike's power using the key.
- Locate the nut underneath the battery cover plate. Unscrew it and lift off the cover plate.
- Gently rotate the blue clip of the battery connector clockwise and unplug the connector.
- Carefully take the battery out. The battery is heavy; handle with care to avoid injury or damage.
4.2. Charging Instructions
- Once the charger is set up, locate the charging port on the right side of the electric bike.
- Connect the charging cable to the charging port to start charging.
- The indicator light on the charger will be red while charging.
- When the indicator light turns green, charging is complete. This also indicates if the battery is not connected.

Figure 2: The 1080Wh high-capacity battery provides 37-45 miles of range and charges in 7-8 hours.
5. Operating Instructions
5.1. Powering On
- Insert the key into the ignition.
- Turn the key clockwise to power on the bike.
5.2. Display Dashboard and Controls
The display dashboard on the left handlebar shows speed, battery life, odometer, and other information.
- Toggle Display: A short press on the middle 'M' button lets you toggle between total mileage, trip mileage, and battery voltage.
- Park Mode: When powered on, the bike defaults to park mode ('P' displayed). Squeeze the brake lever to switch to riding mode.
- Speed Modes: Use the '+' and '-' buttons to adjust the assist mode levels:
- Level 1: Up to 15 MPH (for safe starts)
- Level 2: Up to 22 MPH (for efficient cruising)
- Level 3: Up to 37 MPH (for high-speed thrills)
- Hazard Lights: Activated via a dedicated button on the control panel.
- Headlight Switch: Controls the 4-LED headlight.
- Turn Signals: Left and right turn signals for front and rear lights.
- Horn: Activated via a dedicated button.
- Rear Light: Illuminates when the brake is applied.

Figure 3: Overview of the handlebar controls and digital display dashboard.
Video 2: Features and riding demonstration of the Windone RM7 Electric Dirt Bike.
6. Maintenance
- Brake System: Regularly inspect the front and rear dual hydraulic brakes. If levers feel stiff or fluid is low, refill brake fluid immediately.
- Tires: Check tire pressure before each ride. The 14" front and 12" rear off-road tires are designed for various terrains.
- Suspension: The dual hydraulic front forks and rear Nitrogen Gas shock provide comfort. Periodically check for proper function and adjust as needed.
- Battery: Charge the 48V 22.5Ah (1080Wh) battery fully after each use. Avoid completely draining the battery to prolong its lifespan. The battery is UL 2849 certified for safety.
- General Inspection: Regularly check all bolts, nuts, and connections for tightness. Ensure all cables are properly routed and free from damage.
- Cleaning: The bike is IPX6 waterproof. Clean with a damp cloth and mild detergent. Avoid high-pressure washing directly on electrical components.
7. Troubleshooting
If you encounter any issues not covered here, please contact Windone customer support.
- Bike Not Powering On: Ensure the key is fully inserted and turned clockwise. Check battery charge level.
- Motor Not Engaging: Ensure the bike is out of park mode by squeezing the brake lever. Check battery connection.
- Reduced Range/Power: Fully charge the battery. Check tire pressure. Riding conditions (load, speed, terrain, temperature) can affect range.
- Brake Issues: Inspect brake pads and fluid levels. Consult a professional if issues persist.
8. Specifications
| Feature | Specification |
|---|---|
| Model Name | RM7 |
| Bike Type | Electric Dirt Bike |
| Brand | Windone |
| Motor Power | 2200W Peak |
| Top Speed | Up to 37 MPH |
| Speed Modes | 3 (15 MPH, 22 MPH, 37 MPH) |
| Battery | 48V 22.5Ah (1080Wh) Lithium Battery |
| Range | 37-45 Miles (varies by conditions) |
| Charging Time | 7-8 Hours |
| Battery Certification | UL 2849 Certified |
| Waterproof Rating | IPX6 |
| Brake Style | Dual Hydraulic Disc Brakes |
| Suspension Type | Dual (Hydraulic Front Forks, Nitrogen Gas Rear Shock) |
| Tire Size | 14" Front / 12" Rear Off-Road Tires |
| Max Load Weight | 265 lbs (120 kg) |
| Item Weight | 124.8 lbs (56.6 kg) |
| Dimensions (L x W x H) | 64.17" x 29.72" x 38.98" |
| Recommended Rider Height | 4.3 FT to 6.0 FT (130-183 cm) |
| Age Range | Adult (13+) |
| Frame Material | Metal |
| Special Features | Digital Display, Odometer, Rechargeable, Waterproof |
9. Warranty and Support
The Windone RM7 Electric Dirt Bike comes with a 1 Year Limited Warranty.
For any questions, assistance, or warranty claims, please contact our customer support team:
- Email: support@windone.com
Our support team is committed to ensuring your satisfaction and will respond as soon as possible.


