Introduction
Thank you for choosing the Insoma Programmable Water Timer. This device is designed to automate your garden watering, providing convenience and efficient water management for various applications such as gardens, patios, flower beds, and lawns. Please read this manual carefully before installation and operation to ensure proper use and longevity of your product.
Safety Information
- Do not immerse the timer in water. The unit is IP55 waterproof, meaning it is protected against dust and low-pressure water jets, but not submersion.
- Ensure the water pressure is within the specified range of 0.5 bar to 8 bar (7.25 PSI to 116 PSI). Exceeding this range may damage the device.
- Use only AA alkaline batteries. Do not mix old and new batteries, or different types of batteries.
- Remove batteries if the timer will not be used for an extended period or during freezing temperatures to prevent damage.
- Keep out of reach of children.
Package Contents
Please check the package for the following items:
- 1 x Insoma Programmable Water Timer
- 1 x Reduced Hex Bushing (3/4" male NPT to 1/2" female NPT)
- 1 x 3/4" Male GHT Thread (pre-installed or included as adapter)
- 1 x Thread Sealing Tape
- 1 x User Manual
Product Overview
The Insoma Water Timer features a large LCD display and intuitive controls for easy programming. Familiarize yourself with the main components:
- LCD Display: Shows current time, watering schedule, battery level, and other settings.
- Dial: Used to navigate between different setting modes (OFF, AUTO, Set Clock, Start Time, How Long, How Often).
- '+' / '-' Buttons: Adjust values and settings.
- 'OK' Button: Confirms selections.
- Manual Button: Activates temporary manual watering.
- Battery Compartment: Located on the back, requires 2 AA batteries.

Figure 1: Front view of the Insoma Water Timer, highlighting the LCD display, control dial, and buttons. The display shows a low battery indication, and labels point to tool-free installation, large LCD display, and 1-year battery life.
Setup and Installation
- Install Batteries: Open the battery compartment on the back of the timer. Insert two (2) new AA alkaline batteries, ensuring correct polarity. Close the compartment securely. The LCD screen will power on.
- Attach to Faucet: Screw the timer onto your outdoor faucet (hose bib). The timer features a 3/4" GHT (Garden Hose Thread) connection. If your faucet has a different size, use the provided reduced hex bushing and thread sealing tape as needed to ensure a watertight seal. The 360° rotating inlet thread allows for easy positioning.
- Connect Hose: Attach your garden hose to the outlet of the water timer. Ensure all connections are tight to prevent leaks.

Figure 2: The water timer connected to a faucet, illustrating its leak-proof design, built-in metal filter, and 360° rotating inlet thread for easy installation and durability.
Operating Instructions
The timer offers flexible watering options including timed, manual, and rain delay modes.
1. Setting the Current Time
- Turn the dial to Set Clock.
- Use the '+' and '-' buttons to adjust the hour. Press OK to confirm.
- Adjust the minutes using '+' and '-'. Press OK to confirm.
- The current time is now set.
2. Programming a Watering Schedule (Timed Watering)
This mode allows you to set specific start times, duration, and frequency for automatic watering.
- Turn the dial to Start Time. Use '+' and '-' to set the desired watering start time. Press OK to confirm.
- Turn the dial to How Long. Use '+' and '-' to set the watering duration from 1 minute to 23 hours and 59 minutes. Press OK to confirm.
- Turn the dial to How Often. You have two frequency modes:
- Hourly Mode: Set frequency from 1 hour to 24 hours.
- Daytime Mode: Set frequency from 1 day to 7 days.
- Once all settings are confirmed, turn the dial to AUTO for the programmed schedule to take effect.
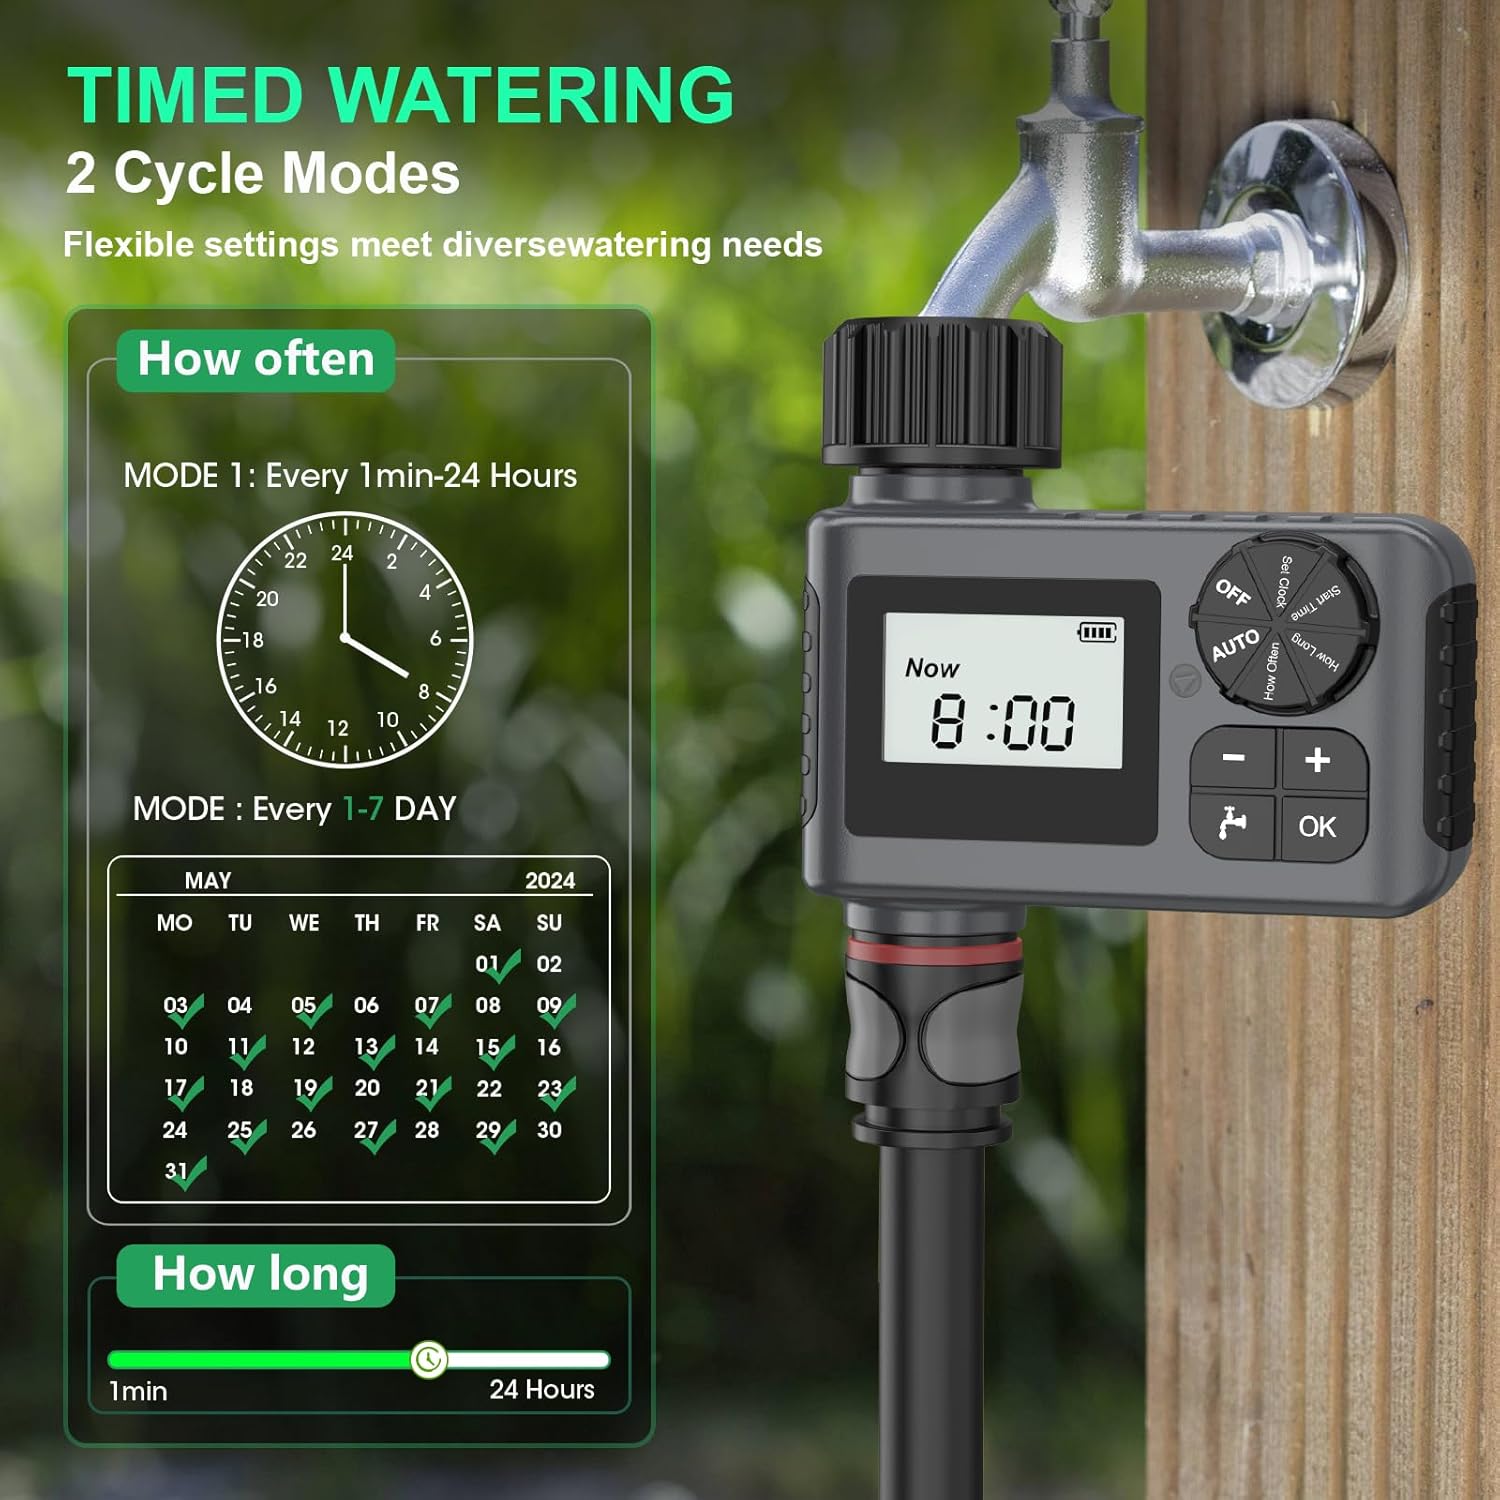
Figure 3: The timer's display illustrating the two cycle modes for timed watering: hourly (1 min-24 hours) and daily (1-7 days), along with duration settings.
3. Manual Watering
This feature allows for temporary watering without interrupting your programmed schedule.
- Ensure the dial is in the AUTO position.
- Press the Manual button.
- Use '+' and '-' to set the desired manual watering duration (1 minute to 23 hours 59 minutes).
- Press OK to start manual watering. The timer will automatically return to its programmed schedule after the manual watering duration ends.
- To stop manual watering early, press the Manual button again or turn the dial to OFF and then back to AUTO.
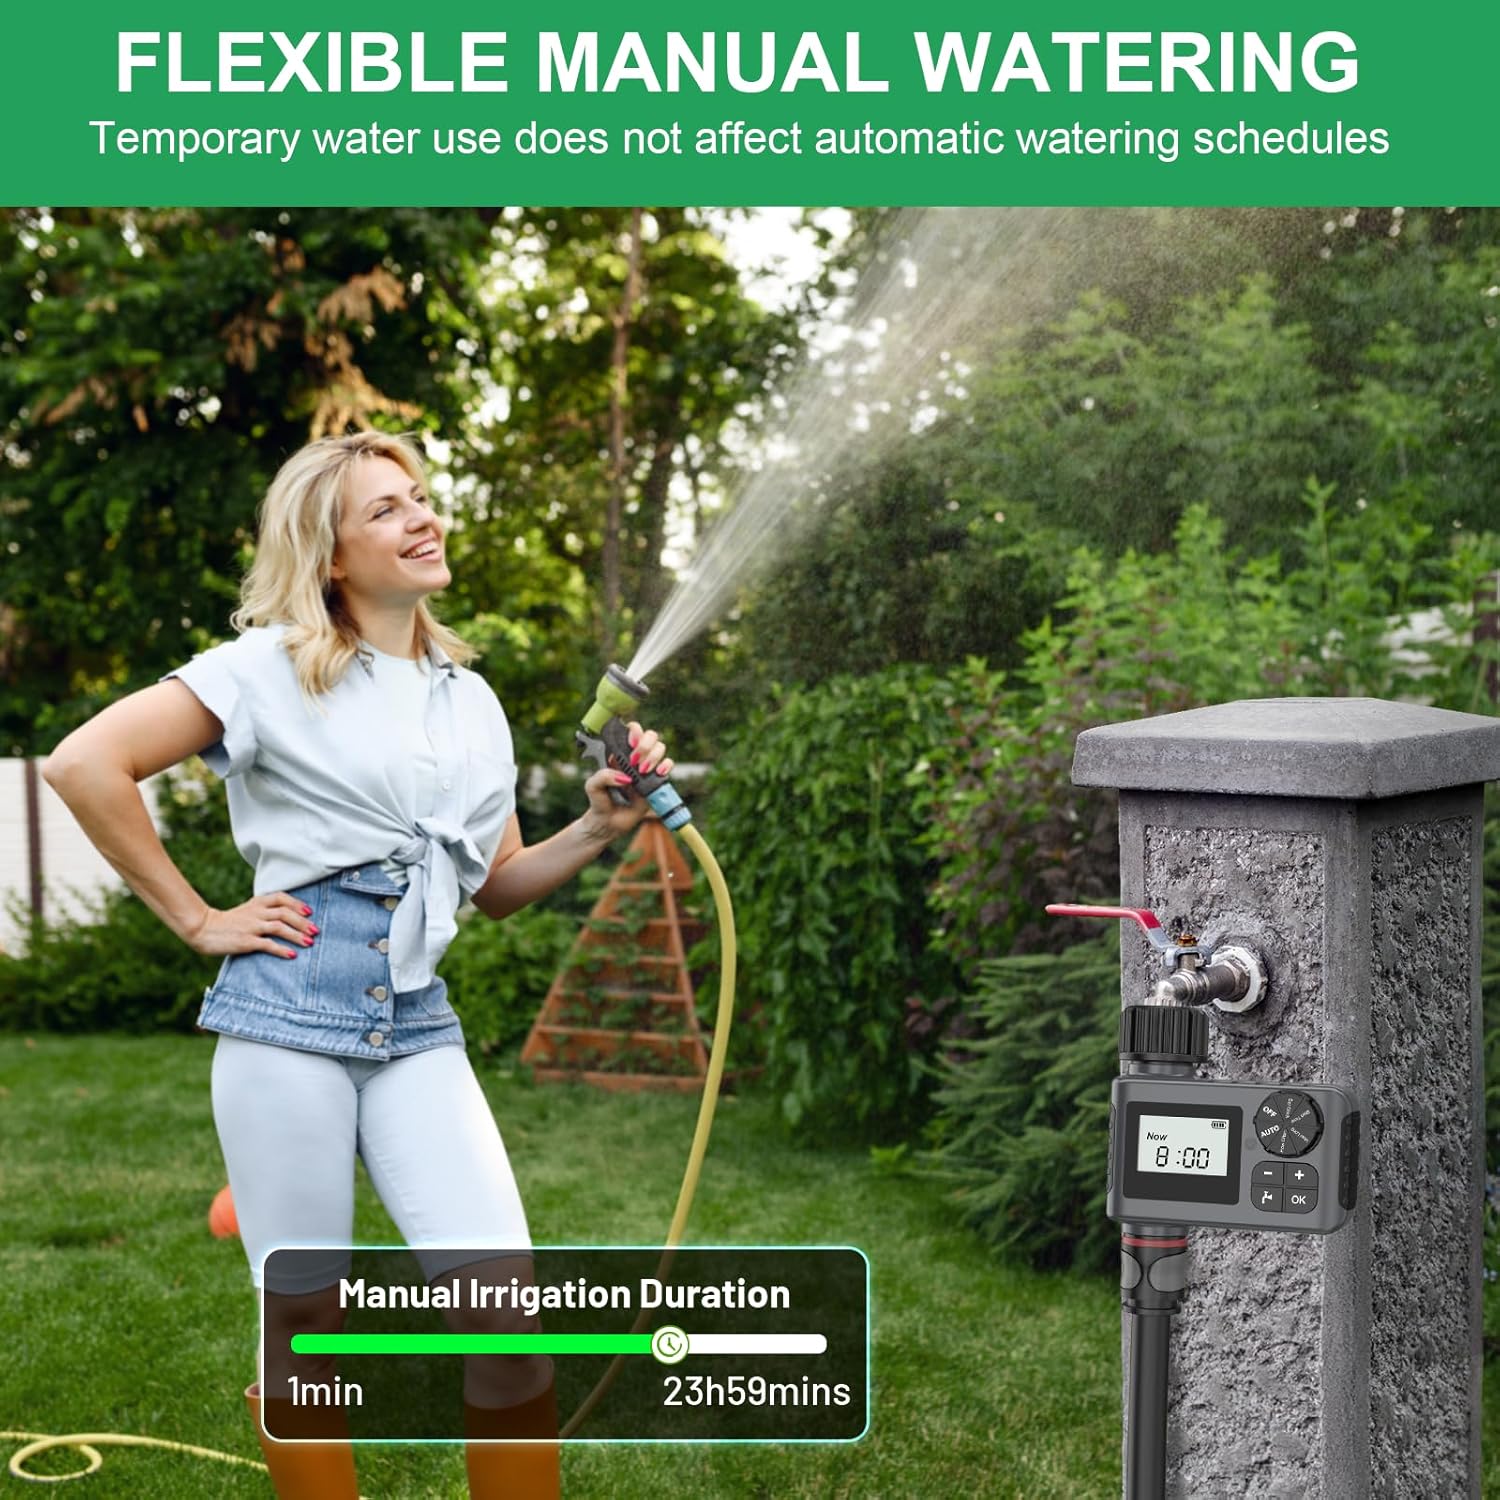
Figure 4: A user demonstrating flexible manual watering with the Insoma Water Timer, which allows temporary water use without affecting automatic schedules. The display shows the manual irrigation duration setting.
4. Rain Delay Mode
This feature allows you to pause your watering schedule for a set number of days, conserving water during rainy periods.
- Ensure the dial is in the AUTO position.
- Press and hold the '+' button for 5 seconds until a cloud icon appears on the display.
- Use '+' and '-' to select the desired delay duration (1 to 7 days).
- Press OK to confirm the rain delay. The timer will resume its programmed schedule after the delay period.
- To cancel the rain delay, press and hold the '+' button again for 5 seconds.

Figure 5: The water timer displaying the rain delay mode, indicating a 2-day delay. This feature helps save water by postponing watering during rainy conditions. The image also highlights the IP55 waterproof rating.
5. Child Lock Feature
The timer includes a child lock feature to prevent accidental changes to the settings. Refer to the on-screen instructions or specific button combinations in the quick start guide for activation and deactivation.
Maintenance
- Filter Screen: Periodically check the built-in metal filter screen at the inlet for debris or sediment. Clean it as necessary to ensure optimal water flow and prevent blockages.
- Battery Replacement: The LCD display features a low-battery warning indicator. When this appears, replace the batteries promptly. The valve will automatically close if the battery level becomes critically low to prevent continuous watering.
- Winterization: In regions with freezing temperatures, remove the water timer from the faucet before the first frost. Store it indoors in a dry, protected area with the batteries removed to prevent damage from freezing water.
- Cleaning: Clean the exterior of the timer with a soft, damp cloth. Do not use abrasive cleaners or solvents.
Troubleshooting
| Problem | Possible Cause | Solution |
|---|---|---|
| Timer not turning on/LCD blank | Dead or incorrectly installed batteries. | Replace with new AA alkaline batteries, ensuring correct polarity. |
| No water flow | Faucet off, low water pressure, clogged filter, timer in OFF mode, or valve stuck. | Ensure faucet is fully open. Check water pressure. Clean the inlet filter. Turn dial to AUTO. Check for obstructions in the hose. |
| Water leaks from connections | Loose connections, missing/damaged washer, or insufficient thread sealing tape. | Tighten all connections. Ensure a rubber washer is properly seated. Apply thread sealing tape to threads. |
| Timer not watering at scheduled time | Timer in OFF mode, incorrect programming, or rain delay active. | Turn dial to AUTO. Review and correct Start Time, How Long, and How Often settings. Check if Rain Delay is active. |
Specifications
- Model: SGW05-ZZ-5-04-F
- Water Pressure Range: 0.5 bar - 8 bar (7.25 PSI - 116 PSI)
- Watering Duration: 1 minute to 23 hours 59 minutes
- Watering Frequency: Hourly (1-24 hours) or Daily (1-7 days)
- Power Source: 2 x AA Alkaline Batteries (not included)
- Waterproof Rating: IP55
- Product Dimensions: 3"D x 4"W x 2"H (approximate)
- Item Weight: 9.6 ounces (approximate)
Warranty and Support
Insoma products are designed for reliability and performance. For any questions, technical support, or warranty inquiries, please contact Insoma customer service through the retailer's platform or the official Insoma website. Please have your model number (SGW05-ZZ-5-04-F) and purchase information ready.