1. Introduction
This manual provides instructions for the installation, operation, and maintenance of the camgeet Wired Remote Extension Button. This device is designed to provide convenient desktop control for camgeet KVM Switch models KVM1001A and KVM1002A, allowing users to switch between up to 10 connected computers remotely.
Please read this manual thoroughly before using the product to ensure proper functionality and to prevent damage.
2. Product Overview
The camgeet Wired Remote Extension Button is a compact desktop controller that connects to your compatible camgeet KVM switch. It features individual buttons for each port (PC1-PC10) and a digital display to indicate the currently active computer. This remote simplifies the process of switching between multiple systems without needing to access the KVM switch directly.
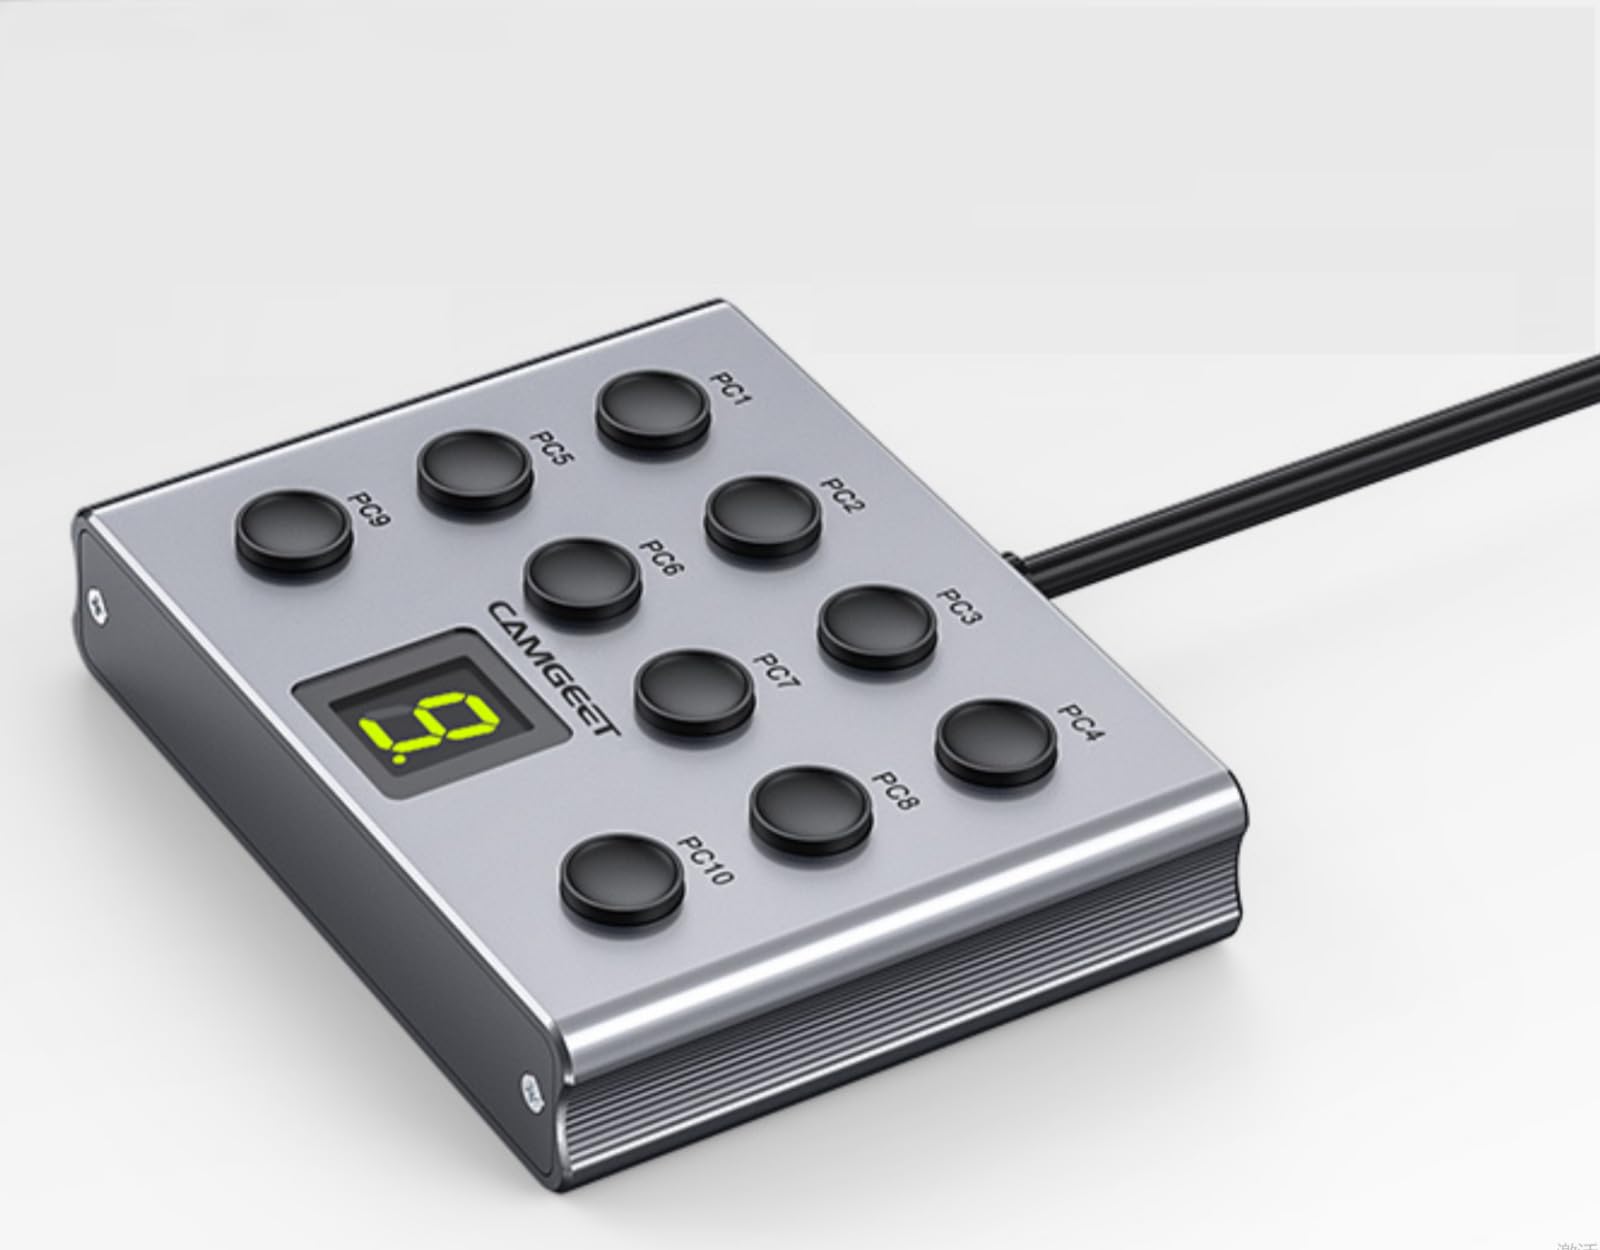
Figure 1: camgeet 10 Port KVM Switch Wired Remote Extension Button and KVM Switch setup. The image shows the KVM switch connected to a monitor and multiple computers. The wired remote control unit is displayed with its connection to the KVM switch, featuring buttons for PC selection and a digital port indicator.
3. Specifications
| Feature | Detail |
|---|---|
| Compatibility | camgeet KVM Switch models KVM1001A and KVM1002A |
| Number of Positions | 10 (for 10 computers) |
| Cable Length | 1.5 meters |
| Connector Type | Micro USB Port (for connection to KVM) |
| Operating Voltage | 5 Volts |
| Current Rating | 2 Amps |
| Dimensions (L x W x H) | 3.15 x 2.36 x 0.39 inches |
| Item Weight | 2.12 ounces |
| Material | Aluminum |
| International Protection Rating | IP54 |
4. Setup Instructions
- Ensure KVM Switch is Powered Off: Before connecting the remote, ensure your camgeet KVM Switch (KVM1001A or KVM1002A) is powered off and disconnected from all computers.
- Locate Remote Port: Identify the dedicated Micro USB port labeled "Wired Remote" or similar on your KVM switch. Refer to your KVM switch's manual for the exact location.
- Connect Remote: Plug the Micro USB connector of the Wired Remote Extension Button's cable into the designated "Wired Remote" port on your KVM switch.
- Position Remote: Place the remote control unit on your desktop or a convenient location within the 1.5-meter cable reach.
- Power On KVM Switch: Reconnect power to your KVM switch and power on all connected computers. The remote's display should illuminate, indicating it is ready for use.
Important: This remote is only compatible with camgeet KVM Switch models KVM1001A and KVM1002A. Attempting to connect it to other devices may result in malfunction or damage.
5. Operating Instructions
Once the Wired Remote Extension Button is connected and the KVM switch is powered on, you can use it to switch between your connected computers.
- Switching Computers: To switch to a specific computer, press the corresponding numbered button (PC1 through PC10) on the remote control unit.
- Port Indicator: The digital display on the remote will show the number of the currently active computer port.
- Instant Switching: The KVM switch will instantly switch the connected monitor, keyboard, and mouse to the selected computer.
6. Maintenance
- Cleaning: Use a soft, dry cloth to clean the surface of the remote control unit. Avoid using liquid cleaners or abrasive materials.
- Storage: Store the device in a cool, dry place away from direct sunlight and extreme temperatures when not in use for extended periods.
- Cable Care: Do not bend or crimp the cable excessively. Ensure the cable is not under tension or placed where it can be tripped over.
- Environmental Protection: The device has an IP54 rating, meaning it is protected from limited dust ingress and water spray from any direction. However, it is not waterproof and should not be submerged in liquids.
7. Troubleshooting
- Remote Not Responding:
- Ensure the Micro USB cable is securely connected to both the remote and the KVM switch.
- Verify that the KVM switch is powered on.
- Confirm that the remote is connected to a compatible camgeet KVM switch (KVM1001A or KVM1002A).
- Try disconnecting and reconnecting the remote cable.
- Display Not Lighting Up:
- Check the power supply to the KVM switch.
- Ensure the remote cable is fully inserted into the KVM switch's remote port.
- Incorrect Port Displayed:
- If the display shows an incorrect port after switching, press the desired port button again firmly.
- Ensure there are no loose connections between the KVM switch and the computers.
8. Warranty and Support
For warranty information and technical support, please refer to the documentation provided with your camgeet KVM switch or visit the official camgeet website. Keep your purchase receipt for warranty claims.
If you encounter issues not covered in this manual, please contact camgeet customer support for assistance.