Introduction
This manual provides essential information for the safe assembly, operation, and maintenance of your Garvee 10x10ft Louvered Pergola. Please read all instructions carefully before beginning assembly or use. Retain this manual for future reference.
Safety Information
Important Safety Warnings:
- Always follow the assembly instructions provided.
- Ensure the pergola is securely anchored to a stable foundation to prevent it from tipping over in strong winds or during heavy snow loads.
- Keep children and pets away from the assembly area to prevent injuries.
- Do not climb on the pergola or its components.
- This product is designed for outdoor use only.
Product Overview
The Garvee 10x10ft Louvered Pergola features a robust design for outdoor living spaces. Key features include:
- All-Weather Aluminum Construction: Crafted with a heavy-duty aluminum frame and powder-coated metal louvers for resistance to rust, UV damage, and corrosion.
- Adjustable Louvered Roof: Louvers can be adjusted from 0° to 90° using a hand crank to control sunlight and airflow.
- Integrated Drainage System: A concealed gutter system directs rainwater from the louvers into the columns and drains discreetly at the base, preventing pooling.
- Enhanced Stability: Reinforced frame and pre-drilled bases ensure stability on various surfaces.
Product Dimensions
The Garvee 10x10ft Louvered Pergola has the following approximate dimensions:
- Length: 114.96 inches (approx. 9.58 ft)
- Width: 114.96 inches (approx. 9.58 ft)
- Height: 88.18 inches (approx. 7.35 ft)
- Item Weight: 262.57 Pounds

Image: Product dimensions illustrating the overall size of the pergola.
Setup and Assembly
Assembly of the Garvee Louvered Pergola is required. The product includes labeled parts and detailed video instructions to facilitate a straightforward setup process. It is recommended to have at least two people for assembly.
Anchoring for Stability
To ensure maximum stability and safety, the pergola must be securely anchored to a level surface. Expansion screws are included for this purpose. Proper anchoring is crucial to withstand strong winds and other environmental factors.

Image: Base plate and anchoring hardware for securing the pergola.
Operating Instructions
Adjusting the Louvered Roof
The pergola features an adjustable louvered roof, allowing you to control the amount of sunlight and airflow. Use the smooth hand crank mechanism to rotate the louvers.
- Open Position (0°): Rotate the crank to fully open the louvers for maximum sunlight and ventilation.
- Closed Position (90°): Rotate the crank to fully close the louvers to provide shade and protection from rain.
- Intermediate Positions: Adjust the louvers to any angle between 0° and 90° to customize your desired level of shade and light.

Image: Pergola with louvers adjusted for partial shade.

Image: Close-up of louvers in open and closed positions.
Integrated Drainage System
The pergola is equipped with a built-in drainage system. When the louvers are closed, rainwater is channeled through a concealed gutter system. The water then flows down inside the integrated columns and exits discreetly at the base, ensuring a dry area underneath.
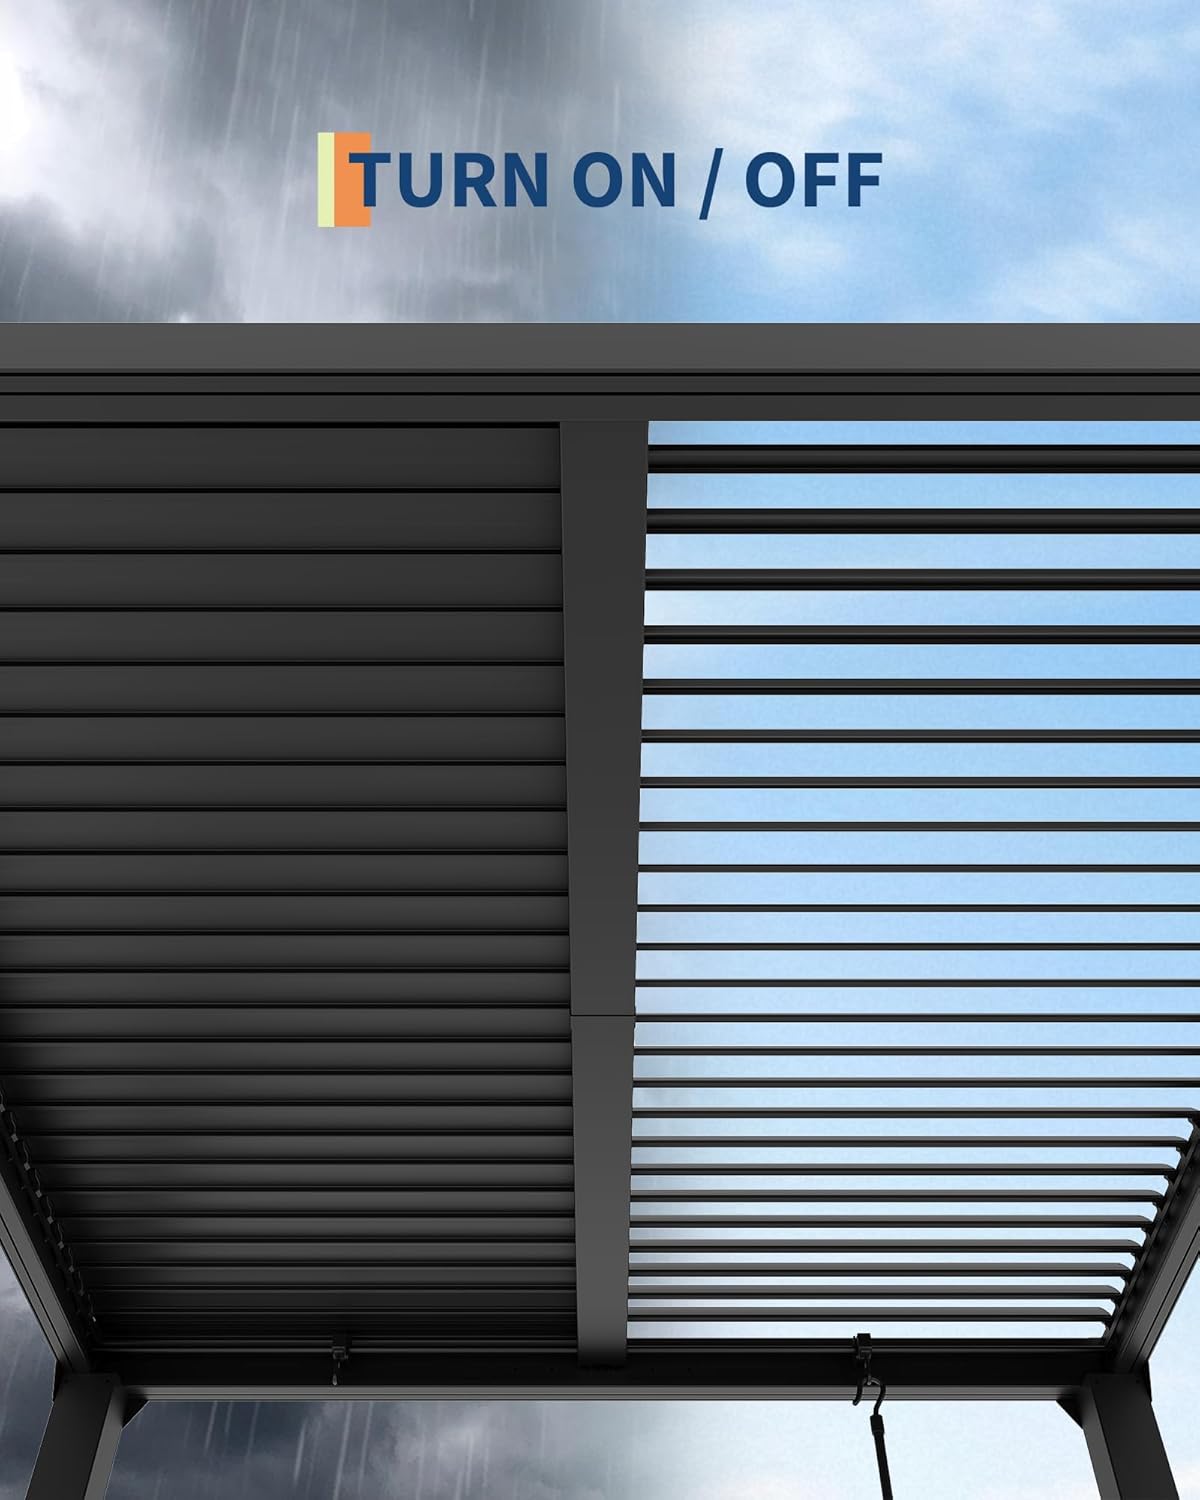
Image: Diagram of the integrated drainage system.
Maintenance
Regular maintenance will help prolong the life and appearance of your pergola.
- Cleaning: Clean the aluminum frame and louvers periodically with mild soap and water. Rinse thoroughly with clean water and dry with a soft cloth to prevent water spots. Avoid abrasive cleaners or harsh chemicals.
- Inspection: Regularly inspect all bolts, screws, and connections to ensure they are tight. Re-tighten as necessary.
- Drainage System: Periodically check the drainage channels and column bases for any debris that might obstruct water flow. Clear any blockages to ensure proper drainage.
- Winter Care: In areas with heavy snowfall, it is recommended to keep the louvers open or clear snow accumulation from the roof to prevent excessive weight on the structure.
Troubleshooting
If you encounter issues with your Garvee Louvered Pergola, consider the following:
- Louvers not adjusting smoothly: Check for any obstructions in the louver mechanism or along the tracks. Ensure the hand crank is properly engaged.
- Water pooling on the roof: Verify that the louvers are fully closed when rain is expected. Inspect the drainage system for blockages and clear any debris.
- Pergola feels unstable: Re-check all anchoring points and ensure they are securely fastened to a level and stable surface. Verify all frame connections are tight.
- Missing parts during assembly: Refer to the parts list in your assembly guide. Contact customer support with the specific part numbers for assistance.
Specifications
| Brand | Garvee |
| Model Number | 1MO9Lvg_nsrDhPGwpdgIrAf4 |
| Material | Aluminum, Metal |
| Product Dimensions (L x W x H) | 114.96" x 114.96" x 88.18" |
| Item Weight | 262.57 Pounds |
| Frame Material | Aluminum |
| Water Resistance Level | Water Resistant |
| UV Protection | No UV Protection |
| Assembly Required | Yes |
| Color | Gray |
Warranty and Support
For warranty information or technical support, please refer to the documentation included with your purchase or contact Garvee customer service. Keep your purchase receipt and model number handy for faster service.
Contact Information: Please visit the official Garvee website or refer to your product packaging for the most current customer support contact details.