1. Product Overview
The NearStream AMIX40U is an all-in-one audio interface designed for recording and production. It features dual XLR/6.35mm combo inputs, 48V phantom power, dual headphone outputs for monitoring, and multiple connectivity options including Bluetooth, AUX, and USB. The device is equipped with a 2-inch HD LCD screen for intuitive control and real-time monitoring of audio levels and settings. It supports 10 channels and includes features like loopback, reverb, and noise reduction, making it suitable for podcasting, streaming, music creation, and gaming.
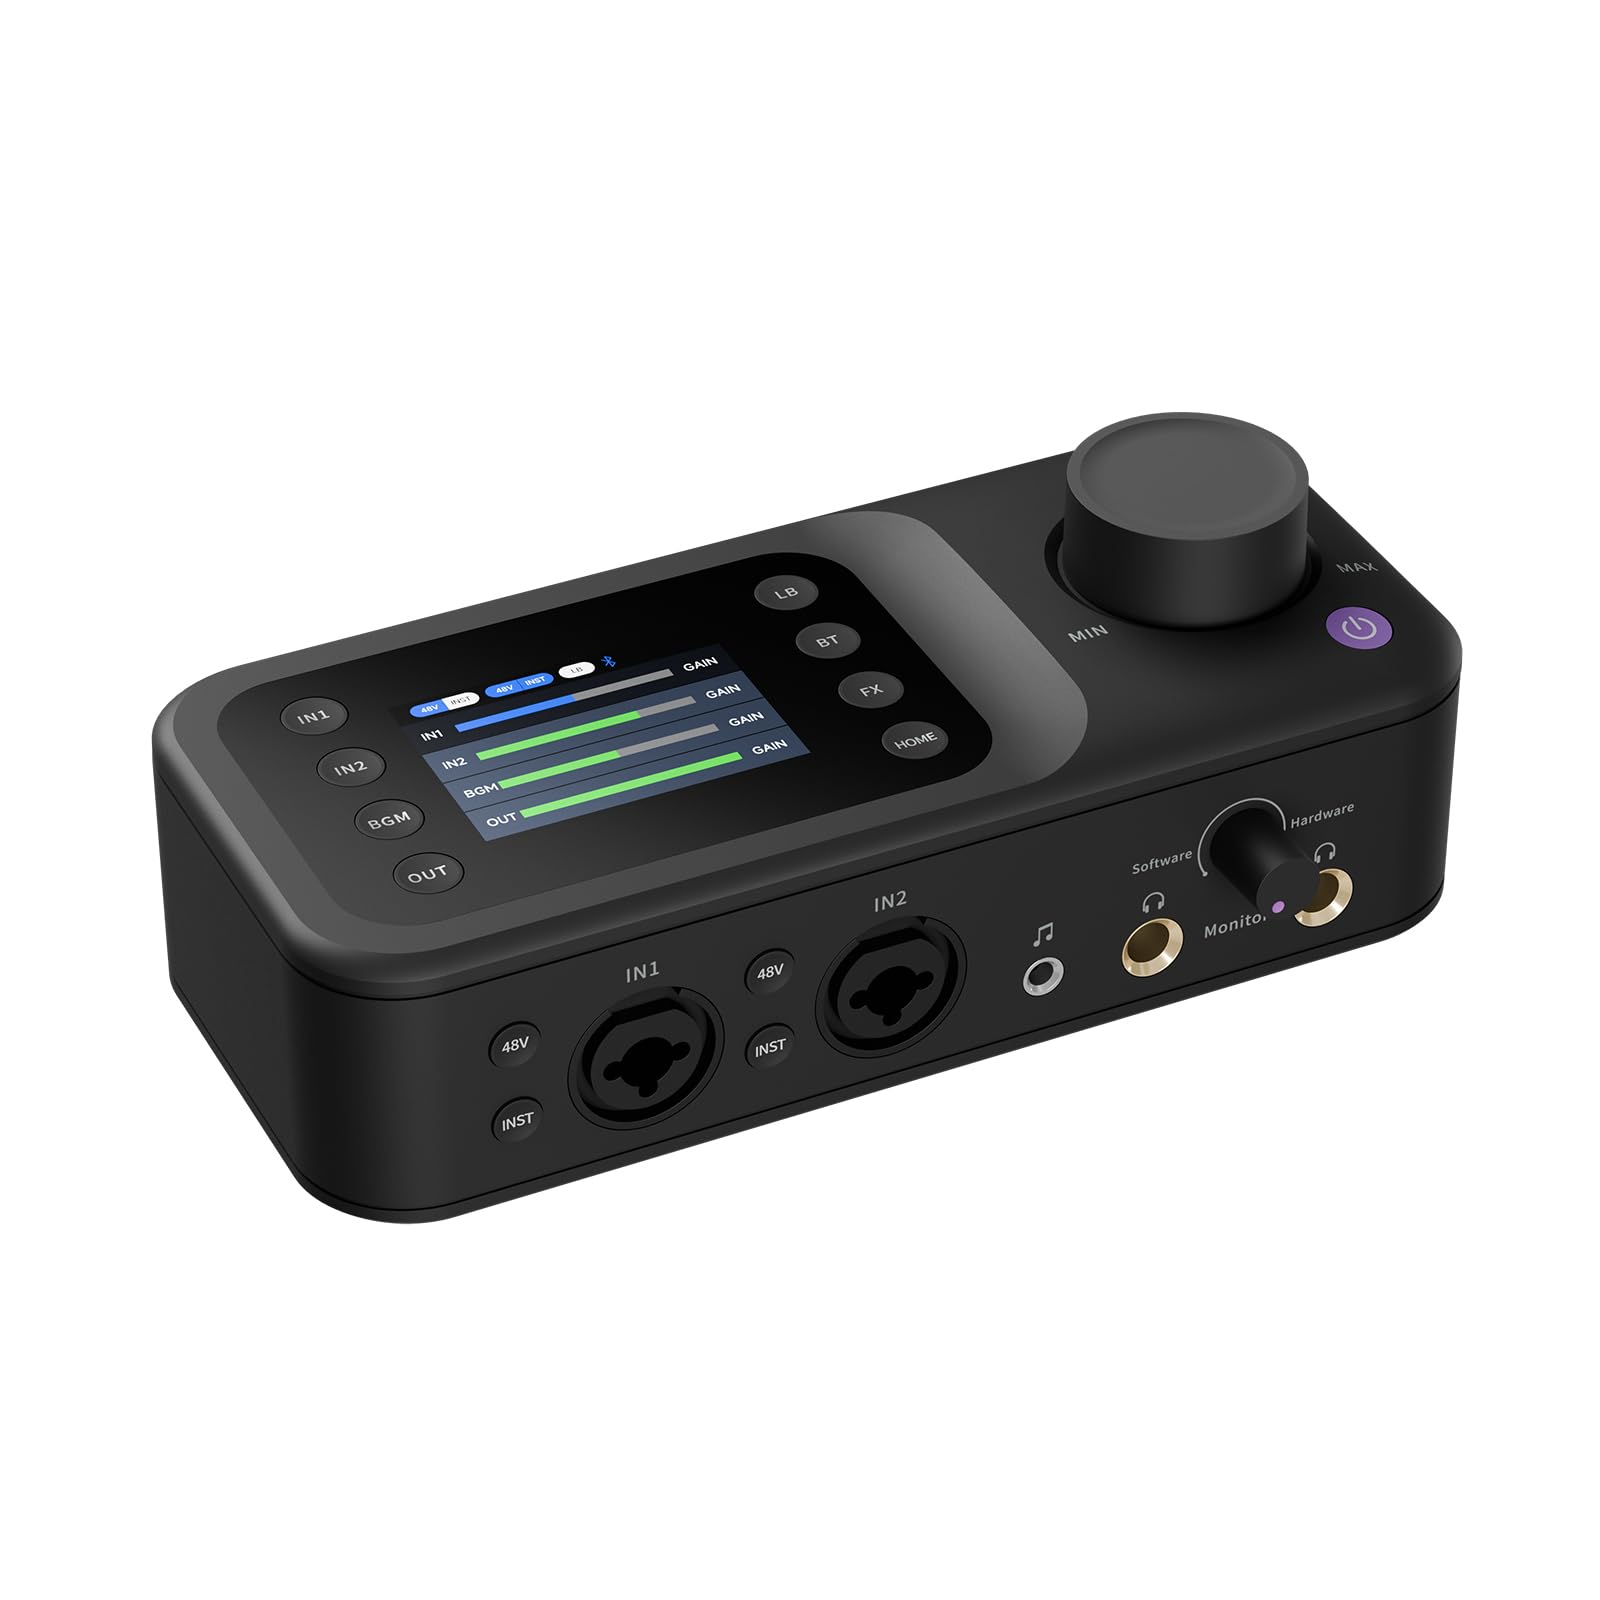
Image: Front view of the NearStream AMIX40U Audio Interface, showcasing its compact design and control layout.
2. Package Contents
Verify that all items listed below are included in your package:
- AMIX40U Audio Interface (x1)
- USB-A/USB-C to USB-C cable (x1)
- 3.5mm TRRS audio cable (x1)
- 3.5mm TRS audio cable (x1)
- 3.5mm to 6.35mm audio adapter (x1)
- User manual (x1)
- Quick Start Guide (x1)

Image: All items included in the NearStream AMIX40U Audio Interface package, laid out on a table.
3. Product Features
3.1. Inputs and Outputs
- Dual XLR/6.35mm Combo Inputs: Connect microphones or instruments. Each input features studio-grade preamps and individual 48V phantom power switches for condenser microphones.
- Dual Headphone Outputs: For real-time, ultra-low latency monitoring with adjustable volume.
- Auxiliary (AUX) Input: 3.5mm input for connecting smartphones, PCs, or tablets for background music or accompaniment.
- USB-OTG Port: Connects to PC, smartphone, or tablet for streaming or recording.
- 6.35mm Line Outputs (L/R): For connecting to external speakers.
- 3.5mm Audio Output: For connecting to speakers, PC, smartphone, or iPad to play recorded sound.
- Power/Upgrade Port: 5V 1A DC IN for power and firmware upgrades.
- Kensington Lock: For securing the device.
- Reset Button: For factory reset.

Image: Detailed diagram of the AMIX40U's front and back panels, highlighting all input and output ports.
3.2. Control Interface
- HD LCD Screen: A 2-inch display showing system statuses, input levels, tone modes, noise reduction, and reverb settings.
- Multi-functional Rotary Dial: Adjusts volume, reverb, denoise level, and sound mode.
- IN1/IN2 Buttons: Switch between EQ, Denoise, Reverb, and Audio Gain modes for respective input ports.
- BGM Button: Selects AUX, USB, or Bluetooth channels for background music.
- OUT Button: Adjusts volume for Output, Monitor 1, and Monitor 2 channels.
- LB (Loopback) Button: Enables/disables loopback function, allowing the OTG interface to transmit sound played by connected devices.
- BT (Bluetooth) Button: Activates Bluetooth pairing mode.
- FX Button: Short press to enable/disable vocal ducker; long press to enable/disable vocal remover (for BGM channel).
- HOME Button: Returns to the main screen.

Image: Detailed diagram of the AMIX40U's top panel, highlighting the LCD screen, rotary dial, and control buttons.
3.3. Audio Processing
- Advanced Audio Digital Chip (DSP) with High-Gain Preamps: Boosts microphone signals for clear, ultra-low noise sound.
- Three Levels of Smart Noise Reduction: Customizable noise reduction to capture clear audio.
- Adjustable Reverb Control (0-100): Fine-tune reverb levels for added richness and dimension.
- EQ Adjustment with Three Presets: Easily adjust EQ with three modes: Original (balanced), Deep (enhanced warmth), and Bright (clearer, sharper audio).

Image: Internal view of the AMIX40U highlighting the Advanced DSP chip and high-gain preamps.
4. Setup Guide
4.1. Powering the Device
- Connect the provided USB-A/USB-C to USB-C cable to the 5V 1A DC IN port on the AMIX40U.
- Connect the other end of the cable to a power source (e.g., USB wall adapter, computer USB port).
- Press and hold the power button (purple button) for 2 seconds to power on/off the device.
4.2. Connecting to a Streaming/Recording Device (OTG Port)
- Connect the USB-OTG port on the AMIX40U to your computer, smartphone, or tablet using the appropriate USB cable.
- This connection allows the AMIX40U to transmit audio directly to your device for recording or live streaming.
4.3. Microphone and Instrument Connections
- Microphone: Connect your microphone to either the IN1 or IN2 XLR/6.35mm combo input.
- Instrument: Connect your instrument (e.g., guitar) to either the IN1 or IN2 XLR/6.35mm combo input.
- Phantom Power (48V): For condenser microphones, press the '48V' button above the respective input. A blue background indicates it's on. Turn it off for dynamic microphones.
- Instrument Mode (INST): For instruments, press the 'INST' button below the respective input. A blue background indicates it's on.
4.4. Headphone Monitoring
- Connect your headphones to the 6.35mm Headset Monitor Port.
- Adjust the monitoring sound gain using the 'Monitor' knob to balance software and hardware audio sources.
4.5. Auxiliary Audio Connection
- Connect a 3.5mm audio cable from your smartphone, PC, or tablet to the AUX IN port on the AMIX40U to play background music.
4.6. Bluetooth Connection
- Hold the 'BT' (Bluetooth) button for 2 seconds until the blinking icon appears, indicating pairing mode.
- On your smartphone or tablet, go to Bluetooth settings and select "NearStream Bluetooth AMIX40U" to connect.
4.7. Audio Output to Speakers
- Connect your speakers to the 6.35mm Audio Left (L) and Right (R) Output Ports for sound output.
- Alternatively, connect the 3.5mm audio output to your speaker/PC/smartphone/iPad to play the recorded sound.
Video: A detailed guide on how to set up and connect the NearStream AMIX40U Audio Interface to various devices, including power, microphones, instruments, headphones, and output speakers.
5. Operating Instructions
5.1. Using the LCD Screen and Rotary Dial
- IN1/IN2 Buttons: Press these buttons to cycle through settings for EQ, Denoise, Reverb, and Audio Gain for the selected input. Use the rotary dial to adjust the values.
- BGM Button: Press this button to select between AUX, USB, or Bluetooth channels. Use the rotary dial to adjust the volume of the selected background music source.
- OUT Button: Press this button to select between Output, Monitor 1, and Monitor 2 channels. Use the rotary dial to adjust the volume for the selected output.
5.2. Loopback Function
Press the 'LB' button to enable or disable the loopback function. When enabled, the audio played from devices connected to the OTG port (e.g., computer, smartphone) will be transmitted back into the AMIX40U's output, allowing you to record or stream both your microphone/instrument and the device's audio simultaneously.
5.3. FX Button (BGM Channel)
- Short Press: Toggles the vocal ducker feature on/off. When active, the background music volume will automatically lower when speech is detected.
- Long Press: Toggles the vocal remover feature on/off. This attempts to remove vocals from the background music.
5.4. HOME Button
Press the 'HOME' button to return to the main display screen at any time.
6. Software Setup for Recording
To use the NearStream AMIX40U with your recording software (Digital Audio Workstation - DAW), follow these general steps. The exact menu names may vary slightly depending on your software.
- Connect the AMIX40U to your computer via the USB-OTG port.
- Open your preferred recording software (e.g., Adobe Audition, Audacity, GarageBand).
- Navigate to the software's preferences or settings menu. This is often found under 'Edit' or the software's name in the top menu bar.
- Look for 'Audio Hardware', 'Audio Device Settings', or a similar option.
- Set the 'Default Input' and 'Default Output' devices to 'NearStream Mixer AMIX40U'.
- Ensure the sample rate is set to 48000 Hz for optimal performance.
- Click 'OK' or 'Apply' to save your settings.
- You should now be able to select the AMIX40U's inputs and outputs within your recording software for tracking and monitoring.
Video: Demonstrates how to set up the NearStream AMIX40U as the default audio input and output device in recording software like Adobe Audition.
7. Maintenance
To ensure the longevity and optimal performance of your NearStream AMIX40U, follow these maintenance guidelines:
- Cleaning: Use a soft, dry cloth to clean the exterior of the device. Avoid using liquid cleaners or solvents, as they may damage the finish or internal components.
- Storage: Store the device in a cool, dry place away from direct sunlight, extreme temperatures, and high humidity.
- Handling: Handle the device with care to prevent drops or impacts that could cause internal damage.
- Cable Management: Avoid bending or crimping cables excessively, as this can lead to damage and signal loss.
8. Troubleshooting
If you encounter issues with your NearStream AMIX40U, refer to the following common troubleshooting steps:
- No Power: Ensure the USB-C power cable is securely connected to both the device and a working power source. Try a different USB port or power adapter.
- No Sound Input:
- Check if microphones/instruments are correctly plugged into IN1/IN2.
- Verify that 48V phantom power is enabled for condenser microphones (blue light on).
- Ensure 'INST' mode is enabled for instruments (blue light on).
- Check input gain levels on the LCD screen and adjust using the rotary dial.
- Confirm the correct input device is selected in your recording software.
- No Sound Output/Monitoring:
- Ensure headphones or speakers are correctly connected to the output ports.
- Adjust the 'Monitor' and 'OUT' volume levels using the rotary dial.
- Check the output device selection in your computer's sound settings and recording software.
- Bluetooth Connection Issues:
- Ensure the AMIX40U is in pairing mode (blinking 'BT' icon).
- Disable and re-enable Bluetooth on your smartphone/tablet.
- Forget the device and try pairing again.
- Loopback Not Working: Ensure the 'LB' button is enabled (blue light on). Check that the audio source on your connected device (PC/smartphone) is playing.
- Device Unresponsive: Press the 'RST' (Reset) button using a small pin or paperclip to restart the device.
9. Specifications
| Feature | Description |
|---|---|
| Item Weight | 1 pounds |
| Package Dimensions | 8.9 x 4.9 x 4 inches |
| Item Model Number | AW-AMIX40U-US |
| Compatible Devices | Guitar, Laptop, Personal Computer, Smartphone, Tablet |
| Operating System | Android, Windows, iOS, macOS |
| Brand | NearStream |
| Connectivity Technology | AUX, Bluetooth, USB |
| Number of Channels | 10 |
10. Warranty and Support
The NearStream AMIX40U Audio Interface comes with a standard manufacturer's warranty. Please refer to the warranty card included in your package for specific terms and conditions. For technical support, troubleshooting assistance, or warranty claims, please contact NearStream customer service through their official website or the contact information provided in your product documentation.
For additional resources and product information, visit the official NearStream Store: NearStream Official Store

