1. Introduction
Thank you for choosing the GOLOZA Digital Alarm Clock. This manual provides detailed instructions for setting up and operating your new alarm clock. Please read it thoroughly to ensure proper use and to enjoy all the features this product offers.
This digital alarm clock features a large, clear display, customizable brightness and night mode, multiple alarm tones and volume levels, a convenient snooze function, and a USB charging port. Its modern curved design makes it a stylish addition to any bedroom.
2. What's in the Box
Upon unpacking, please ensure all items listed below are present and in good condition:
- GOLOZA Digital Alarm Clock
- USB Charging Cable (71in/1.8m)
- Power Adapter
- User Manual

Image: Contents of the product packaging, showing the digital alarm clock, charging cable, adapter, and user manual.
3. Setup
3.1 Initial Power-On
- Remove the insulating paper from the battery compartment on the back of the clock. This battery provides power-off memory for settings.
- Connect the USB charging cable to the clock's USB port.
- Plug the power adapter into a standard wall outlet. The clock display will light up.

Image: A person removing the insulating paper from the battery compartment and plugging in the USB cable to power the clock.
4. Operating Instructions
4.1 Time Setting and 12/24H Switch
- Long press the DST button to enter time setting mode. The hour digits will flash.
- Press the +/- button to switch between 12-hour and 24-hour format.
- Press the DST button again to confirm the format. The hour digits will flash.
- Press the +/- button to adjust the hour. Long press for quick adjustment.
- Press the DST button to confirm the hour. The minute digits will flash.
- Press the +/- button to adjust the minute. Long press for quick adjustment.
- Press the DST button to confirm the minute and exit time setting.
Video: Instructions on how to set the time and switch between 12-hour and 24-hour display formats on the GOLOZA Digital Alarm Clock.

Image: The alarm clock displaying time in 12-hour, 24-hour, and DST formats.
4.2 DST (Daylight Saving Time) Switch
- Press the DST button to enter DST switch mode. The display will show "ON" or "OFF".
- Press the +/- button to toggle between "ON" and "OFF".
- Press the DST button to confirm your selection and exit.
Video: Demonstration of how to set the DST (Daylight Saving Time) mode on the digital alarm clock.
4.3 Alarm Setting
- Long press the Alarm (bell icon) button to enter alarm setting mode. The hour digits will flash.
- Press the +/- button to adjust the alarm hour. Long press for quick adjustment.
- Press the Alarm button to confirm the hour. The minute digits will flash.
- Press the +/- button to adjust the alarm minute. Long press for quick adjustment.
- Press the Alarm button to confirm the minute and exit alarm time setting.
Video: Step-by-step guide on how to set the alarm time on the GOLOZA Digital Alarm Clock.
4.4 Alarm Tones and Volume
- To change the alarm volume, press the Volume (-/+) button. There are 2 levels of alarm volume (75-85dB). The last selected volume will be saved automatically.
- To change the alarm ringtone, press the Ringtone (-/+) button. Choose from 3 fixed ringing music sounds: Birdsongs, Beep, and Chording. The last selected ringtone will be saved automatically.

Image: The alarm clock showing two alarm volume levels (75dB and 85dB) and the snooze button.

Image: Icons illustrating the three available alarm sounds: Beep, Chording, and Bird Song.
5. Features
5.1 Brightness Adjustment
The clock offers 5 adjustable brightness levels (including OFF) to suit your preference.
- Press the Snooze/Light (Zzz/sun icon) button to cycle through the 5 brightness levels.
- The display can be set from sleep-friendly dim to a soothing glow, or completely off.
Video: Demonstration of how to adjust the display brightness of the GOLOZA Digital Alarm Clock through its five levels.

Image: The alarm clock on a nightstand, showing its adjustable brightness for peaceful sleep.
5.2 Customizable Night Mode
The Night Mode feature allows you to set specific times for the display brightness to automatically adjust to a lower level.
- Long press the Snooze/Light (Zzz/sun icon) button to enter Night Mode setting. The start hour will flash.
- Press the +/- button to adjust the start hour for Night Mode.
- Press the Snooze/Light button to confirm the start hour. The start minute will flash.
- Press the +/- button to adjust the start minute.
- Press the Snooze/Light button to confirm the start minute. The end hour will flash.
- Repeat the steps to set the end hour and minute for Night Mode.
- Once set, the clock will automatically dim during the specified period.
Video: Guide on how to set the customizable night mode, allowing the clock to automatically adjust brightness during specific hours.

Image: The alarm clock demonstrating its customizable night mode, with a visual representation of time-based brightness adjustment.
5.3 Snooze Function
When the alarm rings, press the raised Snooze (Zzz) button to activate the 9-minute snooze function. The alarm will ring again after 9 minutes. To turn off the alarm completely for the day, press any other button except the Snooze button.
5.4 USB Charging Port
The clock includes a USB charging port (Type-C) for convenient charging of your mobile devices. Simply connect your device's charging cable to the USB port on the back of the alarm clock.
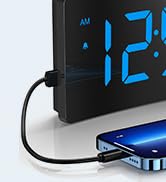
Image: The digital alarm clock with a smartphone connected to its USB port for charging.
6. Maintenance
- Clean the clock with a soft, dry cloth. Do not use abrasive cleaners or solvents.
- Keep the clock away from direct sunlight, high temperatures, and humid environments.
- Avoid dropping the clock or subjecting it to strong impacts.
- Ensure the non-slip rubber sticker at the bottom is clean and intact for stability.

Image: The alarm clock on a surface, showing its non-slip design with a bottom rubber sticker.
7. Troubleshooting
| Problem | Solution |
|---|---|
| Clock display is blank | Ensure the USB cable is securely connected and the power adapter is plugged into a working outlet. Check if the display brightness is set to OFF. |
| Alarm does not sound | Verify the alarm is set and activated (bell icon visible). Check alarm volume settings. |
| Time/settings lost after power outage | Ensure the insulating paper has been removed from the backup battery compartment. The battery retains settings but does not power the display or alarm during an outage. |
| Display too bright/dim | Adjust brightness using the Snooze/Light button. Check Night Mode settings if applicable. |
8. Specifications
| Feature | Detail |
|---|---|
| Brand | GOLOZA |
| Model Number | TCA-245 |
| Display Type | LED |
| Brightness Levels | 5 (including OFF) |
| Alarm Tones | 3 (Birdsongs, Beep, Chording) |
| Alarm Volume | 2 levels (75-85dB) |
| Snooze Duration | 9 minutes |
| Time Format | 12H/24H/DST |
| Power Source | Corded Electric (USB) |
| Memory Function | Yes (battery backup for settings) |
| Product Dimensions | 5.05"W x 3.03"H |
| Item Weight | 0.28 Kilograms |
9. Warranty and Support
GOLOZA provides a 24-month safeguard and 24-hour fast support for this product.
If you have any questions or require assistance, please contact us via the following path:
- Your Account > Orders > Order Detail > Sold by: GOLOZA > Ask a question
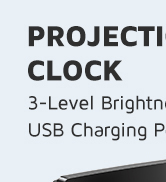
Image: GOLOZA Support information, highlighting 24-month warranty and contact method.