Cobbawe B3 Professional Skin Analysis Machine User Manual
Model: B3
1. Setup Instructions
Follow these steps to set up your Cobbawe B3 Skin Analysis Machine:
Power Connection: Connect the power cable to the machine's power port and then to a power outlet. Ensure the power switch is in the OFF position before connecting.
Handheld Microimager Connection: Insert the handheld microimager's USB cable into an available USB port on the machine.
Power On: Turn on the main power switch located at the back of the device. Wait for the device to boot up completely.
Wi-Fi Connection:
From the top of the screen, scroll down to access the notification panel.
Long-press the Wi-Fi icon to enter the Wi-Fi settings page.
Select your desired Wi-Fi network and enter the password to connect.
Launch Application: Once connected to Wi-Fi, open the "SkinCenter" application on the device's home screen.
Trial Mode: Select "Trial Mode" to enter the home page of the application.
Video: Setup and initial application navigation for the Cobbawe B3 Skin Analysis Machine.
Image: Front view of the Cobbawe B3 Skin Analysis Machine, highlighting the main unit and integrated touchscreen.
2. Operating Instructions
2.1. Client Profile Management
Access Member Center: From the homepage, click the second icon at the bottom to enter the Member Center page.
Create New Profile: Click "New" in the upper right corner to access the "Create New Profile" page.
Enter Client Details: Input the client's username, gender, birthday, phone number, and consultant's name.
Save Profile: Click "Save" to complete the profile creation.
Search/Edit Profile: Use the search bar to find existing client profiles. Click on a profile to view or edit personal information.
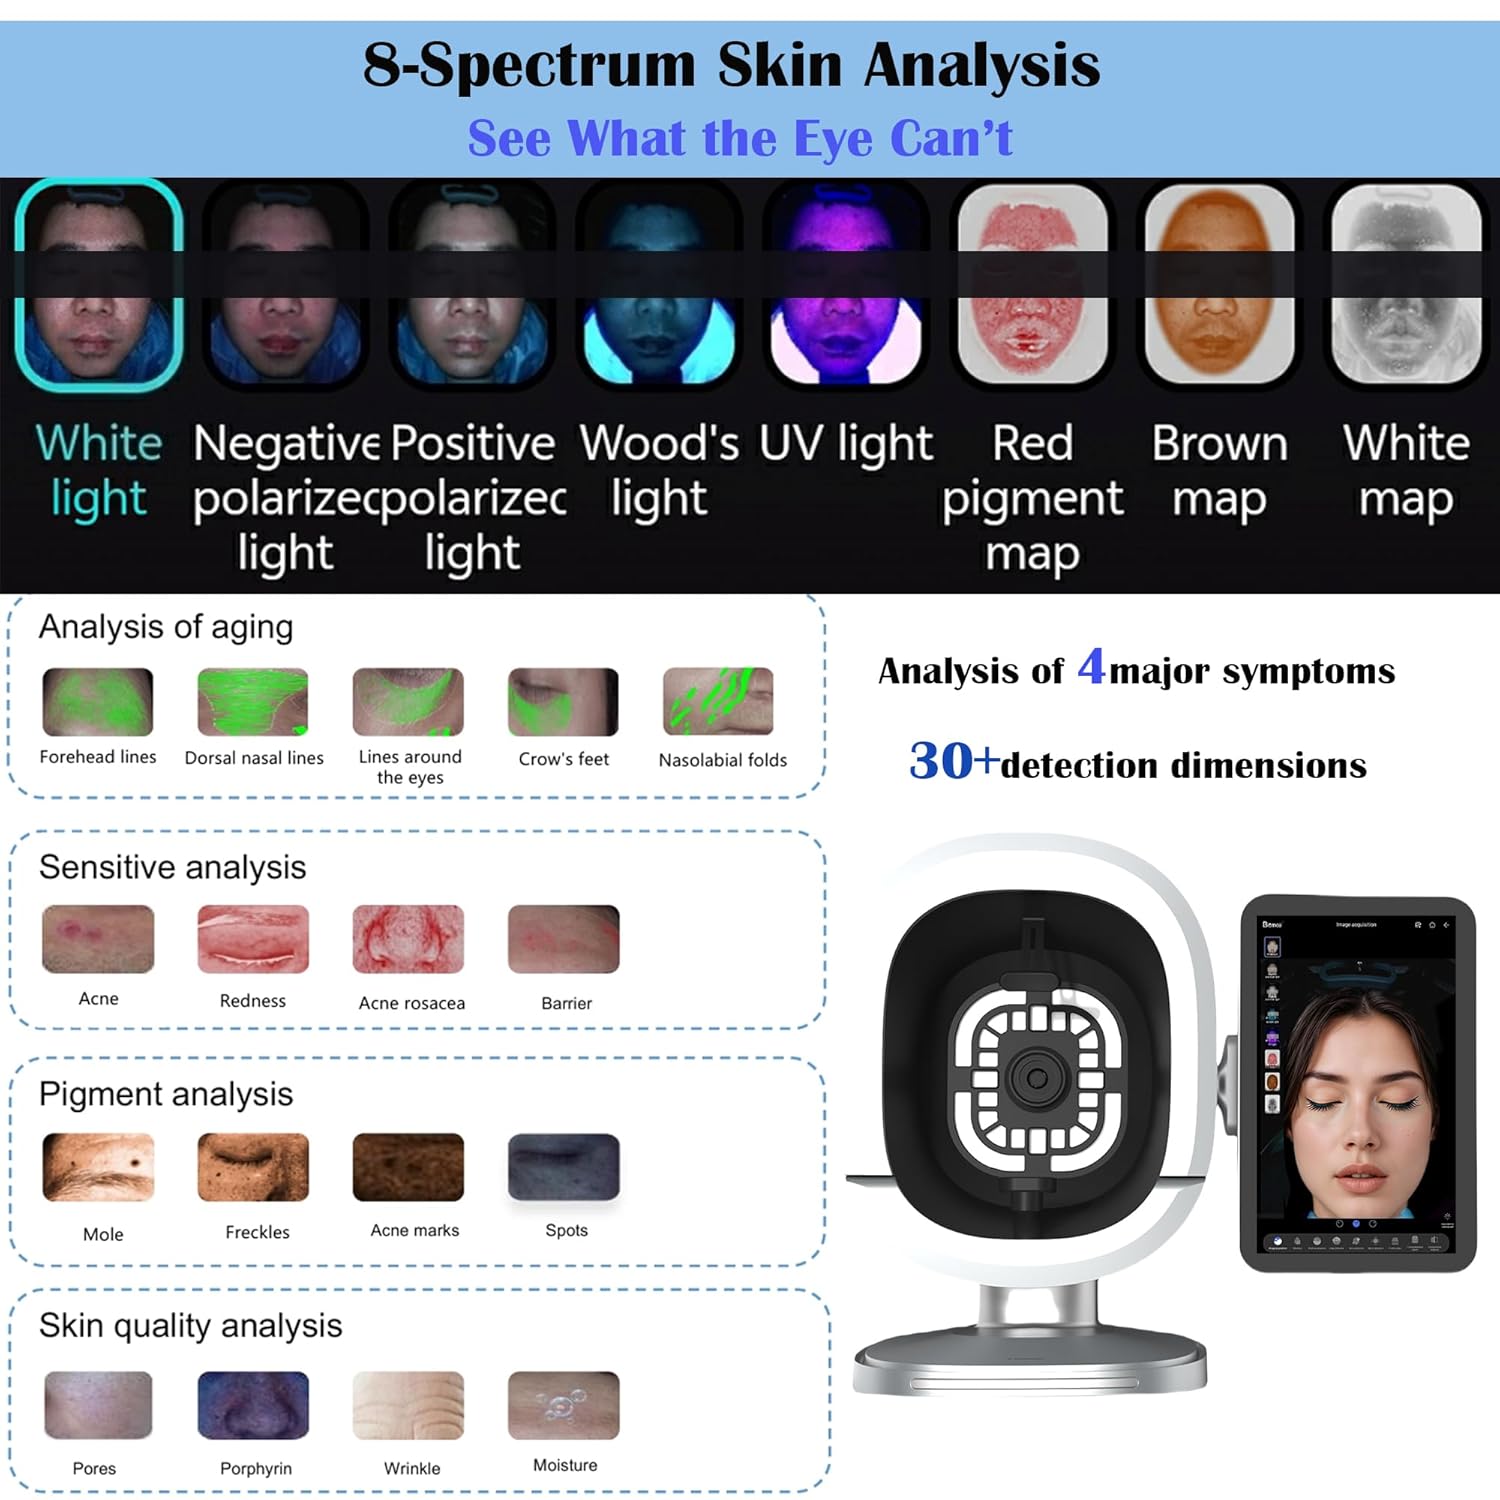
2.2. Skin Detection Process
The device utilizes 8-spectrum imaging technology for comprehensive skin analysis.
Start Detection: From a client's personal profile, click the "Start Skin Detection" button (camera icon) on the right.
Positioning: Ensure the client's face is correctly aligned within the capture frame. Use the "T-Shaped Guide" and "Facial Contour Guide" functions for precise positioning.
Capture Front Face: Click the "Front Face" button to capture the initial image. The device will automatically capture five images under different light spectrums.
Capture Side Faces: Click "Left Face" and "Right Face" buttons to capture images of the respective sides of the face. If a side face capture is unnecessary, click "Finish".
Spectral Views: After capturing, the system will display various spectral views including:
White Light
Negative Polarized Light
Positive Polarized Light
Wood's UV Light
Red Pigment Map
Brown Map
White Map
Hypodermal Scenograph: Click the "Hypodermal Scenograph" button to view UV Light, Red Pigment Map, and Brown Map for deeper analysis.
Image: Visual representation of the 8-spectrum skin analysis, illustrating how different light types reveal various skin conditions like aging, sensitivity, and pigmentation.
2.3. Moisture Content Measurement
The handheld microimager can measure skin moisture levels on different facial areas.
Access Moisture Page: Navigate to the "Moisture" page within the application.
Position Microimager: Pick up the handheld skin microimager. Place the two metal probes close to the skin on the forehead, left cheek, right cheek, and chin, following the voice prompts.
Read Moisture Value: Click the test button on the microimager to read the moisture value for each area.
View Analysis: Click the value button on the far right of the screen to view the data analysis dialog box.
Image: A user demonstrating the handheld microimager for detailed skin analysis, with results displayed on the main touchscreen.
2.4. Deep Detection and Skin Prediction
Analyze deeper skin issues and simulate future skin conditions.
Deep Detection: The deep detection function analyzes 8 skin indicators. The first part focuses on porphyrin.
Pigmentation Comparison: Use the sliding cursor to compare skin pigmentation issues under polarized light and brown light.
Skin Prediction: Slide the cursor to the left for skin care simulation effects and to the right for aging simulation.
2.5. Micro Detection
Perform detailed micro-level analysis using the handheld microimager.
Microimager Buttons: The handheld microimager has two buttons: the top button for taking photos and the bottom button for switching light sources.
Capture Microscopic Images: Place the microimager on the desired area (e.g., nose, forehead, left face, right face, chin). Press the bottom button to switch light sources (white light, polarized light, UV light) and the top button to take photos. Repeat this process three times for each light source.
Submit Images: After completing the shots, click "Submit".
2.6. Report Generation and Product Recommendation
Generate comprehensive reports and receive AI-driven product recommendations.
View Report Details: Click the "Report Details" button to view the comprehensive analysis.
Product Recommendations: The system provides AI-based product recommendations. Click on product thumbnails to zoom in/out and view product details.
Print/Download Report: Click the print button on the top right to enter the print page. Click the PDF document download button to save the electronic version of the report.
Image: Screenshot of the AI Product Recommendation feature, displaying tailored skincare routines and product suggestions based on skin analysis data.
2.7. Comparative Analysis
Compare skin conditions over time or under different analyses.
Image Selection: Select images taken at two different times to compare skin indicators.
Comparison Modes: The interface offers three comparison modes:
Horizontally: Side-by-side comparison.
Portrait: Vertical comparison.
Multinomial Comparison: Compares four images, allowing switching between four indicators and different shooting times.
Image: Example of a before and after comparison, demonstrating visible changes in skin condition over time.
2.8. Data Center
Access and manage client data and statistics.
Access Data Center: Click the fourth icon at the bottom to enter the Data Center.
View Statistics: The Data Center displays various statistics, including annual/monthly changes in customer numbers, gender ratio, age distribution, and proportion of scalp issues.
2.9. System Settings
Configure device and application settings.
Parameter Adjustment: Adjust individual or overall parameters for skin detection.
Watermark Settings: If you need to add a watermark to images and annotated maps, click on "Watermark" to customize settings. Watermark types can be custom text, time selection, or custom images. Watermark positions can be photos laid out flat, bottom-centered, or photo-centered.
Language Support: The device supports 19 interface languages, including English, Spanish, French, Chinese, Arabic, and German.
Image: The device interface highlighting multi-language support, showing flags of various countries.
3. Maintenance
Proper maintenance ensures the longevity and optimal performance of your Cobbawe B3 Skin Analysis Machine.
Cleaning the Screen: Use a soft, lint-free cloth slightly dampened with a screen cleaner solution to clean the 15.6" FHD touchscreen. Avoid abrasive materials or harsh chemicals.
Cleaning the Microimager: Gently wipe the lens and body of the handheld microimager with a soft, dry cloth. For stubborn spots, use a small amount of isopropyl alcohol on a cotton swab, ensuring no liquid enters the device.
General Cleaning: Keep the main unit free from dust and debris. Use a dry cloth to wipe down the exterior surfaces regularly.
Storage: When not in use, store the device in a cool, dry place away from direct sunlight and extreme temperatures.
Software Updates: Regularly check for and install software updates to ensure optimal performance and access to new features. This can typically be done through the "System Settings" menu.
4. Troubleshooting
This section addresses common issues you might encounter with your device. For problems not listed here, please contact customer support.
Device Not Powering On:
Ensure the power cable is securely connected to both the device and the power outlet.
Verify that the power switch on the back of the device is in the ON position.
Check if the power outlet is functional by plugging in another device.
Wi-Fi Connection Issues:
Confirm that your Wi-Fi network is active and within range.
Double-check the Wi-Fi password for accuracy.
Restart the device and your Wi-Fi router.
Handheld Microimager Not Detected:
Ensure the microimager's USB cable is firmly inserted into a USB port on the main unit.
Try connecting the microimager to a different USB port.
Restart the main device.
Application Freezing or Crashing:
Close and restart the "SkinCenter" application.
If the issue persists, restart the entire device.
Ensure the device's software is up to date.
Inaccurate Readings:
Ensure the skin is clean and free of makeup or heavy creams before analysis.
Verify that the microimager probes are making full contact with the skin during moisture measurement.
Calibrate the device if a calibration option is available in the system settings.
5. Specifications
Feature
Detail
Product Dimensions
26 x 14.8 x 22 inches
Product Weight
36.4 Pounds
Display
15.6" FHD Touchscreen
Imaging Technology
8-Spectrum Imaging
AI Features
AI Product Recommendation
Language Support
19 interface languages (including English, Spanish, French, Chinese, Arabic, German)
Data Storage
AWS-encrypted cloud storage for unlimited client data
Manufacturer
Shenzhen Zhimei Lihe Industrial Development Co.,Ltd
ASIN
B0FXB8YS9G
Image: Diagram showing the physical dimensions of the Cobbawe B3 Skin Analysis Machine.
6. Warranty & Support
For warranty information and technical support, please refer to the documentation included with your purchase or contact the manufacturer directly.
Manufacturer: Shenzhen Zhimei Lihe Industrial Development Co.,Ltd
Seller: Zenian
Return Policy: 30-day refund/replacement policy (as per Amazon's buybox winner information). Specific warranty details may vary.
Contact Support: Please refer to the contact information provided in your product packaging or on the official Cobbawe website for the most up-to-date support channels.
Ask a question about this manual
Ask about setup, troubleshooting, compatibility, parts, safety, or missing instructions. Manuals+ will review the question and use this page’s manual context to help answer it.