Introduction
This manual provides detailed instructions for the installation, operation, and maintenance of your Vaconoff Wireless Smart Thermostat. This device is designed to offer precise temperature control for your heating system, featuring wireless connectivity, app control, and compatibility with smart home assistants.

Image: The Vaconoff Wireless Smart Thermostat, its receiver unit, and a smartphone displaying the control app.
Package Contents
Please verify that all items listed below are included in your package:
- 1 x Thermostat (batteries not included)
- 1 x Receiver (100-240V power supply)
- 1 x USB-C Cable
- 1 x Jumper Cable
- 1 x Stand Bracket
- 2 x Screws
- 1 x User Manual
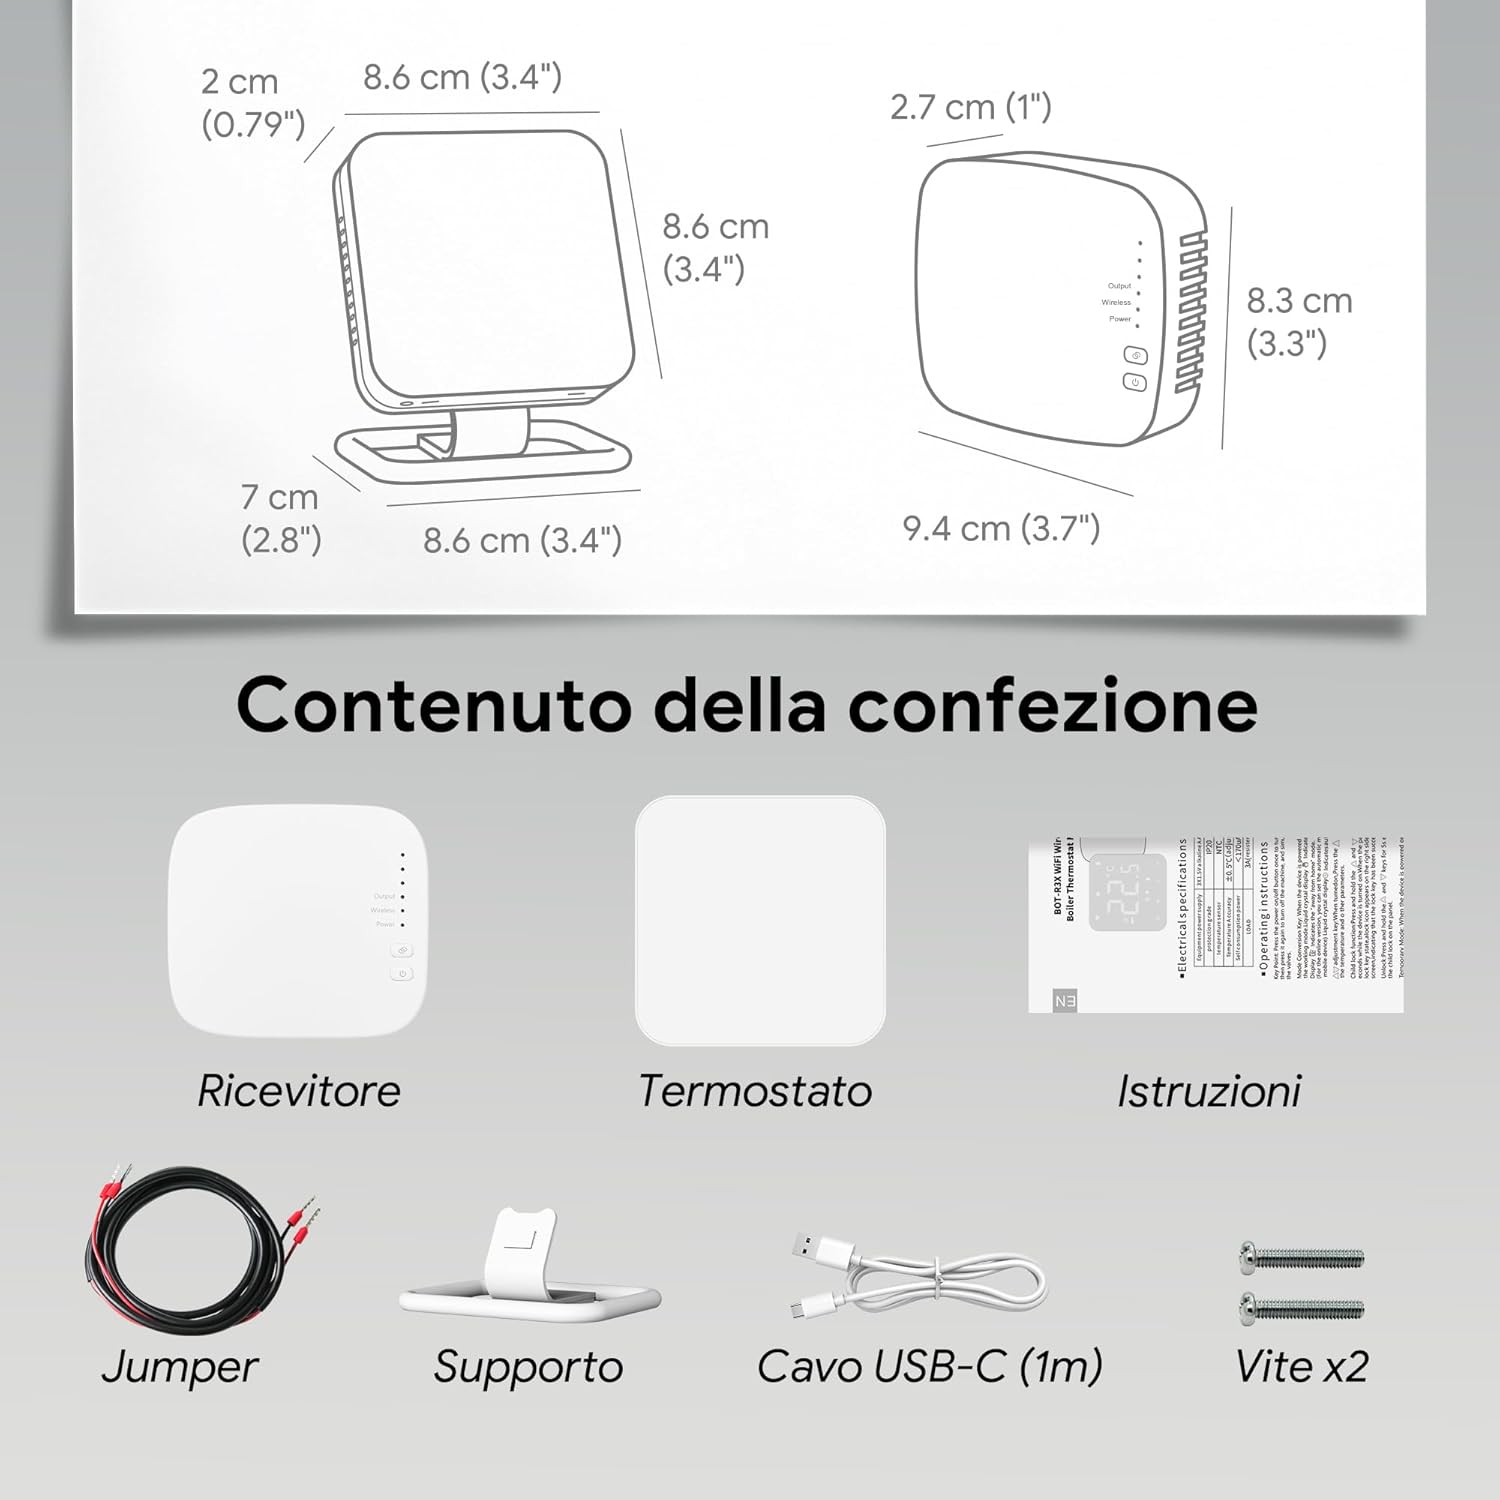
Image: All components included in the Vaconoff Wireless Smart Thermostat package.
Product Overview
The Vaconoff Wireless Smart Thermostat offers advanced features for convenient and efficient home heating control.
Key Features:
- Wireless Connectivity: The thermostat communicates wirelessly with the receiver, allowing flexible placement up to 30 meters away.
- App Control: Manage your heating system from anywhere using the Tuya or Smart Life app on your smartphone.
- Voice Control: Compatible with Amazon Alexa and Google Assistant for hands-free temperature adjustments.
- Programmable Schedule: Create custom 7-day schedules with multiple time slots per day to optimize energy efficiency.
- Versatile Mounting: Can be placed on a desk using the included stand or mounted on a wall.
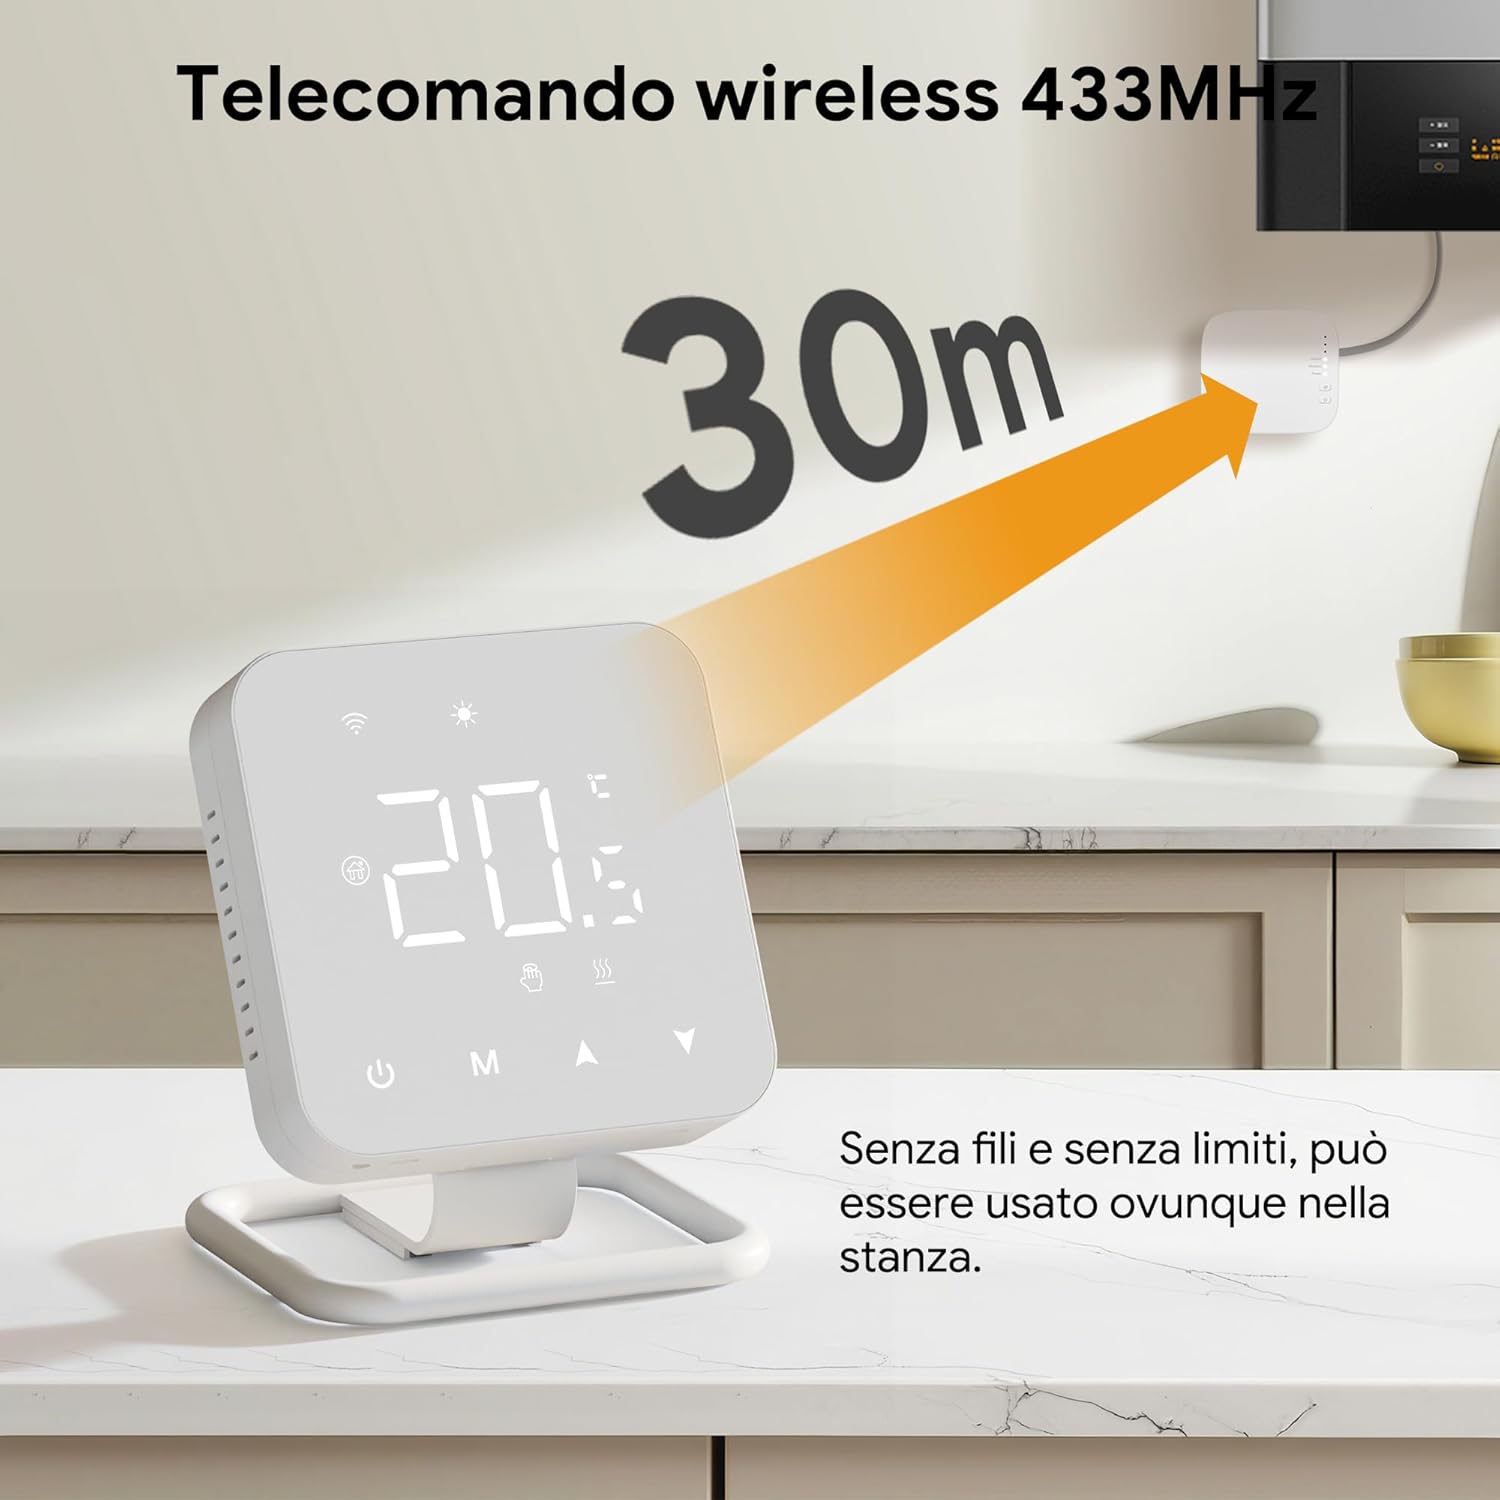
Image: The thermostat demonstrating its 30-meter wireless range to the receiver.

Image: Visual representation of app control, voice control compatibility, and the thermostat's tactile buttons.

Image: Screenshot of the app interface for customizing daily temperature programs.
Setup
1. Powering the Thermostat
The thermostat can be powered by either AAA batteries or a USB-C cable.
- Battery Power: Insert 3 AAA batteries (not included) into the thermostat. The screen will turn off after 5 seconds of inactivity to conserve power. Touch the screen to reactivate.
- USB Power: Connect the provided USB-C cable to the thermostat and a power source. This allows the screen to remain on continuously. You can enable "Auto screen off at 5 seconds" in the app if desired.

Image: Illustration of battery and USB power options for the thermostat.
2. Mounting Options
The thermostat can be mounted in two ways:
- Desk Stand: Attach the thermostat to the included stand bracket for placement on any flat surface.
- Wall Mount: Use the provided screws to secure the thermostat to a wall. Ensure proper wiring if connecting directly to a power source.
3. Receiver Installation and Wiring
The receiver connects to your heating system (boiler, electric actuators, electric valves, pumps, etc.). Most boilers connect to NO and COM terminals. Some may require a connection to COM and NC.

Image: Wiring diagrams for connecting the receiver to a gas boiler and a water heating system.
4. Pairing Thermostat and Receiver
Follow these steps to pair the thermostat with the receiver:
- On the Receiver: Press and hold the pairing button until the wireless indicator light flashes.
- On the Thermostat: Press and hold the 'Down' button until the receiver's wireless indicator light stops flashing and remains solid.
- Confirmation: To confirm connection, activate heating mode and set the thermostat temperature higher than the ambient temperature. If all three indicator lights on the receiver illuminate, the connection is successful.

Image: Visual guide for the pairing process between the thermostat and receiver.
5. Connecting to the App (Tuya/Smart Life)
To control your thermostat remotely, connect it to the Tuya or Smart Life app:
- Activate Wi-Fi Pairing Mode: Press the 'Up' button on the thermostat for 5 seconds until the Wi-Fi icon flashes.
- Open App: Open the Tuya or Smart Life app. The thermostat should appear automatically. If not, tap '+' and then 'Add Device'.
- Connect to 2.4G Wi-Fi: Ensure your phone is connected to a 2.4GHz Wi-Fi network. Enter your Wi-Fi name and password in the app, then tap 'Next'.
- Proximity Pairing: Keep your phone close to the thermostat and wait for the connection to complete.
- Success: Once connected, you can view and modify the thermostat's name in the top right corner of the app.

Image: Visual instructions for connecting the thermostat to the mobile application.
Operating Instructions
Basic Operation
- Power On/Off: Use the power button on the thermostat or the app to turn the system on or off.
- Temperature Adjustment: Use the 'Up' and 'Down' arrows on the thermostat or the app to set your desired temperature.
- Mode Selection: Switch between different operating modes (e.g., manual, automatic, summer) using the 'M' button or the app.
Programming Daily Schedule
Utilize the Tuya or Smart Life app to create a personalized weekly schedule. You can set unique temperature and time settings for each day of the week, with up to 6 programmable time slots per day. This allows you to adapt the heating routine based on whether you are home, sleeping, or away, optimizing energy efficiency.
Voice Control
Integrate your thermostat with Amazon Alexa or Google Assistant for convenient voice control. Simply use commands such as "Alexa, set the thermostat to 21 degrees" or "Hey Google, turn on the heating."
Advanced Features
- Summer Mode: Activate this mode for cooling systems, such as heat pumps, to manage temperature during warmer months.
- Temperature Calibration: Manually adjust the displayed ambient temperature for accuracy.
- Power Outage Memory: The thermostat retains settings in case of a power interruption.
- Anti-freeze Protection: Maintains an ambient temperature of 5°C to prevent freezing.
- Child Safety Lock: Prevents accidental operations by locking the thermostat buttons.
- Multi-User Control: Share device control with family members through the app.

Image: Display of advanced features including temperature calibration, anti-freeze protection, key lock, and multi-user control.
Maintenance
To ensure optimal performance and longevity of your Vaconoff Wireless Smart Thermostat, follow these maintenance guidelines:
- Battery Replacement: If using battery power, replace the 3 AAA batteries when the low battery indicator appears on the display. Ensure correct polarity.
- Cleaning: Gently wipe the thermostat and receiver surfaces with a soft, dry cloth. Do not use abrasive cleaners, solvents, or wet cloths, as these can damage the device.
- Environmental Conditions: Avoid placing the thermostat in direct sunlight, near heat sources, or in areas with high humidity or extreme temperature fluctuations.
Troubleshooting
If you encounter issues with your Vaconoff Wireless Smart Thermostat, refer to the following common problems and solutions:
| Problem | Possible Cause | Solution |
|---|---|---|
| Thermostat not powering on | Dead batteries; USB-C cable not connected or faulty. | Replace AAA batteries; ensure USB-C cable is securely connected to a working power source. |
| No connection between thermostat and receiver | Pairing failed; too far apart; interference. | Repeat the pairing process (Section 3.4); ensure thermostat is within 30m of receiver; check for strong interference sources. |
| App cannot connect to thermostat | Incorrect Wi-Fi password; not on 2.4GHz network; thermostat not in pairing mode. | Verify Wi-Fi password; ensure phone is on a 2.4GHz network; put thermostat into Wi-Fi pairing mode (Section 3.5). |
| Heating system not responding | Receiver wiring issue; boiler fault; thermostat not calling for heat. | Check receiver wiring (Section 3.3); ensure thermostat is set to a temperature above ambient; consult a qualified technician if boiler issues persist. |
| Difficulty integrating with Alexa/Google Assistant | Skill/service not enabled; incorrect device name; network issues. | Ensure the Tuya/Smart Life skill is enabled in your smart assistant app; rename the device to a simple, recognizable name; check network stability. |
| Thermostat display turns off quickly | Normal behavior for battery mode; auto-off setting enabled. | This is normal for battery-powered operation. Touch the screen to reactivate. If using USB power, check the 'Auto screen off' setting in the app. |
Specifications
| Feature | Specification |
|---|---|
| Brand | Vaconoff |
| Product Dimensions (Thermostat) | 8.5 x 8.5 x 2 cm (3.4 x 3.4 x 0.79 inches) |
| Product Dimensions (Receiver) | 9.5 x 8.5 x 2.1 cm (3.7 x 3.3 x 0.83 inches) |
| Item Weight | 330 grams |
| Power Supply (Thermostat) | 3 x AAA Batteries (not included) or USB-C |
| Power Supply (Receiver) | 100-240V AC |
| Wireless Range | Up to 30 meters (433MHz) |
| Controller Type | Google Assistant, Alexa, App (Tuya/Smart Life) |
| Temperature Control Type | Smart/Remote |
| Specific Product Uses | Boiler, Hydronic Systems (electric actuators, valves, pumps) |
| Special Features | Summer mode for cooling systems, Anti-freeze protection, Child safety lock, Power outage memory, Temperature calibration |
Warranty and Support
Vaconoff products are designed for reliability and performance. For information regarding warranty coverage, technical support, or service, please refer to the contact details provided with your purchase documentation or visit the official Vaconoff website. Please retain your proof of purchase for warranty claims.