1. Introduction
The Vaconoff Wireless Smart Boiler Thermostat (Model: BOT-R7X) is designed to provide intelligent and efficient control over your boiler heating system. This device features a wireless thermostat and an RF receiver, allowing for flexible placement and remote management. With daily programming, app control via Tuya or Smart Life, and voice command compatibility with Alexa and Google Assistant, you can optimize your home's heating for comfort and energy savings. This manual will guide you through the setup, operation, and advanced features of your new thermostat.

Image 1.1: Vaconoff Wireless Smart Boiler Thermostat and RF Receiver.
2. Package Contents
Please check the package carefully to ensure all items are present and undamaged. The standard package includes:
- 1x Wireless Thermostat
- 1x RF Receiver
- 1x Wall Mounting Panel
- 1x Thermostat Support Stand
- 1x User Manual (Instructions)
- 1x USB-C Cable (1m)
- 1x Jumper (1m)
- 4x Mounting Screws

Image 2.1: All components included in the Vaconoff Smart Thermostat package.

Image 2.2: Visual representation of package contents with key dimensions.
3. Product Overview
The Vaconoff Smart Thermostat system consists of two main components: the wireless thermostat unit and the RF receiver. The thermostat unit features a clear display and intuitive rotary control, while the receiver handles the connection to your boiler system.
3.1. Key Features
- Daily Programming: Customize heating schedules for each day of the week.
- App Control: Manage your heating system remotely via Tuya or Smart Life app.
- Voice Control: Compatible with Amazon Alexa and Google Assistant.
- Wireless Connectivity: Thermostat communicates with the receiver via RF (up to 30m).
- Temperature Calibration: Fine-tune temperature readings for accuracy.
- Frost Protection: Automatically prevents pipes from freezing.
- Child Lock: Prevents unauthorized changes to settings.
- Power Failure Memory: Retains settings after power interruptions.
- Adjustable Brightness: Control display illumination.

Image 3.1: Visual representation of key features including app control, voice control, heating/cooling, frost protection, key lock, and brightness adjustment.

Image 3.2: Detailed view of the thermostat display, labeling various indicators such as Wi-Fi, battery level, temperature, mode switch, and time.
4. Setup and Installation
4.1. Component Placement and Power
The wireless thermostat can be placed up to 30 meters (approximately 98 feet) from the receiver. Ensure there are no major obstructions that could interfere with the RF signal.
- Thermostat Power: The thermostat can be powered by 3x AAA batteries (not included) or via the included USB-C cable.
- Receiver Power: The receiver requires a 100-240V AC power supply.

Image 4.1: Illustration of thermostat and receiver placement, power options, and wireless range.
4.2. Wiring the Receiver
Important: Wiring should be performed by a qualified electrician. Always turn off the main power supply before attempting any wiring.
The receiver connects directly to your boiler system. Refer to the diagrams below for common wiring configurations. Most boilers are connected to NO (Normally Open) and COM (Common) terminals, while some may require connection to COM and NC (Normally Closed).

Image 4.2: Wiring diagrams for connecting the receiver to a gas boiler, pump, NC actuator, and NO actuator.

Image 4.3: Connection diagrams for gas boiler and water heating systems, showing wiring for the receiver.
4.3. Pairing the Thermostat and Receiver
Follow these steps to establish a wireless connection between your thermostat and receiver:
- Configure the Receiver: Press and hold the pairing button on the receiver until the wireless LED blinks.
- Configure the Thermostat: Press and hold the checkmark button on the thermostat until the receiver's wireless LED stops blinking and remains solid.
- Connection Verification: Activate heating mode on the thermostat and set the temperature above the ambient temperature. If all three lights on the receiver illuminate, the connection is successful.

Image 4.4: Two-step process for connecting the thermostat and receiver, including button presses and LED indicators for successful pairing.
5. Operating Instructions
5.1. Basic Control
The thermostat features an intuitive rotary control for adjustments:
- Adjusting Temperature: First, press the checkmark key, then rotate left or right to set the desired temperature.
- Adjusting Brightness: Simply rotate the dial left or right to adjust the display brightness.
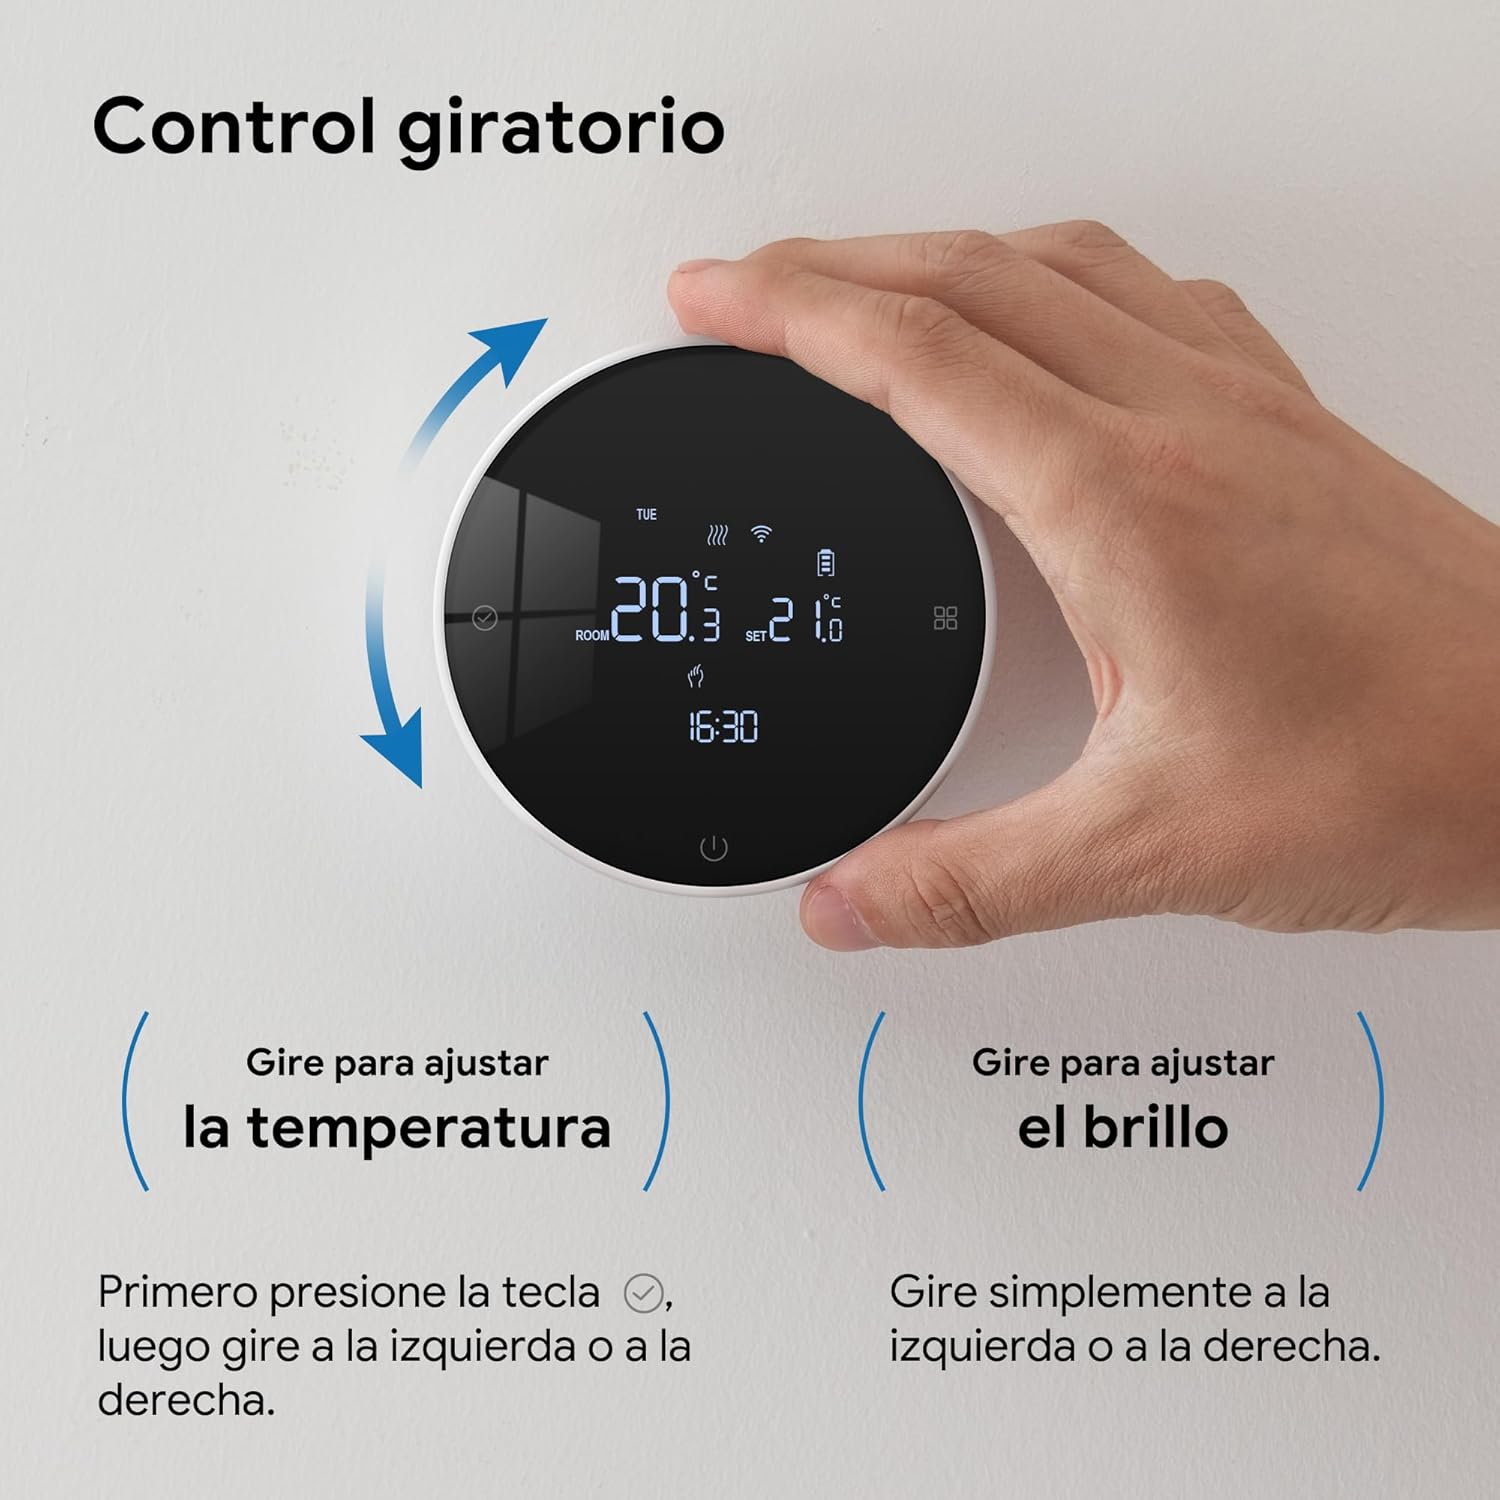
Image 5.1: Hand demonstrating the rotary control for adjusting temperature and brightness on the thermostat.
5.2. Mode Selection
The thermostat supports various operating modes, including heating, cooling (if applicable to your system), manual, and automatic modes. Refer to the display indicators (Image 3.2) for current mode status.
5.3. Child Lock
To prevent accidental changes, activate the child lock feature. Consult the full user manual (included in the package) for specific instructions on enabling and disabling this function.
6. Daily Programming
The Vaconoff Smart Thermostat allows you to create personalized heating schedules for optimal comfort and energy efficiency. You can set up to 6 programmable periods per day.
- Open the Tuya or Smart Life app on your smartphone.
- Navigate to your thermostat device.
- Select the "Program" or "Schedule" option.
- Choose a specific day of the week (e.g., Monday).
- Set desired temperatures and times for up to 6 periods throughout the day.
- You can clone schedules from one day to another to simplify setup.

Image 6.1: App interface showing customizable daily programming with multiple time slots.

Image 6.2: Detailed view of the daily programming interface within the app, showing customizable time slots and temperatures for each day.
7. App Connection and Smart Control
Connect your Vaconoff Smart Thermostat to the Tuya or Smart Life app for remote control and smart home integration.
- Power On Thermostat: When the thermostat is off, press and hold the power button for several seconds until the screen lights up and the Wi-Fi symbol blinks rapidly.
- Open App: Open the Tuya Smart or Smart Life app. The thermostat should appear automatically. If not, tap "+" to "Add Device".
- Enter Wi-Fi Details: Ensure your phone is connected to a 2.4GHz Wi-Fi network. Enter your Wi-Fi network name and password in the app, then tap "Next".
- Pairing: Bring your phone close to the thermostat and wait for the connection process to complete.
- Success: Once connected, verify and rename the thermostat in the app (top right corner).

Image 7.1: Visual guide for connecting the thermostat to the mobile application, including Wi-Fi setup and device renaming.
7.1. Voice Control (Alexa/Google Assistant)
Once connected to the Tuya or Smart Life app, you can link your thermostat to Amazon Alexa or Google Assistant for voice control. Follow the instructions within your Alexa or Google Home app to enable the "Tuya Smart" or "Smart Life" skill/service. You can then use commands such as:
- "Alexa, set [Thermostat Name] to 21 degrees."
- "Hey Google, turn on [Thermostat Name]."
- "Alexa, what is the temperature of [Thermostat Name]?"

Image 7.2: Overview of smart control features, highlighting compatibility with Google Assistant, Alexa, and the Smart Life/Tuya Smart App.
8. Specifications
| Feature | Specification |
|---|---|
| Brand | Vaconoff |
| Model | BOT-R7X |
| Color | White |
| Thermostat Dimensions | Diameter: 90 mm |
| Receiver Dimensions | 86 x 86 x 28 mm |
| Product Weight | 330 g |
| Thermostat Power Source | 3x AAA Batteries (not included) or USB-C |
| Receiver Power Source | 100-240V AC |
| Connectivity Technology | Wi-Fi (2.4GHz), RF (Wireless Thermostat to Receiver) |
| Control Type | App (Tuya/Smart Life), Voice (Alexa/Google Assistant), Manual Rotary Control |
| Special Features | Smart Heating, Daily Programming, Frost Protection, Child Lock, Power Failure Memory, Temperature Calibration |
| Specific Uses | Boiler Control |
9. Troubleshooting
If you encounter issues with your Vaconoff Smart Thermostat, please refer to the following common problems and solutions:
| Problem | Possible Cause | Solution |
|---|---|---|
| Thermostat display is blank or unresponsive. | Low or depleted batteries; no USB power; power issue with receiver. | Replace AAA batteries or connect USB-C power. Ensure receiver is powered (AC 220V). |
| Thermostat not controlling boiler (no heating). | Thermostat and receiver not paired; incorrect wiring; boiler issue. | Re-pair thermostat and receiver (Section 4.3). Check receiver wiring (Section 4.2). Ensure boiler is operational. |
| Wi-Fi connection fails or disconnects frequently. | Incorrect Wi-Fi password; 5GHz Wi-Fi network; weak signal; router issues. | Ensure you are connecting to a 2.4GHz Wi-Fi network. Verify Wi-Fi password. Move thermostat closer to router. Restart router. |
| App control not working. | No Wi-Fi connection; app not linked to thermostat; app permissions. | Check Wi-Fi connection (Section 7). Ensure thermostat is added and online in the app. Check app permissions on your phone. |
| Voice control (Alexa/Google) not responding. | Skill/service not enabled; incorrect device name; Wi-Fi issue. | Ensure "Tuya Smart" or "Smart Life" skill is enabled in your voice assistant app. Verify device name. Check Wi-Fi connection. |
| Thermostat settings are lost (as per review). | Potential power interruption; internal contact issue; software glitch. | Ensure stable power supply to both thermostat and receiver. If using batteries, ensure they are fresh and properly inserted. If the issue persists, contact customer support. |
10. Maintenance
- Cleaning: Wipe the thermostat and receiver with a soft, dry cloth. Do not use abrasive cleaners or solvents.
- Battery Replacement: If using batteries, replace them when the low battery indicator appears on the thermostat display. Ensure correct polarity.
- Software Updates: Keep your Tuya or Smart Life app updated to ensure the best performance and access to new features. Firmware updates for the thermostat may be available through the app.
11. Warranty and Support
Vaconoff products are designed for reliability and performance. For warranty information, please refer to the documentation included in your product package or visit the official Vaconoff website. If you require technical assistance or have questions not covered in this manual, please contact Vaconoff customer support through their official channels or the retailer where you purchased the product.
For additional support and product information, you may visit the Vaconoff Brand Store on Amazon.