1. Product Overview
The frecaer BM08 Cordless Vacuum Cleaner is designed for versatile and efficient cleaning across various surfaces. It features a powerful 550W brushless motor, intelligent auto sensor technology, and a multi-stage filtration system to ensure thorough cleaning and cleaner air. Its lightweight, self-standing design and long-lasting detachable battery provide convenience and extended cleaning time.
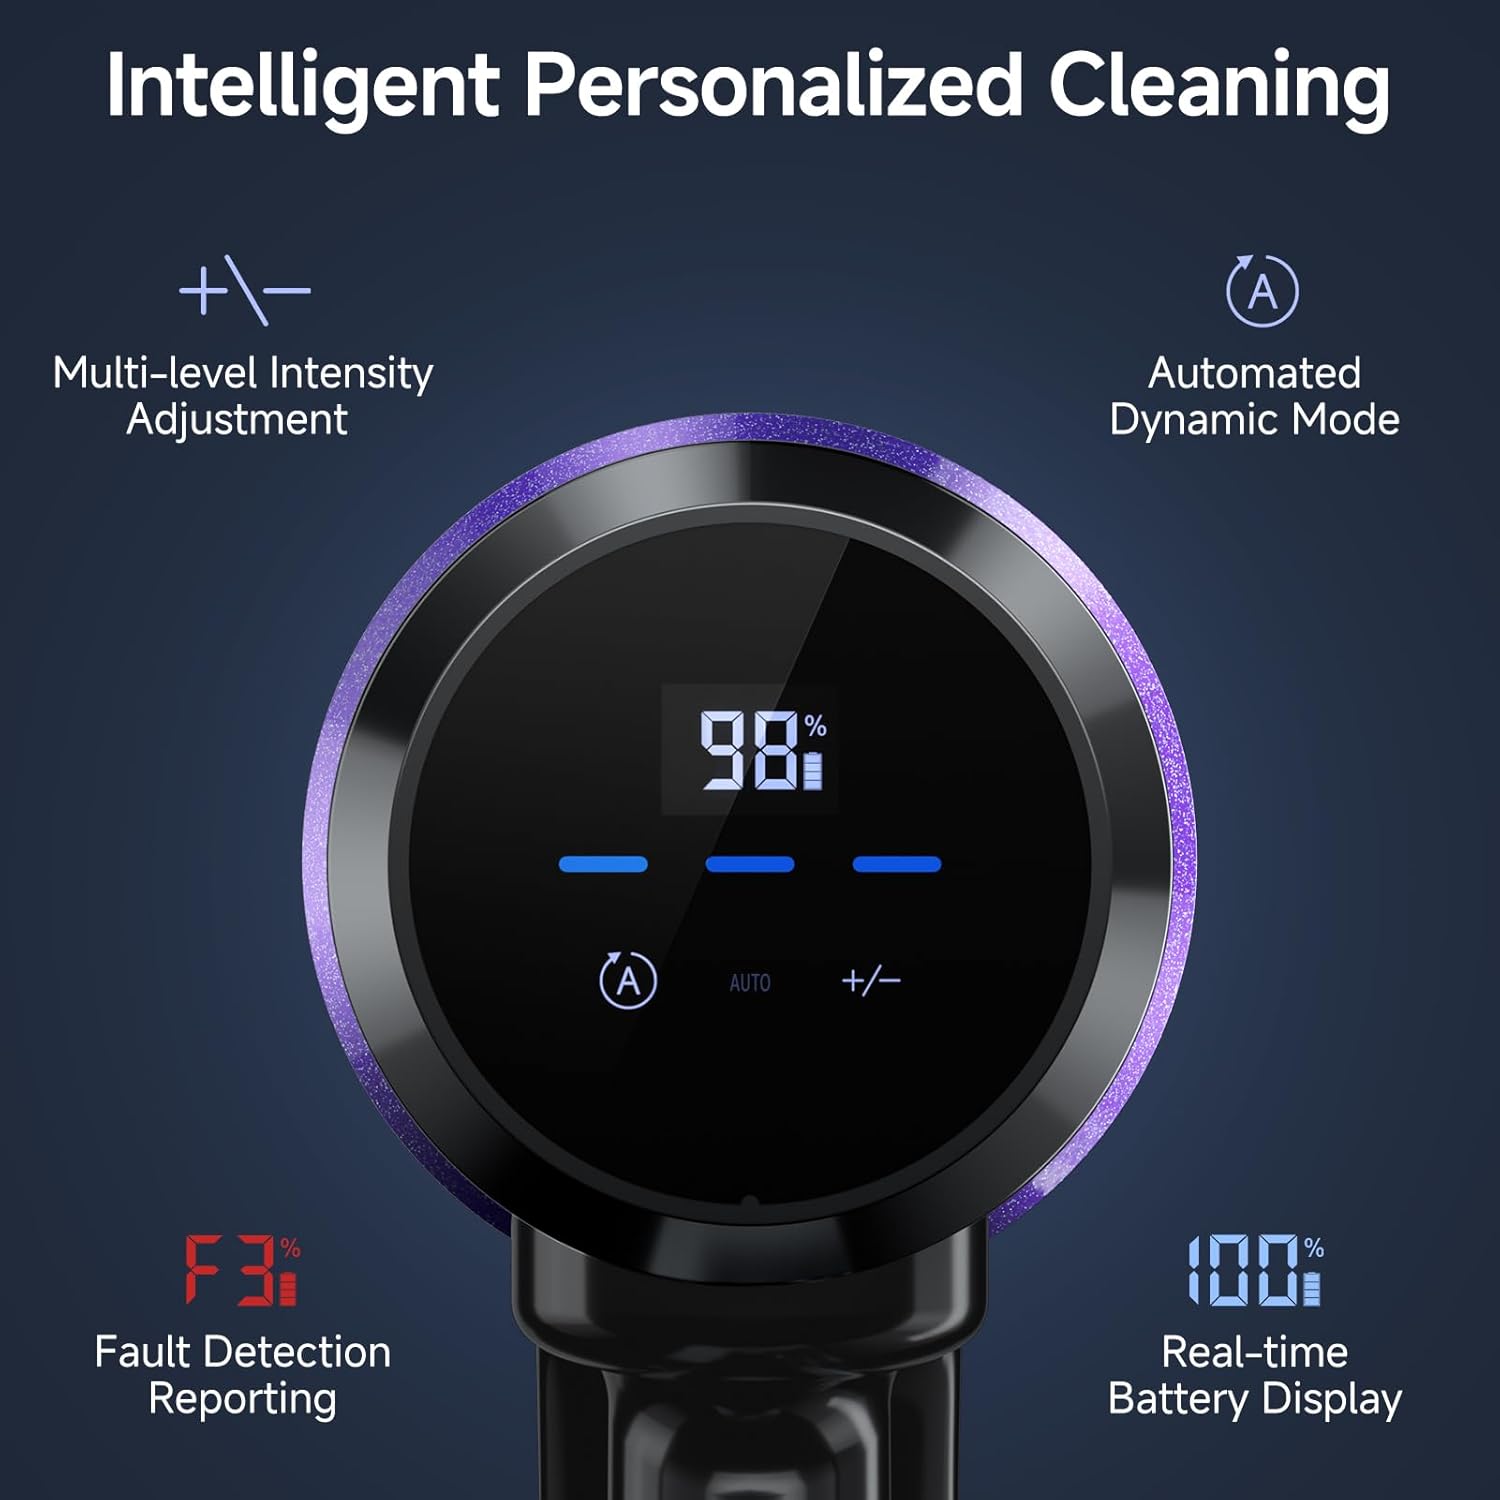
Figure 1: Main unit of the frecaer Cordless Vacuum Cleaner.
2. Safety Instructions
- Read all instructions before using the appliance.
- Do not use outdoors or on wet surfaces.
- Do not allow to be used as a toy. Close attention is necessary when used by or near children.
- Use only as described in this manual. Use only manufacturer's recommended attachments.
- Do not use with damaged cord or plug. If appliance is not working as it should, has been dropped, damaged, left outdoors, or dropped into water, return it to a service center.
- Do not pull or carry by cord, use cord as a handle, close a door on cord, or pull cord around sharp edges or corners. Do not run appliance over cord. Keep cord away from heated surfaces.
- Do not unplug by pulling on cord. To unplug, grasp the plug, not the cord.
- Do not handle plug or appliance with wet hands.
- Do not put any object into openings. Do not use with any opening blocked; keep free of dust, lint, hair, and anything that may reduce air flow.
- Keep hair, loose clothing, fingers, and all parts of body away from openings and moving parts.
- Do not pick up anything that is burning or smoking, such as cigarettes, matches, or hot ashes.
- Do not use to pick up flammable or combustible liquids, such as gasoline, or use in areas where they may be present.
- Do not use without dust cup and/or filters in place.
- Turn off all controls before unplugging.
- Use extra care when cleaning on stairs.
- Store the appliance indoors.
3. Package Contents
Verify that all items are present in the package:

Figure 2: All components included in the frecaer Cordless Vacuum Cleaner package.
- frecaer Cordless Stick Vacuum Cleaner (Main Body)
- Wall Mounting Bracket
- Long Flat brush
- 2-in-1 Brush
- HEPA Filter (x2)
- Sponge Filter
- Battery Charger
- Quick Start Guide
- User Manuals
4. Product Components
The frecaer BM08 vacuum cleaner consists of several key components designed for optimal performance and ease of use:
- Main Body: Houses the 550W brushless motor, dustbin, and control panel.
- Detachable Battery: Provides up to 70 minutes of runtime and can be charged separately.
- Telescopic Rod: Adjustable for different cleaning heights and configurations.
- Power Brush: Features an anti-tangle design and LED lights for effective cleaning on various floor types.
- Dust Cup: 1.5-liter capacity for collecting debris, easily emptied.
- Filtration System: A 6-stage system including HEPA filters to capture fine particles.
- LED Touch Display: Shows battery life, suction mode, and fault detection.
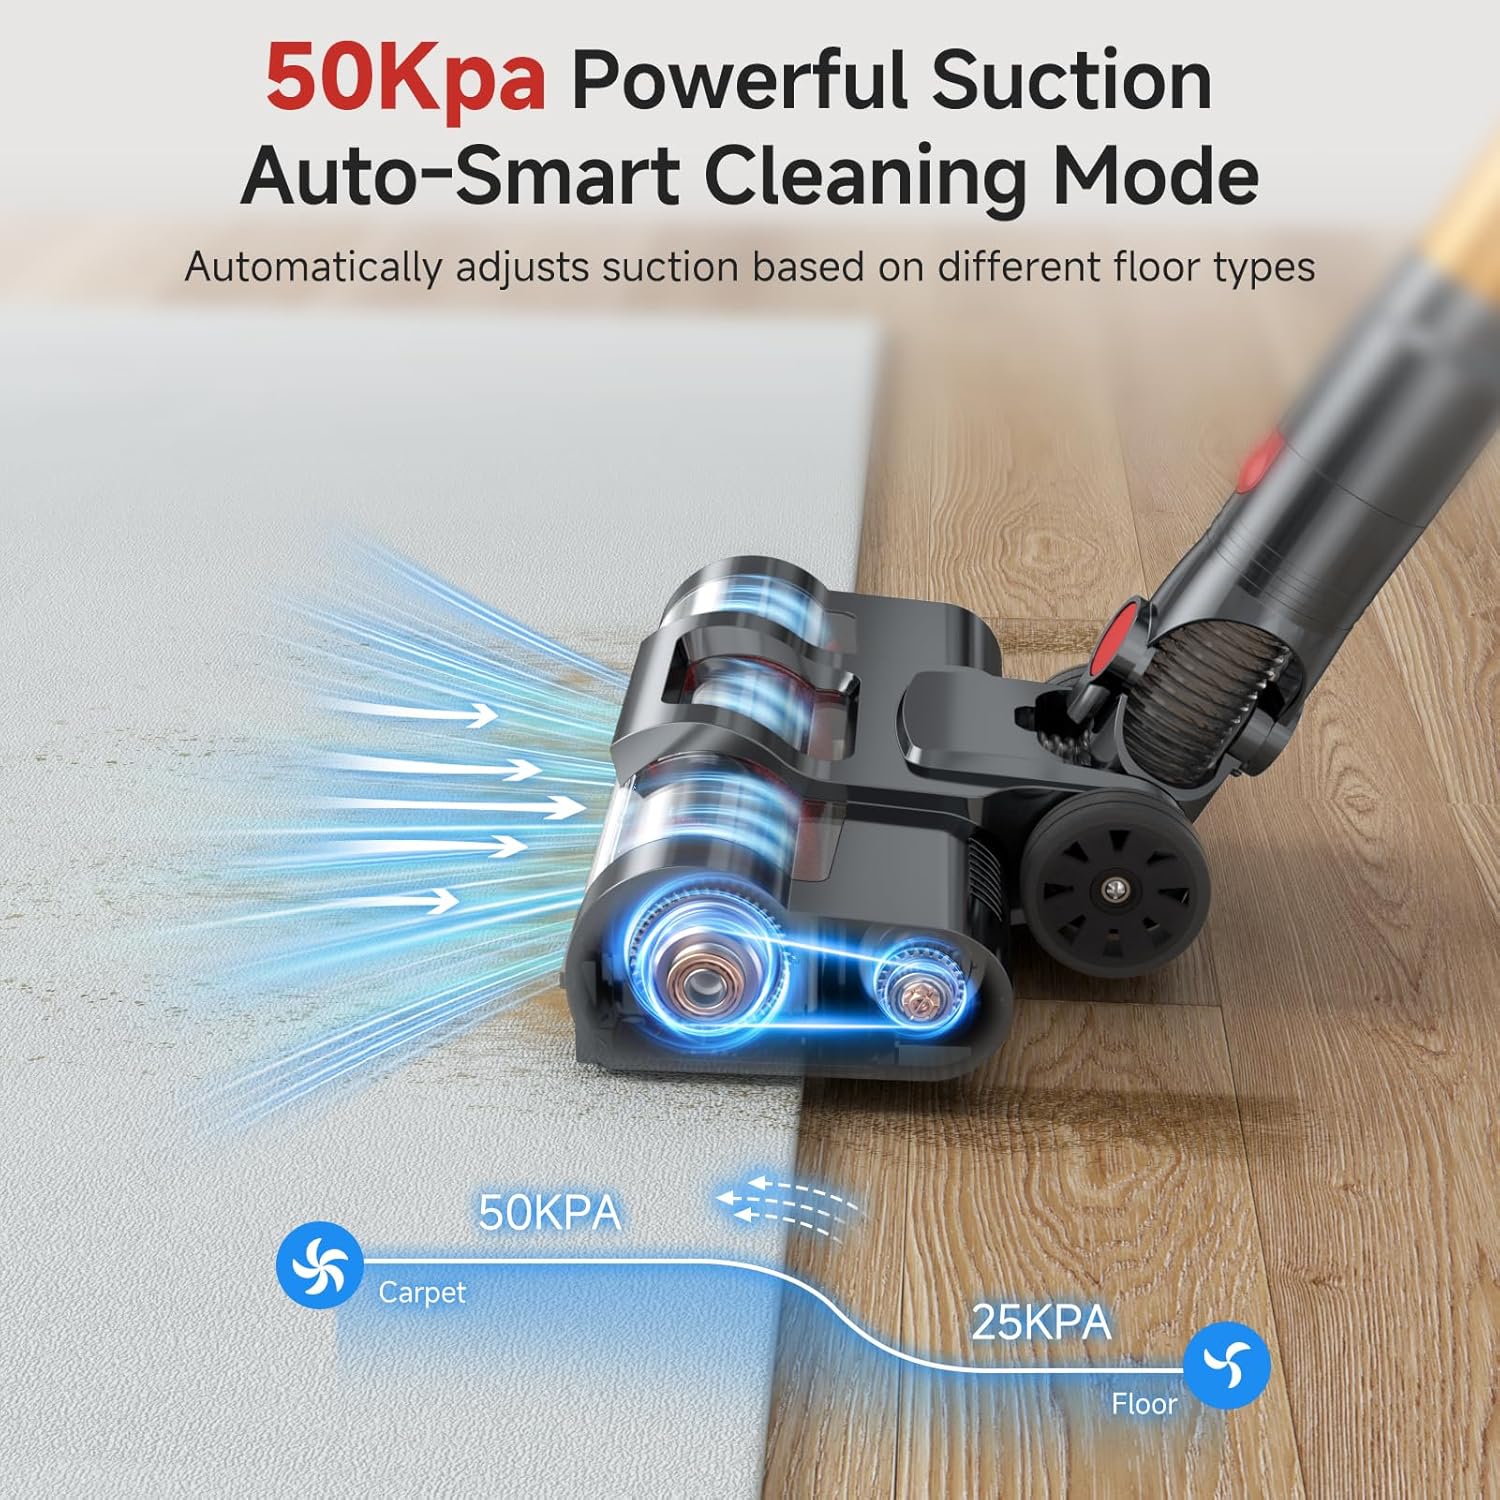
Figure 3: Detailed view of the Ultra Multi-Layer HEPA-Filtered System.
5. Setup
5.1 Assembly
- Attach the telescopic rod to the main body until it clicks into place.
- Connect the power brush head to the other end of the telescopic rod, ensuring a secure fit.
- For handheld use, attach desired accessories (Long Flat brush or 2-in-1 brush) directly to the main body.
5.2 Initial Charging
Before first use, fully charge the detachable battery. The battery can be charged while attached to the vacuum or separately.

Figure 4: Detachable battery and charging methods.
- Connect the battery charger to a power outlet and to the battery.
- The LED touch display will indicate the charging status. A full charge typically takes approximately 4.5 hours.
- The wall mounting bracket can also be used to store and charge the vacuum.
Video 1: Demonstration of the battery life and charging process.
6. Operating Instructions
6.1 Powering On/Off and Suction Modes
To power on the vacuum, press the power button on the handle. The LED touch display will activate. You can cycle through three suction levels (Eco, Standard, Max) or select the Smart Auto Mode using the +/- buttons or the 'AUTO' button on the display.
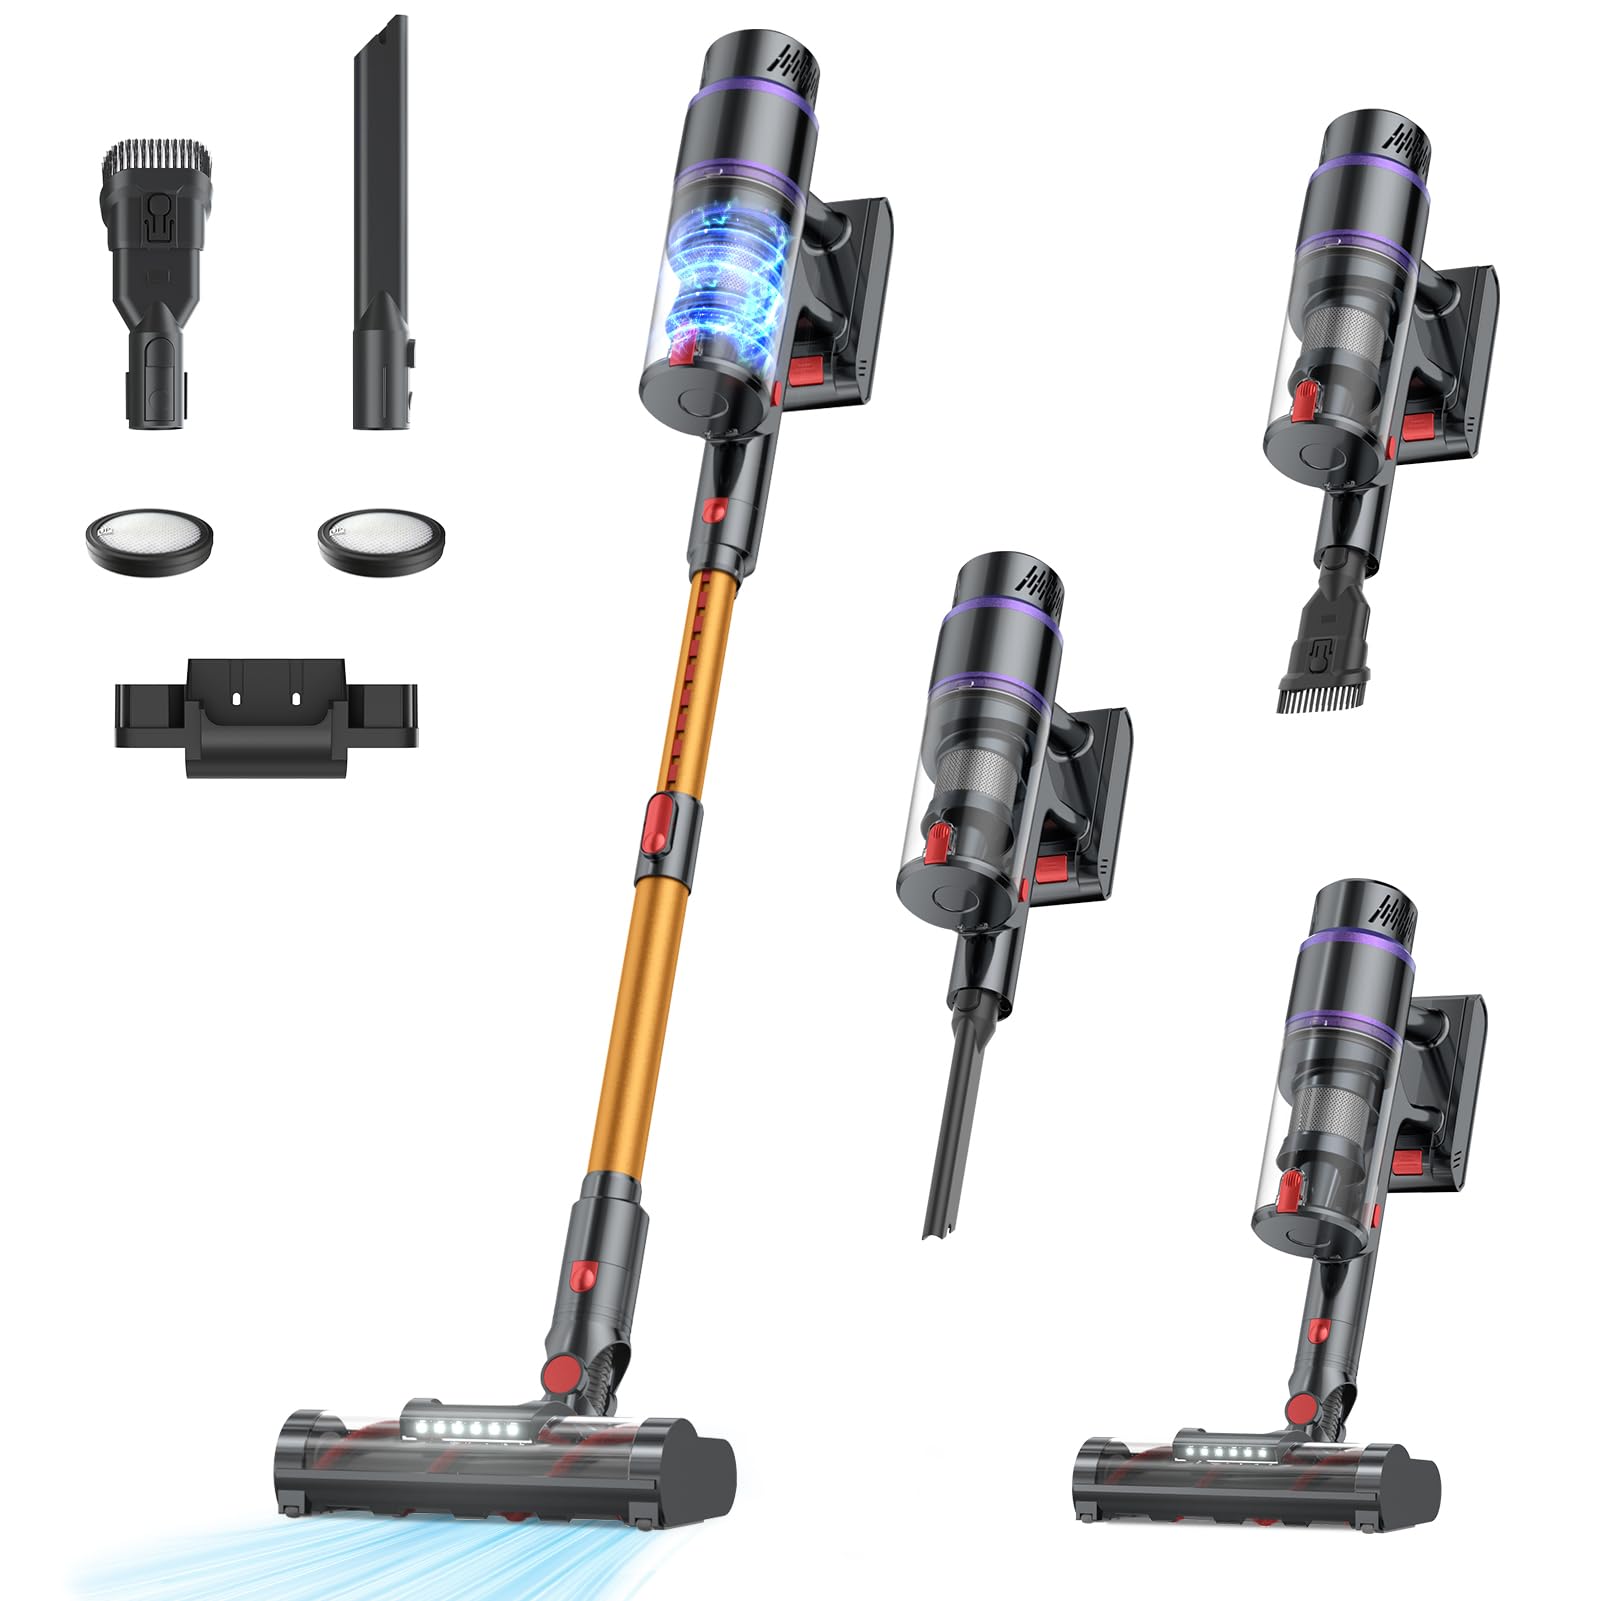
Figure 5: LED Touch Display for controlling suction and monitoring battery.
- Smart Auto Mode: Automatically detects dust levels and adjusts suction power for optimal cleaning and battery conservation.
- Eco Mode: Provides up to 70 minutes of runtime for lighter cleaning tasks.
- Max Mode: Delivers 50KPA suction for deep cleaning on carpets and stubborn debris.
6.2 Using Attachments
The vacuum comes with various attachments for specialized cleaning:

Figure 6: Vacuum in use with different attachments for floors, pet hair, car interiors, and hard-to-reach spots.
- Power Brush: Ideal for all floor types, including hard floors and carpets. The integrated LED lights illuminate dust and debris.
- Long Flat Brush: Perfect for reaching into narrow gaps, corners, and tight spaces.
- 2-in-1 Brush: Combines a brush and a wide nozzle for cleaning upholstery, curtains, and delicate surfaces.
6.3 Self-Standing Feature
The vacuum is designed to stand upright on its own, allowing you to pause cleaning anytime without needing to lean it against a wall or lay it down.

Figure 7: The self-standing design for convenient pausing and storage.
Video 2: Comprehensive overview of the vacuum's features and ease of use.
7. Maintenance
7.1 Emptying the Dustbin
The 1.5-liter dustbin should be emptied regularly to maintain optimal suction power. Press the release button on the dustbin to detach it from the main body, then open the bottom flap to dispose of collected debris.
7.2 Cleaning Filters
The 6-stage filtration system includes washable HEPA and sponge filters. Regular cleaning is essential for maintaining filtration efficiency and preventing clogs.

Figure 8: Washable and reusable filters.
- Twist and pull to remove the filter assembly from the dustbin.
- Separate the HEPA filter and sponge filter.
- Rinse both filters under cold running water until the water runs clear.
- Allow filters to air dry completely for at least 24 hours before reassembling and placing back into the vacuum. Do not use the vacuum with wet filters.
7.3 Cleaning the Brush Roll
The anti-tangle brush roll minimizes hair wrap, but occasional cleaning may be necessary.

Figure 9: Upgraded anti-tangle brush roll.
- Turn off the vacuum and detach the power brush head.
- Locate the release tab on the side of the brush head and open it to remove the brush roll.
- Remove any tangled hair or debris from the brush roll using scissors or a cleaning tool.
- Reinsert the clean brush roll and secure the release tab.
8. Troubleshooting
| Problem | Possible Cause | Solution |
|---|---|---|
| Vacuum does not turn on | Battery is not charged or not properly installed. | Ensure battery is fully charged and correctly inserted. |
| Low suction power | Dustbin is full, filters are clogged, or brush roll is tangled. | Empty dustbin, clean filters, remove tangles from brush roll. |
| Brush roll not spinning | Obstruction in the brush roll or brush head. | Turn off vacuum, remove brush roll, clear any obstructions. |
| LED display shows error code (e.g., F3) | Indicates a specific fault or blockage. | Refer to the detailed troubleshooting section in the full user manual for specific error code meanings and solutions. Generally, check for blockages in the air path, dustbin, or brush head. |
9. Specifications
| Feature | Detail |
|---|---|
| Brand | frecaer |
| Model Name | BM08 |
| Wattage | 550 watts |
| Suction Power | Up to 50Kpa |
| Runtime | Up to 70 minutes (Eco Mode) |
| Battery Type | Lithium-Ion (1 C battery included) |
| Charging Time | Approx. 4.5 hours |
| Dustbin Capacity | 1.5 Liters |
| Filter Type | HEPA Filter (6-stage filtration) |
| Noise Level | 68 Decibels |
| Product Dimensions | 17.3"L x 9.4"W x 7.7"H |
| Item Weight | 6 pounds |
| Special Features | Smart Auto Sensor, LED Touch Screen, Self-standing design, V-shaped anti-tangle brush, Wall-mounted charging |
10. Warranty and Support
The frecaer Cordless Vacuum Cleaner comes with a 2-year warranty. For any questions, technical assistance, or warranty claims, please contact our professional technical support team. Our team is available to assist you within 24 hours.
Video 3: Detailed review highlighting the vacuum's technology and ease of use.


