1. Introduction
Thank you for choosing the Generic Stainless Steel Kitchen Sink with Dual Waterfalls. This product is designed to enhance your kitchen experience with its durable construction and versatile features. This manual provides essential information for the safe installation, operation, and maintenance of your new sink system. Please read these instructions carefully before installation and use, and retain them for future reference.
2. Safety Instructions
- Always ensure that water supply is turned off before beginning any installation or maintenance work.
- If you are unsure about any part of the installation process, it is recommended to consult a qualified plumber.
- Do not use abrasive cleaners or harsh chemicals on the sink surface, as this may damage the finish.
- Ensure all connections are watertight to prevent leaks and water damage.
- Keep small children away from the installation area and during operation to prevent accidents.
3. Package Contents
Verify that all components listed below are present and undamaged before proceeding with installation.
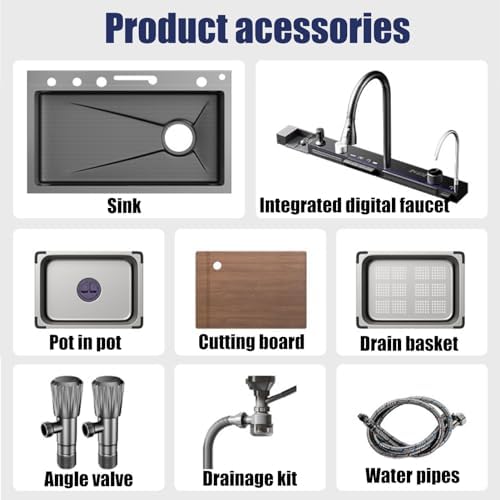
Figure 3.1: Included Product Accessories
- Stainless Steel Sink (1 unit)
- Integrated Digital Faucet (1 unit)
- Drainage Set (1 set)
- Pot-in-Pot (1 unit)
- Cutting Board (1 unit)
- Drain Basket (1 unit)
- Angle Valves (2 units)
- Drainage Kit (1 set)
- Water Pipes (2 units)
4. Setup and Installation
Professional installation is recommended for optimal performance and to ensure proper sealing and plumbing connections.
4.1. Pre-Installation Checks
- Ensure your countertop opening matches the sink dimensions. Refer to Figure 4.1 for precise measurements.
- Confirm that all necessary plumbing connections (hot and cold water lines, drain) are accessible.
- Gather all tools required for installation (e.g., sealant, wrench, screwdriver).

Figure 4.1: Sink Dimensions (Model 85x46CM)
4.2. Installation Steps
- Prepare Countertop: Ensure the countertop opening is clean and smooth. Apply a bead of silicone sealant around the edge of the opening to create a watertight seal.
- Install Sink: Carefully lower the sink into the countertop opening. Press down firmly to ensure good contact with the sealant. Secure the sink using the provided mounting clips from underneath the countertop.
- Connect Drainage: Attach the drainage kit components to the sink's drain opening. Connect the P-trap and waste pipe to your household drainage system. Ensure all connections are tightened securely to prevent leaks.
- Install Faucet and Water Lines: Mount the integrated digital faucet into its designated opening on the sink. Connect the hot and cold water supply lines from the faucet to your angle valves. Use the provided water pipes and ensure all connections are hand-tightened, then gently snugged with a wrench.
- Install Accessories: Place the soap dispenser, cutting board, pot-in-pot, and drain basket into their respective positions on or within the sink.
- Test for Leaks: Turn on the main water supply slowly and check all connections for any signs of leaks. Address any leaks immediately by tightening connections or reapplying sealant if necessary.
5. Operating Instructions
Your sink system features multiple water outlets and integrated accessories for versatile use.

Figure 5.1: Sink Components Overview
5.1. Water Outlet Modes
The integrated digital faucet offers various water modes, controlled by the piano keys on the sink panel.
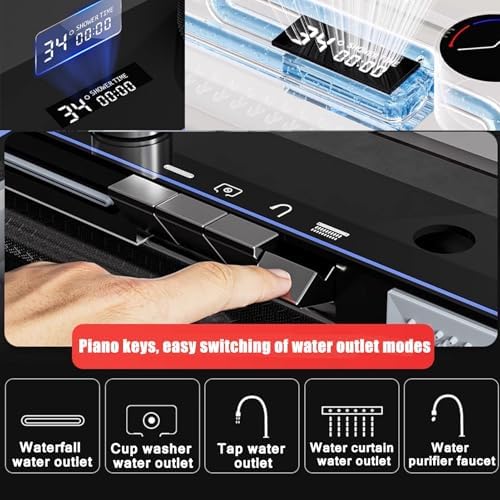
Figure 5.2: Piano Key Controls for Water Modes
- Waterfall Water Outlet: Provides a wide, gentle flow suitable for washing vegetables, fruits, and large items.
- Cup Washer Water Outlet: A high-pressure jet designed for quick rinsing of cups and glasses.
- Tap Water Outlet: The standard faucet flow for general washing and filling.
- Water Curtain Water Outlet: Creates a broad sheet of water, ideal for rinsing and cleaning the sink basin.
- Water Purifier Faucet: Delivers filtered water for drinking or cooking (requires connection to a water purification system, not included).

Figure 5.3: Detailed Water Functions
5.2. Digital Display
The integrated digital display provides real-time information, such as water temperature or usage time, depending on the model and selected function.
5.3. Pull-Out Faucet
The pull-out faucet offers extended reach and flexibility, allowing you to direct water precisely where needed. It typically features multiple spray patterns (e.g., shower, stream) for different tasks.
5.4. Integrated Accessories
- Cutting Board: A convenient surface for food preparation directly over the sink.
- Basin-in-Basin / Pot-in-Pot: A smaller basin insert for soaking or washing smaller items separately.
- Drain Basket: Ideal for draining washed produce or utensils.
- Soap Dispenser: Refillable dispenser for liquid soap or detergent.
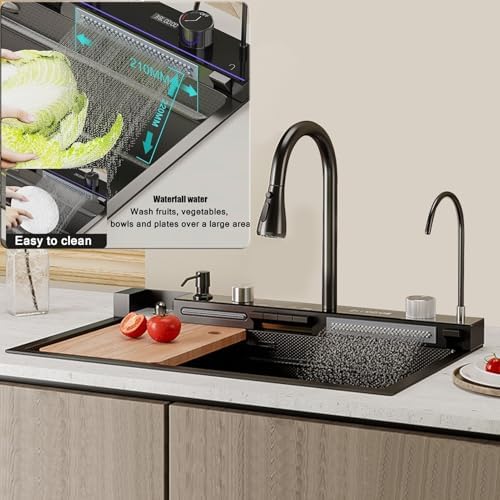
Figure 5.4: Sink in Operation with Waterfall Feature
6. Maintenance
Regular cleaning and maintenance will ensure the longevity and optimal performance of your sink.
6.1. Daily Cleaning
- After each use, rinse the sink thoroughly with water to remove food particles and soap residue.
- Wipe the sink surface with a soft cloth or sponge and mild dish soap.
- For the nano-brushed finish, wipe in the direction of the grain to maintain its appearance.
6.2. Deep Cleaning
- For stubborn stains, use a non-abrasive stainless steel cleaner and a soft cloth. Follow the product instructions.
- Avoid using steel wool, abrasive pads, or harsh chemicals (e.g., bleach, ammonia-based cleaners) as they can scratch or corrode the stainless steel.
- Periodically clean the drain basket and drainage components to prevent blockages and odors.
6.3. Noise Reduction
The sink features an ultra-quiet design with rubber pads and a bottom slope for efficient drainage, reducing noise during use.
7. Troubleshooting
If you encounter any issues, refer to the following common troubleshooting steps. If the problem persists, contact customer support.
- Low Water Pressure: Check if the angle valves are fully open. Inspect the faucet aerator for clogs and clean if necessary. Ensure main water supply pressure is adequate.
- Leaks Around Connections: Turn off water supply. Inspect all plumbing connections for tightness. If necessary, disassemble, reapply plumber's tape or sealant, and reassemble.
- Slow Drainage: Remove the drain basket and check for food debris or blockages. If the blockage is further down, a plumbing snake or drain cleaner may be required.
- Digital Display Not Working: Check if the power supply to the digital display (if battery-operated, check batteries) is functional. Ensure all connections are secure.
8. Specifications
| Manufacturer | Generic |
| Model Number | 85x46CM |
| Item Weight | 2.2 pounds |
| Package Dimensions | 3.15 x 3.15 x 3.15 inches |
| Size (Overall Sink) | 85x46CM |
| Color | Black Gray |
| Batteries Required? | No |
| ASIN | B0FX3NQJXH |
| Date First Available | October 21, 2025 |
9. Warranty and Support
This product comes with a standard manufacturer's warranty. For specific warranty details, please refer to the documentation provided at the time of purchase or contact your retailer. For technical support or assistance with parts, please contact the Generic customer service department through your purchase platform.