1. Introduction
This manual provides essential information for the safe and effective operation, maintenance, and troubleshooting of your FOTING 4200 PSI Pressure Power Washer. Please read all instructions carefully before use and retain this manual for future reference.
The FOTING 4200 PSI Pressure Power Washer is designed for various cleaning tasks, delivering up to 4200 PSI water pressure at 2.8 GPM water flow. It is suitable for cleaning decks, terraces, driveways, siding, sheds, cars, and other outdoor equipment.
2. Safety Information
General Safety Warnings:
- Always wear appropriate personal protective equipment, including safety glasses, gloves, and hearing protection, when operating the pressure washer.
- Never point the spray gun at people, pets, or electrical devices. The high-pressure spray can cause serious injury.
- Ensure all connections are secure before starting the unit to prevent leaks and potential hazards.
- Do not operate the pressure washer in an enclosed space due to potential exhaust fumes (if applicable to electric models, though this is electric, it's a general warning).
- Keep children and bystanders away from the operating area.
- Always disconnect the power supply before performing any maintenance or cleaning.
- The Total Stop System (TSS) automatically shuts off the pump when the trigger is not engaged, saving energy and prolonging pump life.
Safety Lock Feature:
The spray gun is equipped with a safety lock to prevent accidental activation. Always engage the safety lock when the pressure washer is not in use or when changing nozzles.
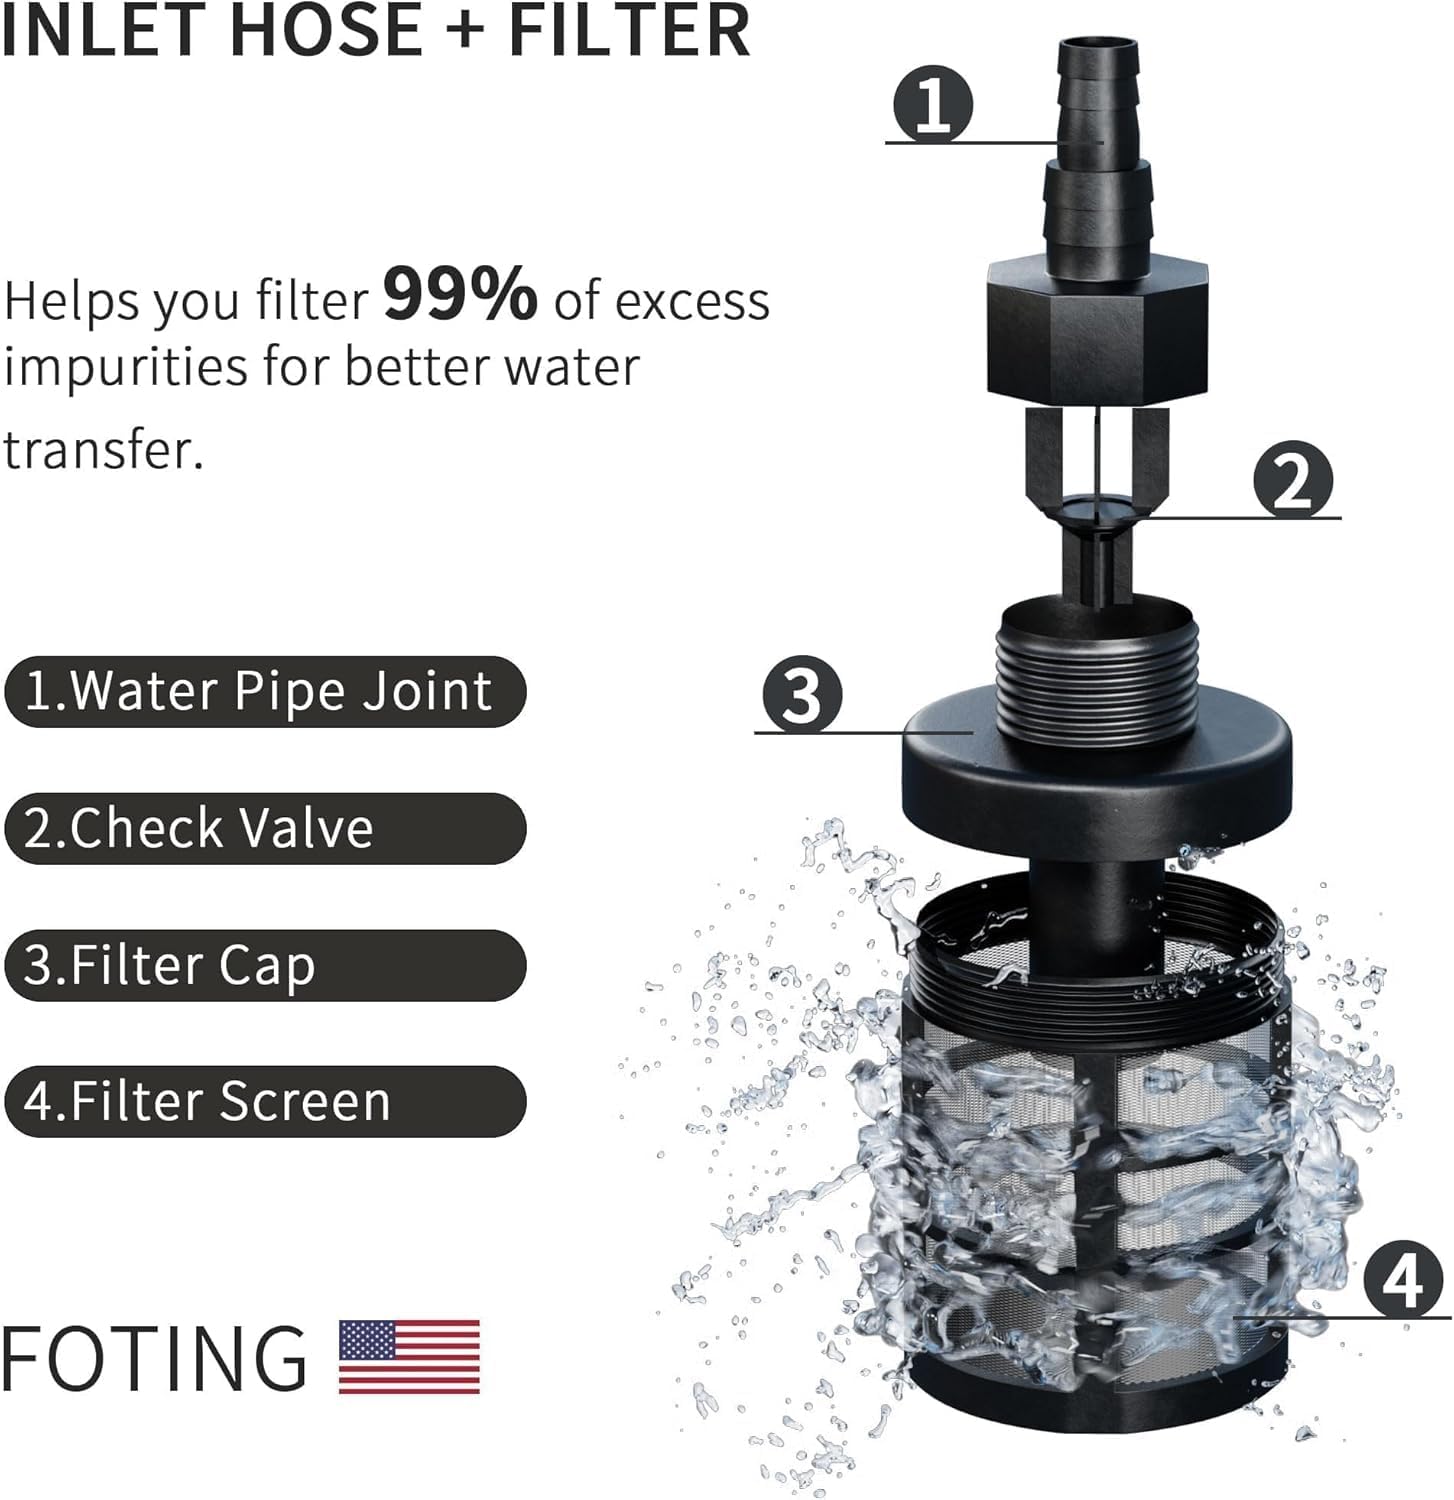
Figure 2.1: Safety Lock and other operational precautions.
3. Package Contents
Verify that all components are present before assembly and operation:
- FOTING Pressure Power Washer Unit
- Spray Gun
- High-Pressure Hose (23 FT)
- Power Cord (35 FT)
- 4 Quick-Connect Nozzles (0°, 15°, 25°, 40°)
- Inlet Hose
- Water Filter Assembly
- Foam Cannon (Detergent Bottle)
- Nozzle Cleaning Pin
- Instruction Manual

Figure 3.1: All components included with the FOTING Pressure Power Washer.
4. Setup Instructions
Follow these steps to assemble your pressure washer:
- Mounting Handle: Secure the handle to the main unit using the provided swivel screw.
- Mounting Bracket: Attach any necessary mounting brackets for accessories to the main unit.
- Connecting Nozzle: Insert the desired quick-connect nozzle into the spray gun wand until it clicks securely into place.
- Install Water Outlet Pipe: Connect the high-pressure hose to the water outlet on the pressure washer unit. Ensure it is tightened along the thread to prevent leaks.
- Install Water Inlet Pipe: Connect the inlet hose to the water inlet on the pressure washer. Attach the water filter assembly to the inlet hose and then connect it to your water source (e.g., garden hose).
- Rotary Switch: Ensure the rotary switch is in the 'OFF' position before connecting to power.

Figure 4.1: Assembly steps for the FOTING Pressure Power Washer.
Water Filter Assembly:
The included water filter helps remove impurities from the water supply, protecting the pump. Ensure the water pipe joint, check valve, filter cap, and filter screen are correctly assembled and clean before use.
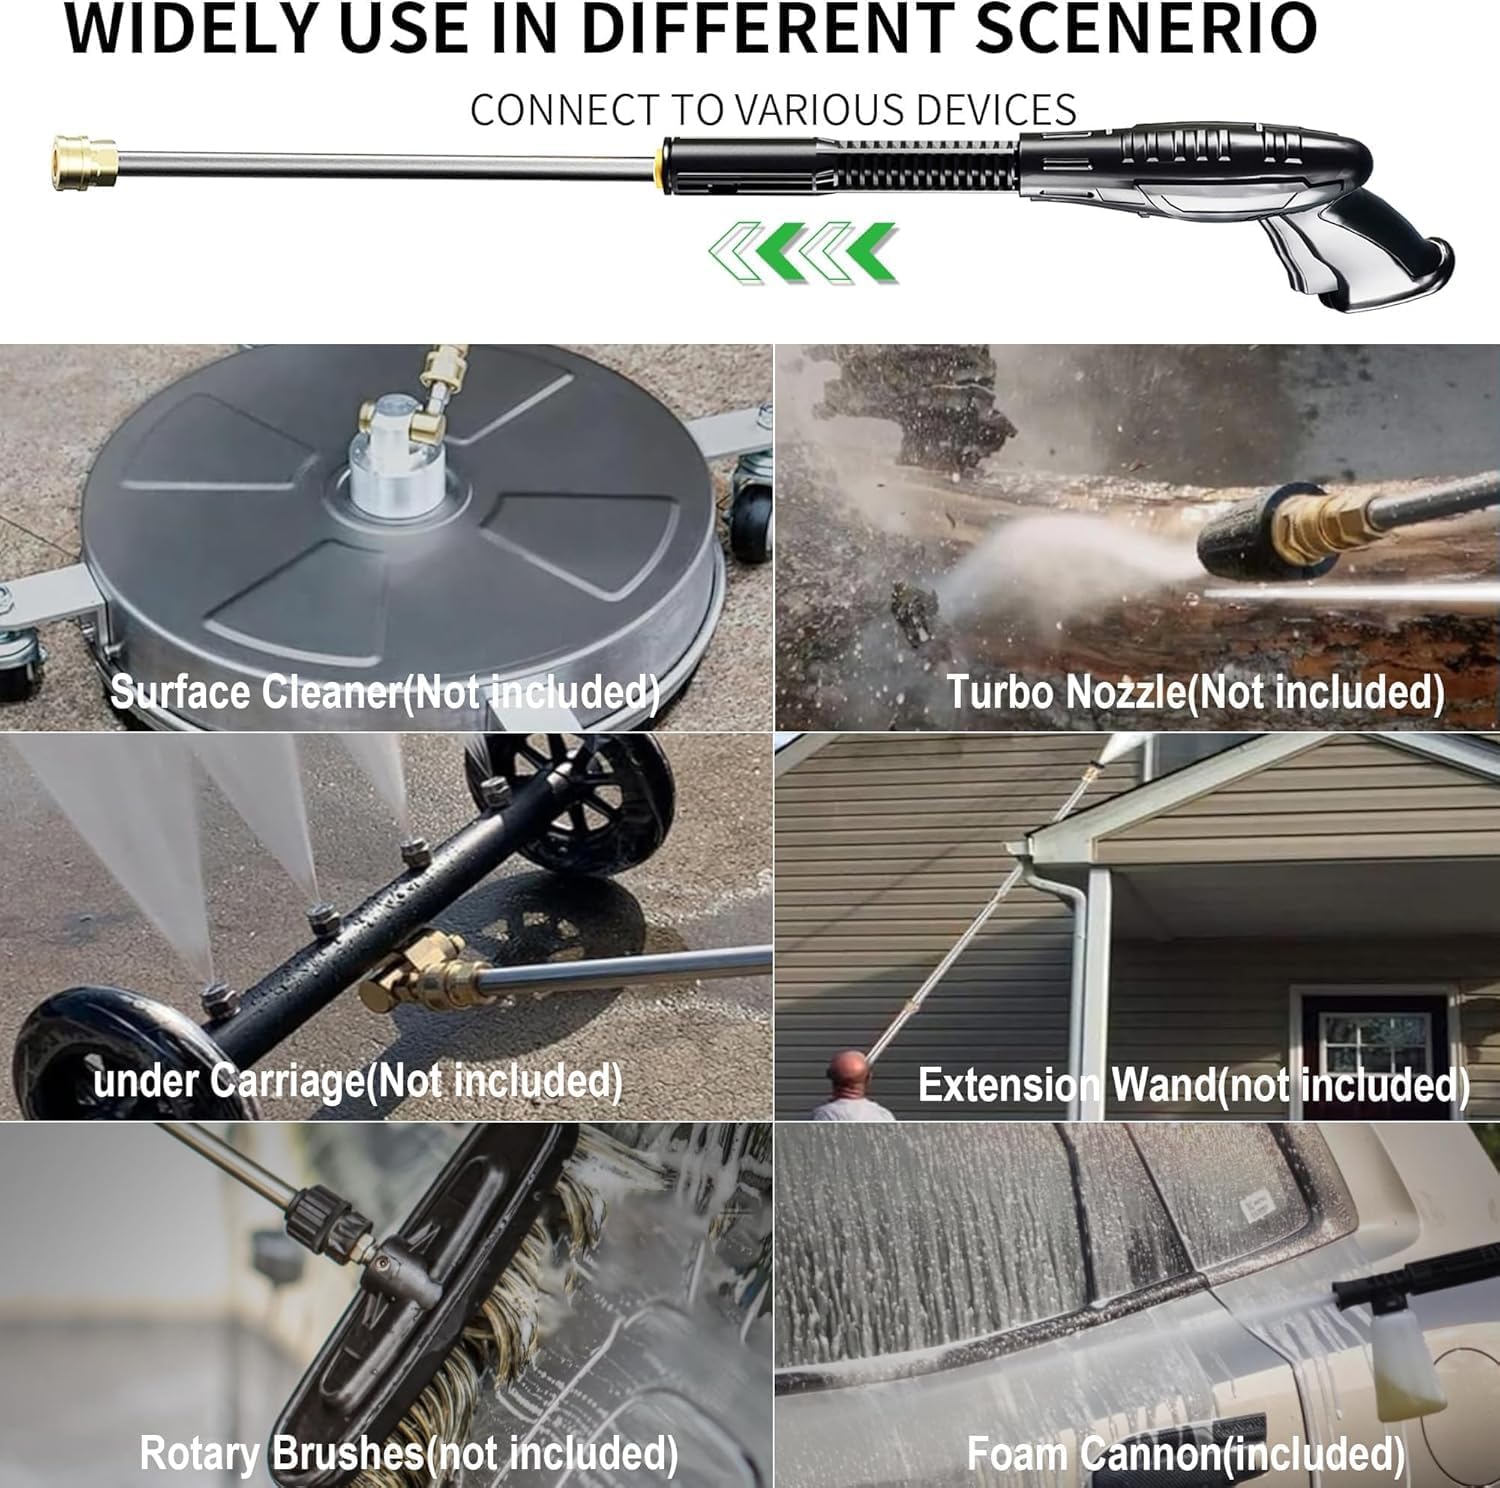
Figure 4.2: Inlet hose and filter components.
5. Operating Instructions
5.1 Initial Start-up:
- Connect the pressure washer to a grounded power outlet.
- Turn on the water supply completely.
- Squeeze the trigger on the spray gun to purge air from the system until a steady stream of water emerges.
- Turn the rotary switch to the 'ON' position. The motor will start.
5.2 Nozzle Selection:
The pressure washer comes with 4 quick-connect nozzles, each designed for specific cleaning tasks:
- 0° (Red): For stubborn stains and hard-to-reach areas. Delivers a concentrated, powerful stream. Use with caution.
- 15° (Yellow): For mud and sand stains. Provides a powerful, narrow spray for intensive cleaning.
- 25° (Green): A versatile angle suitable for general cleaning of fences, wood decks, and painted surfaces.
- 40° (White): For sensitive materials and wider coverage, such as windows and vehicles.

Figure 5.1: Quick-connect nozzle spray patterns.
5.3 Using the Foam Cannon:
The foam cannon allows for the application of detergent. Fill the detergent bottle with appropriate pressure washer soap, attach it to the spray gun, and spray evenly over the surface to be cleaned. Allow the foam to dwell before rinsing with a suitable nozzle.
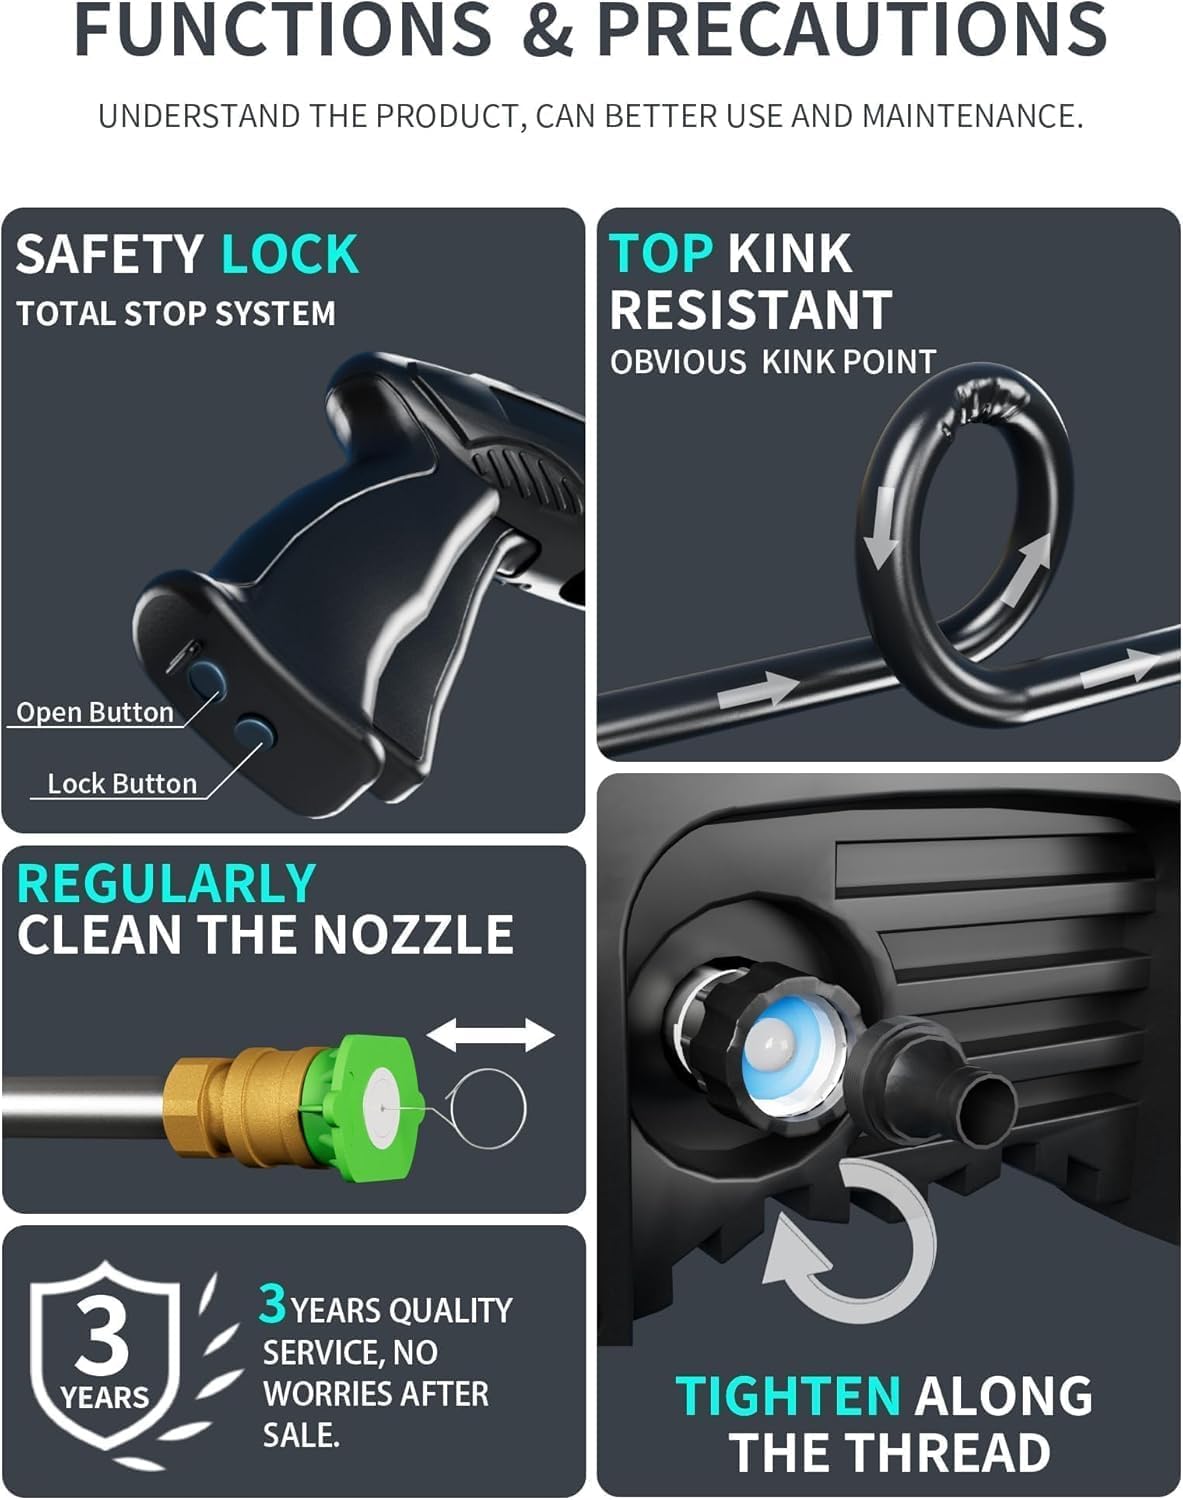
Figure 5.2: Foam cannon in operation.
5.4 Cleaning Applications:
The FOTING Pressure Power Washer is suitable for a variety of cleaning tasks. Always test on an inconspicuous area first to ensure compatibility with the surface and to select the correct nozzle and pressure.

Figure 5.3: Diverse cleaning applications.
5.5 Product Demonstration Video:
Video 5.1: Official product video demonstrating the FOTING Pressure Power Washer in use, highlighting its features and cleaning capabilities.
6. Maintenance
Regular maintenance ensures optimal performance and extends the life of your pressure washer.
- Clean Nozzles: Regularly inspect and clean the nozzles to prevent blockages. Use the provided nozzle cleaning pin to clear any debris.
- Check Water Filter: Periodically clean the water filter screen to ensure unrestricted water flow and protect the pump from impurities.
- Hose Inspection: Check the high-pressure hose for any kinks, cuts, or damage before each use. Replace if damaged.
- Storage: Store the pressure washer in a dry, frost-free environment. Drain all water from the pump and hoses before storing to prevent freezing damage. Utilize the integrated accessory storage for tidy organization.

Figure 6.1: Portable storage and safety features.
7. Troubleshooting
Refer to this section for common issues and their solutions.
| Problem | Possible Cause | Solution |
|---|---|---|
| Unit does not start | No power supply; Power switch off; Safety lock engaged; Water supply off. | Check power connection; Turn power switch ON; Disengage safety lock; Turn on water supply. |
| Low pressure | Insufficient water supply; Clogged nozzle; Air in pump; Kinked hose. | Ensure full water supply; Clean nozzle; Purge air from system (squeeze trigger without power); Straighten hose. |
| Water leaks from connections | Loose connections; Damaged O-rings. | Tighten all connections securely; Inspect and replace damaged O-rings. |
| Motor stops frequently (TSS) | Normal operation of Total Stop System (TSS); Overheating. | This is normal when the trigger is not engaged. If stopping during continuous use, allow unit to cool down. |
8. Specifications
- Brand: FOTING
- Model Number: CBK-KLC-T1-GN010
- Maximum Pressure: 4200 PSI
- Water Flow: 2.8 GPM
- Power Source: AC Electric
- Product Dimensions: 8 x 15 x 27 inches
- Hose Length: 23 Feet
- Power Cord Length: 35 Feet
- Color: Green
9. Warranty and Support
FOTING offers a 3-year quality service for this product, ensuring support and peace of mind after purchase.
For technical assistance, troubleshooting beyond this manual, or warranty claims, please contact the seller, CBK-Kelier, through your purchase platform or their official support channels. Please have your model number (CBK-KLC-T1-GN010) and purchase details ready when contacting support.
Optional protection plans are available for extended coverage. Please refer to your purchase details for more information on these plans.


