1. Introduction
This manual provides essential instructions for the safe and effective use of your HiTauing Aquarium Heater AP05 series. Please read this manual thoroughly before installation and operation, and retain it for future reference. This heater is designed to maintain a stable water temperature in freshwater and saltwater aquariums.
2. Safety Information
- Always ensure the heater is fully submerged in water before connecting it to a power source. Operating the heater out of water will cause damage and poses a fire hazard.
- The power plug should be positioned higher than the feeding container to prevent water from dripping along the cord and reaching the electrical outlet (drip loop).
- Before performing any maintenance, water changes, or removing the heater from the aquarium, unplug the power cord and allow the heater to cool for at least 15 minutes. The glass tube can be very hot.
- Do not touch the glass tube with bare hands immediately after unplugging or during operation.
- Inspect the heater and power cord regularly for any signs of damage. Do not use if damaged.
- This appliance is not intended for use by persons (including children) with reduced physical, sensory or mental capabilities, or lack of experience and knowledge, unless they have been given supervision or instruction concerning use of the appliance by a person responsible for their safety.
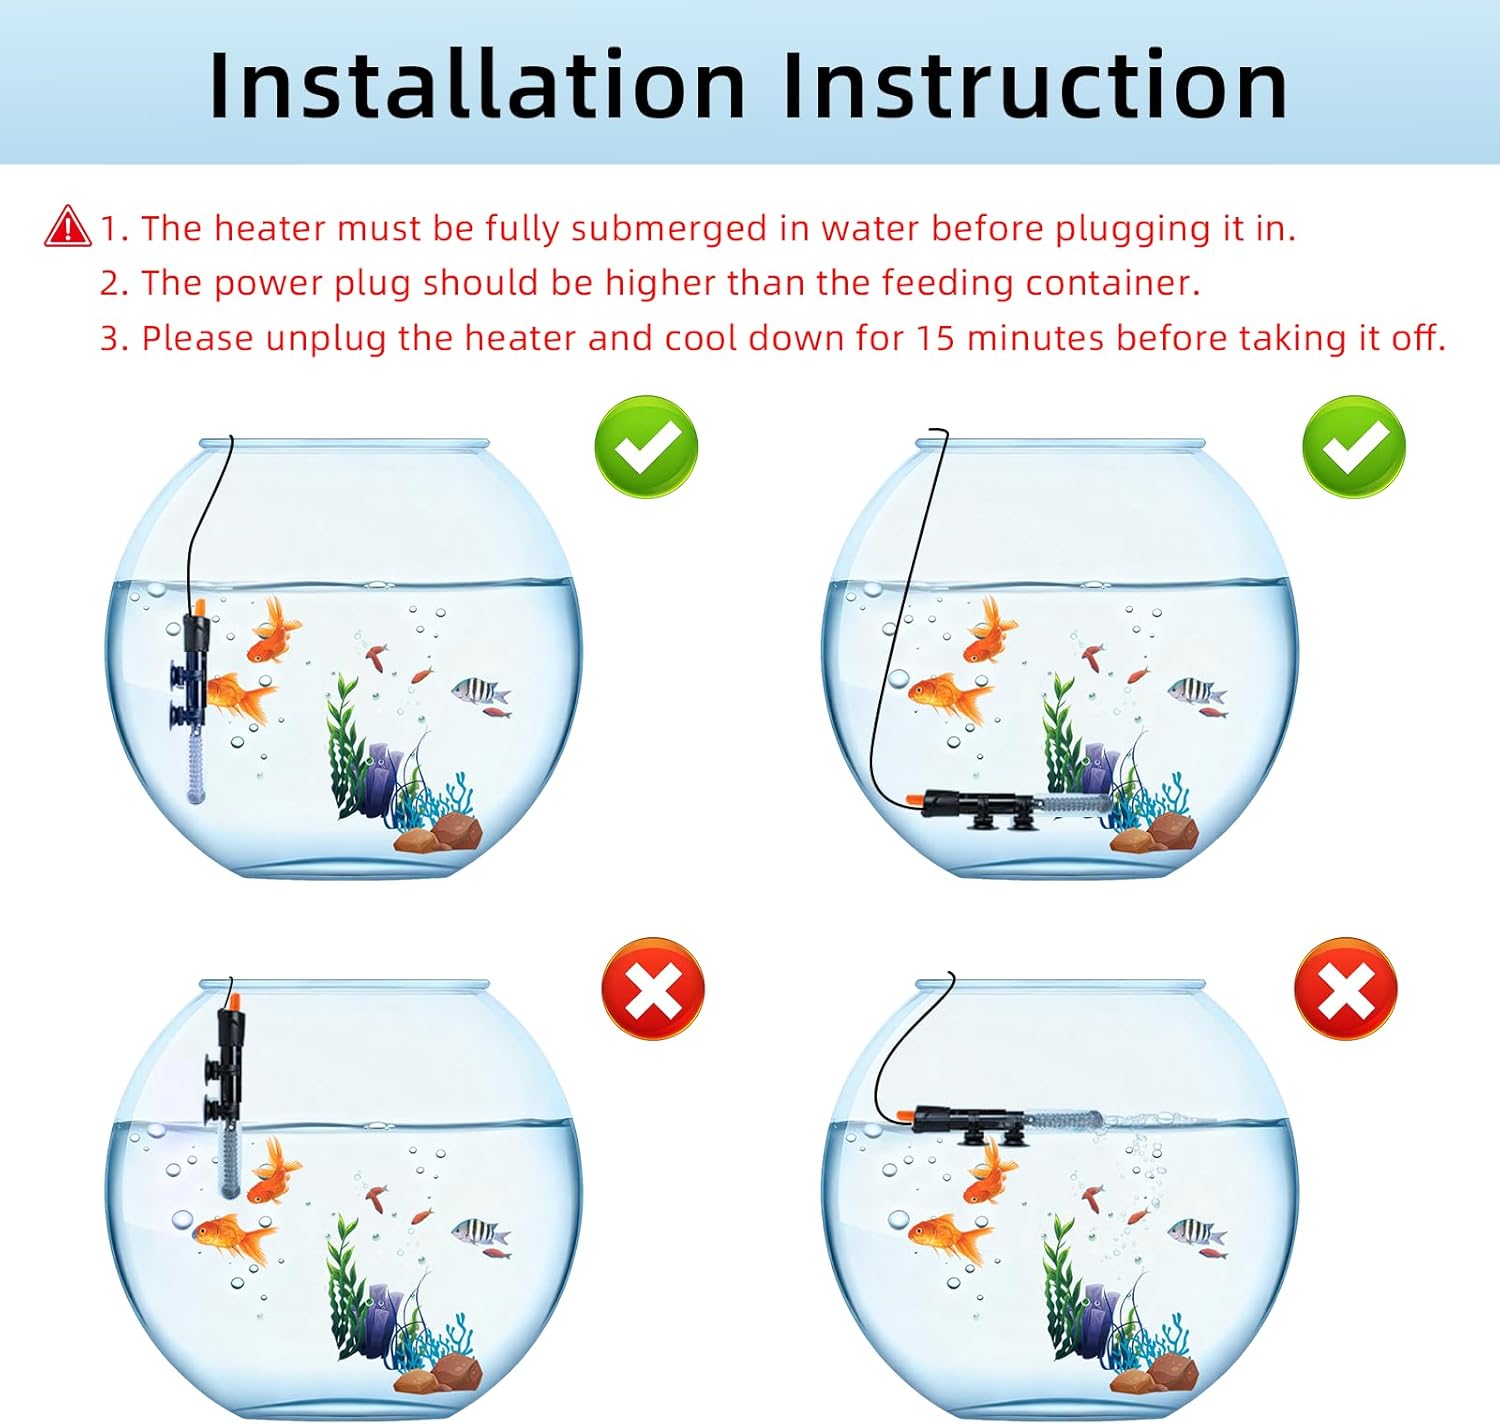
Image: Correct and incorrect heater installation. The heater must be fully submerged, and the power cord should form a drip loop.
3. Product Overview
The HiTauing Aquarium Heater AP05 series features an adjustable knob for temperature control and includes a separate digital thermometer for accurate water temperature monitoring. It is designed for full submersion in both freshwater and saltwater environments.
Components:
- Aquarium Heater Unit (with adjustable knob and power cord)
- Suction Cups (for mounting)
- Digital Thermometer (with probe and suction cup)
Materials:
The heater is constructed with a premium nickel-chromium heating wire for efficient heat transfer. The outer layer features a thickened, explosion-proof glass tube for durability and safety. The power plug is CE-certified.
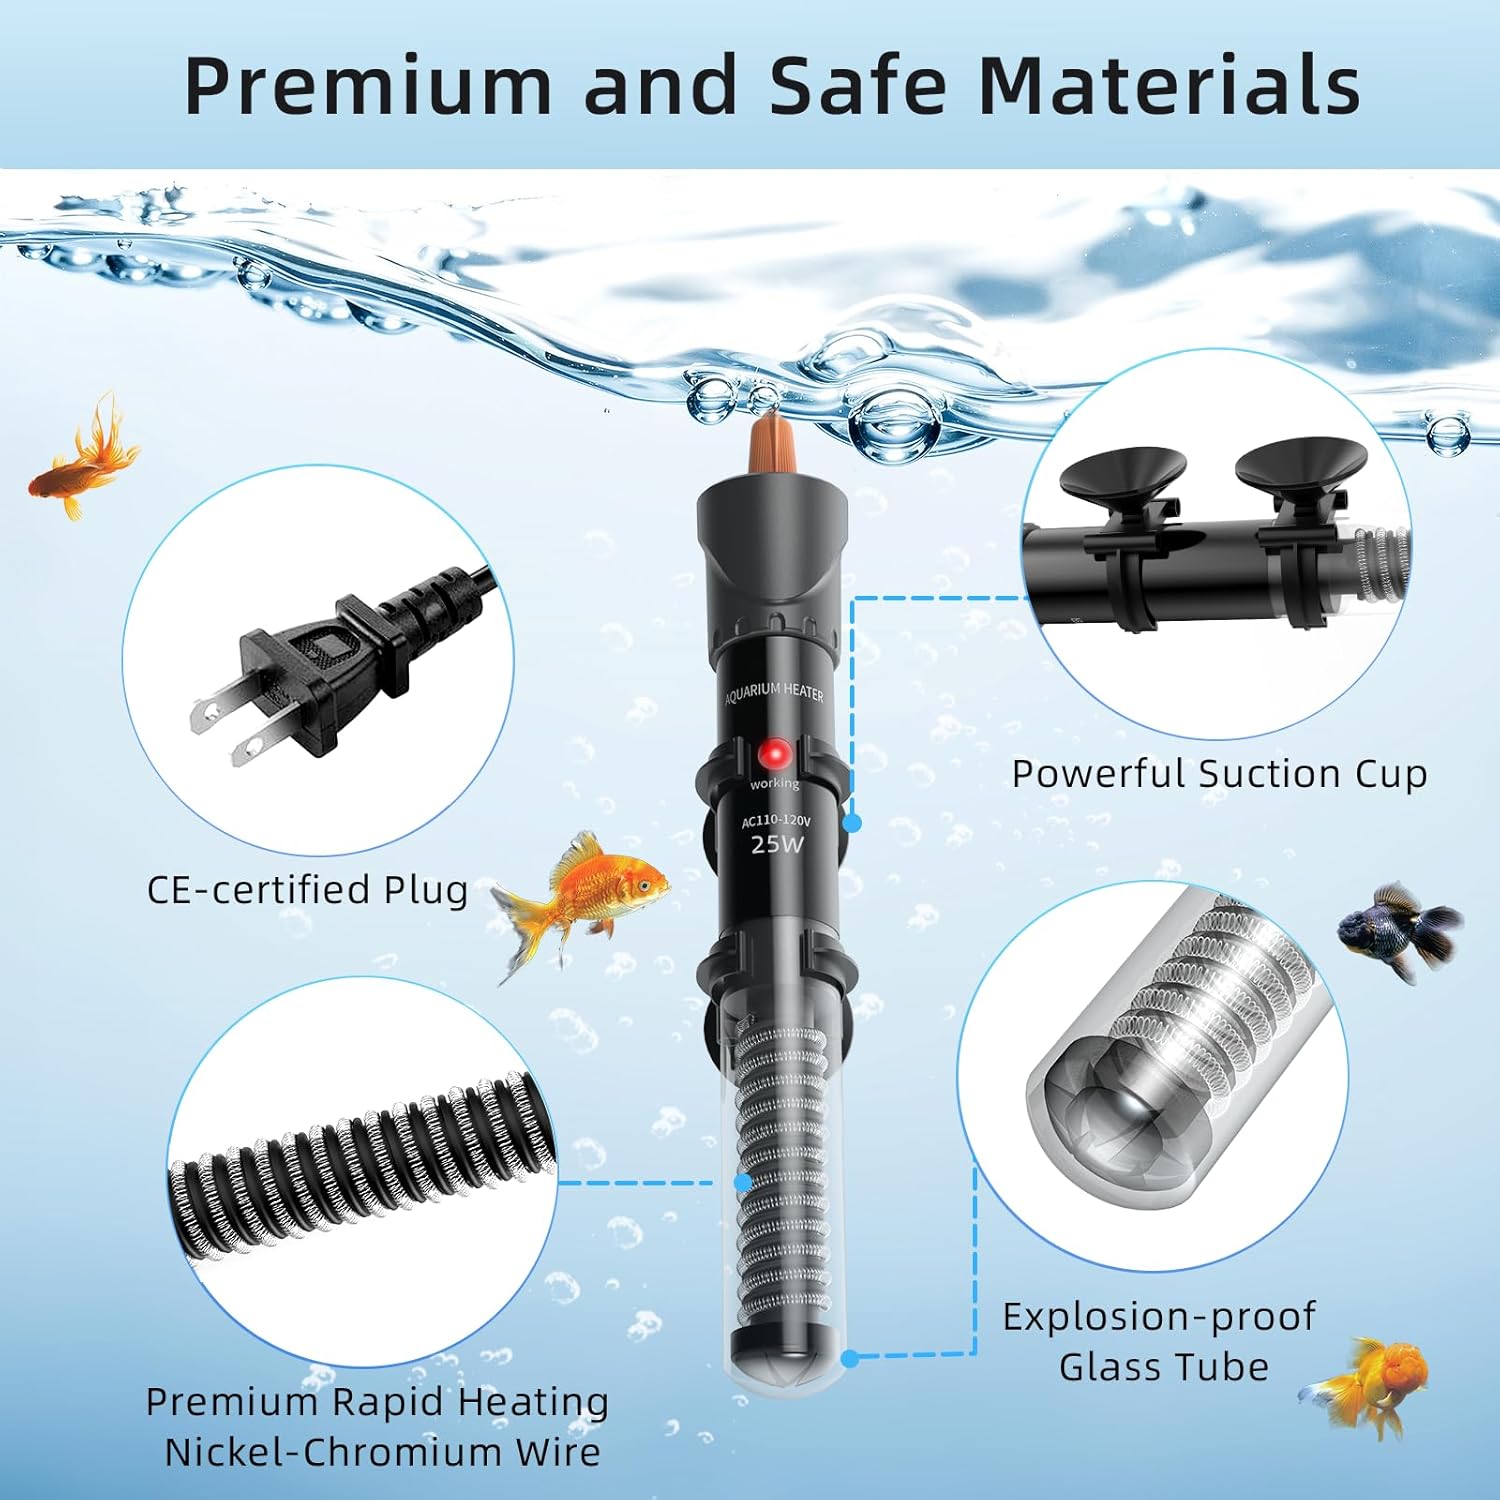
Image: Breakdown of heater components including CE-certified plug, powerful suction cup, rapid heating nickel-chromium wire, and explosion-proof glass tube.
4. Setup
- Unpack Components: Carefully remove the heater unit and digital thermometer from the packaging.
- Attach Suction Cups: Securely attach the provided suction cups to the heater unit.
- Position Heater: Place the heater inside your aquarium, ensuring it is fully submerged in the water. Use the suction cups to firmly attach it to the aquarium wall. Ensure there is adequate water circulation around the heater.
- Position Digital Thermometer: Attach the digital thermometer probe to the aquarium wall using its suction cup, ensuring it is also submerged and positioned away from the heater for accurate readings.
- Create Drip Loop: Arrange the power cord so that it hangs below the electrical outlet, forming a drip loop. This prevents water from flowing along the cord into the outlet.
- Do Not Plug In Yet: Do not plug the heater into the power outlet until the desired temperature is set.
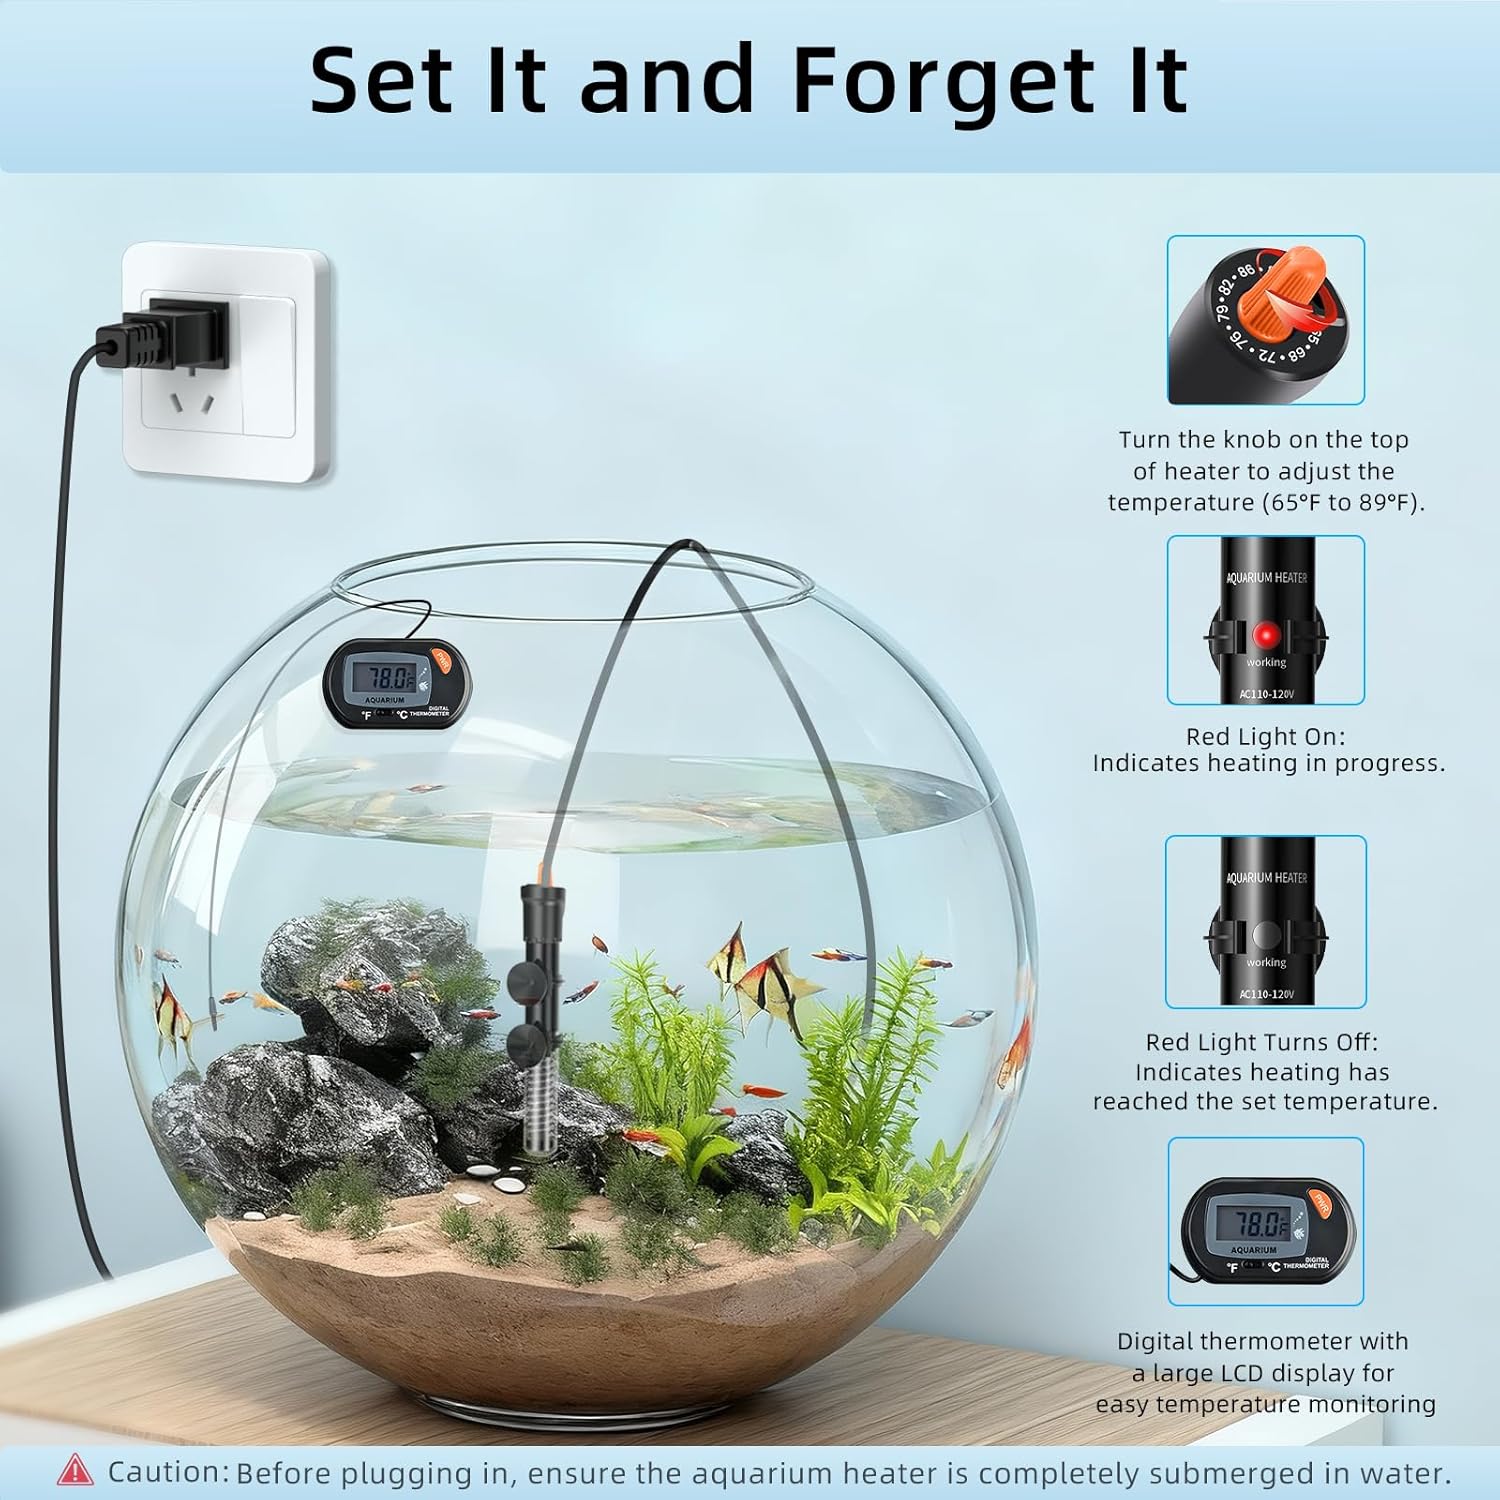
Image: A HiTauing aquarium heater and digital thermometer correctly installed in a fish tank, showing the adjustable knob and indicator light.
5. Operating Instructions
- Set Desired Temperature: Locate the adjustable knob on the top of the heater. Rotate the knob to select your desired water temperature within the range of 65°F to 89°F (18°C to 32°C).
- Connect to Power: Once the temperature is set and the heater is fully submerged, plug the power cord into a suitable electrical outlet.
- Monitor Heating: A red indicator light on the heater will illuminate, indicating that the heater is actively heating the water.
- Temperature Reached: When the aquarium water reaches the set temperature, the red indicator light will turn off. The heater will cycle on and off to maintain the set temperature.
- Verify with Thermometer: Always refer to the separate digital thermometer for real-time monitoring of the aquarium water temperature to ensure accuracy.

Image: Step-by-step guide for operating the heater, showing knob adjustment, heating indicator light, and thermometer placement.
6. Maintenance
- Cleaning: Over time, algae or mineral deposits may accumulate on the heater. To clean, unplug the heater and allow it to cool for 15 minutes. Gently wipe the glass tube with a soft cloth or sponge. Do not use abrasive cleaners or harsh chemicals.
- Water Changes: Always unplug the heater before performing any water changes to prevent exposure to air while hot, which can cause damage. Allow it to cool before removing it from the tank.
- Regular Inspection: Periodically check the heater and its power cord for any signs of wear, cracks, or damage. Replace the unit if any damage is observed.
7. Troubleshooting
- Heater Not Heating:
- Ensure the heater is fully submerged and plugged into a working power outlet.
- Check if the set temperature on the knob is higher than the current water temperature. The heater will only activate if the water is below the set point.
- Verify the power outlet is functional by plugging in another device.
- If the red indicator light does not turn on when the water temperature is below the set point, the unit may be faulty.
- Temperature Inaccuracy:
- The heater's knob setting may not perfectly match the actual water temperature. Always rely on the separate digital thermometer for precise temperature readings.
- Ensure the digital thermometer probe is placed in an area with good water circulation, away from the heater, to get an accurate reading of the overall tank temperature.
- Heater Overheating:
- Immediately unplug the heater.
- Ensure the heater is fully submerged and not exposed to air.
- Verify the set temperature is appropriate for your aquatic life.
- Check if the heater wattage is appropriate for your tank size (refer to specifications). An oversized heater can lead to rapid temperature fluctuations.
8. Specifications
The HiTauing Aquarium Heater AP05 series is available in various wattages to suit different aquarium sizes.
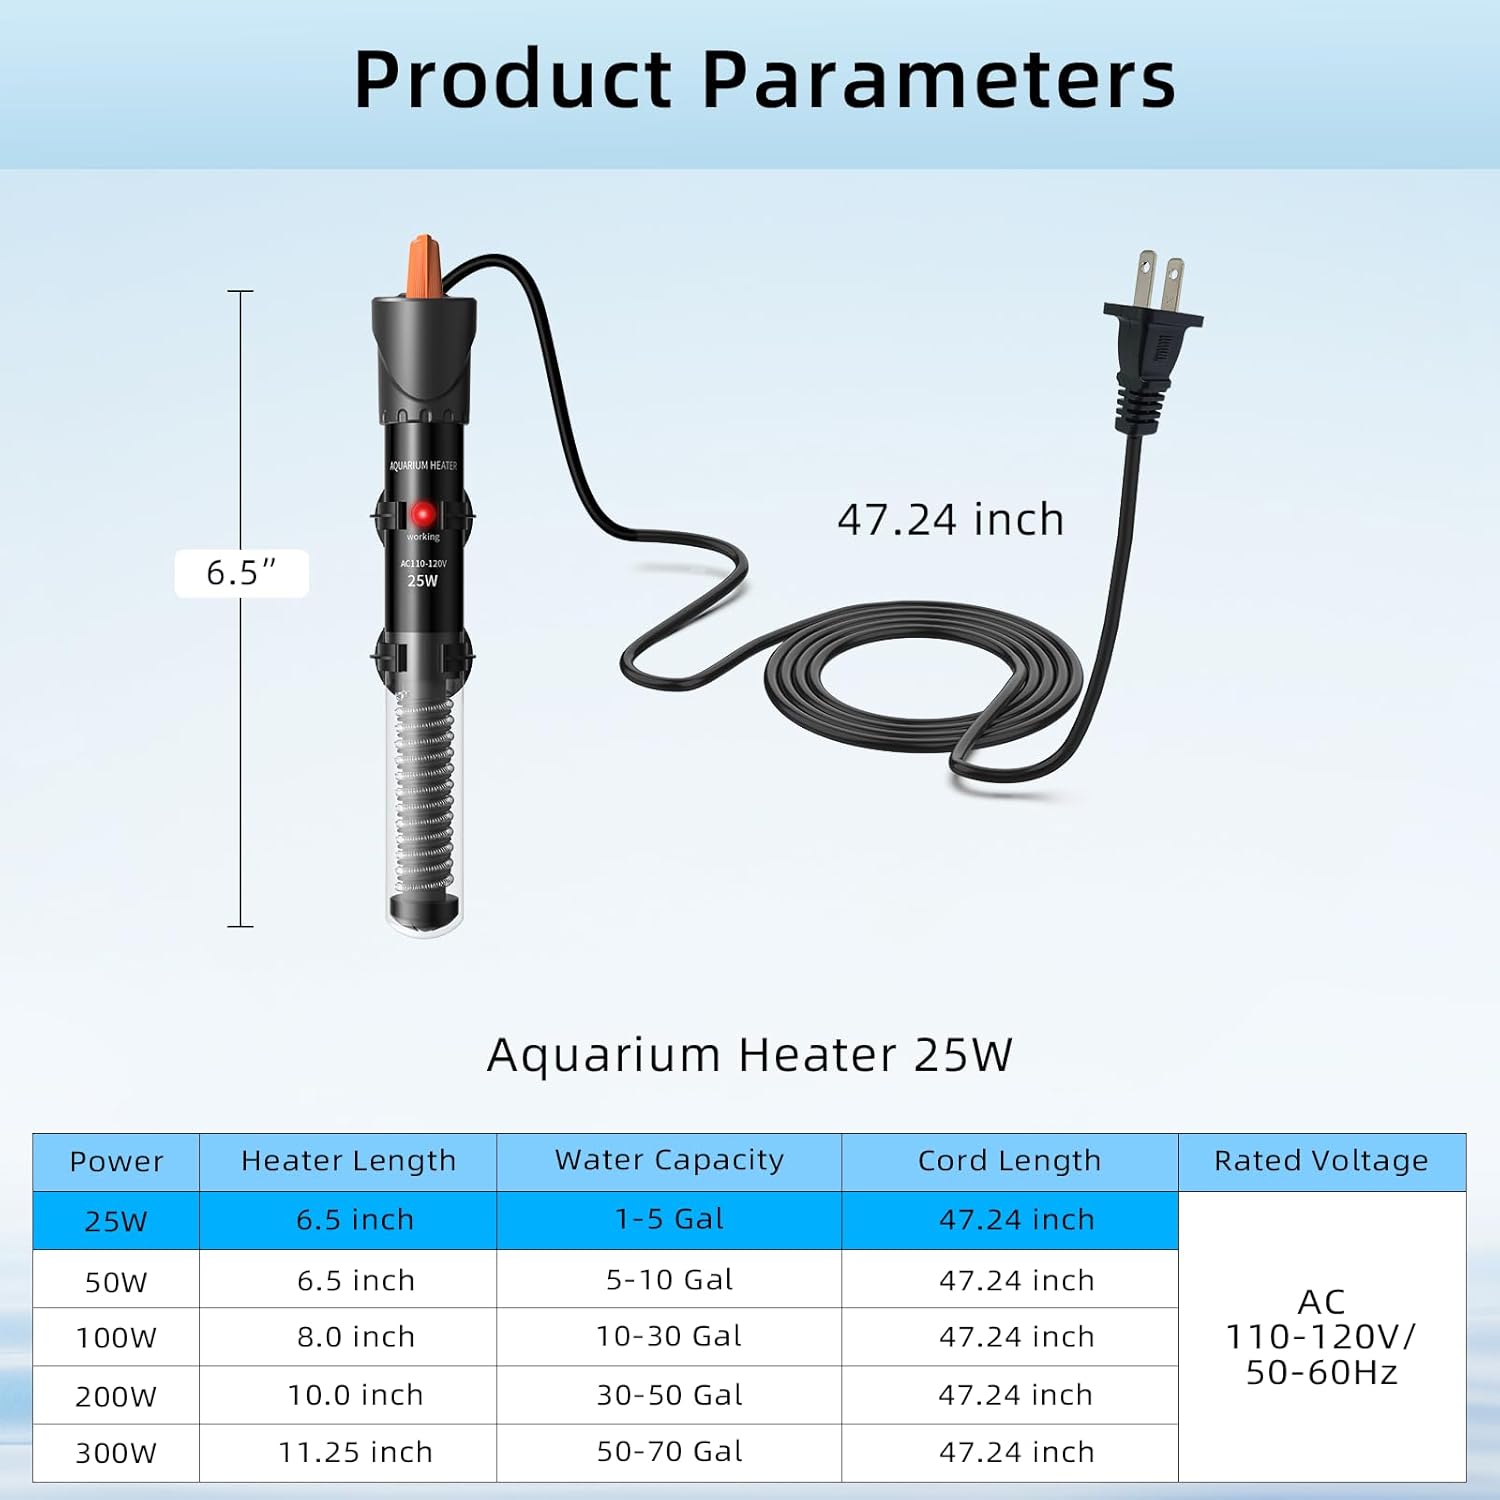
Image: Detailed product parameters for various wattage models of the HiTauing Aquarium Heater.
| Power | Heater Length | Water Capacity | Cord Length | Rated Voltage |
|---|---|---|---|---|
| 25W | 6.5 inches | 1-5 Gallons | 47.24 inches | AC 110-120V / 50-60Hz |
| 50W | 6.5 inches | 5-10 Gallons | 47.24 inches | |
| 100W | 8.0 inches | 10-30 Gallons | 47.24 inches | |
| 200W | 10.0 inches | 30-50 Gallons | 47.24 inches | |
| 300W | 11.25 inches | 50-70 Gallons | 47.24 inches |
Additional Specifications:
- Item Model Number: AP05
- Item Weight: Approximately 6.7 ounces (for 25W model)
- Item Package Dimensions: 7.87 x 3.19 x 1.77 inches (for 25W model)
- Date First Available: October 20, 2025
- Target Audience: Fish, aquatic pets
Applications:
This aquarium heater is suitable for a variety of aquatic environments:
- Freshwater Tanks
- Saltwater Tanks
- Turtle Tanks
- Betta Tanks

Image: Examples of the heater's application in freshwater, saltwater, turtle, and betta tanks.
9. Warranty and Support
HiTauing provides a One Year Warranty for this product, which includes a 12-month replacement policy. For warranty claims, technical assistance, or any product-related inquiries, please contact HiTauing customer service through the retailer's platform or the official HiTauing website.
Please have your purchase details and product model number (AP05) available when contacting support.