
1. Product Overview
The Preciva Threaded Inserts Set provides a comprehensive solution for embedding durable threaded inserts into plastic components, ideal for 3D printed parts. This kit includes a 100W digital soldering iron, a variety of heat-set insert tips, and a selection of M2 to M8 brass threaded inserts, along with essential accessories.
Kit Contents:
- 1 x 100W Digital Soldering Iron
- 6 x Heat-Set Insert Tips (M2, M3, M4, M5, M6, M8)
- 2 x Soldering Tip Connecting Rods
- 300 x Threaded Inserts (various sizes: M2, M3, M4, M5, M6, M8)
- 1 x Soldering Iron Holder
- 1 x Tweezer

Figure 1: Complete Preciva Threaded Inserts Set components.

Figure 2: Detailed view of the 300-piece hot melt nut kit with various sizes.
2. Setup Instructions
- Prepare the Soldering Iron: Ensure the soldering iron is unplugged and cool before attaching any tips.
- Attach the Heat-Set Insert Tip:
- Select the appropriate heat-set insert tip (M2, M3, M4, M5, M6, or M8) that matches the threaded insert you intend to use.
- Screw the chosen tip onto one of the soldering tip connecting rods.
- Screw the connecting rod with the tip onto the soldering iron. Ensure it is securely fastened but do not overtighten.
- Place the Soldering Iron in Holder: Position the soldering iron securely in its holder before plugging it in. This prevents accidental burns and protects your work surface.
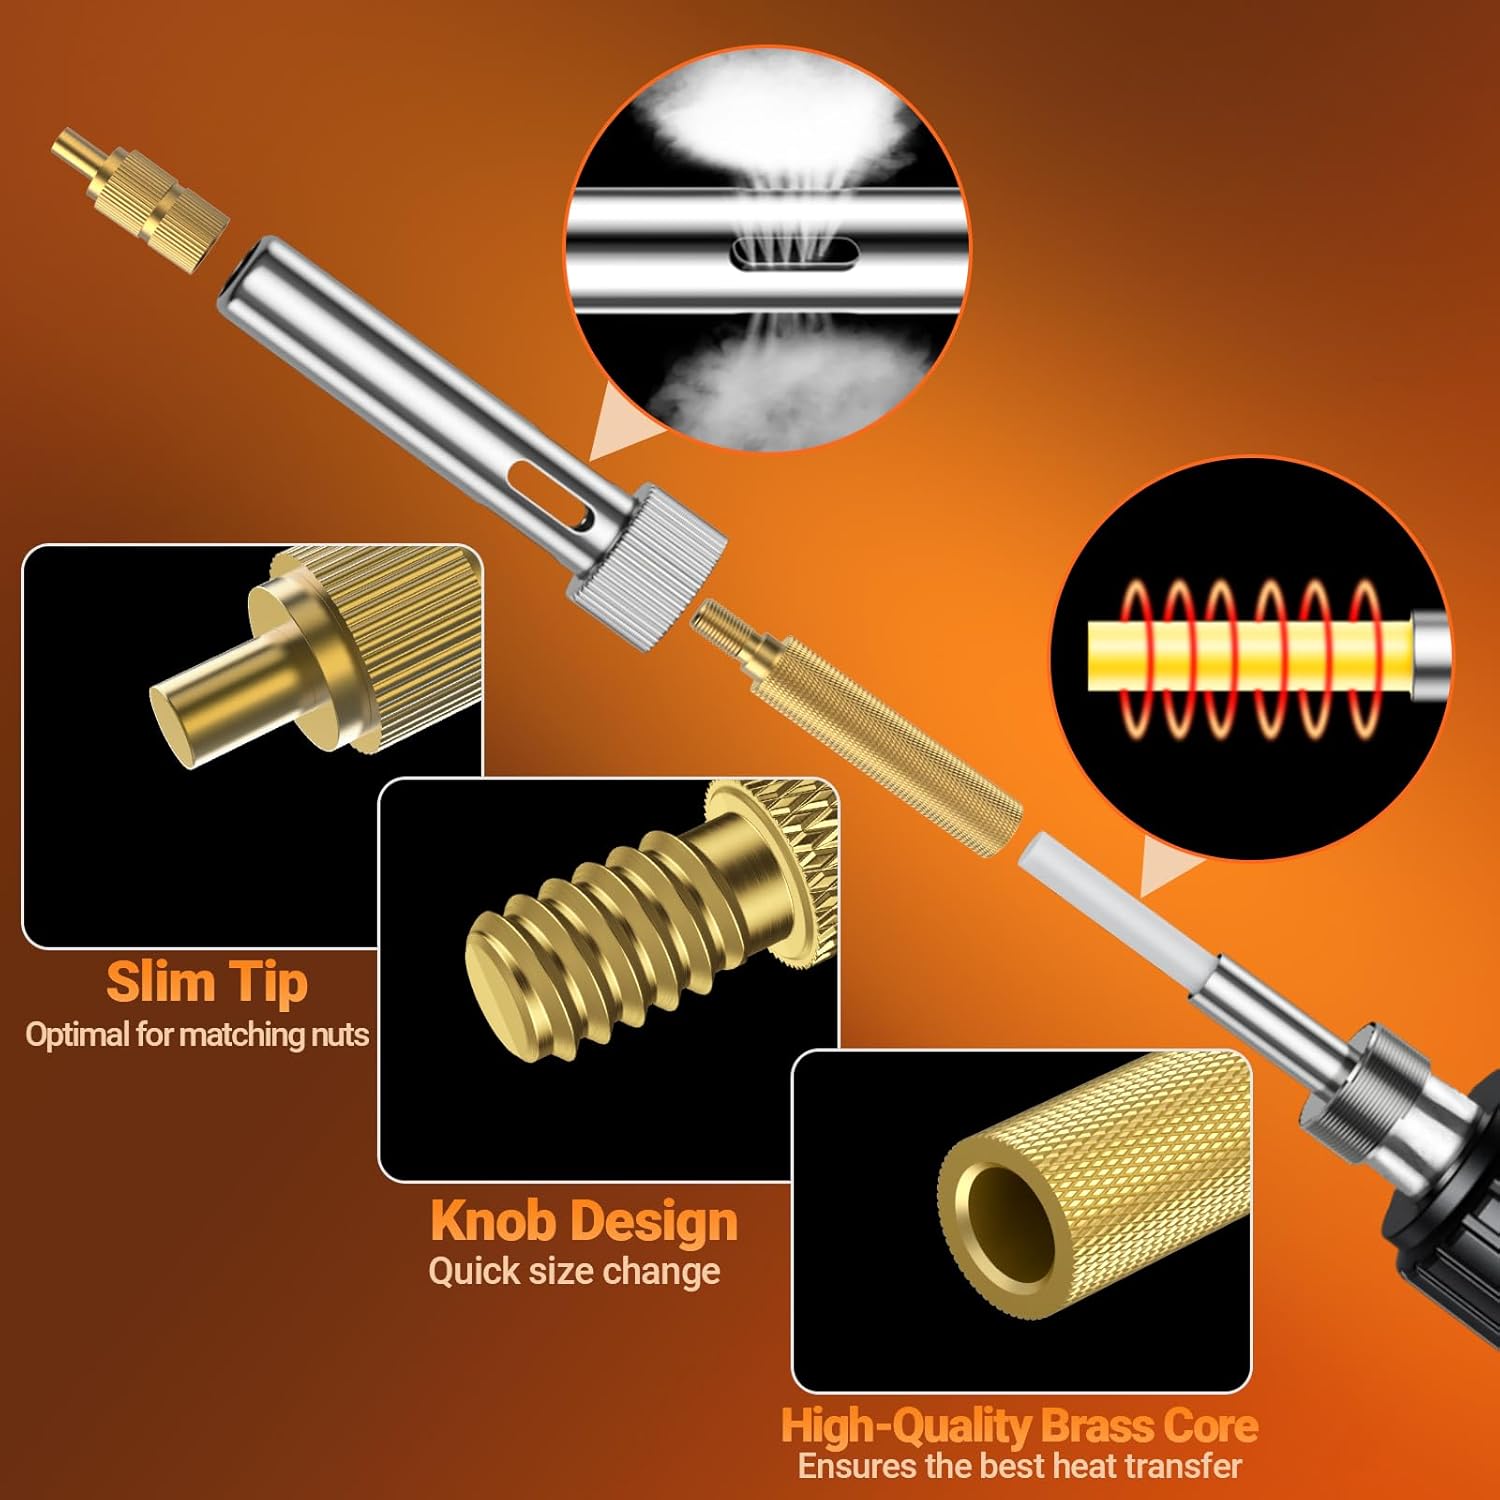
Figure 3: Assembly of the heat-set insert tip onto the soldering iron.
Video 1: Demonstrates the unboxing and assembly of the Preciva Heat-Set Insert Tip Set, including attaching the tip to the soldering iron.
3. Operating Instructions
- Power On and Set Temperature:
- Plug in the soldering iron.
- Press and hold the temperature increase (+) and decrease (-) keys simultaneously for approximately 2 seconds to turn on the power.
- Adjust the temperature using the (+) and (-) buttons. The recommended temperature range for heat-set inserts is 200-500°C (392-932°F). Start with a lower temperature and increase as needed.
- To switch between Celsius (°C) and Fahrenheit (°F), press and hold the temperature decrease (-) key.
- Select and Position Insert: Using the provided tweezers, carefully pick up the appropriate threaded insert and place it onto the heat-set tip. Ensure the insert is stable on the tip.
- Embed the Insert:
- Gently press the heated insert tip with the threaded insert into the pre-drilled hole in your plastic part. The heat will melt the plastic, allowing the insert to sink in.
- Apply steady, even pressure. Do not force the insert. Allow the plastic to melt around the insert.
- Ensure the top of the insert is flush with the plastic surface. Avoid sinking the insert too deep.
- Remove the Tool: Once the insert is fully seated and the plastic has flowed around it, remove the soldering iron promptly and carefully. Allow the plastic to cool and solidify around the insert.
- Safety Precaution: Always use tweezers to handle hot inserts. Never use your bare hands.

Figure 4: Digital display and temperature adjustment buttons on the soldering iron.

Figure 5: Visual guide for embedding threaded inserts into plastic.
Video 2: Demonstrates the process of attaching the heat-set tip, selecting an insert, adjusting temperature, and embedding the insert into a plastic part.
4. Maintenance
- Tip Cleaning: Regularly clean the heat-set insert tips. While the iron is warm, gently wipe the tip with a damp sponge or brass wool to remove any plastic residue. Ensure the sponge is not dripping wet to avoid thermal shock.
- Storage: Store the soldering iron and all components in a dry, cool place. Use the provided case for the threaded inserts to keep them organized and protected.
- Inspection: Periodically inspect the power cord and soldering iron for any signs of damage. Do not use if damaged.
5. Troubleshooting
- Insert Not Melting into Plastic:
- Ensure the soldering iron has reached the set temperature.
- Increase the temperature setting gradually. Different plastics (e.g., PLA, ABS, PETG) have different melting points.
- Verify the tip is clean and making good contact with the insert.
- Plastic Around Insert is Damaged/Deformed:
- The temperature may be too high. Reduce the temperature setting.
- You might be applying too much pressure or holding the iron in place for too long. Use gentle, steady pressure and remove the iron promptly once the insert is seated.
- Ensure the pre-drilled hole size is appropriate for the insert to minimize excess plastic displacement.
- Insert is Not Straight:
- Ensure the insert is placed squarely on the tip before beginning the embedding process.
- Apply pressure directly downwards, keeping the soldering iron perpendicular to the plastic surface.
6. Specifications
| Brand | Preciva |
| Model | 928D |
| Material | Brass |
| Thread Sizes Included | M2, M3, M4, M5, M6, M8 |
| Number of Pieces | 300 (Threaded Inserts) |
| Soldering Iron Power | 20W rated, 100W max |
| Temperature Range | 200~500°C / 392~932°F |
| Display | Digital |
7. Warranty and Support
Preciva products are designed for quality and reliability. For any questions regarding product use, troubleshooting, or concerns, please contact our customer support team. Our dedicated team is committed to providing prompt solutions and ensuring your satisfaction.
Refer to your purchase documentation or the official Preciva website for specific warranty details and contact information.