1. Safety Information
Please read all safety instructions before assembly and use. Failure to follow these guidelines may result in injury or damage to the product.
- Do not exceed the recommended weight limit for the countertop, shelves, and cabinets.
- Ensure the island is stable and secure on a level surface before use.
- Avoid overloading shelves and cabinets to prevent tipping or structural damage.
- Use caution when moving the island, especially if it contains items, to prevent tipping.
- Follow proper electrical safety procedures when using the built-in power outlets and LED lights. Do not expose electrical components to water.
- Keep children and pets away from moving parts, such as the rolling wheels and pull-out spice rack, and electrical components.
- Always unplug the island from the power source before cleaning or performing any maintenance.
2. Product Overview
The Homiflex 63" Kitchen Island is designed to provide versatile storage and workspace in your kitchen or dining area. It features a spacious countertop, integrated LED lighting, power outlets, a pull-out spice rack, and a tilt-out trash can cabinet.

Image: The Homiflex 63-inch Kitchen Island with a microwave, flowers, and food on the countertop.
Dimensions
The overall dimensions of the kitchen island are approximately 31.4"D x 63"W x 33.8"H (80cm D x 160cm W x 86cm H).
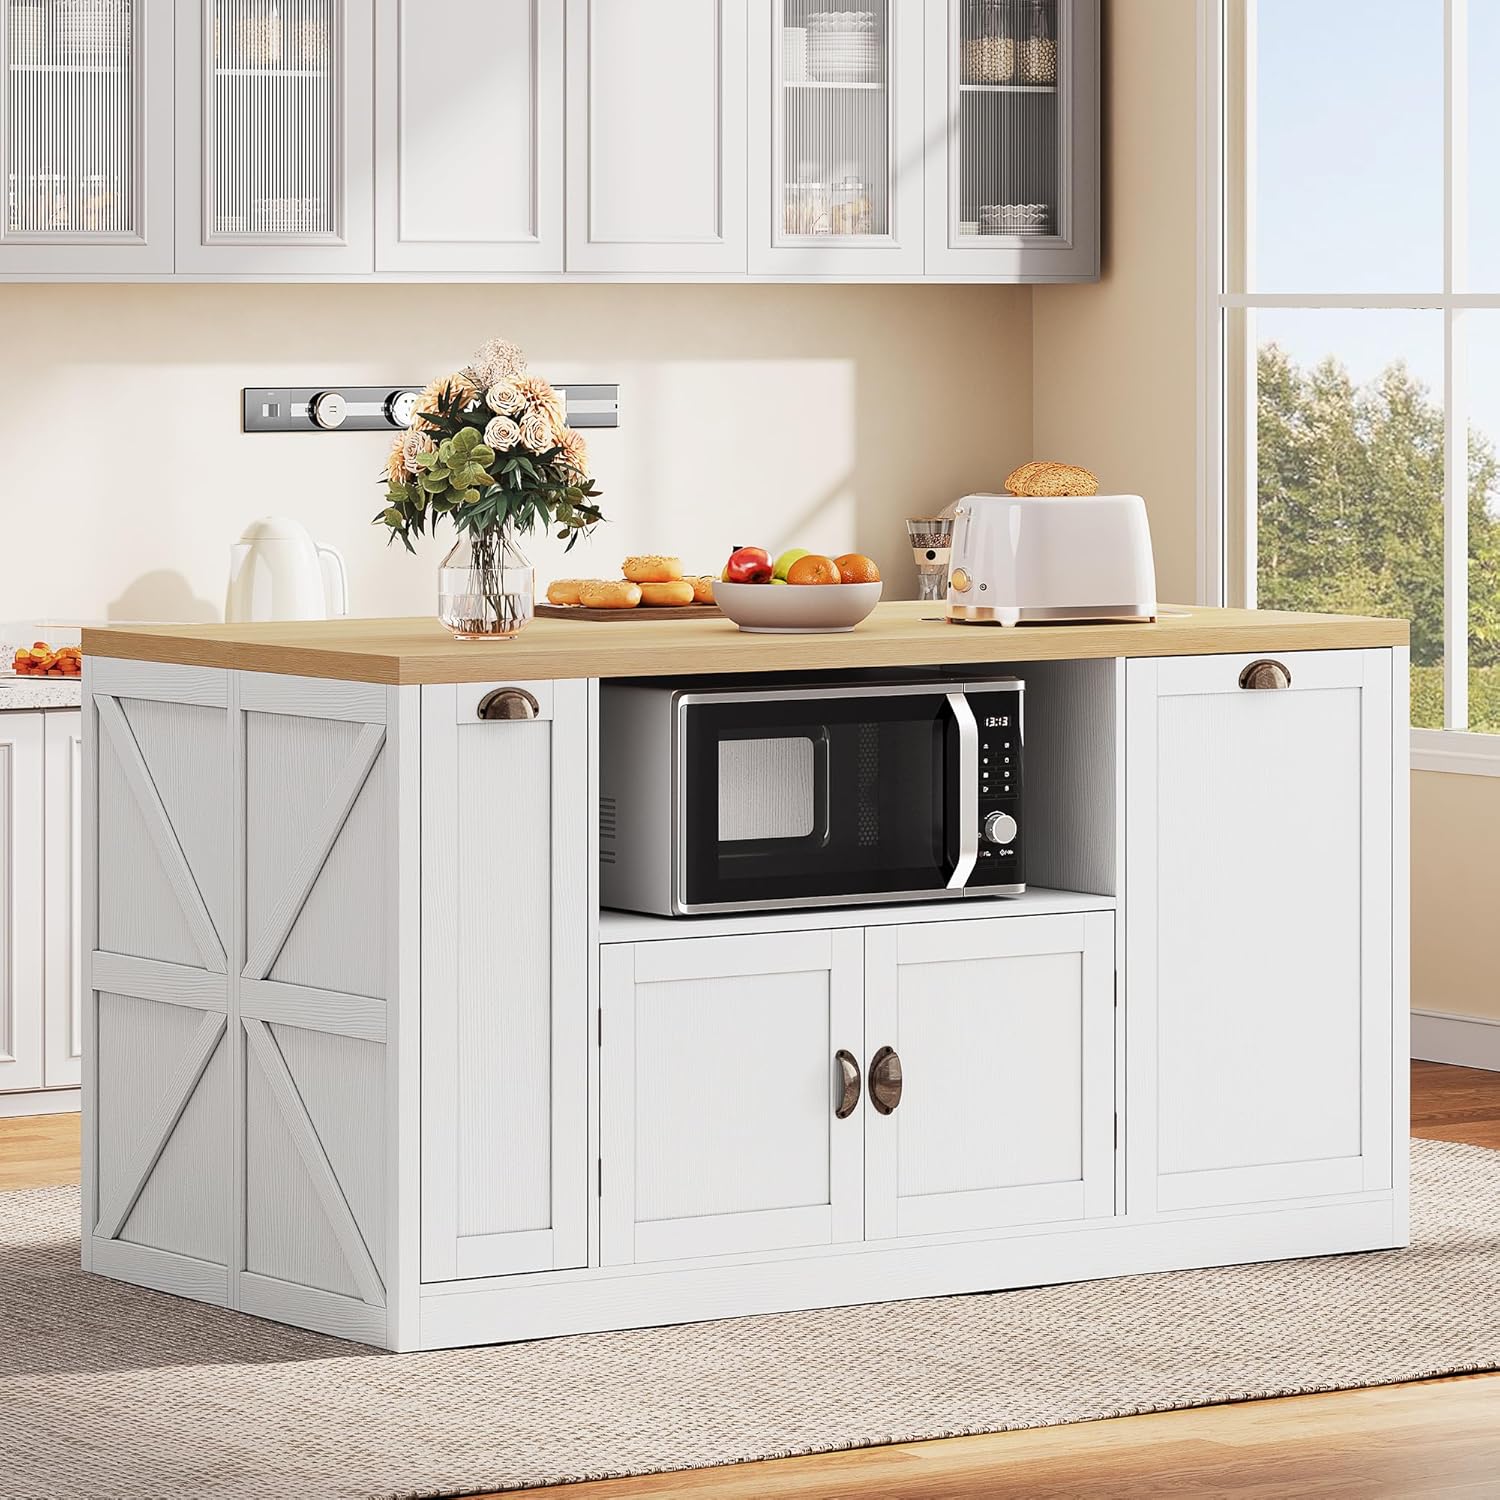
Image: Diagram showing the detailed dimensions of the kitchen island, including width, depth, and height, as well as internal compartment measurements.
3. Setup and Assembly
Assembly is required for this kitchen island. Please refer to the detailed assembly instructions included in your product packaging. The instructions will guide you through each step, including attaching the countertop, installing the LED lights, assembling the storage cabinets, and connecting the power outlets. Ensure all parts are present and undamaged before beginning assembly.
General Assembly Steps:
- Unpack all components and verify against the parts list provided in the manual.
- Assemble the base frame of the island.
- Install the internal shelving and cabinet structures.
- Attach the side panels and doors.
- Secure the countertop to the base.
- Install the LED light strips according to the specific instructions.
- Connect the power outlet unit and ensure all wiring is secure and properly routed.
- Attach the rolling wheels to the base for mobility.
Follow the step-by-step instructions carefully to ensure proper assembly and functionality. It is recommended to have two people for assembly.
4. Operating Instructions
4.1 LED Lighting System
The kitchen island features built-in RGB LED strips with multiple color options. These lights can be controlled via a remote (if included) to create various atmospheres.
- Power On/Off: Use the designated button on the remote or control panel to turn the LED lights on or off.
- Color Selection: Cycle through available colors or select a specific color using the remote control.
- Brightness Adjustment: Adjust the light intensity to your preference.
- Mode Selection: Choose from various lighting modes, such as static color, flashing, or fading effects.

Image: The kitchen island with its integrated LED lights turned on, illuminating the space beneath the countertop and creating a cozy dining setting with two bar stools.
4.2 Power Outlet and USB Ports
The island is equipped with 2 AC outlets and 2 USB ports for convenient power access. These are located on the countertop for easy use.
- AC Outlets: Plug in small kitchen appliances such as blenders, toasters, or coffee makers. Ensure the appliance's power requirements do not exceed the island's electrical capacity.
- USB Ports: Charge mobile phones, tablets, or other USB-powered devices.
- Safety: Always ensure hands are dry before plugging or unplugging devices. Do not overload the outlets.

Image: A close-up view of the integrated power strip on the countertop, showing two AC outlets and two USB ports with a power cord plugged in.
4.3 Storage Features
The island offers various storage solutions to keep your kitchen organized.
- 63-Inch Countertop: Use the spacious surface for meal preparation, dining, or as a general workspace.
- Pull-Out Spice Rack: Located on the side, this rack provides easy access to spices and small condiments. Gently pull the handle to extend the rack.

Image: A pull-out spice rack on the side of the kitchen island, showcasing multiple shelves filled with various spice containers.
- Tilt-Out Trash Can Cabinet: A dedicated cabinet designed to conceal a trash can (suitable for a 10-gallon can). Pull the handle to tilt the cabinet door open for trash disposal.
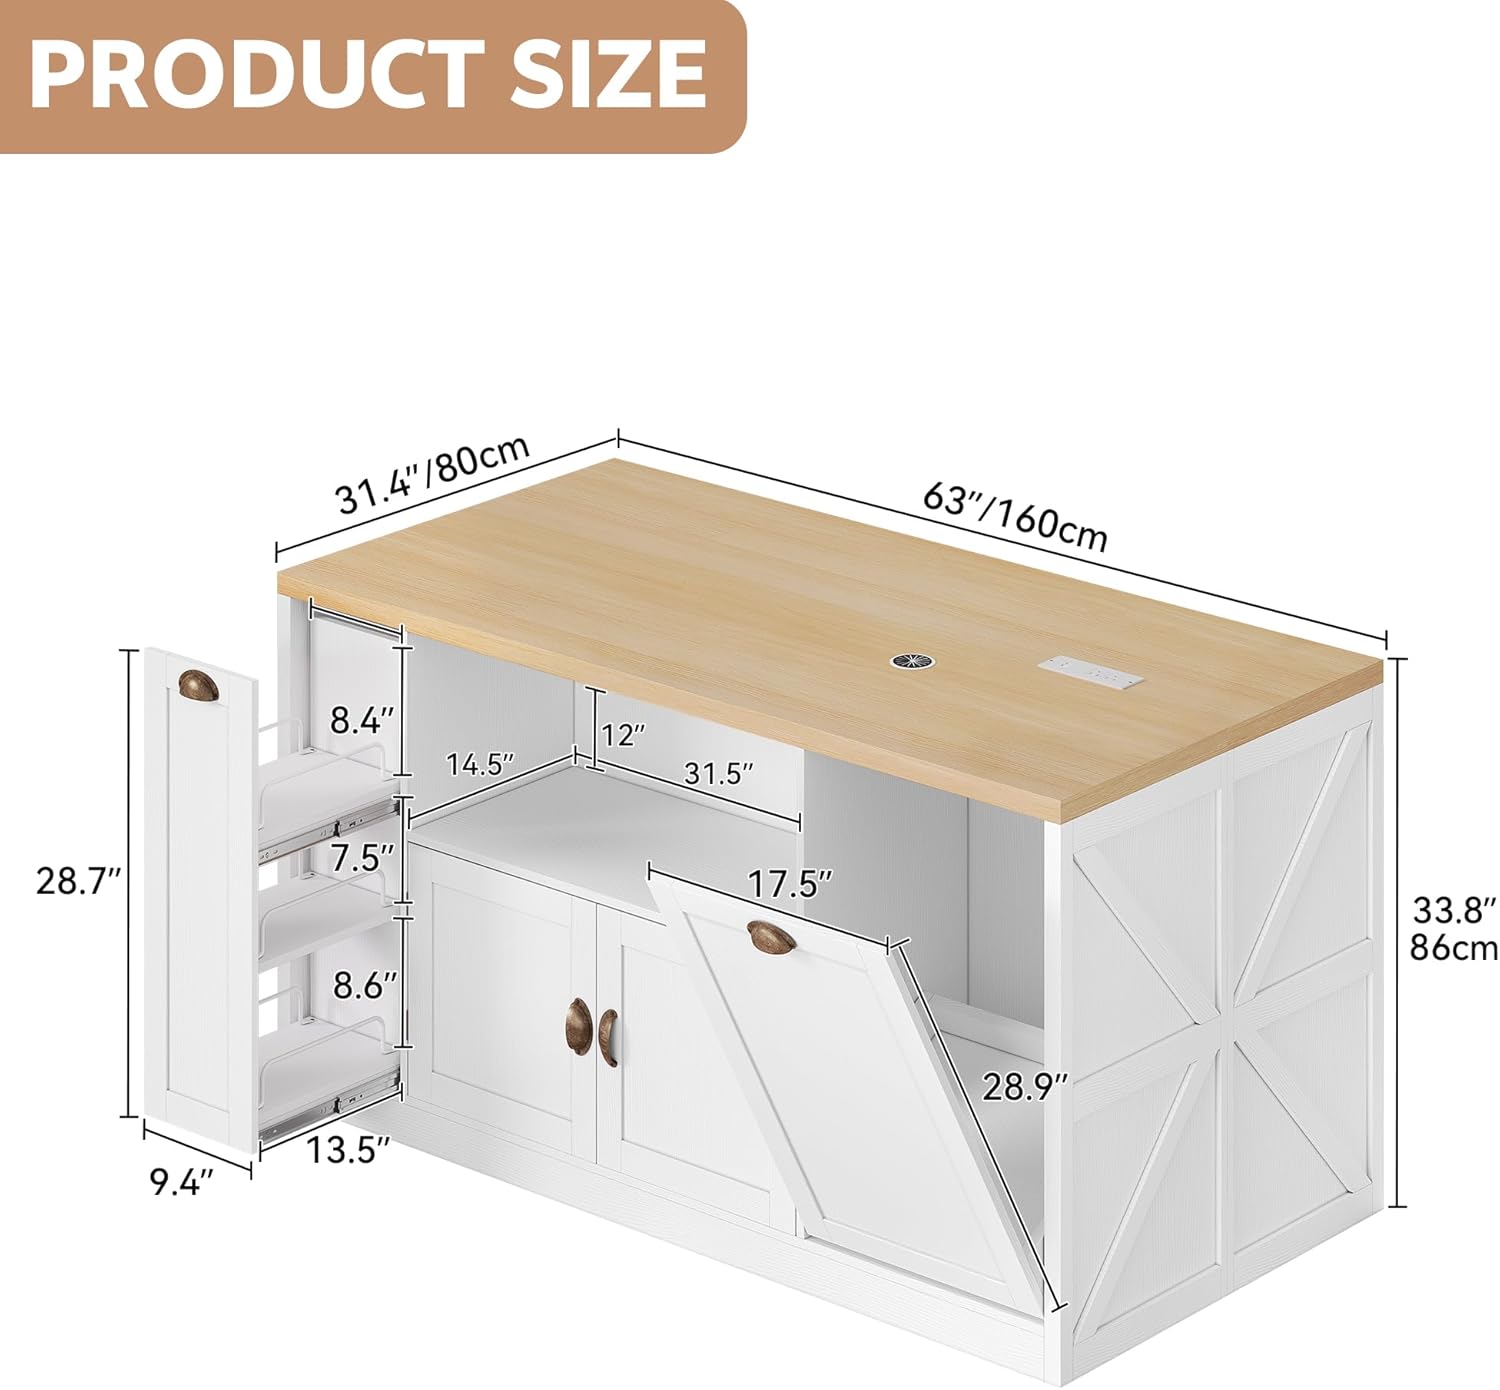
Image: The tilt-out trash can cabinet on the kitchen island, shown with its door open and a gray trash bin inside.
- Microwave Storage: An open compartment is provided for a microwave or other small appliances. Ensure adequate ventilation around the appliance.
- Enclosed Cabinets: Additional cabinets offer enclosed storage for larger kitchen tools, dishes, or other items, keeping them dust-free and organized.
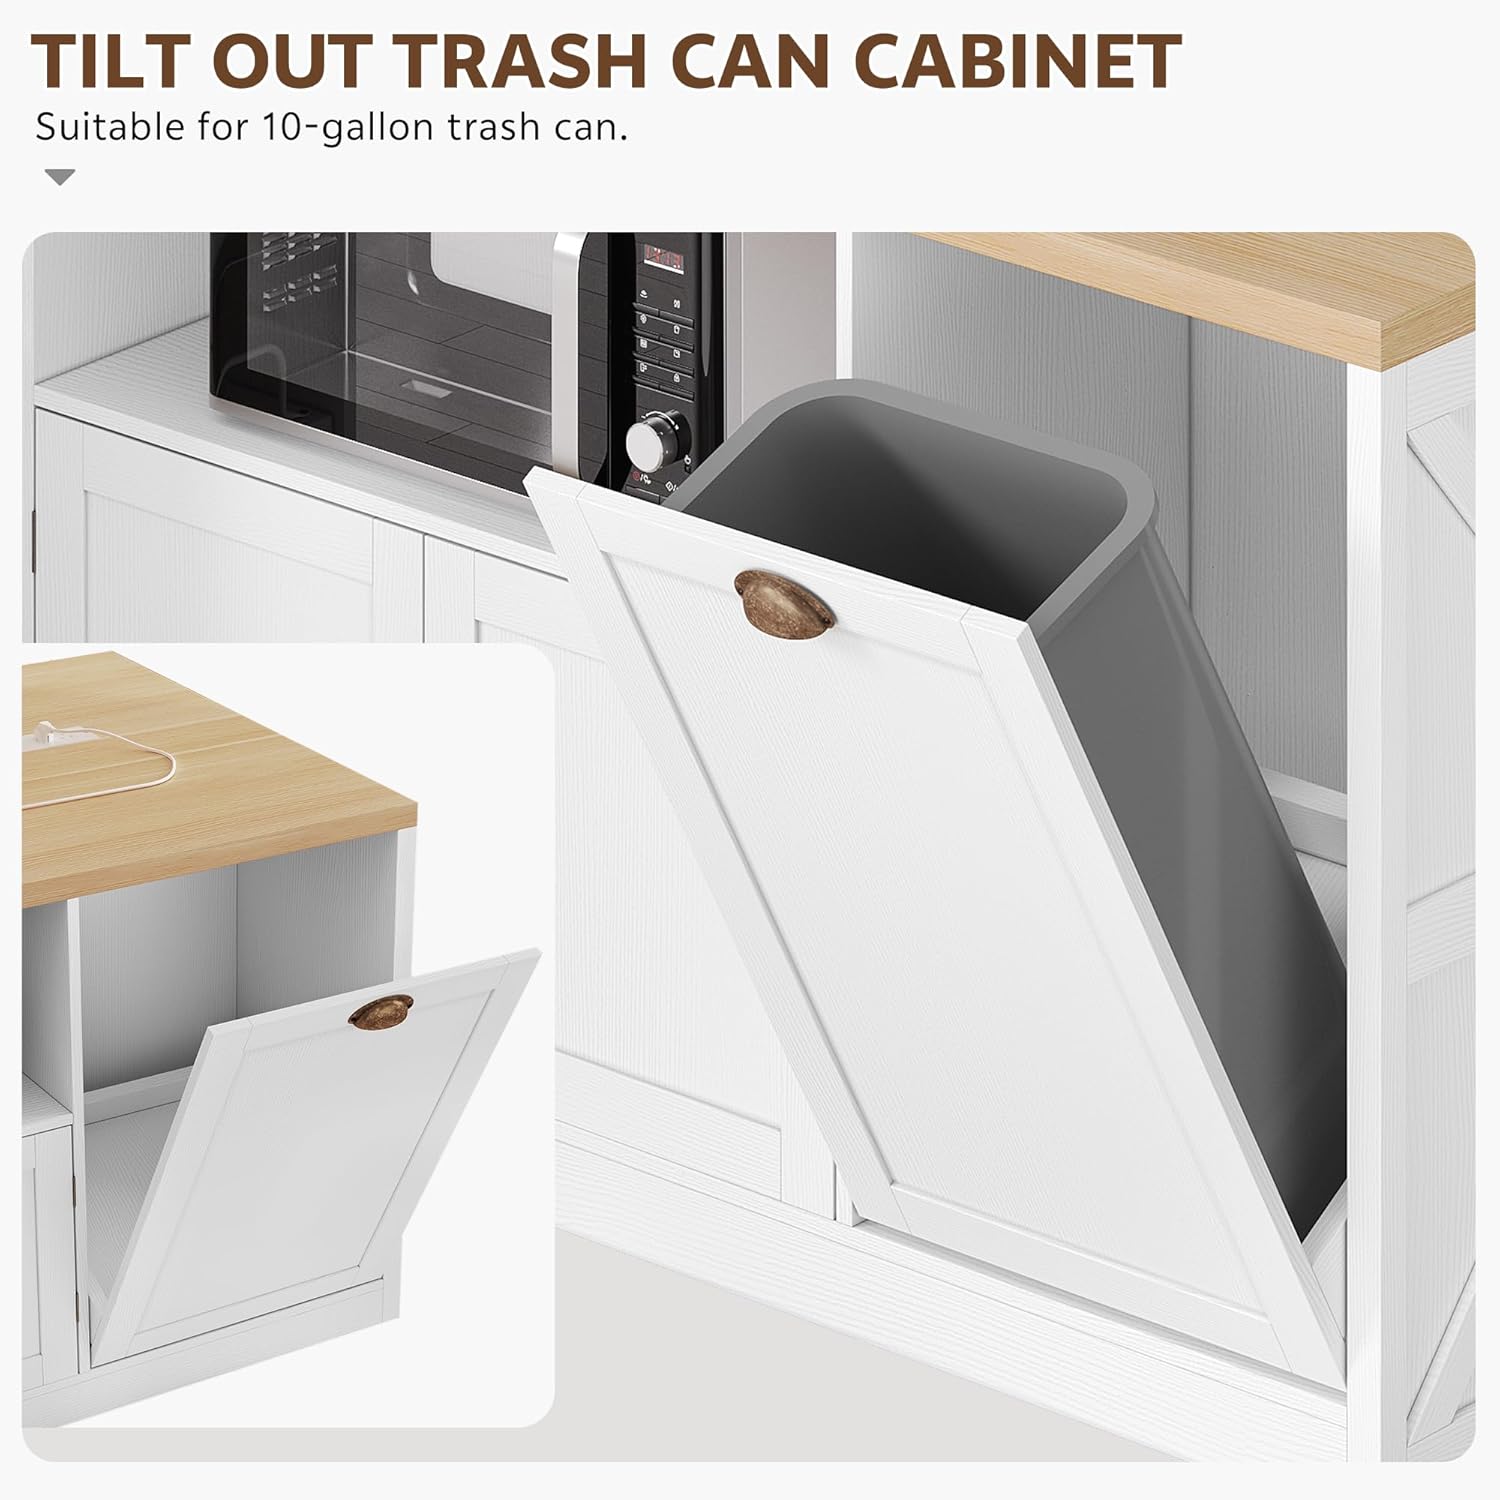
Image: A view of the kitchen island's open storage compartment, housing a microwave, and an adjacent enclosed cabinet with its doors open, revealing a cooking pot.
4.4 Mobility
The island is equipped with universal wheels for easy movement. Ensure the wheels are unlocked before attempting to move the island. Lock the wheels once the island is in its desired position to prevent accidental movement.
5. Maintenance
5.1 Cleaning
- Surfaces: Wipe down all surfaces with a soft, damp cloth. For stubborn stains, use a mild, non-abrasive cleaner. Avoid harsh chemicals that may damage the engineered wood finish.
- Electrical Components: Before cleaning, always unplug the island from the power source. Use a dry cloth to wipe the power outlets and LED strips. Do not spray liquids directly onto electrical parts.
- Wheels: Periodically clean any dust or debris from the wheels to ensure smooth movement.
5.2 General Care
- Avoid placing hot items directly on the countertop without protection.
- Protect the surface from sharp objects to prevent scratches.
- Periodically check all screws and fasteners to ensure they remain tight. Retighten as necessary.
- Keep the island away from direct sunlight and excessive moisture to prevent warping or discoloration.
6. Troubleshooting
6.1 LED Lights Not Working
- Ensure the island is properly plugged into a working power outlet.
- Check if the LED remote control batteries need replacement.
- Verify that all LED strip connections are secure.
6.2 Power Outlets Not Functioning
- Confirm the island is plugged into a live electrical outlet.
- Check if the circuit breaker for the outlet has tripped.
- Ensure no single appliance is drawing excessive power, potentially overloading the circuit.
6.3 Island Instability
- Verify that the island is placed on a flat, level surface.
- Check all assembly screws and bolts for tightness and retighten if loose.
- Ensure the wheels are locked when the island is stationary.
7. Specifications
| Feature | Detail |
|---|---|
| Brand | Homiflex |
| Model Number | MAHflet1tzt |
| Color | White |
| Material | Engineered Wood |
| Product Dimensions (D x W x H) | 31.4" x 63" x 33.8" |
| Item Weight | 131.39 Pounds |
| Additional Features | Built-In Charging Station, Dustproof, Scratch Resistant, Wheeled, Color-changing LED |
| Included Components | Storage Cabinet, Color-changing LED, Power Outlet, Pull-out Spice Rack, Microwave Cabinet |
| Number of Shelves | 3 |
| Number of Doors | 3 |
| Assembly Required | Yes |
8. Warranty and Support
For warranty information and customer support, please refer to the documentation included with your purchase or contact Homiflex directly through their official website or customer service channels. Keep your proof of purchase for any warranty claims.