EROMMY 24 Inch Ventless Natural Gas Fireplace Logs Set
Instruction Manual
Model: 24 Inch Ventless Fireplace Logs Set | Brand: EROMMY
1. Introduction
Thank you for choosing the EROMMY 24 Inch Ventless Natural Gas Fireplace Logs Set. This product is designed to provide efficient heating and a realistic flame experience without the need for external venting. This manual contains important information regarding the safe installation, operation, and maintenance of your fireplace logs set. Please read it thoroughly before installation and keep it for future reference.
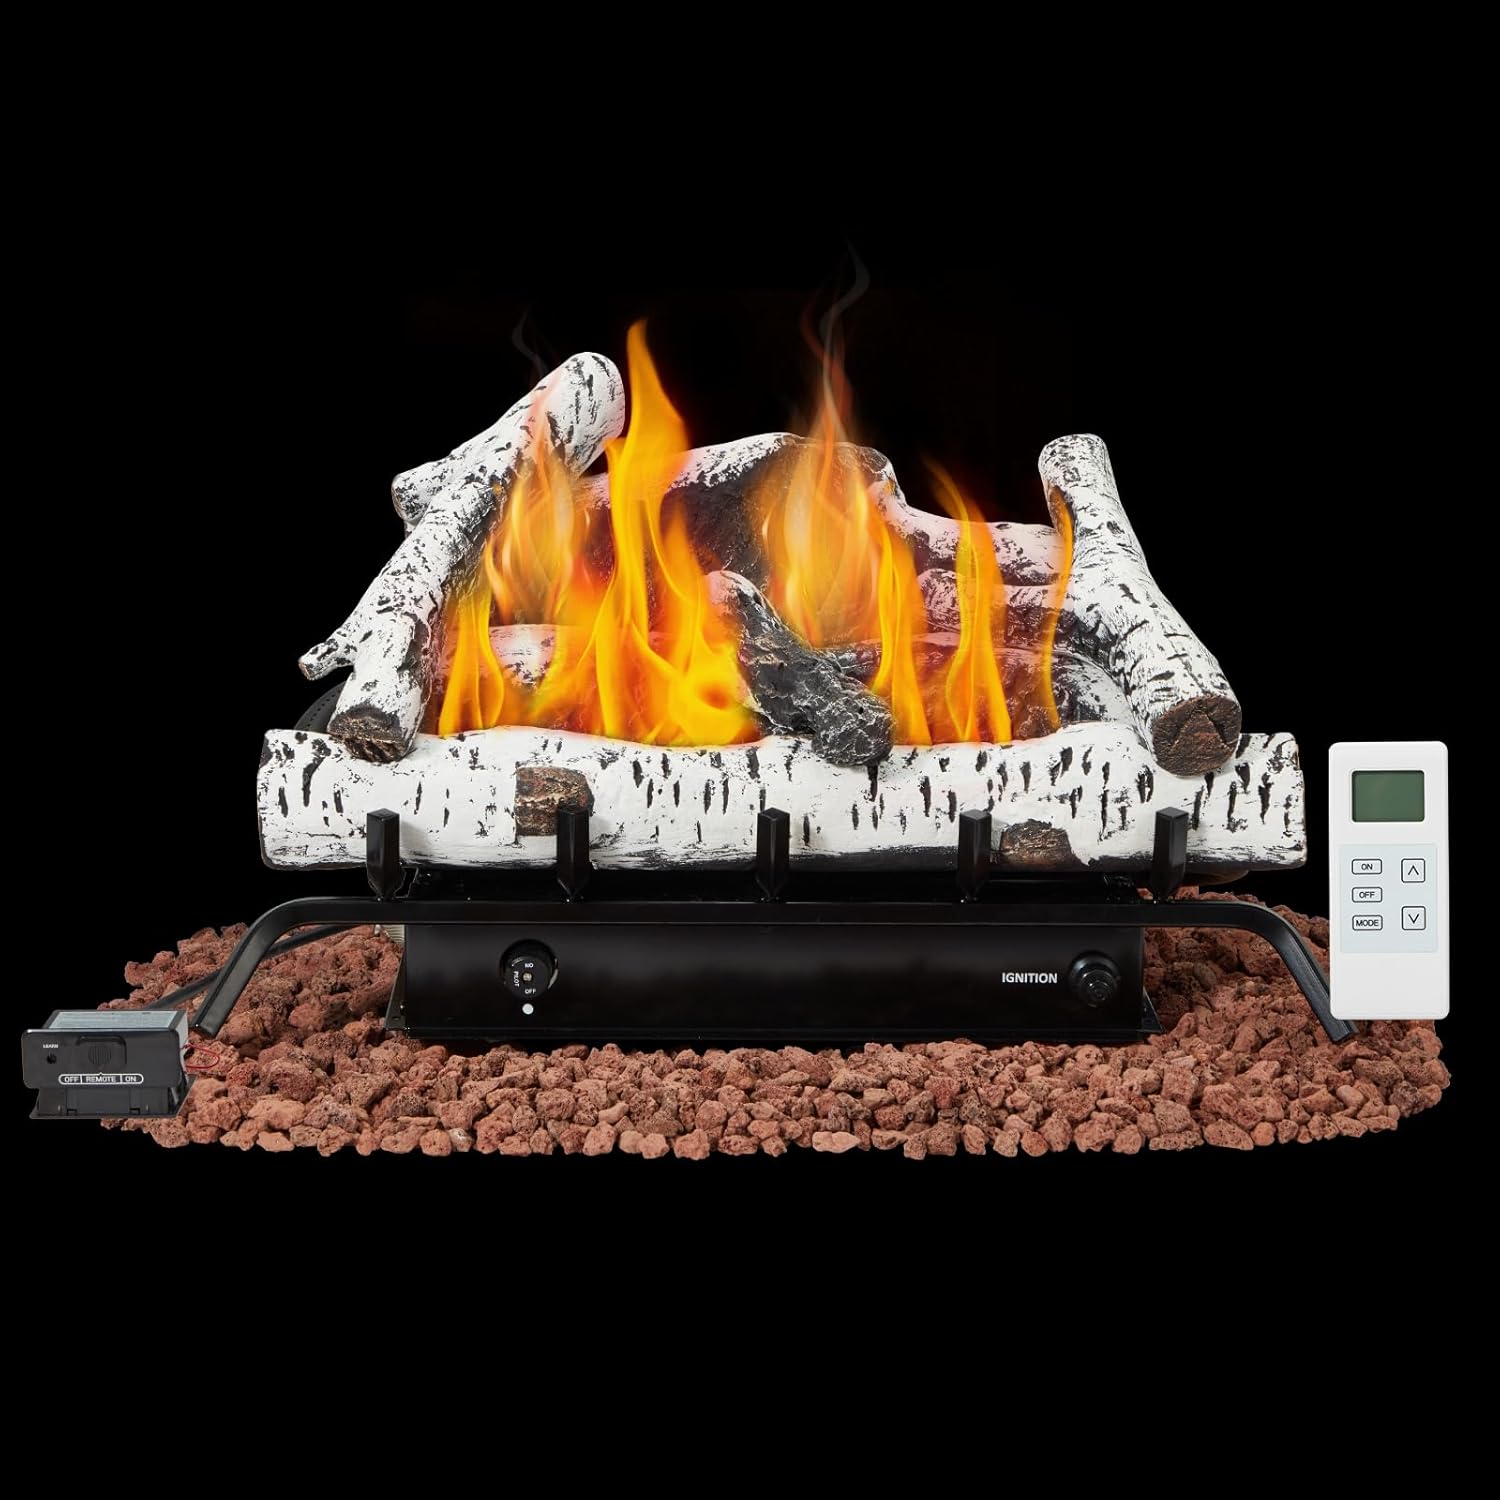
Image 1.1: The EROMMY 24 Inch Ventless Natural Gas Fireplace Logs Set, including the burner assembly, ceramic logs, lava rocks, and remote control.
2. Important Safety Information
WARNING: Improper installation, adjustment, alteration, service, or maintenance can cause injury or property damage. Read the installation, operating, and maintenance instructions thoroughly before installing or servicing this equipment.
- This appliance is for use with Natural Gas only. Do not attempt to use with LP/Propane gas.
- Ensure adequate ventilation in the room where the appliance is installed.
- Attention: Any glass doors on the fireplace enclosure must be fully opened when operating the heater to prevent overheating and potential damage.
- The Oxygen Depletion Sensor (ODS) is a safety device designed to automatically shut off the gas supply if oxygen levels in the room drop below a safe threshold. Do not tamper with or bypass this safety feature.
- Keep combustible materials, such as furniture, drapes, and clothing, at a safe distance from the fireplace logs. Refer to local codes for minimum clearances.
- Never leave the appliance operating unattended, especially when children or pets are present.
- Do not place anything on the logs or burner assembly.
- Ensure the firebox meets the minimum required dimensions before installation.
3. Package Contents
Verify that all components are present and undamaged before proceeding with installation.
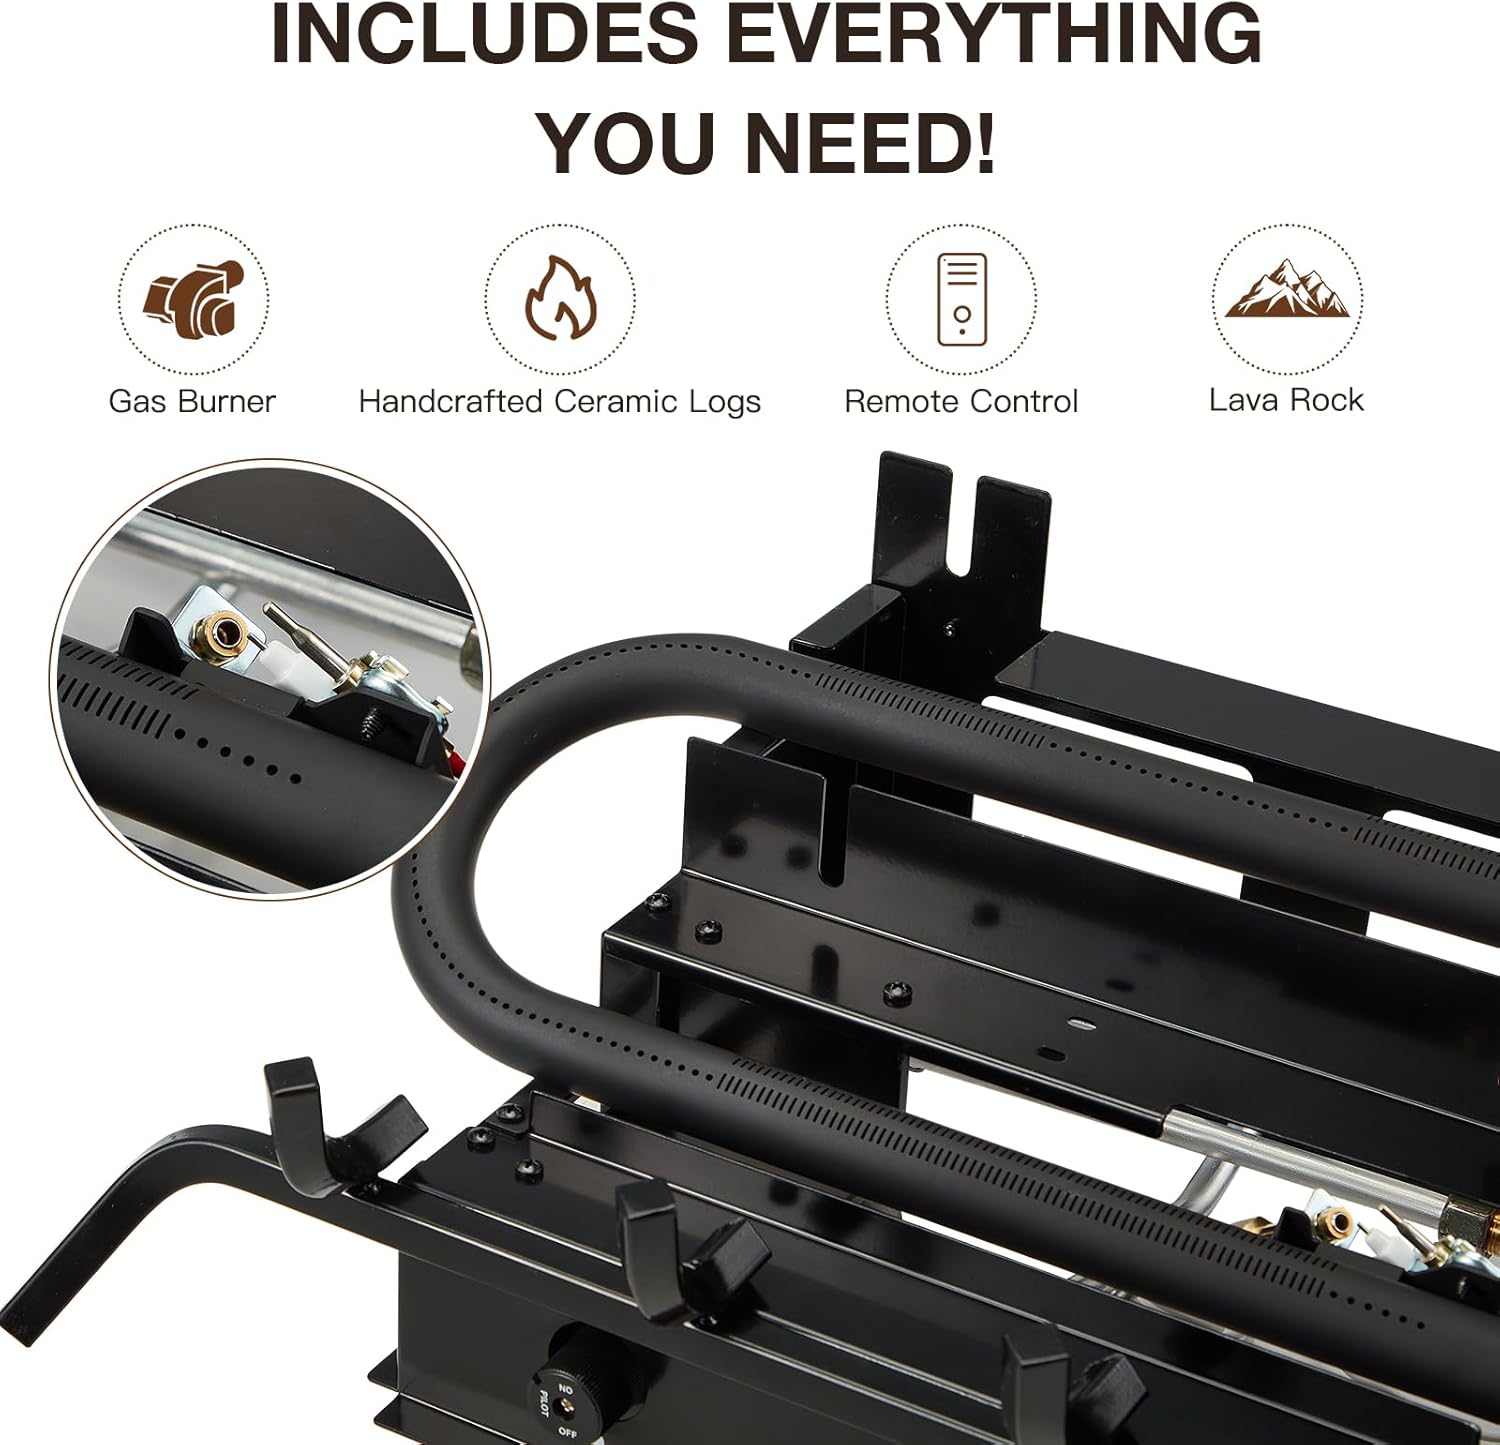
Image 3.1: Visual representation of the main components included in the package.
- 1 x Gas Burner Assembly with Grate
- 7 x Hand-Painted Ceramic Logs (Birch Wood Design)
- 1 x Bag of Lava Rock (approximately 6.6 pounds)
- 1 x Remote Control
- 1 x Receiver Box
- Instruction Manual
4. Product Specifications
| Feature | Specification |
|---|---|
| Model | 24 Inch Ventless Fireplace Logs Set |
| Fuel Type | Natural Gas Only |
| BTU Output | 32,000 BTU |
| Heating Efficiency | 99.9% |
| Heating Area | Up to 1,100 square feet |
| Venting | Vent-free (no external venting required) |
| Log Material | High-temperature ceramic, hand-painted birch wood design |
| Minimum Firebox Required | 14"D x 32"W (22"W rear) front x 24"H |
| Remote Control Features | Manual mode, thermostat mode, customizable temperature, child lock (CP lock), °F/°C conversion, 2-hour auto-shutoff |
| Safety Features | Pulse ignition, Oxygen Depletion Sensor (ODS) |

Image 4.1: Product dimensions and minimum firebox requirements.
5. Setup and Installation
Note: Installation of gas appliances should be performed by a qualified professional in accordance with all local codes and regulations.
- Prepare the Firebox: Ensure your firebox meets the minimum dimensions specified in Section 4. Clear any debris from the firebox.
- Place the Burner Assembly: Carefully place the gas burner assembly into the firebox. Ensure it is level and stable.
- Install Ignition Battery: Unscrew the cap on the IGNITION button located on the burner assembly. Insert one AAA battery, ensuring correct polarity. Tighten the cap clockwise.
- Install Receiver Batteries: Open the battery compartment on the receiver box. Insert four AAA batteries, observing correct polarity. Close the compartment.
- Connect Receiver to Main Unit: Connect the wire from the main burner unit to the receiver box. Ensure the receiver's switch is in the OFF position during connection.
- Install Remote Control Batteries: Open the battery compartment on the remote control. Insert two AAA batteries, observing correct polarity. Close the compartment.
- Add Lava Rocks: Distribute the provided lava rocks around the base of the burner assembly, ensuring they do not obstruct the pilot light or burner ports.
- Arrange Ceramic Logs: Place the 7 hand-painted ceramic logs onto the grate according to the numbering or diagram in the instruction manual. Proper log placement is crucial for optimal flame appearance and safe operation.
- Gas Line Connection: Connect the natural gas supply line to the burner assembly. This step must be performed by a qualified gas technician to ensure a leak-free and safe connection.

Image 5.1: Details of the remote receiver unit.

Image 5.2: Individual ceramic logs for placement.

Image 5.3: Properly arranged ceramic logs on the grate.
6. Operating Instructions
Always ensure any glass doors on your fireplace are fully open before operating the logs set.
- Set Receiver to REMOTE: Locate the switch on the receiver box and slide it to the REMOTE position.
- Light the Pilot Flame:
- Press lightly on the control knob on the burner assembly.
- While pressing, turn the knob counter-clockwise to the PILOT position.
- Continue pressing the knob and simultaneously press the IGNITION button until the pilot flame lights.
- Hold the control knob in for approximately 30-60 seconds after the pilot flame lights to allow the thermocouple to heat up and stabilize. Release the knob slowly. If the pilot flame extinguishes, repeat the process.
- Turn On Main Burner: Once the pilot flame is stable, press lightly on the control knob and turn it counter-clockwise to the ON position.
- Activate Main Flame with Remote:
- Press any button on the remote control to wake it up and display the current room temperature.
- Press the ON button on the remote control to ignite the main flame.
- Select Operating Mode: Use the MODE button on the remote to switch between manual mode (constant flame) and automatic constant temperature mode (thermostat).
- Adjust Temperature/Flame: Use the UP and DOWN arrow buttons on the remote to adjust the desired temperature in thermostat mode or the flame height in manual mode.
- Child Lock (CP Lock): The remote features a child lock. Refer to the remote's specific instructions for activation and deactivation.
- Auto-Shutoff: The unit will automatically shut off after 2 hours if no signal is detected from the remote for 15 minutes.
- Turn Off Main Flame: Press the OFF button on the remote control to turn off the main flame. The pilot flame will remain lit.
- Turn Off Pilot Flame: To completely turn off the unit, press lightly on the control knob on the burner assembly and rotate it clockwise to the OFF position.

Image 6.1: Remote control diagram and functions.
Operating Instructions Video
Video 6.1: This video demonstrates the step-by-step process for operating the EROMMY 24 Inch Ventless Fireplace Logs Set using the remote control, including battery installation, pilot light ignition, and main flame activation.
7. Maintenance
Regular maintenance ensures the longevity and safe operation of your fireplace logs set.
- Cleaning Logs: Allow the ceramic logs to cool completely before handling. Gently brush off any dust or soot with a soft brush. Do not use abrasive cleaners or water, as this can damage the ceramic material.
- Burner and Pilot Light Area: Periodically inspect the burner ports and pilot light assembly for any obstructions (e.g., dust, lint, lava rock fragments). Use a soft brush or compressed air to clear any blockages.
- Battery Replacement: Replace batteries in the ignition, receiver, and remote control as needed. Low batteries can affect ignition and remote functionality.
- Annual Inspection: It is recommended to have the appliance inspected annually by a qualified service technician to ensure proper operation and safety.
8. Troubleshooting
If you encounter issues, refer to the following common problems and solutions:
| Problem | Possible Cause | Solution |
|---|---|---|
| Pilot flame will not light or stay lit. | No gas supply; air in gas line; pilot orifice clogged; thermocouple not heating; low ignition battery. | Check gas supply valve; purge air from line (consult technician); clean pilot orifice; ensure thermocouple is in pilot flame; replace ignition battery. |
| Main burner will not ignite. | Pilot flame not lit; receiver in OFF position; remote batteries low; remote not paired; main burner orifice clogged. | Light pilot flame; set receiver to REMOTE; replace remote batteries; re-pair remote (refer to remote instructions); clean burner orifice. |
| Unit shuts off unexpectedly. | Oxygen Depletion Sensor (ODS) activated; gas supply interrupted; remote auto-shutoff. | Ensure adequate ventilation; check gas supply; unit may have entered auto-shutoff mode (press ON on remote). |
| Remote control not responding. | Low or dead batteries; receiver in OFF position; remote out of range; interference. | Replace remote batteries; set receiver to REMOTE; move closer to unit; remove sources of interference. |
| Loud air/gas sounds during operation. | Normal operation sound; gas pressure issue; burner obstruction. | Some sound is normal. If excessively loud or unusual, consult a qualified technician to check gas pressure or for burner obstructions. |
9. Warranty and Support
For warranty information, product support, or to purchase replacement parts, please contact EROMMY customer service. Details regarding specific warranty terms and conditions are typically provided with your purchase documentation or can be obtained directly from the manufacturer.
You can also visit the official EROMMY store for more information: