1. Introduction
The Generic Alarm Band is a silent vibration wake-up wristband engineered to provide a gentle and discreet alarm experience. It aims to improve sleep quality by waking you without disturbing others, making it ideal for light sleepers, partners, and shared living spaces. This device delivers a quiet wrist vibration, promoting a natural and peaceful awakening.

Figure 1: The Generic Alarm Band, a sleek black wristband designed for silent wake-up.
2. Package Contents
Please verify that all items are present in your package:
- 1x Generic Alarm Band (Black)
- 1x USB Charging Cable
- 1x User Manual
3. Setup
3.1 Charging the Device
Before initial use, fully charge your Alarm Band. The device features a convenient USB plug-and-charge design.
- Locate the USB charging port on the wristband. This is typically integrated into one end of the strap.
- Plug the wristband directly into a standard USB port on a computer, wall adapter, or power bank.
- The display will indicate charging status. A full charge typically takes approximately one hour.

Figure 2: The Alarm Band features a direct USB plug-and-charge design, connecting to a laptop or wall adapter.
A fully charged device provides over 14 days of battery life, depending on usage patterns.
3.2 Wearing the Wristband
For optimal comfort and effective vibration, wear the wristband snugly but not too tightly on your wrist.
- Wrap the wristband around your wrist.
- Secure the strap using the adjustable snap fastener. Ensure it is comfortable for all-night wear.
- The wristband is designed to fit wrist sizes from 12cm to 19cm.
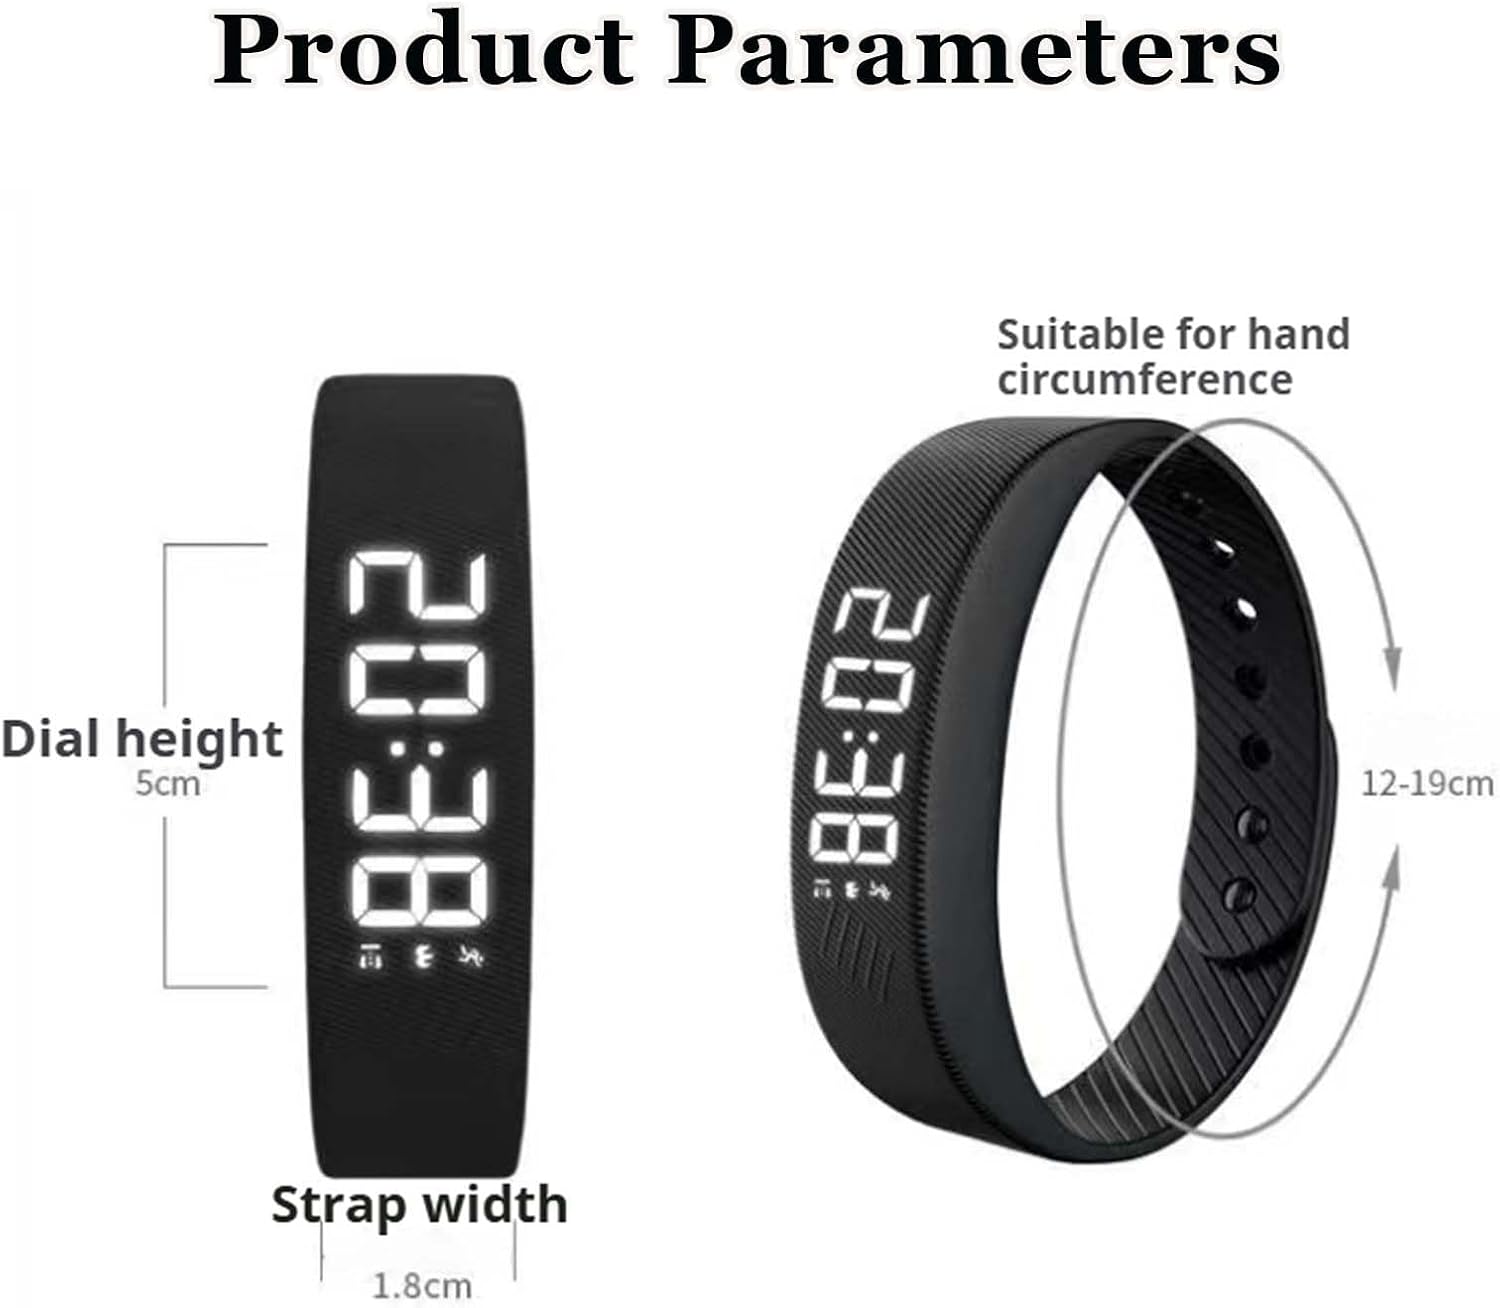
Figure 3: The Alarm Band worn on a wrist, demonstrating its comfortable and secure fit.
3.3 Setting the Time and Alarm
The Alarm Band features an HD digital display for clear time reading. Setting the time and alarm is crucial for proper function.

Figure 4: The Alarm Band's HD display, showing the time, along with details of its secure snap fastener and skin-friendly silicone strap.
While specific button functions may vary slightly, the general procedure involves:
- Accessing Settings: Typically, a long press on the main button (if present) or a series of short presses will enter the settings mode.
- Setting Time: Once in settings, use short presses to cycle through hours and minutes. A long press usually confirms a selection or moves to the next setting. Adjust to the current time.
- Setting Alarm: Navigate to the alarm setting. Set your desired wake-up time using the same adjustment method as for the current time. The device supports a dual alarm system, allowing two separate wake-up times.
- Confirming Settings: Exit the settings mode, usually by a long press or by letting the device time out, to save your changes.
4. Operating Instructions
4.1 Alarm Functionality
The Alarm Band uses silent vibration to wake you up. When the set alarm time is reached, the wristband will vibrate gently on your wrist.
- Snooze-Free Design: This device is designed to be snooze-free, meaning the vibration will continue for a set duration or until manually dismissed, encouraging you to wake up without delay.
- Dismissing the Alarm: To stop the vibration, typically a short press on the main button will dismiss the active alarm.
4.2 Checking Time and Display Options
To view the current time, a short press on the main button will usually activate the HD display. The device supports switching between 12-hour and 24-hour time formats. This option is typically found within the device's settings menu, accessible as described in Section 3.3.

Figure 5: Key features of the Alarm Band, including its silent vibration, dual alarm system, adjustable fit, and time format options.
5. Maintenance
5.1 Cleaning
- Wipe the wristband regularly with a soft, damp cloth.
- Avoid using harsh chemicals or abrasive cleaners, as these can damage the silicone material and electronic components.
- Ensure the device is dry before charging or wearing.
5.2 Battery Care
- Charge the device fully when the battery is low to prolong its lifespan.
- Avoid extreme temperatures, which can affect battery performance.
5.3 Storage
- Store the Alarm Band in a cool, dry place when not in use.
- Keep it away from direct sunlight and moisture.
6. Troubleshooting
If you encounter issues with your Alarm Band, please refer to the following common solutions:
| Problem | Possible Cause / Solution |
|---|---|
| Device not turning on or charging. | Ensure the USB connection is secure and the power source is active. Try a different USB port or charger. The battery might be completely depleted; allow a few minutes for it to respond to charging. |
| Alarm not vibrating. | Verify that the alarm is set correctly and activated. Check the battery level; low battery might prevent vibration. Ensure the device is worn correctly on the wrist. |
| Difficulty setting time or alarm. | Refer to Section 3.3 for detailed instructions. Ensure you are using the correct button presses (short vs. long) to navigate and confirm settings. If the display is unresponsive, try charging the device. |
| Incorrect time displayed. | Re-enter the settings mode and adjust the current time as per Section 3.3. Ensure the 12/24-hour format is set to your preference. |
7. Specifications
| Feature | Detail |
|---|---|
| Brand | Generic |
| Model Name | ACC |
| Part Number | 001 |
| Color | Black |
| Screen Size | 1.8 Inches |
| Suggested Users | Unisex |
| Wrist Circumference | 12-19 cm (Adjustable) |
| Battery Life | 14+ Days (approx.) |
| Charging Time | Approx. 1 hour |
8. Warranty and Support
For warranty information or technical support, please refer to the documentation provided at the time of purchase or contact the seller directly. Keep your purchase receipt as proof of purchase.
If you have further questions or require assistance not covered in this manual, please reach out to the customer support team of your retailer or the manufacturer.