1. Introduction
This manual provides detailed instructions for the assembly, operation, and maintenance of your busyaeh Queen Bed Frame with Storage Headboard and LED Lights. Please read this manual thoroughly before assembly and use to ensure proper function and safety. Keep this manual for future reference.
2. Safety Instructions
- Ensure all parts are present and undamaged before beginning assembly. Do not use if any parts are missing or damaged.
- Follow assembly instructions carefully. Incorrect assembly can lead to instability and injury.
- Do not exceed the maximum weight capacity of 1000 LBS.
- Keep small parts away from children during assembly to prevent choking hazards.
- Ensure all connections for the charging station and LED lights are properly secured and follow electrical safety guidelines.
- Place the bed frame on a level surface to prevent wobbling.
- Regularly check all bolts and screws to ensure they remain tight.
3. Package Contents
Verify that all components listed below are included in your package. If any items are missing, please contact customer support.
- Headboard components (including storage shelves, hidden compartment, LED strip)
- Footboard components (including storage shelves, LED strip)
- Side rails with Velcro strips
- 12 Solid wooden slats
- Metal frame components and tripod supports
- Built-in charging station (2 AC outlets, 1 USB port, 1 Type-C port)
- Power cord (6.6 feet)
- Assembly hardware (screws, bolts, Allen wrench, etc.)
- Remote control for LED lights
- Instruction manual
4. Setup and Assembly Instructions
Assembly typically requires two adults. Please refer to the included step-by-step instructions and diagrams for detailed guidance. Ensure you have adequate space for assembly.
- Unpack and Identify Parts: Lay out all components and hardware. Compare them with the package contents list to ensure everything is present.
- Assemble the Headboard:
Attach the storage shelves and hidden compartment to the main headboard structure. Connect the LED strip wiring as indicated in the specific headboard assembly diagram.
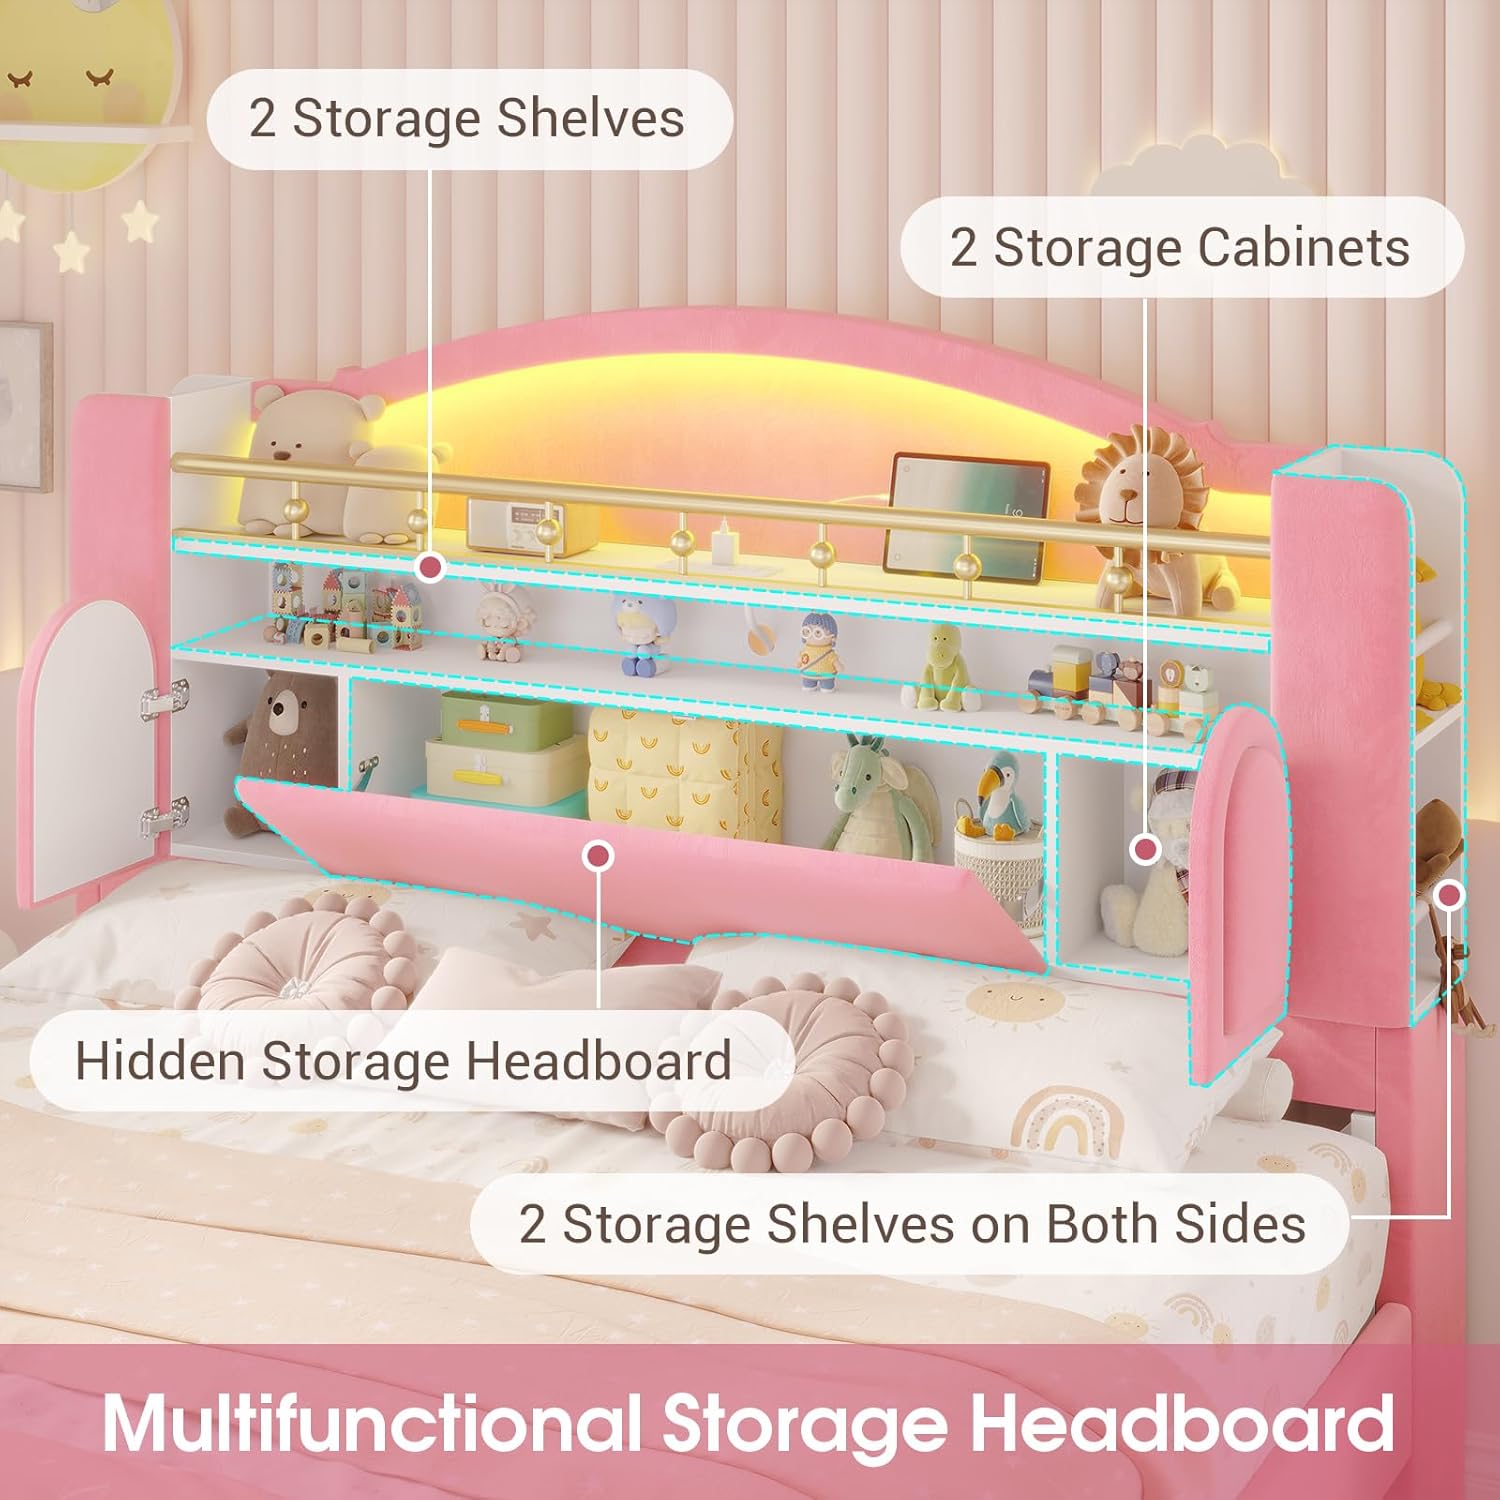
Image: Multifunctional Storage Headboard. This image shows the various storage options within the headboard, including two open shelves, a hidden compartment, and two side storage shelves.
- Install the Charging Station:
Integrate the charging station into the designated slot on the headboard. Ensure the power cord is routed safely and securely.

Image: Built-in Charging Station. This image highlights the integrated charging station with two AC outlets, one USB port, and one Type-C port, along with its 6.6-foot power cord.
- Assemble the Footboard:
Attach the storage shelves and LED strip to the footboard structure, following the specific footboard assembly diagram.

Image: Storage Footboard with LED Lights. This image shows the footboard with illuminated storage compartments, suitable for books or toys.
- Connect Side Rails:
Attach the side rails to the assembled headboard and footboard using the provided hardware. Ensure the Velcro strips on the side rails are facing inwards.
- Install Wooden Slats:
Unroll and attach the wooden slats to the side rails. The Velcro strips on the slats should align with those on the side rails for secure placement. Ensure the silent strips are properly positioned to reduce noise.

Image: Assembly Features. This diagram illustrates the Velcro slat installation, the sturdy wood frame with silent pads, metal tripod support, and the hinged board mechanism.
- Final Checks:
Confirm all bolts and screws are tightened. Ensure the bed frame is stable and level. Plug in the power cord for the charging station and LED lights.
5. Operating Instructions
5.1. LED Lights Operation
The integrated RGB LED lights can be controlled via a remote control or a dedicated smartphone application.
- Remote Control: Use the provided remote to turn the lights on/off, change colors, adjust brightness, and select various modes (e.g., static color, flashing, fading).
- Smartphone App: Download the recommended app (refer to the QR code or link in the separate LED light instruction sheet). The app offers advanced features such as:
- Over 60,000 color options.
- Mic Mode: Lights react to sound.
- Music Mode: Lights sync with music.
- Timing Mode: Schedule light on/off times.
- Custom Style: Create personalized light effects.

Image: RGB LED Lights in Operation. This image demonstrates the bed's RGB LED lights, highlighting features like music sync and app control.
5.2. Charging Station Usage
The built-in charging station provides convenient power access for your electronic devices.
- Plug the bed frame's main power cord into a standard wall outlet.
- Use the 2 AC outlets (125V/12A) for larger devices like laptops or lamps.
- Use the 1 USB port (5V/2.1A) or 1 Type-C port (5V/2.1A) for charging smartphones, tablets, and other compatible USB-powered devices.
- Ensure devices are compatible with the provided voltage and current specifications.
6. Maintenance and Care
- Cleaning:
- For the velvet fabric, gently spot clean with a damp cloth and mild detergent. Avoid harsh chemicals.
- For the frame, wipe with a soft, dry cloth.
- Do not use abrasive cleaners or solvents.
- Hardware Check: Periodically inspect all bolts, screws, and connections to ensure they are tight. Re-tighten as necessary to maintain stability.
- Electrical Components: Ensure the power cord and charging station are free from damage. Do not attempt to repair electrical components yourself.
- Slats: Check wooden slats for any signs of damage or wear. Replace if necessary to maintain mattress support.
7. Troubleshooting
| Problem | Possible Cause | Solution |
|---|---|---|
| Bed frame is wobbly. | Loose connections; uneven floor. | Ensure all bolts and screws are tightened. Move the bed to a level surface or use shims if necessary. |
| LED lights not working. | Power cord unplugged; remote battery dead; loose LED strip connection. | Check if the power cord is securely plugged in. Replace remote battery. Verify LED strip connections. |
| Charging station not providing power. | Power cord unplugged; device incompatibility; internal wiring issue. | Ensure the bed's main power cord is plugged in. Check device compatibility. If issues persist, contact customer support. |
| Squeaking noises. | Loose connections; slats rubbing; silent strips dislodged. | Tighten all hardware. Ensure slats are properly seated and silent strips are in place. |
8. Specifications
- Size: Queen
- Product Dimensions (L x W x H): 87.8" x 60.7" x 46.9"
- Color: Pink
- Material: Heavy-duty metal frame, solid wooden slats, velvet fabric, soft sponge padding
- Weight Capacity: Up to 1000 LBS
- Recommended Mattress Thickness: 6-12 inches (No box spring needed)
- Under-bed Clearance: 5.9 inches
- Charging Station:
- 2 AC Outlets: 125V/12A
- 1 USB Port: 5V/2.1A
- 1 Type-C Port: 5V/2.1A
- Power Cord Length: 6.6 feet
- LED Lights: RGB, App/Remote Control, Mic Mode, Music Mode, Timing Mode, Custom Style
- Item Weight: Approximately 119 pounds
- Model Number: Princess Bed for girls
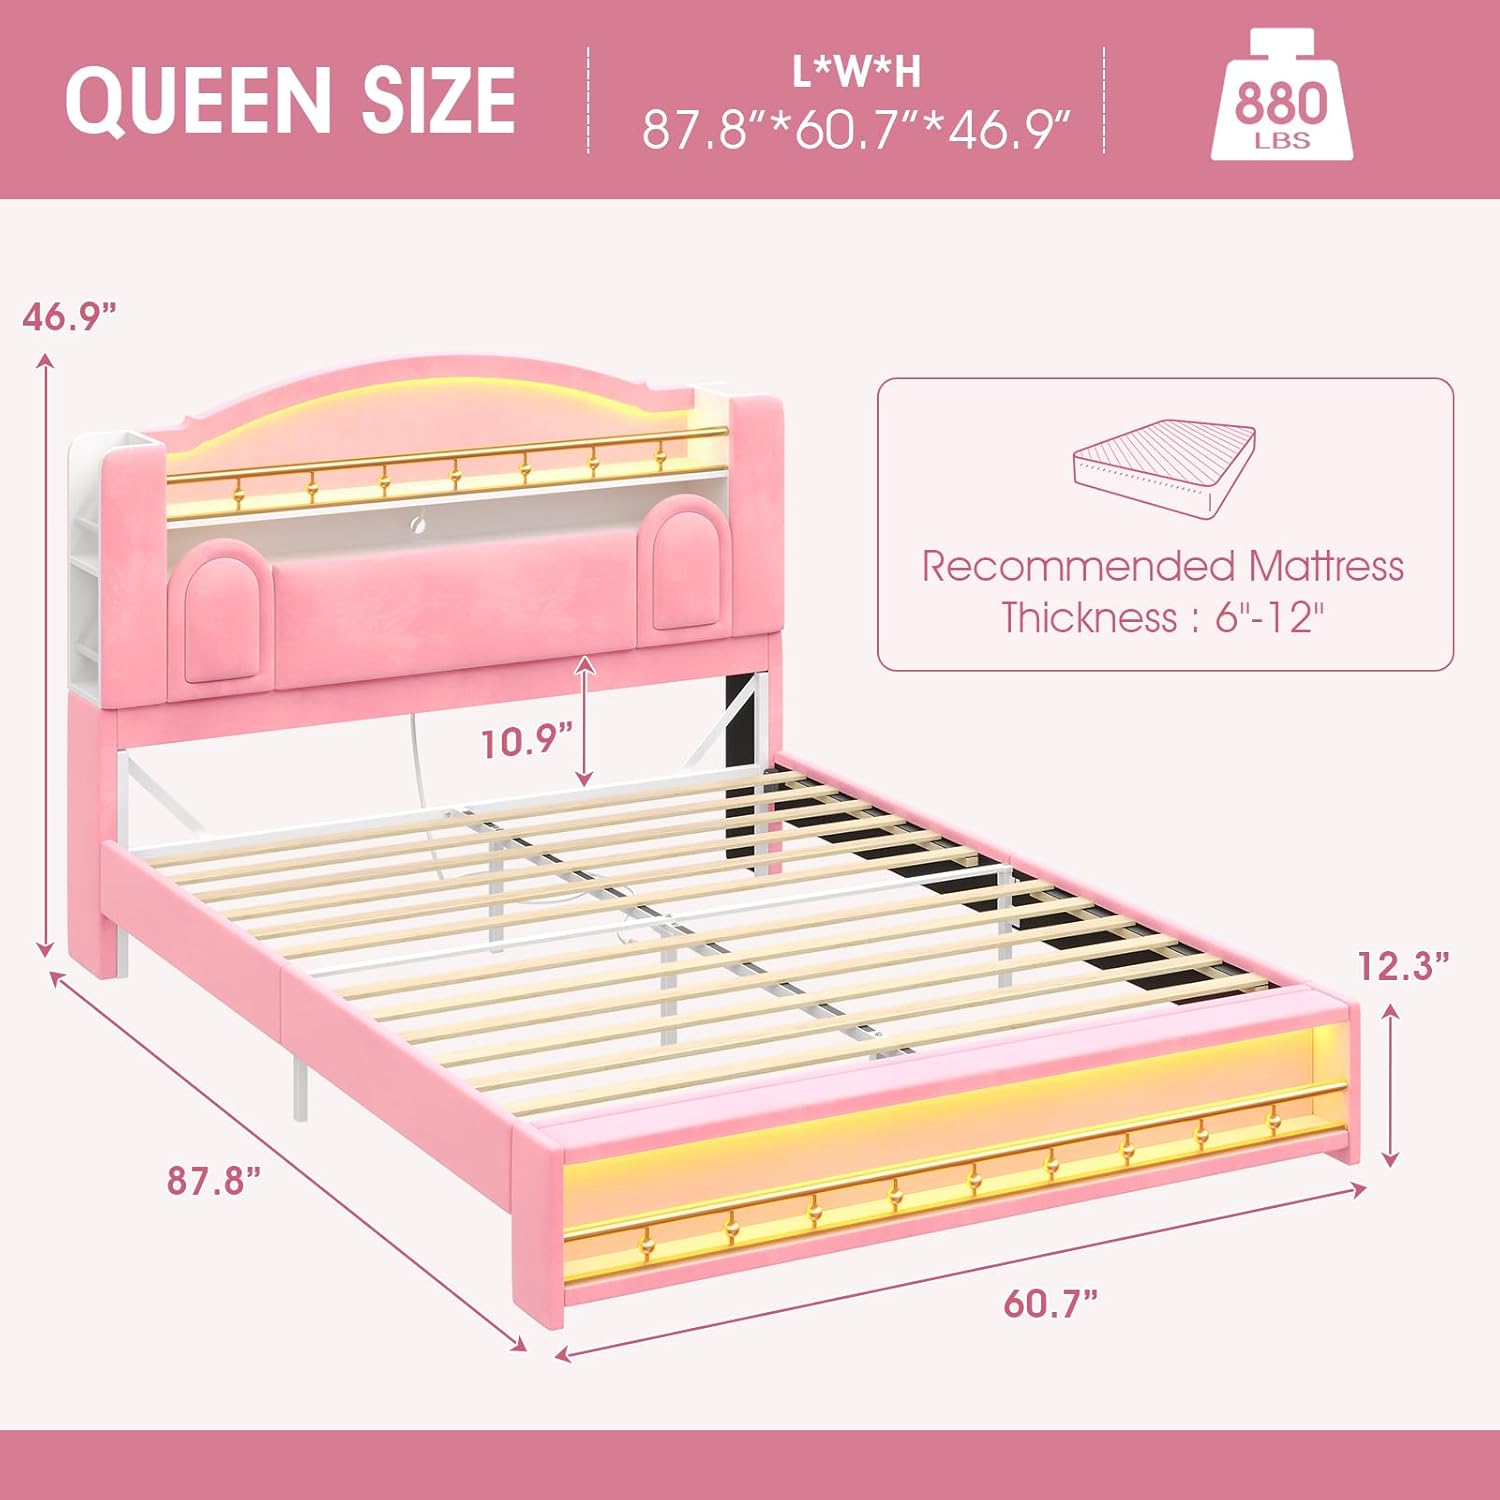
Image: Queen Size Bed Dimensions. This diagram provides the overall dimensions (length, width, height) and weight capacity of the queen bed frame.

Image: Under-bed Storage Space. This image illustrates the 5.9-inch under-bed clearance, suitable for robot vacuums or storage bins.
9. Warranty and Support
For any missing or damaged parts during installation, or for further assistance, please contact busyaeh customer support. Refer to your purchase documentation for specific warranty details.
Contact Information: Please refer to the contact details provided with your purchase or visit the official busyaeh website.


