ATTACHXPRO ATTACHXPRO-MOWER500Pro-1
ATTACHXPRO Remote Control Slope Crawler Lawn Mower
Model: ATTACHXPRO-MOWER500Pro-1 User Manual
1. Introduction
This manual provides essential instructions for the safe operation, maintenance, and troubleshooting of your ATTACHXPRO Remote Control Slope Crawler Lawn Mower, Model ATTACHXPRO-MOWER500Pro-1. This powerful, all-terrain grass cutter is designed for efficient lawn care, featuring a robust engine, remote control capabilities, and adjustable cutting height for diverse landscapes. Please read this manual thoroughly before operating the machine to ensure proper use and longevity.
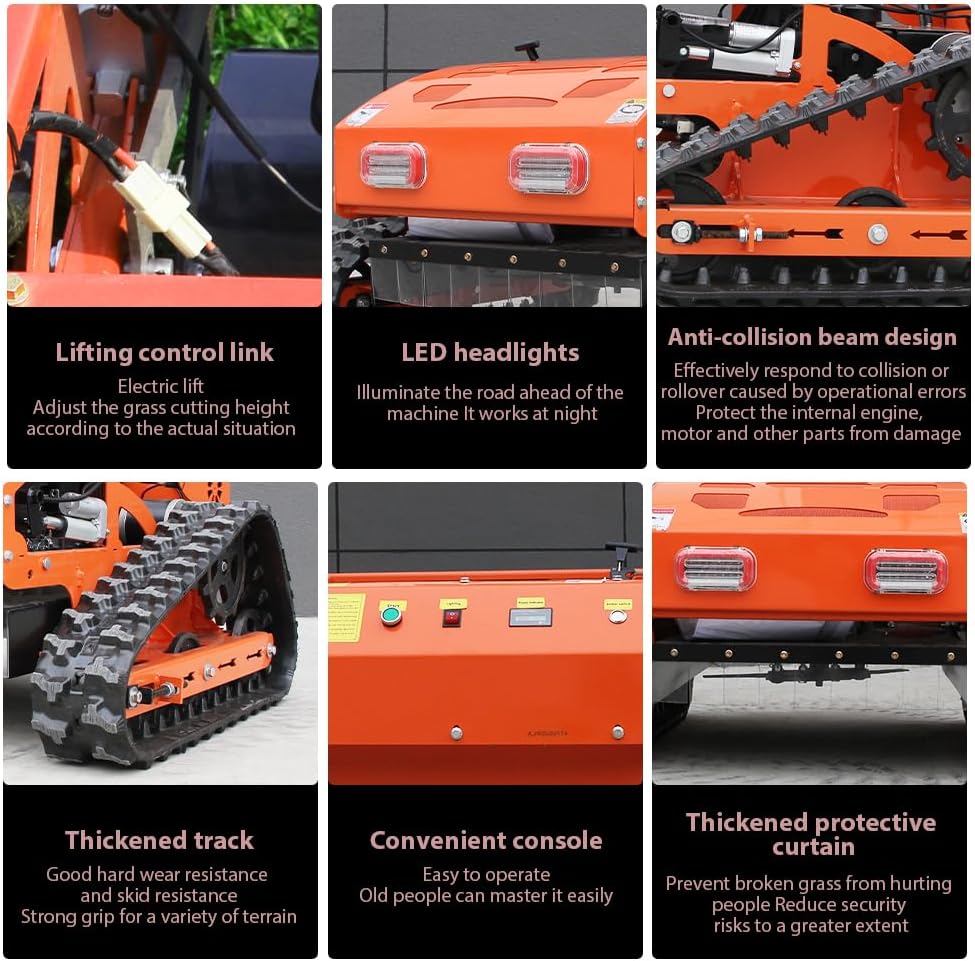
Image 1.1: The ATTACHXPRO Remote Control Slope Crawler Lawn Mower, designed for efficient and remote-controlled lawn maintenance.
2. Safety Information
Always prioritize safety when operating the lawn mower. Failure to follow safety guidelines can result in serious injury or damage to the equipment.
- Read the Manual: Familiarize yourself with all controls and safety features before operation.
- Personal Protective Equipment (PPE): Always wear appropriate safety glasses, hearing protection, sturdy footwear, and long pants during operation.
- Clear the Area: Before starting, ensure the mowing area is free of debris, rocks, toys, and other objects that could be thrown by the blades.
- Maintain Safe Distance: Keep bystanders, children, and pets at a safe distance from the operating mower.
- Slope Operation: The mower is designed for slopes up to 50 degrees (80% grade). Exercise extreme caution on inclines and declines. Operate across slopes when possible, not up and down.
- Debris Protection: The thickened protective curtain minimizes debris splashing, but always be aware of potential projectiles.
- Fuel Handling: Refuel in a well-ventilated area with the engine off and cool. Avoid spilling fuel.
- Engine Off: Always turn off the engine and disconnect the spark plug wire before performing any maintenance, adjustments, or clearing blockages.
- Night Operation: Utilize the integrated LED front lights for enhanced visibility if operating in low-light conditions.
- Anti-Collision Beam: The anti-collision beam design helps protect internal components from damage due to operational errors. However, avoid intentional collisions.
3. Components Overview
Understanding the key components of your ATTACHXPRO lawn mower is crucial for effective operation and maintenance.

Image 3.1: Labeled diagram illustrating the main components of the lawn mower.
- Brand Engine: The powerful RATO225 gasoline engine provides reliable power for mowing and climbing.
- LED Headlights: Integrated lights for improved visibility during operation in low-light conditions.
- Lifting Control Link: Electric mechanism to adjust the cutting height of the blades.
- Multi-function Console: Centralized control panel for various functions.
- Throttle Handle: Controls engine speed and power output.
- Thickened Track: Durable, wear-resistant tracks provide strong grip and excellent traction on various terrains, including slopes.
- Heat Sink: Dissipates heat from internal components to maintain optimal operating temperature.
- Thickened Protective Curtain: A safety feature designed to prevent grass and debris from being ejected towards the operator.
- Blades: High-quality, wear-resistant blades designed for efficient cutting of various grass types.

Image 3.2: Detailed views of the lifting control link, LED headlights, anti-collision beam, thickened track, convenient console, and thickened protective curtain.
4. Setup
Before operating your lawn mower, ensure it is properly set up and prepared.
- Unpacking: Carefully remove the mower from its packaging. Inspect for any shipping damage.
- Fueling: Fill the 1.2L fuel tank with unleaded gasoline. Refer to the engine manual for specific fuel requirements.
- Engine Oil: Check the engine oil level and fill with the recommended oil type up to the specified mark. The engine oil capacity is 0.6L.
- Battery Connection: Ensure the 12V12A high-efficiency battery is properly connected. The engine features a self-charging system during operation.
- Remote Control Preparation: Install batteries in the remote control unit. Familiarize yourself with the remote's layout and functions.
- Pre-Operation Check: Before each use, inspect the blades for sharpness and damage, check all fasteners for tightness, and ensure the protective curtain is intact.
5. Operating Instructions
Follow these steps for safe and effective operation of your remote control lawn mower.
- Starting the Engine:
- Ensure the mower is on a level surface.
- Turn the fuel valve to the 'ON' position.
- Set the choke (if applicable) according to engine starting procedures.
- Use the electric start button on the console or remote control to ignite the RATO225 engine.
- Once started, gradually move the choke to the 'RUN' position.
- Remote Control Operation:
- The remote control allows for precise maneuvering and function adjustments from a safe distance. The effective remote control range is up to 600 meters.
- Use the joystick or directional controls to guide the mower. The adjustable travel speed is 0-3 KM/H.
- Control the throttle to adjust engine RPM and blade speed.

Image 5.1: Remote control operation, demonstrating the 600m range and 50-degree climbing capability.
- Adjusting Cutting Height:
- The cutting height can be adjusted electrically from 20mm to 150mm (0.79 inches to 5.9 inches) using the lifting control link via the remote or console.
- Adjust the height based on grass type, desired lawn appearance, and terrain conditions.

Image 5.2: Electric lift for free adjustment of grass cutting height, ranging from 20mm to 150mm.
- Mowing Technique:
- Begin mowing at the highest cutting height and gradually lower it if needed.
- Overlap cutting paths slightly to ensure even coverage.
- On slopes, operate the mower across the incline rather than directly up and down to maintain stability. The powerful crawler drive allows for climbing up to an 80% slope (39 degrees).
- Stopping the Mower:
- Reduce the throttle to idle.
- Turn off the engine using the designated switch on the console or remote.
- Turn the fuel valve to the 'OFF' position.
6. Maintenance
Regular maintenance ensures optimal performance and extends the lifespan of your lawn mower. Always turn off the engine and disconnect the spark plug wire before performing any maintenance.
- Cleaning: After each use, clean grass clippings and debris from the mower deck, blades, and tracks. The modular structure simplifies cleaning and maintenance.
- Blade Inspection: Regularly inspect blades for sharpness, damage, and balance. Sharpen or replace blades as needed.
- Engine Oil Check: Check engine oil level before each use. Change oil according to the engine manufacturer's recommendations (typically after the first 5 hours, then every 25-50 hours).
- Air Filter: Inspect and clean the air filter regularly. Replace if heavily soiled or damaged.
- Spark Plug: Inspect and clean the spark plug periodically. Replace if worn or fouled.
- Fuel System: Drain the fuel tank at the end of the mowing season or if storing for an extended period. Use a fuel stabilizer if storing with fuel.
- Track Inspection: Check the tracks for wear, damage, and proper tension.
- General Inspection: Periodically check all nuts, bolts, and fasteners for tightness. Lubricate moving parts as recommended by the manufacturer.
7. Troubleshooting
This section addresses common issues you might encounter with your lawn mower.
| Problem | Possible Cause | Solution |
|---|---|---|
| Engine does not start | No fuel; Spark plug faulty; Choke incorrect; Battery low (for electric start) | Check fuel level; Clean/replace spark plug; Adjust choke; Charge/check battery. |
| Mower loses power during operation | Low fuel; Clogged air filter; Dull blades; Engine overheating | Refuel; Clean/replace air filter; Sharpen/replace blades; Check for obstructions around engine. |
| Uneven cutting | Dull or bent blades; Incorrect cutting height adjustment; Uneven terrain | Inspect and replace/sharpen blades; Adjust cutting height evenly; Mow at a slower speed on uneven ground. |
| Remote control unresponsive | Remote control batteries low/dead; Out of range; Interference | Replace remote control batteries; Move closer to the mower; Avoid areas with strong signal interference. |
| Excessive vibration | Bent or unbalanced blade; Loose fasteners; Debris caught in blade area | Inspect and balance/replace blade; Tighten all fasteners; Clear debris (engine off). |
8. Specifications
Detailed technical specifications for the ATTACHXPRO Remote Control Slope Crawler Lawn Mower.

Image 8.1: Key parameters and dimensions of the ATTACHXPRO Lawn Mower.
| Feature | Specification |
|---|---|
| Brand | ATTACHXPRO |
| Model Number | ATTACHXPRO-MOWER500Pro-1 |
| Power Source | Fuel Powered (Gasoline) |
| Engine Type | RATO225 Electric Starting Engine |
| Displacement | 224 CC |
| Horsepower (HP) | 9 |
| Cutting Width | 500 mm (19.7 inches) |
| Adjustable Cutting Height | 20 mm - 150 mm (0.79 inches - 5.9 inches) |
| Operation Mode | Automatic (Remote Control) |
| Remote Control Range | Up to 600 meters |
| Max. Working Slope | 50 degrees (approx. 80% grade) |
| Travel Speed | 0-3 KM/H (Adjustable) |
| Fuel Tank Capacity | 1.2 Liters |
| Engine Oil Capacity | 0.6 Liters |
| Battery | 12V12A (High-efficiency, self-charging) |
| Material | Metal |
| Item Weight | 331 Pounds (150 kg) |
| Product Dimensions (L x W x H) | 39.98"D x 31.89"W x 38.98"H (101.5cm x 81cm x 99cm) |
| Assembly Required | No |
9. Warranty and Support
For specific warranty details, please refer to the warranty card included with your product or contact ATTACHXPRO customer service directly. ATTACHXPRO is committed to providing quality products and support.
For technical assistance, parts, or service inquiries, please visit the official ATTACHXPRO website or contact their customer support team. Lifetime technical advisory is typically included with ATTACHXPRO products.
Contact Information: Refer to your purchase documentation or the ATTACHXPRO brand store for the most current contact details.
Ask a question about this manual
Ask about setup, troubleshooting, compatibility, parts, safety, or missing instructions. Manuals+ will review the question and use this page’s manual context to help answer it.