1. Introduction
Thank you for choosing the SIXWIN Dual Lens Waterproof Motorcycle Dash Cam. This device is designed to provide reliable video recording for your motorcycle, enhancing safety and providing crucial evidence in case of incidents. Featuring a 3-inch display, front and rear cameras, G-sensor for automatic incident detection, and loop recording, this dash cam is built for the demands of motorcycle riding.
Please read this manual carefully before installation and operation to ensure proper use and to maximize the product's lifespan.
2. Package Contents
Verify that all items listed below are included in your package. If any items are missing or damaged, please contact customer support.
- Main DVR Host with 3-inch Screen
- Front Lens Camera
- Rear Lens Camera
- Power Cord
- Extension Cords (for cameras)
- Mounting Brackets and Screws
- User Manuals
- TF Memory Card (e.g., 32GB, if included)

Image: Overview of the SIXWIN Motorcycle Dash Cam package contents, showing the main unit, front and rear cameras, power and extension cords, mounting hardware, and user manuals.
3. Product Features Overview
The SIXWIN Motorcycle Dash Cam is equipped with several features to enhance your riding experience and safety:
- 3-inch Display: Clear screen for easy viewing and review of recordings.
- Dual Lens Recording: 720P front and 480P rear cameras capture comprehensive video coverage.
- Automatic Incident Detection (G-Sensor): Automatically locks footage during an impact to prevent overwriting.
- Loop Recording: Continuously records, overwriting the oldest footage when the memory card is full.
- IP67 Waterproof: DVR host and cameras are designed to withstand various weather conditions.
- User-Friendly Interface: Intuitive controls for easy navigation and settings adjustment.

Image: Detailed view of the main DVR unit highlighting key controls such as Menu/Mode, Flip-up, Scroll Down, OK/Shutdown keys, Reset Button, TF Memory Card slot, Red/Blue indicator lights, Horn, Microphone, and Bracket Mounting Position.
4. Setup and Installation
Proper installation is crucial for optimal performance. It is recommended to have this installed by a professional if you are unsure about motorcycle wiring.
4.1 Mounting the DVR Host
- Attach the mounting bracket to the back of the DVR host.
- Securely mount the DVR host to your motorcycle's handlebars or a suitable flat surface using the provided bracket and screws. Ensure the screen is visible and accessible.

Image: Illustration showing how the DVR host attaches to the handlebar mounting bracket.
4.2 Camera and Wiring Installation
- Identify the Front and Rear Lens Cameras.
- Mount the Front Lens Camera at the front of your motorcycle, ensuring a clear view of the road ahead.
- Mount the Rear Lens Camera at the rear of your motorcycle, ensuring a clear view of the road behind.
- Connect the Front and Rear Lens Cameras to the DVR host using the provided extension cords.
- Connect the Power Cord to the DVR host and route it to your motorcycle's power source (e.g., battery or ignition-switched power). Ensure proper wiring to avoid electrical issues.
- Secure all cables using cable ties to prevent them from interfering with moving parts or being damaged by vibration.

Image: Diagram illustrating the connection points for the logger mainframe (DVR), front shot camera, rear shot camera, extension cords, and pressure drop line (power connection) on a motorcycle.
5. Operating Instructions
5.1 Powering On/Off
- Automatic Power: The dash cam will automatically power on and begin recording when your motorcycle's ignition is turned on (if wired to an ignition-switched power source).
- Manual Power: Press and hold the OK/Shutdown key to manually power the device on or off.
5.2 Recording Modes
- Loop Recording: The dash cam continuously records video in segments. When the memory card is full, it automatically overwrites the oldest unlocked files.
- G-Sensor (Automatic Incident Detection): In the event of a sudden impact or collision, the built-in G-sensor will detect the incident and automatically lock the current video file, preventing it from being overwritten by loop recording.

Image: Visual representation of the loop recording process, showing how older video segments are automatically deleted to make space for new recordings, with an indicator for locked files.
5.3 Screen Display Modes
The 3-inch display allows you to switch between different camera views:
- Front Camera View: Displays only the front camera feed.
- Rear Camera View: Displays only the rear camera feed.
- Picture-in-Picture (Front + Rear): Displays the front camera feed with a smaller inset of the rear camera feed.
- Split Screen (Front & Rear): Displays both front and rear camera feeds side-by-side.
Use the Menu/Mode key or Scroll Down key to cycle through the available display modes.
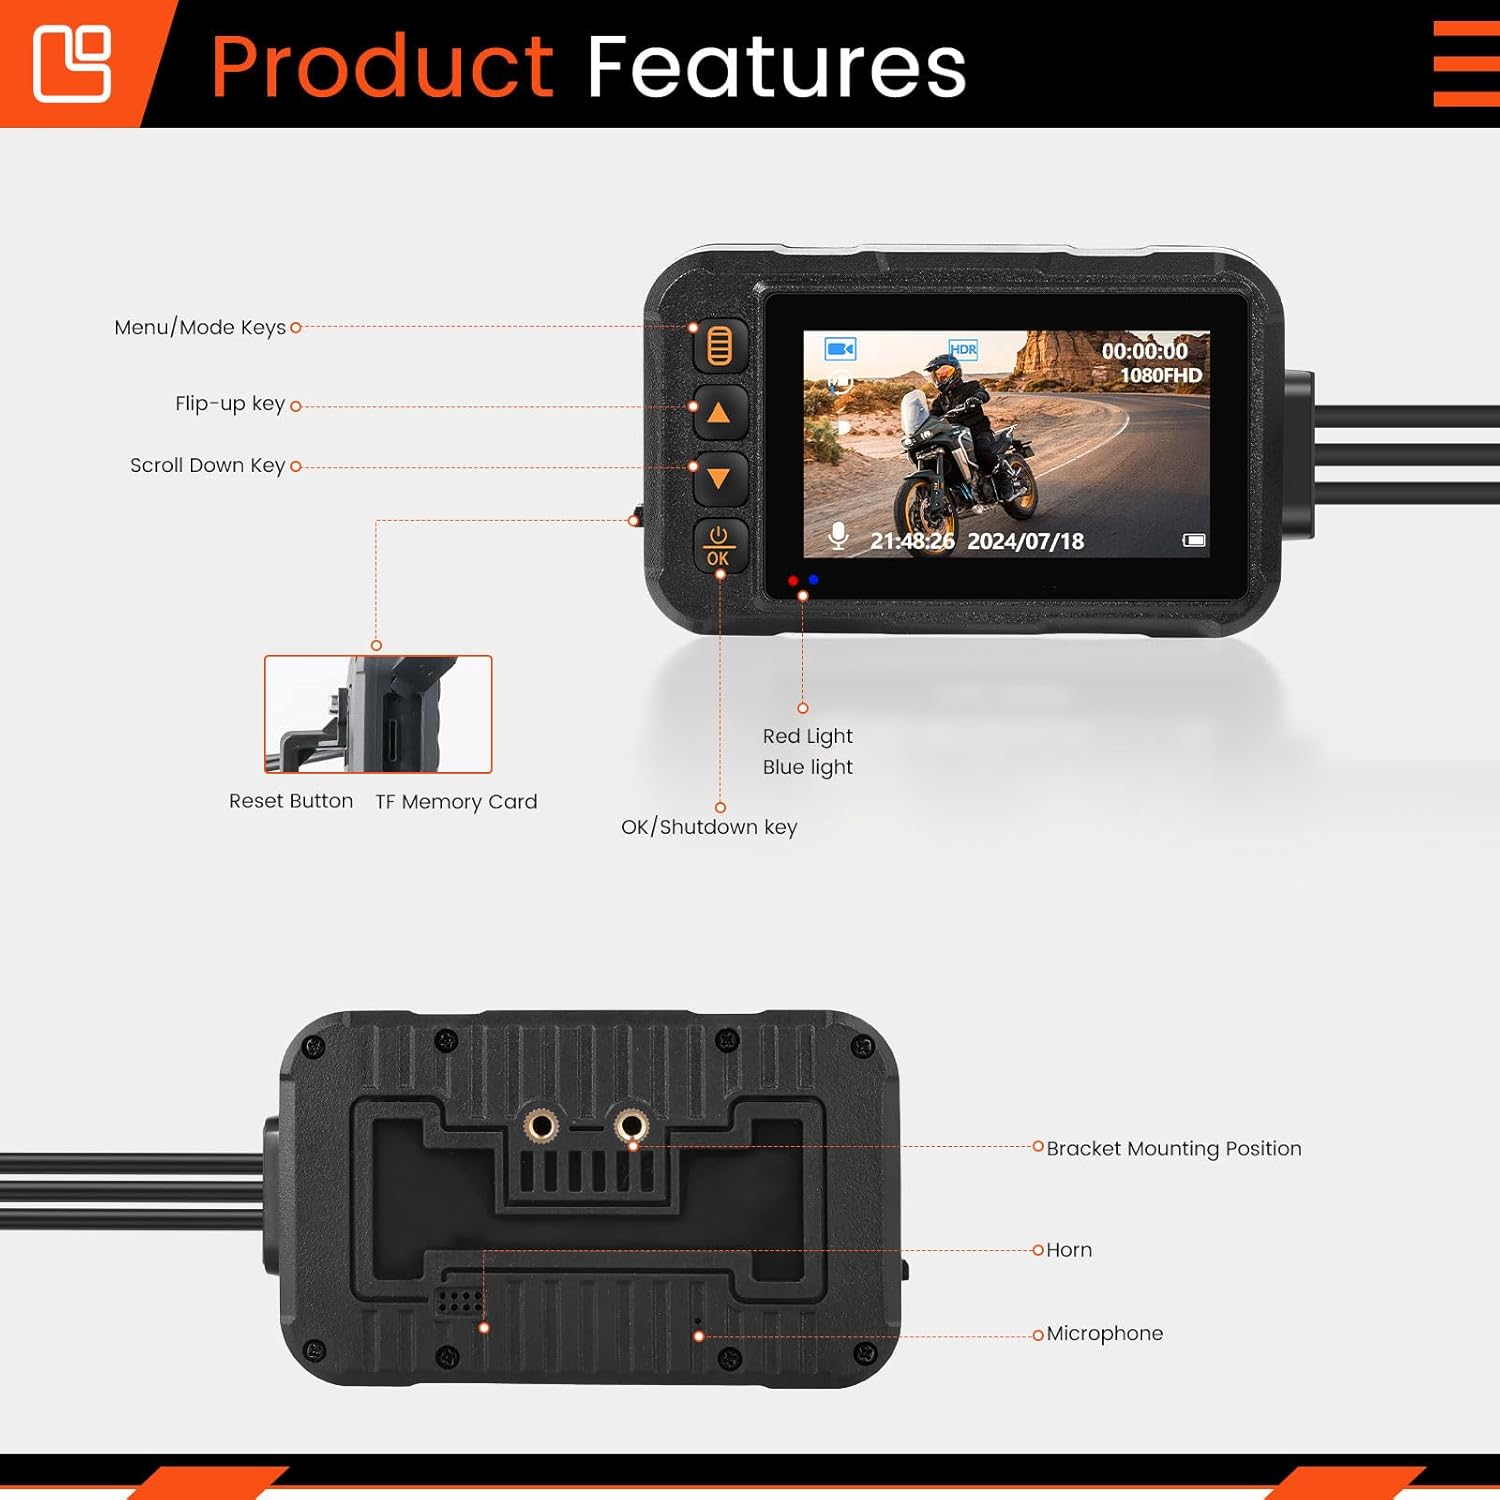
Image: Examples of the four different screen display modes: Front only, Front + Rear (Picture-in-Picture), Front + Rear (Split Screen), and Rear only.
5.4 Menu Navigation and Settings
Press the Menu/Mode key to enter the menu. Use the Flip-up and Scroll Down keys to navigate through options. Press the OK key to select an option or confirm a setting. Common settings include:
- Video Resolution
- Loop Recording Duration
- G-Sensor Sensitivity
- Date/Time Stamp
- Language
- Format SD Card
6. Maintenance
Regular maintenance ensures the longevity and optimal performance of your dash cam.
- Cleaning: Use a soft, dry cloth to clean the DVR screen and camera lenses. Avoid abrasive cleaners or solvents.
- Memory Card: Periodically format the memory card (at least once a month) to prevent data corruption and ensure smooth recording. Back up any important files before formatting.
- Firmware Updates: Check the manufacturer's website for any available firmware updates to improve performance or add new features.
- Cable Inspection: Regularly inspect all cables and connections for wear, fraying, or damage. Replace any damaged cables immediately.

Image: A motorcycle dash cam mounted on handlebars in rainy conditions, demonstrating its IP67 waterproof capability.
7. Troubleshooting
If you encounter issues with your dash cam, refer to the following common problems and solutions:
| Problem | Possible Cause | Solution |
|---|---|---|
| Device does not power on. | No power supply; loose connection; faulty power cord. | Check power connections; ensure ignition is on; test power cord. |
| Recording stops or freezes. | Memory card full or corrupted; low power; faulty memory card. | Format memory card; replace memory card; ensure stable power. |
| Poor video quality. | Dirty lens; incorrect resolution setting; low light conditions. | Clean camera lenses; check video resolution settings; ensure adequate lighting. |
| G-Sensor not working. | Sensitivity set too low; sensor malfunction. | Adjust G-Sensor sensitivity in settings; contact support if issue persists. |
If the problem persists after trying these solutions, please contact SIXWIN customer support for further assistance.
8. Specifications
| Feature | Detail |
|---|---|
| Brand | SIXWIN |
| Model | B0FW3X35L8 |
| Screen Size | 3 Inches |
| Front Camera Resolution | 720P |
| Rear Camera Resolution | 480P |
| Waterproof Rating | IP67 (DVR Host and Cameras) |
| Connectivity Technology | USB |
| Special Features | Touch Screen (as per specifications, though product description implies button interface), G-Sensor, Loop Recording |
| Product Dimensions | 0.39 x 0.39 x 0.39 inches (DVR Host) |
| Item Weight | 2.2 pounds |
9. Warranty and Support
For warranty information, please refer to the documentation included with your purchase or visit the official SIXWIN website. If you require technical support, have questions about installation, or need assistance with troubleshooting, please contact SIXWIN customer service through the retailer where you purchased the product or via the contact information provided on the manufacturer's website.
Please have your product model number (B0FW3X35L8) and purchase date ready when contacting support.