
1. Product Overview
The avedio links HDMI ARC/eARC Audio Extractor Converter is designed to extract audio from an HDMI source and output it to optical SPDIF or 3.5mm stereo audio. It supports high-resolution video up to 8K@60Hz and 4K@120Hz, and includes ARC/eARC functionality for enhanced audio return from compatible televisions. This device allows integration of modern HDMI sources with various audio systems, including soundbars, amplifiers, and headphones.

Figure 1: avedio links 8K@60Hz HDMI Audio Extractor Converter.

Figure 2: The converter offers easy plug-and-play functionality for seamless integration into your home theater system.
2. Package Contents
Verify that all items listed below are included in your package. If any items are missing or damaged, please contact customer support.
- HDMI ARC/eARC Audio Extractor Converter (Main Unit)
- DC 5V Power Adapter
- USB to DC 5V Power Cable
- 4FT HDMI Cable
- 3.5mm to 2 RCA Audio Cable
- User Manual (this document)

Figure 3: Visual representation of the accessories included with the converter.
3. Product Features
- HDMI Audio Extraction: Extracts audio from an HDMI input source to separate optical SPDIF and 3.5mm stereo audio outputs. This allows connection to soundbars, amplifiers, or headphones without requiring a TV/monitor connection for audio.
- High Resolution Support: Supports video resolutions up to 8K@60Hz and 4K@120Hz, including 4KX2K@60Hz, 3D, 1080p, 1080i, 720p, 576i, 480p, and 480i. Compatible with HDMI 2.1 and HDCP2.3.
- Advanced Color Formats: Supports 24bit, deep color 30bit, 36bit, and 48bit video color formats with synchronized sound.
- ARC/eARC Functionality: Audio Return Channel (ARC) and enhanced Audio Return Channel (eARC) allow your TV to send audio back to an external sound system through the HDMI connection, providing an immersive home theater experience.
- Three Audio Output Modes:
- PASS Mode: Audio passes through to the HDMI output (TV/Projector). Only the TV will have sound.
- 2CH Mode: 3.5mm audio output supports 2CH PCM LPCM stereo audio. Optical SPDIF output supports 2CH PCM. Both 3.5mm and optical audio outputs will have sound.
- 5.1CH Mode: Optical SPDIF output supports 5.1CH Dolby Digital, Dolby TrueHD, DTS-HD. The source audio must be 5.1CH. Both 3.5mm and optical audio outputs will have sound.
- Wide Compatibility: Compatible with standard HDMI source devices such as Blu-ray/DVD/HD players, cable/satellite boxes, Fire TV Stick, Apple TV, PS3/4/5, Xbox, PC/laptops, HD cameras, and HD DVRs.

Figure 4: Key technologies supported by the converter, including HDMI 2.1 and eARC.

Figure 5: The converter supports stunning 8K resolution for clear visuals.

Figure 6: Explanation of the eARC (Audio Return Channel) function, enabling TV audio to external sound systems.

Figure 7: The device supports 5.1 channel Dolby Digital audio for immersive sound experiences.
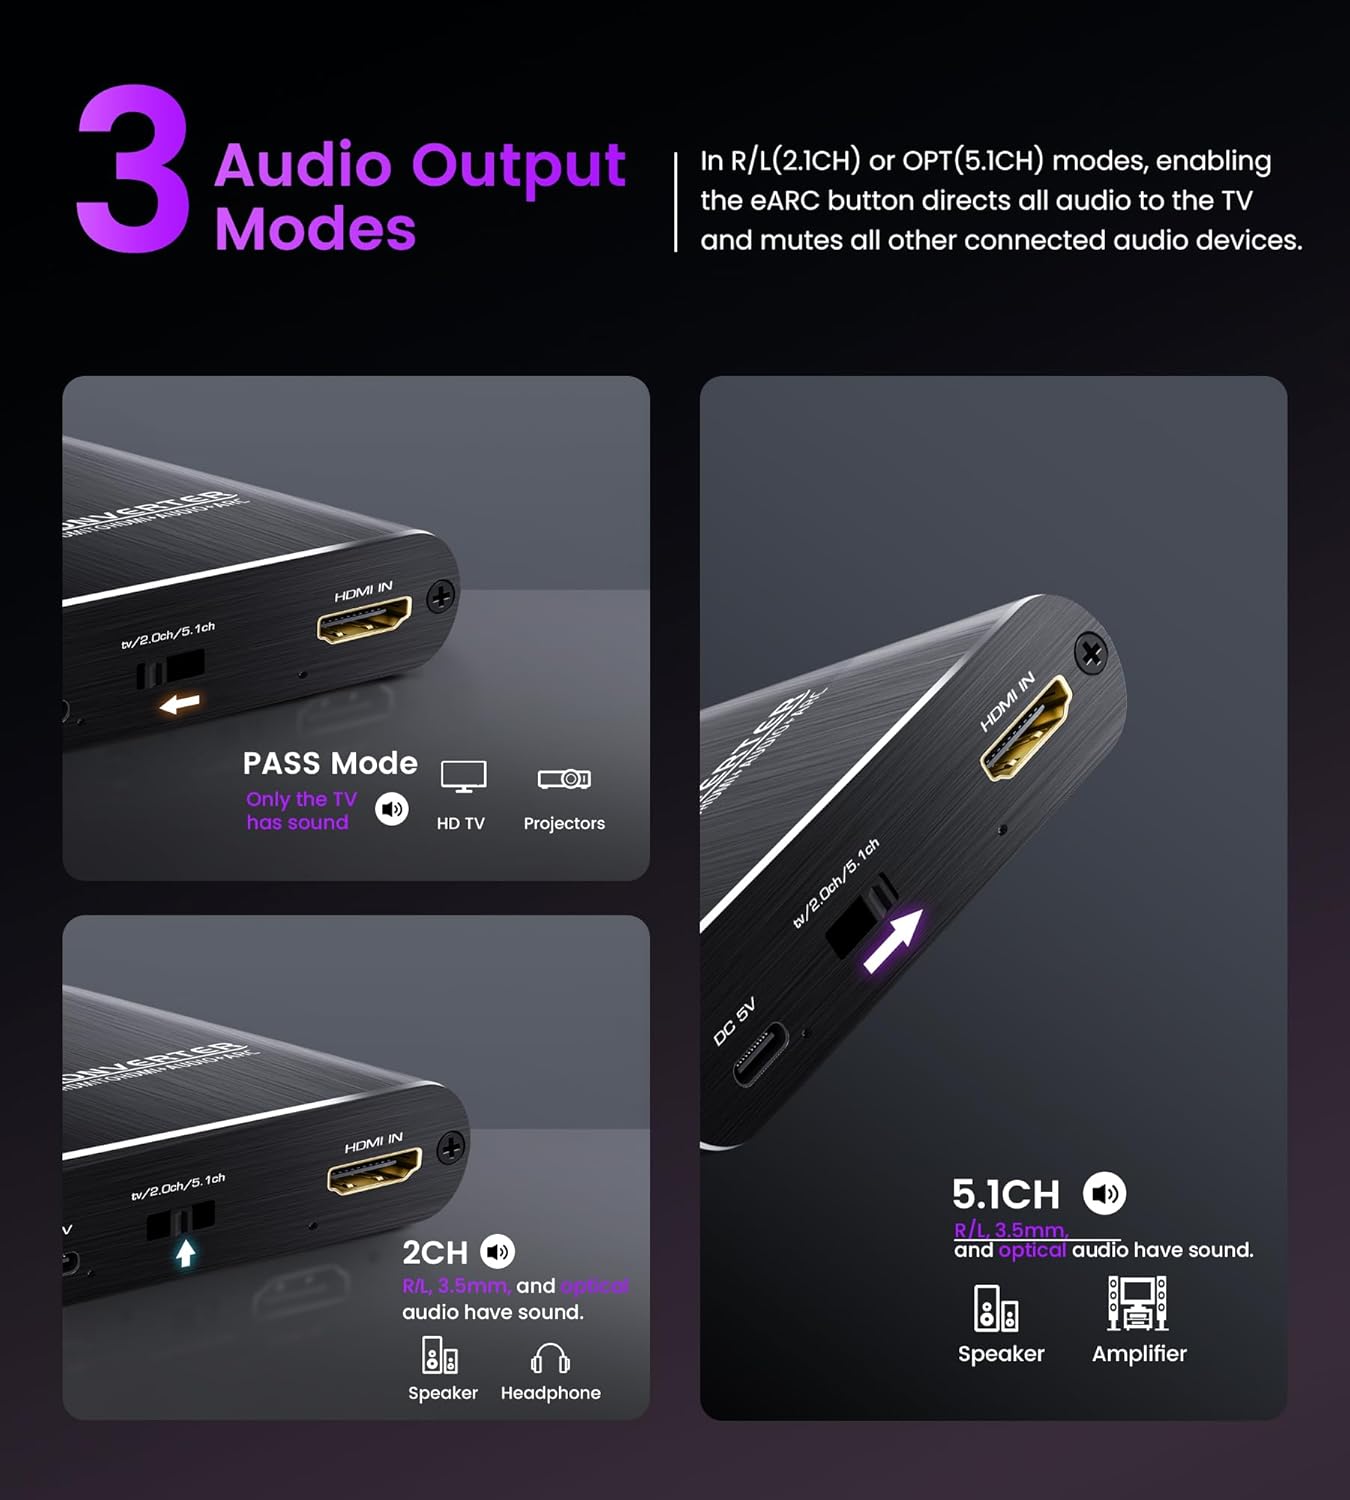
Figure 8: Overview of the three selectable audio output modes: Pass, 2CH, and 5.1CH.

Figure 9: The converter offers broad compatibility with a range of HDMI input sources and audio output devices.
4. Setup Instructions
Follow these steps to connect your avedio links HDMI Audio Extractor Converter:
- Power Connection: Connect the provided DC 5V power adapter to the converter's DC 5V port and then plug it into a power outlet.
- HDMI Input: Connect your HDMI source device (e.g., Blu-ray player, game console, TV box, laptop) to the "HDMI IN" port on the converter using an HDMI cable.
- HDMI Output (Video): Connect your display device (e.g., TV, monitor, projector) to the "eARC/ARC HDMI OUT" port on the converter using an HDMI cable. This port carries both video and, if ARC/eARC is not used, audio to the display.
- Audio Output (External Audio System):
- For optical audio, connect an optical cable from the "SPDIF OUT" port on the converter to your soundbar or amplifier.
- For stereo audio, connect the 3.5mm to 2 RCA audio cable from the "AUDIO OUT (3.5mm)" port on the converter to your amplifier or headphones.
- ARC/eARC Setup (if applicable): If you intend to use the ARC/eARC function to send audio from your TV back to an external sound system:
- Connect your TV's HDMI ARC/eARC port to the converter's "eARC/ARC HDMI OUT" port.
- Connect the audio extractor's optical or 3.5mm output to your speaker or amplifier.
- In your TV settings, select ARC/eARC as the audio output.
- Ensure the ARC/eARC function is enabled on the audio extractor (if there's a dedicated switch, refer to the device itself).
Note: Once ARC/eARC is enabled, your TV remote may lose its ability to control the volume of the external sound system. Volume adjustment will then be solely through the speaker/soundbar's controls.
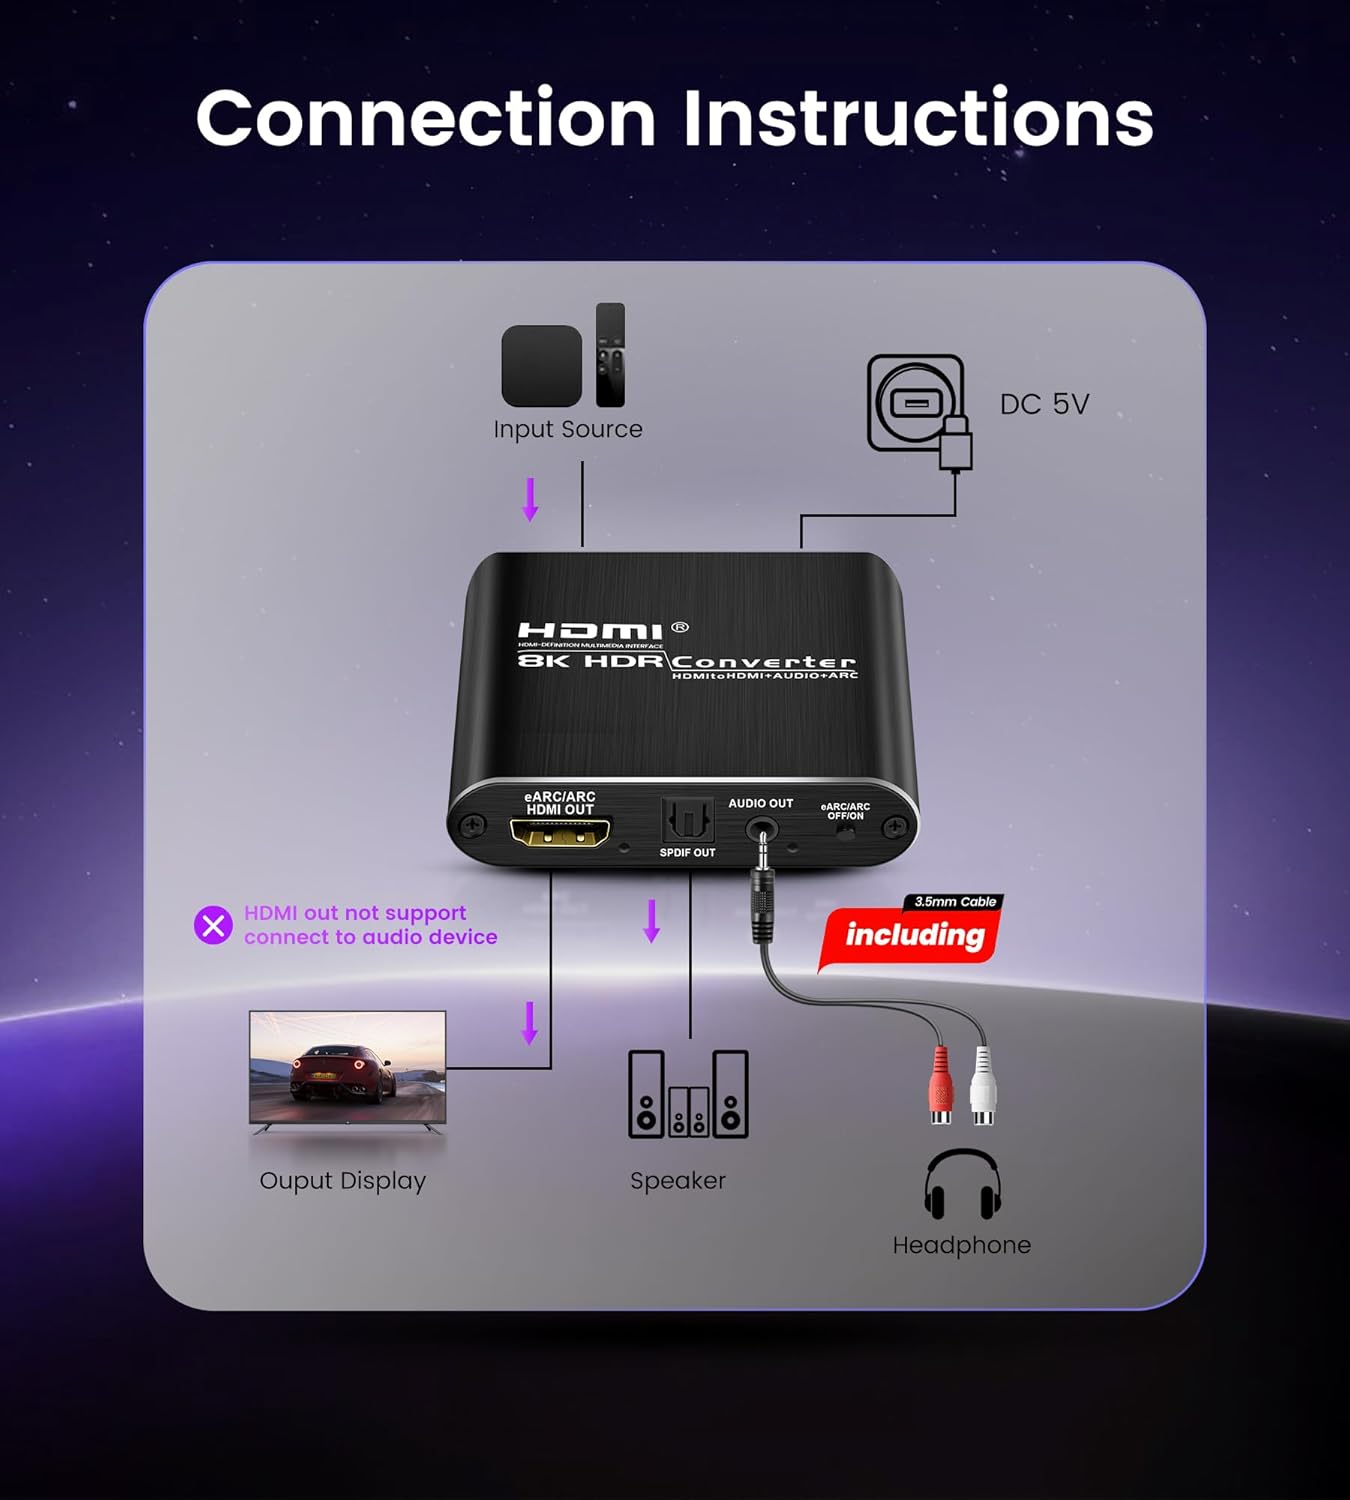
Figure 10: General connection diagram showing input source, converter, output display, and audio devices.

Figure 11: Detailed view of input and output ports on the converter and typical connected devices.

Figure 12: Close-up of the converter's ports, including HDMI IN, eARC/ARC HDMI OUT, SPDIF OUT, and 3.5mm AUDIO OUT.

Figure 13: Illustration emphasizing that the TV must support ARC/eARC for this function to work.

Figure 14: Step-by-step guide for configuring the ARC/eARC function.
5. Operating Instructions
The converter features a mode switch to select the desired audio output format. Locate the switch on the device and select one of the following modes:
- PASS Mode: In this mode, the audio from the HDMI input is passed directly to the HDMI output. Only your connected TV or projector will produce sound. This mode is suitable when you want to use your display's built-in speakers or when your display is connected to an external audio system.
- 2CH Mode: Select this mode for stereo audio output. The 3.5mm AUX jack will output 2-channel PCM/LPCM stereo audio, and the optical SPDIF port will also output 2-channel PCM audio. This mode is ideal for connecting to stereo sound systems, headphones, or soundbars that support 2-channel audio.
- 5.1CH Mode: Choose this mode for multi-channel audio output via the optical SPDIF port. It supports 5.1 channel Dolby Digital, Dolby TrueHD, and DTS-HD. Ensure your audio source is configured to output 5.1 channel audio and your connected sound system supports these formats. The 3.5mm AUX output will also be active, providing stereo downmix if available.
To ensure proper audio output, always verify that your source device's audio settings (e.g., Blu-ray player, game console) are configured to match the selected mode on the converter and the capabilities of your audio receiving device.

Figure 15: Visual guide to the three audio output modes and their applications.
6. Maintenance
To ensure the longevity and optimal performance of your avedio links HDMI Audio Extractor Converter, follow these maintenance guidelines:
- Cleaning: Use a soft, dry cloth to clean the exterior of the device. Avoid using liquid cleaners, aerosols, or abrasive solvents, as these can damage the casing or internal components.
- Ventilation: Ensure the device is placed in a well-ventilated area to prevent overheating. Do not block any ventilation openings.
- Environment: Keep the device away from direct sunlight, heat sources, and moisture. Avoid extreme temperatures.
- Handling: Handle the device with care. Avoid dropping it or subjecting it to strong impacts.
- Power Off: When not in use for extended periods, disconnect the power adapter from the wall outlet.
7. Troubleshooting
If you encounter issues with your avedio links HDMI Audio Extractor Converter, refer to the following common problems and solutions:
7.1 No sound from the Optical output port
- Verify that your audio receiving device (soundbar, amplifier) is correctly adjusted to play optical audio and is set to the correct input channel.
- Adjust the audio format on your source device. Optical fiber typically supports 5.1 channels, but some devices may require specific settings.
- If your TV or speaker does not support the current audio format, change the input source audio format to PCM or LPCM.
- For 4K resolution, ensure the total length of the HDMI cable (before and after the switch) does not exceed 3 meters (9.8 ft).
- Confirm that the audio format on the input source device is set to Stereo, DTS, or standard Dolby Digital. Note: Dolby Digital Plus is not supported.

Figure 16: Troubleshooting steps for resolving issues with optical audio output.
7.2 No sound from the L/R (3.5mm AUX) output port
- Ensure your audio receiving device (amplifier, headphones) is correctly adjusted to play analog audio and is set to the correct input channel.
- Adjust the audio format on your source device. The 3.5mm output typically supports 2.0CH stereo audio.
- If your TV or speaker does not support the current audio format, change the input source audio format to PCM or LPCM.
- For 4K resolution, ensure the total length of the HDMI cable (before and after the switch) does not exceed 3 meters (9.8 ft).
- Confirm that the audio format on the input source device is set to Stereo.

Figure 17: Troubleshooting steps for resolving issues with 3.5mm analog audio output.
General Note for Audio Output: To receive audio from both Optical and L/R output ports simultaneously, the input source device format must be set to PCM/stereo.
8. Specifications
| Feature | Detail |
|---|---|
| Model Number | 8K@60Hz eARC |
| HDMI Version | HDMI 2.1 |
| HDCP Version | HDCP 2.3 |
| Max Resolution | 8K@60Hz, 4K@120Hz |
| Supported Video Formats | 3D, 1080p, 1080i, 720p, 576i, 480p, 480i |
| Color Depth | 24bit, deep color 30bit, 36bit, 48bit |
| Audio Output Ports | Optical SPDIF, 3.5mm AUX Jack |
| Supported Audio Formats (Optical) | 2CH PCM, 5.1CH Dolby Digital, Dolby TrueHD, DTS-HD |
| Supported Audio Formats (3.5mm AUX) | 2CH PCM LPCM Stereo Audio |
| ARC/eARC Support | Yes |
| Power Supply | DC 5V |
| Item Weight | 9.1 ounces (approx. 258 grams) |
| Package Dimensions | 9.84 x 6.18 x 1.1 inches (approx. 25 x 15.7 x 2.8 cm) |
Note: Specifications are subject to change without prior notice.
9. Warranty and Support
This avedio links product comes with a standard manufacturer's warranty. For specific warranty terms and conditions, please refer to the warranty card included in your product packaging or visit the official avedio links website.
If you require technical assistance, have questions about product functionality, or need to report a defect, please contact avedio links customer support. Contact information can typically be found on the product packaging, the official website, or through your retailer.
Please have your product model number (8K@60Hz eARC) and purchase details ready when contacting support to facilitate a quicker resolution.