1. Introduction
Thank you for choosing the Smartmak Upgrade Portable Hot Air Sauna. This manual provides essential information for the safe and efficient operation of your sauna. Please read it thoroughly before assembly and use, and retain it for future reference.
2. Safety Information
WARNING: To reduce the risk of burns, fire, electric shock, or injury to persons, read all instructions before using this appliance.
- Always consult with a physician before using a sauna, especially if you have pre-existing health conditions, are pregnant, or are taking medication.
- Do not use the sauna if you are feeling unwell, dizzy, or nauseous.
- Keep children and pets away from the sauna during operation.
- Ensure the sauna is placed on a flat, stable, and heat-resistant surface.
- Do not block the air vents of the heater.
- Avoid touching the heater directly during operation as it can reach high temperatures.
- Do not use the sauna near water or in excessively humid environments.
- Unplug the unit from the power outlet when not in use and before cleaning.
- Do not attempt to modify or repair the sauna or its components. Contact customer support for assistance.
3. Package Contents
Carefully unpack all components and ensure all items are present. If any parts are missing or damaged, contact Smartmak customer support.

Figure 3.1: Included Components. This image displays the sauna tent, dry heater, red light, folding chair, anti-friction pad, various pipes (A, B, C), corner connectors, triangular connections, and an adapter.
- Sauna Tent (x1)
- Dry Heater (x1)
- Poles (various sizes for frame assembly)
- Portable Chair (x1)
- 660nm Red Light Lamp (x1)
- Red Light Adapter (x1)
- Anti-friction Pad (x1)
- Connectors (for frame assembly)
4. Assembly Instructions
Follow these steps to assemble your portable hot air sauna:
- Assemble the Frame: Connect the various poles (A, B, C) using the provided triangular connections and connectors to form the sauna tent's structural frame. Ensure all connections are secure.
- Install the Sauna Tent: Drape the sauna tent over the assembled frame. Ensure the tent is properly aligned and covers the frame completely.
- Install the Dry Heater:Clip the dry heater securely onto one of the sauna tent poles using the integrated clips. Tighten any screws to ensure it is firmly attached and stable. Position it to allow for optimal air circulation.

Figure 4.1: Dry Heater Installation. This image illustrates the three steps: 1. Prepare the heater, 2. Clip the dry heater onto the pole, 3. Tighten the screws to secure the dry heater.
- Install the Red Light Lamp: Position the 660nm red light lamp inside the sauna tent, typically near the top or on a designated hook. Connect it to its independent adapter.
- Place the Chair: Set up the portable chair inside the sauna tent. The high-back adjustable chair can be set to sitting or semi-reclining positions for comfort.
- Place Anti-friction Pad: Lay the anti-friction pad on the floor of the sauna tent.
5. Operating Instructions
Once assembled, follow these steps to operate your Smartmak Portable Hot Air Sauna:
5.1 Powering On and Heater Operation

Figure 5.1: Heater Specifications Summary. This image highlights the 120V voltage, 1500W power, 0-99 minute adjustable time, and 95°F-185°F (35°C-85°C) adjustable temperature range.
Figure 5.2: Dry Heater Control Panel. This image shows the heater's interface, including the air outlet, temperature sensor, power switch, temperature display screen, and time display screen.
- Connect Power: Plug the dry heater's power cord into a standard 110V electrical outlet.
- Power On: Press the Power Switch on the dry heater to turn it on. The display screens will illuminate.
- Set Temperature: Use the temperature controls (usually '+' and '-' buttons) to set your desired temperature. The heater can reach 95-185°F (approx. 35-85°C). In winter, it may reach up to 149°F or higher, and up to 185°F in summer.
- Set Timer: Use the timer controls to set the desired session duration, from 0 to 99 minutes.
- Pre-heat: Allow the sauna to pre-heat for approximately 5 minutes for rapid heating, or longer to reach your desired temperature.
5.2 Red Light Therapy Operation
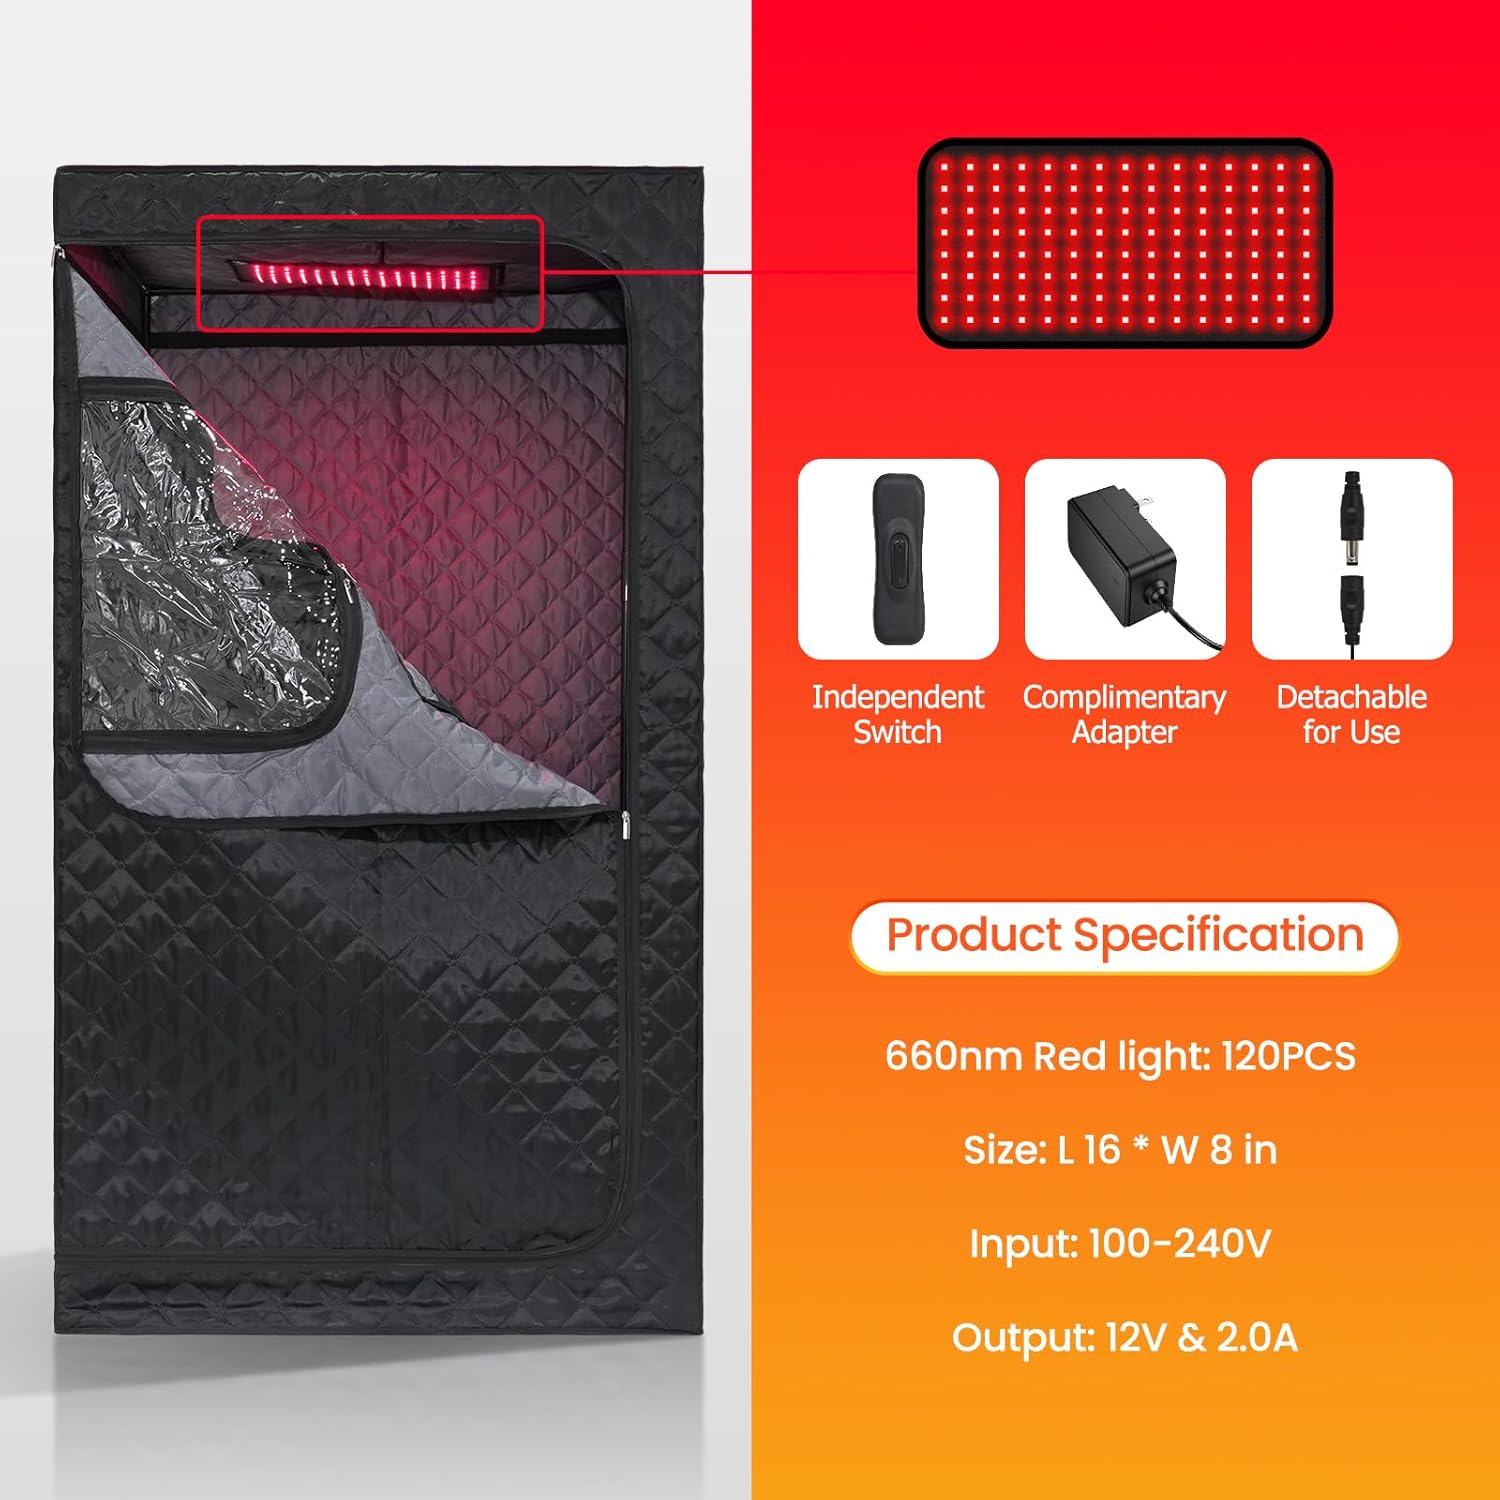
Figure 5.3: Red Light Lamp Specifications. This image shows the red light lamp with an independent switch, complimentary adapter, and detachable design, along with specifications: 120PCS 660nm Red light, Size: L 16 * W 8 in, Input: 100-240V, Output: 12V & 2.0A.
- Connect Red Light: Plug the red light lamp's adapter into a separate electrical outlet.
- Activate Red Light: Use the independent switch on the red light lamp or its adapter to turn it on.
- The 660nm wavelength light is designed to penetrate deep into skin layers.
5.3 During Your Sauna Session
- Enter the sauna tent and sit comfortably on the chair.
- Adjust the chair's angle as desired for sitting or semi-reclining.
- Stay hydrated by drinking water before and after your session.
- Limit sessions to a comfortable duration, typically 15-30 minutes, and do not exceed the set timer.

Figure 5.4: Two-Person Sauna Capacity. This image demonstrates the spacious interior of the sauna tent, accommodating two individuals comfortably.
6. Maintenance and Care
Proper maintenance ensures the longevity and hygiene of your sauna.
- Cleaning the Tent: After each use, wipe down the interior of the sauna tent with a clean, damp cloth. For deeper cleaning, use a mild, non-abrasive cleaner. Ensure the tent is completely dry before folding or storing.
- Cleaning the Heater: Ensure the heater is unplugged and cool before cleaning. Wipe the exterior with a dry or slightly damp cloth. Do not immerse the heater in water.
- Storage: When not in use, disassemble the sauna and store all components in a cool, dry place away from direct sunlight and moisture.
- Red Light Lamp: Keep the red light lamp clean and free of dust. Wipe gently with a dry cloth.
7. Troubleshooting
If you encounter issues with your Smartmak Portable Hot Air Sauna, refer to the following common problems and solutions:
- Sauna Not Heating:
- Check if the power cord is securely plugged into a working outlet.
- Ensure the power switch on the heater is turned ON.
- Verify that the timer is set to a duration greater than 0.
- Check if the temperature setting is above the current ambient temperature.
- Red Light Lamp Not Turning On:
- Ensure the red light adapter is plugged into a working outlet.
- Check the independent switch on the red light lamp or its adapter.
- Unstable Frame:
- Recheck all pole connections and ensure they are fully inserted and secure.
- Ensure the sauna is placed on a completely flat and level surface.
If the problem persists after attempting these solutions, please contact Smartmak customer support.
8. Specifications
| Feature | Specification |
|---|---|
| Model Number | SMT-Dry-02 |
| Product Dimensions | 47.2 x 35.4 x 63 inches (L x W x H) |
| Item Weight | 22.2 pounds |
| Voltage | 110V |
| Power | 1500W |
| Temperature Range | 95°F - 185°F (35°C - 85°C) |
| Timer Setting | 0-99 minutes |
| Red Light Therapy | 660nm wavelength, 120 LED bulbs |
| Manufacturer | Smartmak |
9. Warranty and Support
For warranty information and customer support, please refer to the documentation included with your purchase or visit the official Smartmak website. If you have any questions or require assistance, please contact Smartmak customer service directly.