1. Introduction
Thank you for choosing the YOURLITE Wall-Mounted LED Medicine Cabinet Mirror. This manual provides essential information for safe installation, operation, and maintenance of your new cabinet. Please read it thoroughly before use and retain it for future reference.
2. Safety Information
- Ensure the power supply is disconnected before installation or maintenance.
- Installation should be performed by a qualified electrician if you are unsure about electrical wiring.
- Do not expose the product to excessive moisture or direct water spray.
- Avoid using abrasive cleaners or sharp objects on the mirror surface.
- Keep children away from the product during installation and ensure proper supervision during use.
3. Package Contents
Please verify that all components are present before beginning installation:
- YOURLITE LED Medicine Cabinet Mirror
- Adjustable Shelves (2)
- Mounting Hardware (screws, anchors)
- User Manual
4. Product Specifications
| Feature | Detail |
|---|---|
| Brand | YOURLITE |
| Model Number | US-BT8002-WH-7070-A |
| Color | White |
| Product Dimensions | 6.3"D x 27.6"W x 27.6"H |
| Item Weight | 38.5 Pounds |
| Mounting Type | Wall Mount |
| Material | Engineered Wood, Glass |
| Number of Shelves | 2 (Adjustable) |
| Special Features | LED Lights (3 Modes), Anti-Fog, Adjustable Brightness, Adjustable Shelves, Memory Function |
5. Setup and Installation
5.1 Wall Mounting
The YOURLITE medicine cabinet is designed for wall-mounted installation. Ensure you have appropriate tools and that the wall can support the weight of the cabinet and its contents.
- Prepare the Wall: Choose a suitable location on your bathroom wall. Use a level to mark the desired height and width for the cabinet. Ensure there are no electrical wires or pipes behind the drilling points.
- Drill Pilot Holes: Based on the mounting points on the cabinet, drill pilot holes into the wall. Insert wall anchors if necessary (e.g., for drywall).
- Mount the Cabinet: Secure the cabinet to the wall using the provided screws. Ensure it is level and firmly attached.
- Connect Power: Connect the cabinet's power cord to a suitable electrical outlet.
Video: Medicine Cabinet Assembly & Mounting Introduction. This video demonstrates general assembly and mounting steps for a similar medicine cabinet.
5.2 Adjusting Shelves
The cabinet features adjustable shelves to accommodate items of various sizes. Simply remove the shelves and reposition them into the desired slots.

Image: Internal dimensions and adjustable shelf positions. The image illustrates the cabinet's overall dimensions (27.6"W x 27.6"H x 6.3"D) and the 1.6-inch spacing for adjustable shelves.

Image: Adjustable shelves for flexible storage. This image highlights the adjustable shelves within the cabinet, providing versatile storage options.
5.3 Adjusting Hinges
If the cabinet doors are not perfectly aligned, you can adjust the hinges using a screwdriver. Refer to the video below for detailed instructions on hinge adjustment.
Video: How to Adjust Hinge. This video provides a guide on how to adjust cabinet hinges for proper door alignment.
6. Operating Instructions
6.1 LED Lighting Control
The mirror features integrated LED lighting with three color modes and adjustable brightness.
- Change Light Color: Short press the touch sensor button on the mirror to cycle through White, Natural, and Warm Yellow light modes.
- Adjust Brightness: Long press the touch sensor button to smoothly adjust the brightness level. Release when the desired brightness is reached.
- Memory Function: The mirror remembers your last light color and brightness settings, so you don't need to reset them each time.

Image: Light color and brightness adjustment. This image demonstrates how to short press to switch between White, Natural, and Yellow light, and long press to adjust brightness.

Image: Three distinct light color temperatures. The image displays the White (6000K), Natural (4500K), and Yellow (3000K) light options.

Image: Adjustable brightness control. This image illustrates the touch sensor for adjusting light brightness from 100% down to 10%.
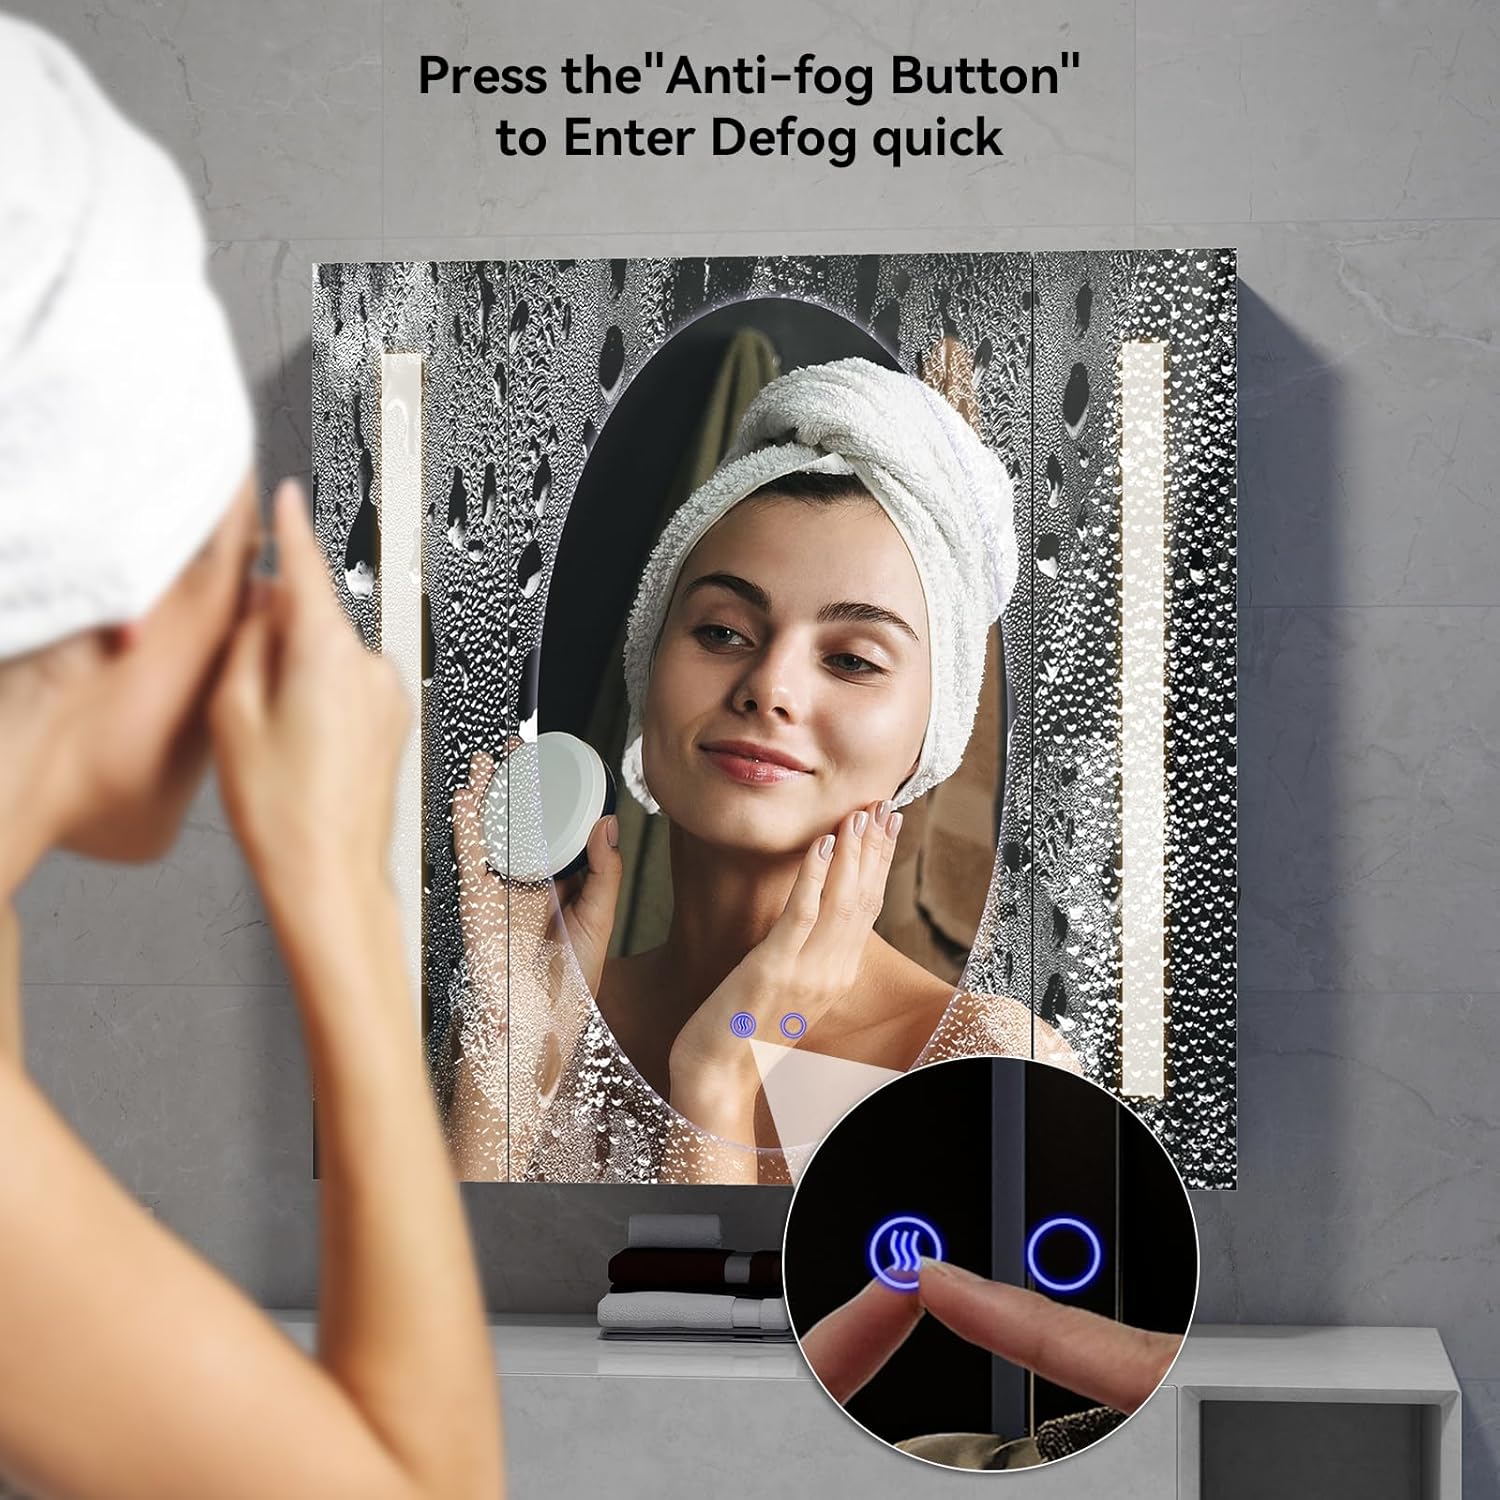
Image: Activating the anti-fog function. A finger is shown pressing the dedicated anti-fog button on the mirror.

Image: Anti-fog feature in use. This image demonstrates the mirror's ability to clear steam, ensuring a clear reflection after showering.
6.2 Anti-Fog Function
The cabinet mirror includes a dedicated anti-fog button to maintain a clear reflection, especially after showers.
- Activate Anti-Fog: Press the "Anti-Fog Button" (indicated by a wavy icon) on the mirror surface. The mirror will gently warm up to remove moisture.
- For optimal performance, it is recommended to activate the anti-fog function shortly before or during your shower.
7. Features Overview
- Flexible Storage: Adjustable shelves allow customization of storage space for various item heights.
- Side Hidden Shelf: Provides additional discreet storage for smaller items.
- Built-in Tissue Slot: Conveniently dispenses tissues, helping to keep countertops clutter-free.
- Soft-Close Hinges: Ensures quiet and gentle closing of the cabinet doors, preventing slamming.
- Durable Construction: Made with 4mm Eco-Friendly Mirror and Engineered Wood for longevity.

Image: Internal storage features. This image highlights the adjustable shelves, side hidden shelf, and integrated tissue slot for enhanced organization.

Image: Detailed features. Close-ups illustrate the adjustable partitions, soft-close hinges, additional storage, and the tissue slot.

Image: Soft-close hinge detail. This image focuses on the soft-close hinge, highlighting its quiet operation and ease of installation.

Image: Mirror durability comparison. This image contrasts the safety of the 4mm Eco-Friendly Mirror (shattering into blunt pieces) with a fragile mirror (shattering into sharp shards).
8. Maintenance
- Cleaning the Mirror: Use a soft, lint-free cloth and a non-abrasive glass cleaner. Spray the cleaner onto the cloth, not directly onto the mirror, to avoid liquid seeping into the edges.
- Cleaning the Cabinet: Wipe the cabinet surfaces with a damp cloth and mild soap. Dry immediately with a clean cloth. Avoid harsh chemicals.
- Hinge Care: Periodically check hinges for tightness and lubricate if necessary to ensure smooth operation.
9. Troubleshooting
| Problem | Possible Cause | Solution |
|---|---|---|
| LED lights not working | No power, loose connection, faulty LED driver. | Check power outlet, ensure connections are secure. If problem persists, contact customer support. |
| Anti-fog function not working | Anti-fog button not pressed, electrical issue. | Ensure the anti-fog button is pressed. Check power supply. Contact support if needed. |
| Cabinet doors are misaligned | Hinges need adjustment. | Refer to Section 5.3 and the hinge adjustment video for instructions. |
10. Warranty and Support
YOURLITE products are manufactured with quality and durability in mind. This product comes with a standard manufacturer's warranty against defects in materials and workmanship. For specific warranty details, claims, or technical support, please refer to the warranty card included with your product or contact YOURLITE customer service directly.
Customer Service: Please visit the official YOURLITE website or refer to your purchase documentation for contact information.