1. Introduction
Thank you for choosing the VIFLYKOO Weather Station Model 3378UC. This device provides comprehensive weather information, including indoor and outdoor temperature and humidity, barometric pressure, weather forecasts, time, date, and alarm functions. Please read this manual carefully to ensure proper setup and operation.
2. Package Contents
- VIFLYKOO Weather Station Main Unit
- Wireless Outdoor Sensor (1 unit)
- Power Cable
- Instruction Manual
Note: AA batteries for the main unit and outdoor sensor are not included and must be purchased separately.
3. Product Overview
The VIFLYKOO Weather Station features a large 7.5-inch color VA display for clear visibility of all weather data. The main unit and the wireless outdoor sensor work together to provide accurate readings.
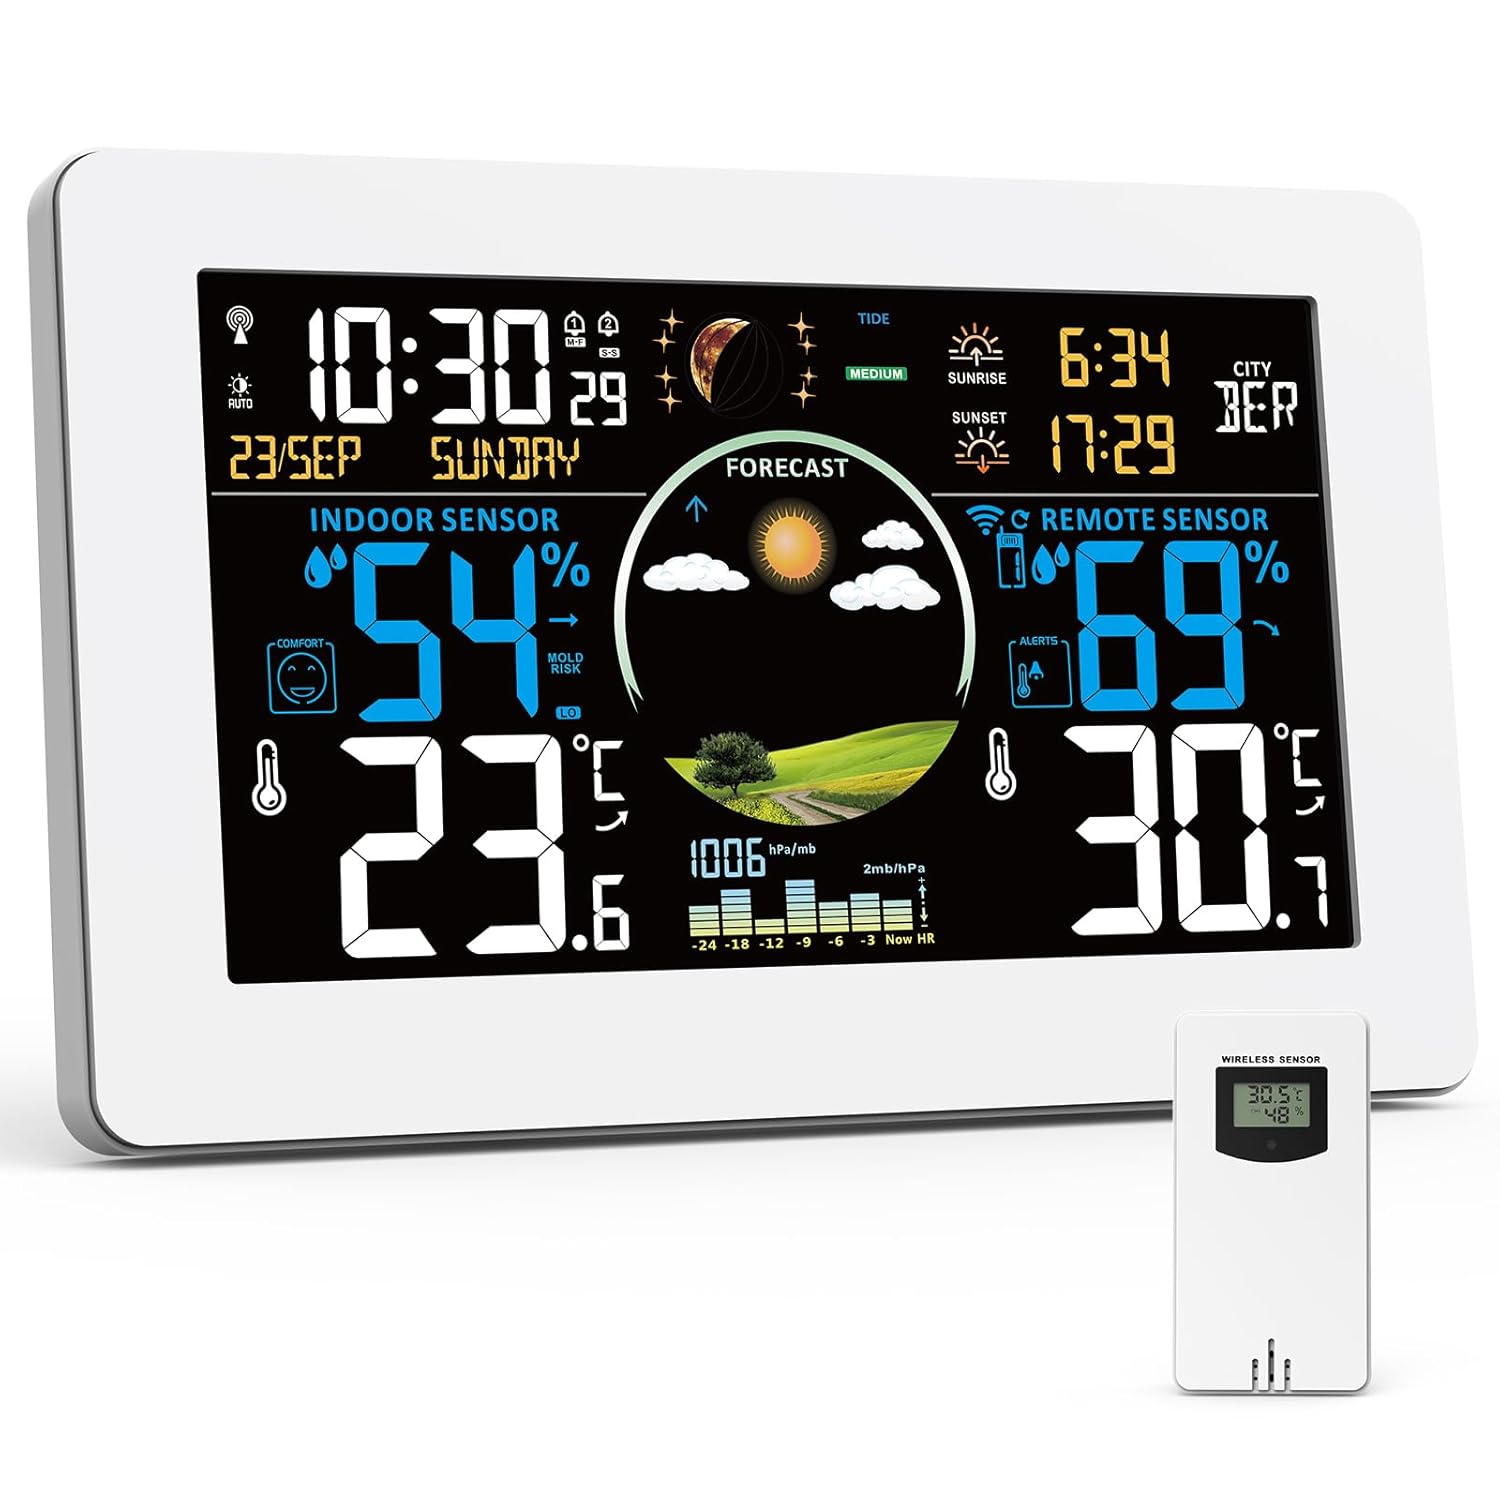
Image 3.1: VIFLYKOO Weather Station main unit and its accompanying wireless outdoor sensor.

Image 3.2: Detailed diagram showing the display elements and rear panel features of the weather station.
Main Unit Display Elements (Refer to Image 3.2)
- A1: Wireless Channel
- A2: Outdoor Temperature
- A3: Outdoor Humidity
- A4: Temperature Alert
- A5: Sunrise Time
- A6: Selected City
- A7: Sunset Time
- A8: Date
- A9: Time
- A10: Weekday
- A11: Tide Level
- A12: Pressure Trend
- A13: Moon Phases
- A14: Barometric Pressure
- A15: Mold Risk in Ambient Environments
- A16: Indoor Humidity
- A17: Comfort Index
- A18: Indoor Temperature
- A19: Weather Forecast
Main Unit Rear Panel Features (Refer to Image 3.2)
- B1: Hanging Hole
- B2: USB Output Port
- B3: Power Input Jack
- B4: Support Feet
- B5: Battery Compartment
4. Setup
4.1 Powering the Main Unit
- Using the Power Adapter: Connect the provided power cable to the Power Input Jack (B3) on the main unit and plug it into a wall outlet. The display will remain continuously lit and can be adjusted to 5 brightness levels.
- Using Batteries: Open the Battery Compartment (B5) and insert 2 AA batteries (not included), observing polarity. In battery mode, the display will automatically turn off after 15 seconds to conserve power. Press any button to temporarily illuminate the display.

Image 4.1: The weather station can be powered by the included AC adapter or 2 AA batteries.
4.2 Installing Batteries in the Outdoor Sensor
- Open the battery compartment on the back of the wireless outdoor sensor.
- Insert 2 AA batteries (not included), ensuring correct polarity.
- Close the battery compartment securely.
4.3 Pairing the Outdoor Sensor
Once both the main unit and the outdoor sensor are powered, the main unit will automatically search for the sensor signal. This process may take a few minutes. Ensure the sensor is within range (up to 100 meters in open air) and not obstructed by thick walls or metal structures.

Image 4.2: The wireless outdoor sensor can be placed up to 100 meters from the main unit.
4.4 Initial Settings (Time, Date, Language, City)
Refer to the detailed instructions in your physical manual for specific button presses to set the time, date, display language, and local city for sunrise/sunset calculations. The device supports automatic time calibration via DCF signal.

Image 4.3: The weather station automatically updates time via DCF radio signal.
4.5 Placement Options
The main unit can be placed on a flat surface using its integrated support feet (B4) or mounted on a wall using the hanging hole (B1).

Image 4.4: The weather station can be placed on a table or mounted on a wall.
5. Operating Instructions
5.1 Display Overview
The 7.5-inch VA display provides a clear and colorful view of all relevant data. Key information includes:
- Indoor/Outdoor Temperature and Humidity
- Weather Forecast (A19)
- Barometric Pressure (A14) and Trend (A12)
- Time (A9) and Date (A8)
- Comfort Index (A17) and Mold Risk (A15)
- Sunrise (A5) and Sunset (A7) Times
- Moon Phases (A13) and Tide Level (A11)

Image 5.1: The large 7.5-inch display provides a clear and colorful overview of all data.
5.2 4-Zone Temperature and Humidity Monitoring
The weather station can monitor up to 4 zones simultaneously: the built-in sensor for indoor readings and up to 3 external wireless sensors (one included). This allows you to track conditions in different areas like a baby's room, basement, or garden.

Image 5.2: The weather station supports monitoring up to 4 zones, including the main unit and up to three external sensors.
5.3 Weather Forecast
The station predicts weather for the next 12 hours based on barometric pressure trends. It displays various icons for sunny, slightly cloudy, cloudy, rainy, stormy, and snowy conditions.

Image 5.3: Examples of weather forecast icons displayed on the screen.
5.4 Setting Alarms
The weather station includes an alarm clock function. You can also set customizable high and low temperature/humidity alerts. When a set threshold is exceeded, the station will emit an audible signal.

Image 5.4: The temperature alarm function alerts users when temperatures exceed set limits.
5.5 Adjustable Brightness
When powered by the AC adapter, the display offers 5 adjustable brightness levels to suit different lighting conditions and preferences. This allows for optimal readability during the day and reduced brightness for nighttime use.

Image 5.5: The display offers 5 levels of adjustable brightness for comfort and energy saving.
5.6 USB Charging Function
The main unit includes a USB output port (B2) that allows you to charge other USB-powered devices while the weather station is in use.

Image 5.6: The weather station features a USB output port for charging other devices.
6. Maintenance
- Clean the display and unit surfaces with a soft, dry cloth. Avoid abrasive cleaners or solvents.
- Replace batteries in both the main unit and the outdoor sensor when the low battery indicator appears on the display.
- Ensure the outdoor sensor is protected from direct heavy rain and prolonged direct sunlight to maximize its lifespan and accuracy.
7. Troubleshooting
7.1 Outdoor Sensor Not Connecting
- Ensure batteries are correctly installed in the outdoor sensor and the main unit.
- Check that the sensor is within the 100-meter range of the main unit.
- Reduce obstacles between the main unit and the sensor (e.g., thick walls, large metal objects).
- Try re-pairing the sensor by removing and reinserting its batteries, then initiating a sensor search on the main unit (refer to your physical manual for specific steps).
7.2 Display Not Visible in Battery Mode
- This is normal behavior to conserve battery power. The display automatically turns off after 15 seconds.
- Press any button on the main unit to temporarily illuminate the display.
- For continuous display, power the unit using the included AC adapter.
7.3 Inaccurate Readings
- Ensure the outdoor sensor is not in direct sunlight or exposed to extreme heat sources, as this can affect temperature readings.
- Verify that the main unit is not placed near heat-emitting appliances or in direct drafts.
- Allow some time for the sensors to stabilize after initial setup or battery replacement.
8. Specifications
| Feature | Detail |
|---|---|
| Product Dimensions | 4 x 20.5 x 13 cm; 600 grams |
| Manufacturer | VIFLYKOO |
| Item Model Number | 3378UC |
| Country of Origin | China |
| Recommended Product Uses | Library, Garden, Laboratory, Restaurant, Office, Home Use |
| Specific Product Uses | Moon Phase, Heat Index, Temperature, Time, Humidity |
| Power Source | Battery, Corded Electric |
| Special Features | Large display, Customizable alert, Adjustable brightness, Pre-calibrated, Wireless |
9. Warranty and Support
For warranty information and customer support, please refer to the documentation included with your purchase or contact VIFLYKOO customer service through their official channels. Keep your purchase receipt as proof of purchase for warranty claims.