1. Introduction
The Miaosical Automatic Cat Food Dispenser provides a convenient and reliable solution for feeding your pet. With a 4.2-liter capacity, it is suitable for cats and small dogs, ensuring they receive consistent meals even when you are away. This manual provides detailed instructions for setup, operation, maintenance, and troubleshooting to help you get the most out of your automatic feeder.

Image: The Miaosical Automatic Cat Food Dispenser, highlighting its 4.2L capacity, next to a cat.
2. Safety Instructions
- Read all instructions before using the appliance.
- Keep the feeder away from children and pets when not in use or during cleaning.
- Use only dry pet food with this dispenser. Do not use wet food, canned food, or treats.
- Do not immerse the main unit in water or any other liquid.
- Ensure the power adapter cable is not damaged or pinched.
- Always unplug the feeder before cleaning or when not in use for extended periods.
- This appliance is for indoor use only.
3. Package Contents
Please check the package contents upon opening:
- Automatic Pet Food Dispenser Main Unit
- Food Storage Container with Lid
- Stainless Steel Food Bowl
- Power Adapter
- Desiccant Bag (pre-installed or separate)
- User Manual
4. Product Overview
Familiarize yourself with the components of your Miaosical Automatic Cat Food Dispenser:
- Food Storage Container: Transparent container for dry food.
- Lid: Secure twist-lock lid with desiccant bag compartment to maintain food freshness.
- Control Panel: Digital display and buttons for programming.
- Food Outlet: Broad and slanted design to prevent clogging.
- Stainless Steel Bowl: Removable for easy cleaning.
- Battery Compartment: Located at the bottom for backup power (3 x D batteries, not included).
- Non-Slip Pads: Four pads on the base for stability.
5. Setup
5.1 Unpacking and Assembly
- Remove all components from the packaging.
- Ensure all parts are present and undamaged.
- Place the main unit on a flat, stable surface. The non-slip pads on the base will help secure it.
- Insert the stainless steel bowl into its designated slot at the base of the feeder.
5.2 Power Supply
The feeder supports dual power supply for uninterrupted operation.
- AC Adapter: Plug the power adapter into the feeder's power port and then into a wall outlet. This is the primary power source.
- Battery Backup: For power outages, install 3 x D-size batteries (not included) into the battery compartment at the bottom of the unit. Ensure correct polarity. The feeder will automatically switch to battery power if AC power is lost.

Image: Illustration of the dual power supply options for the feeder.
5.3 Filling the Food Container
- Twist the lid counter-clockwise to remove it from the food storage container.
- Fill the container with dry pet food. The 4.2L capacity can hold several days' worth of food.
- Ensure the desiccant bag is properly placed in its compartment within the lid to maintain food freshness. Replace the desiccant bag periodically (e.g., monthly).
- Replace the lid and twist clockwise until it is securely locked.
6. Operating Instructions
6.1 Setting the Current Time
Before programming meals, set the current time on the feeder's display.
- Press and hold the 'SET' button until the hour digit flashes.
- Use the 'UP' and 'DOWN' arrows to adjust the hour.
- Press 'SET' again to move to the minute digit and adjust using the arrows.
- Press 'SET' one more time to save the current time.
6.2 Programming Meals
The feeder allows you to program up to 6 meals per day with customizable portion sizes.
- Press the 'SET' button once to enter meal programming mode. The meal number (e.g., '1') will flash.
- Use the 'UP' and 'DOWN' arrows to select the meal number you wish to program (1-6).
- Press 'SET' to confirm the meal number. The hour digit for that meal will flash.
- Adjust the feeding hour using the 'UP' and 'DOWN' arrows. Press 'SET'.
- Adjust the feeding minute using the 'UP' and 'DOWN' arrows. Press 'SET'.
- Adjust the portion size (number of units) for this meal using the 'UP' and 'DOWN' arrows. Press 'SET'.
- Repeat for other meals (2-6) as desired. If a meal is not programmed, it will not dispense food.
- To exit programming mode, wait a few seconds without pressing any buttons, or press and hold 'SET'.
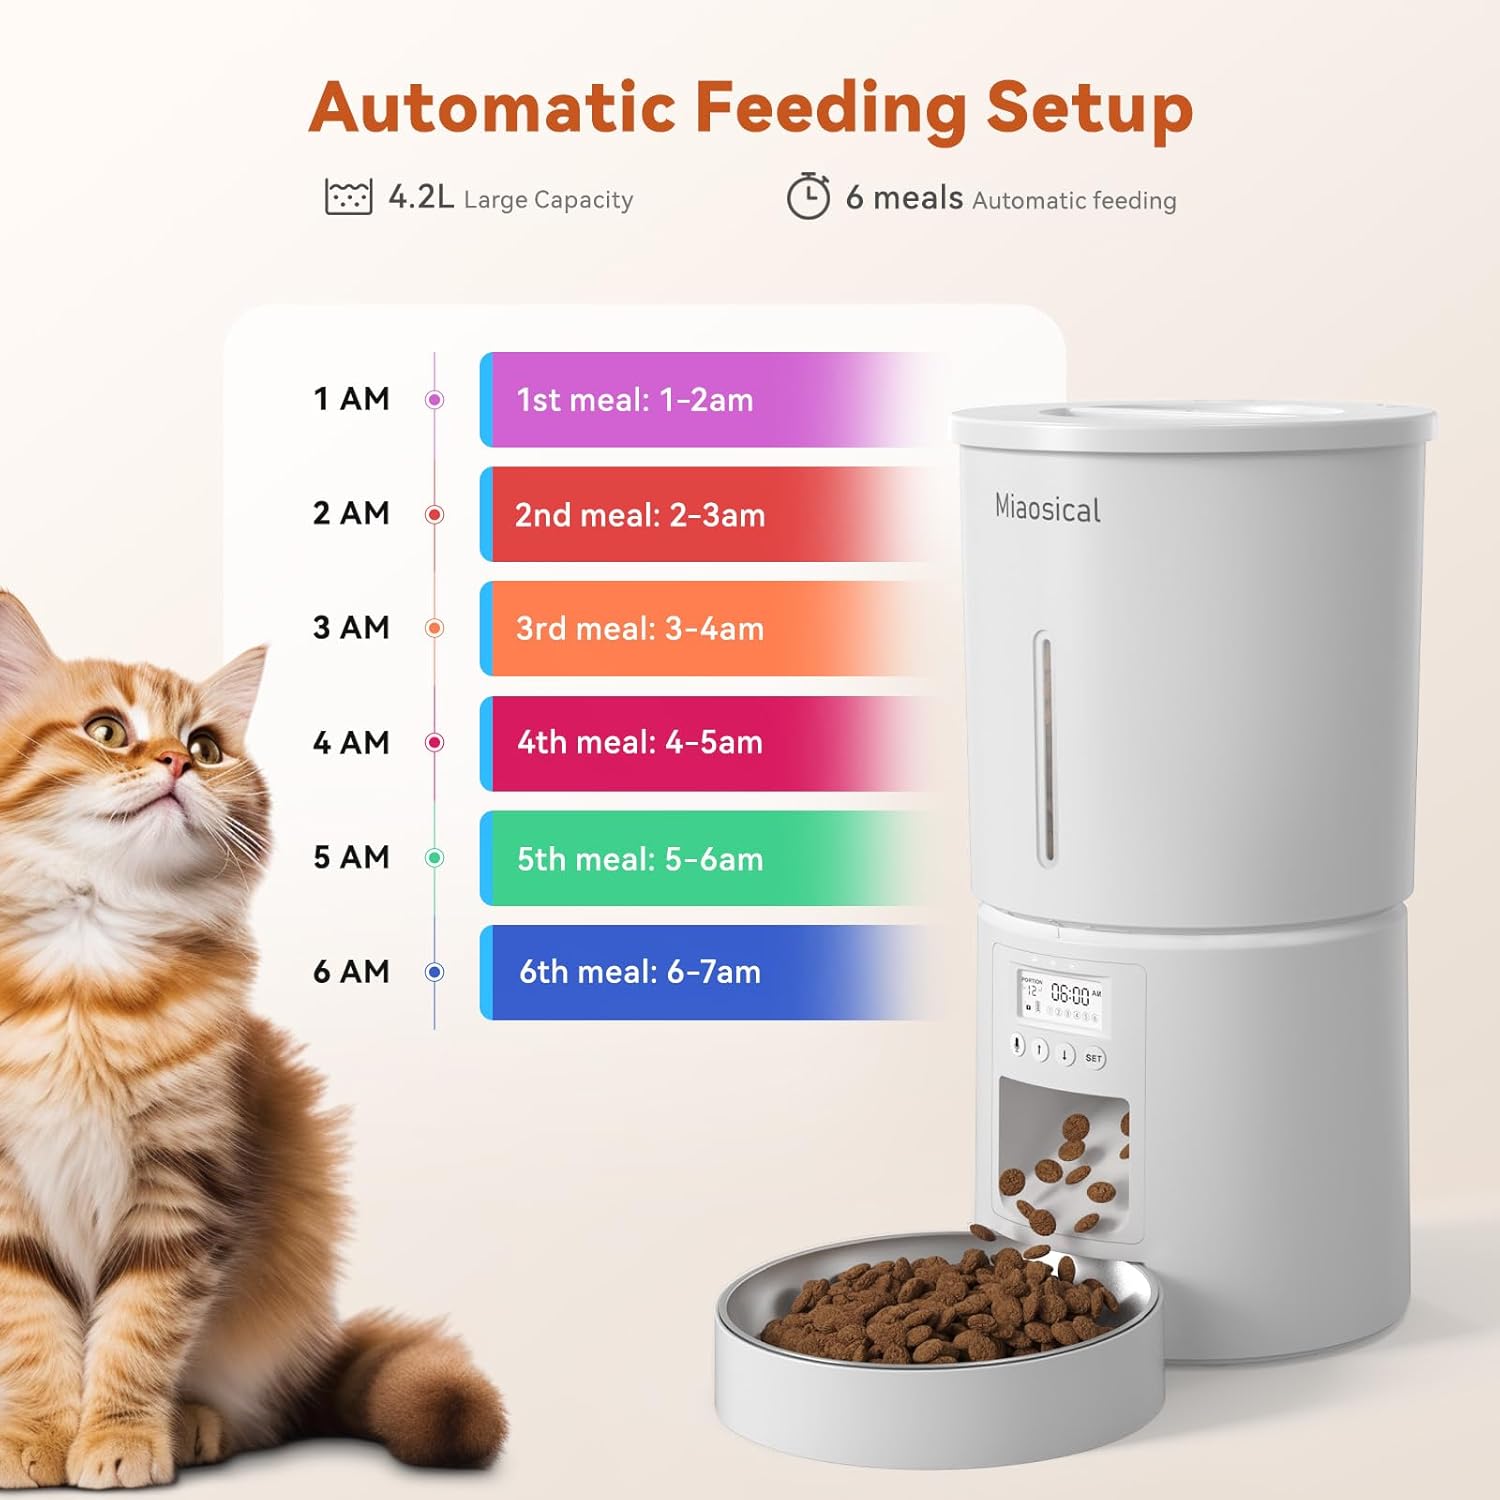
Image: Example of programming up to 6 meals per day.
6.3 Manual Feeding
To dispense food manually, press the 'DOWN' arrow button briefly. One portion will be dispensed immediately.
6.4 Voice Recording
You can record a 10-second voice message that will play at each scheduled meal time.
- Press and hold the 'UP' arrow button until you hear a beep, indicating recording has started.
- Speak clearly into the microphone (usually located near the control panel) for up to 10 seconds.
- Release the 'UP' arrow button to stop recording. You will hear a double beep.
- To test the recording, briefly press the 'UP' arrow button.
- To delete the recording, press and hold the 'UP' arrow button until you hear a single beep, then release and immediately press and hold it again until you hear a double beep.

Image: The feeder's voice recording function, playing a message to attract a cat.
6.5 Child/Pet-Proof Button Lock
To prevent accidental changes to settings, the control panel can be locked.
- To lock the buttons, press and hold the 'SET' button and the 'DOWN' arrow button simultaneously for a few seconds until a lock icon appears on the display.
- To unlock, repeat the process until the lock icon disappears.

Image: Features ensuring the feeder is securely locked and firmly planted, including the button lock.
7. Maintenance
7.1 Cleaning
Regular cleaning ensures hygiene and proper functioning of the feeder.
- Unplug the feeder from the power outlet and remove any batteries.
- Remove the food storage container and the stainless steel bowl.
- Wash the food storage container, lid, and stainless steel bowl by hand with mild soap and water.
- Rinse thoroughly and allow all parts to air dry completely before reassembling.
- Wipe the main unit (base with control panel) with a damp cloth. Do not immerse the main unit in water.
- Ensure all parts are dry before adding food or reconnecting power.

Image: Detachable components of the feeder being hand-washed, with a reminder to keep the main unit dry.
7.2 Food Storage and Freshness
The feeder is designed to keep food fresh.
- The airtight twist-lock lid helps preserve nutrients and flavor.
- The desiccant bag absorbs moisture to keep dry food fresh. Replace it regularly.

Image: Components contributing to sealed freshness, including the lid and desiccant bag.
7.3 Anti-Clog Rotor
The feeder features a double rotor design and a large-diameter outlet to prevent food from clogging.

Image: Close-up of the anti-clog rotor mechanism and food outlet.
8. Troubleshooting
| Problem | Possible Cause | Solution |
|---|---|---|
| Feeder not dispensing food. | No power; food jammed; container empty; buttons locked. | Check power connection/batteries. Clear any food blockages. Refill food container. Unlock buttons. |
| Incorrect meal times or portion sizes. | Incorrect programming. | Re-program meal times and portion sizes as per Section 6.2. |
| Voice recording not playing. | No recording saved; volume too low. | Record a new message (Section 6.4). Ensure volume is audible. |
| Food not fresh. | Lid not sealed; desiccant bag needs replacement. | Ensure lid is securely twisted. Replace desiccant bag. |
9. Specifications
- Model Number: SC-A80K-dw
- Capacity: 4.2 Liters (for dry food)
- Material: Acrylonitrile Butadiene Styrene (ABS)
- Dimensions (L x W x H): 30 x 16 x 32 cm
- Weight: 1.26 Kilograms
- Power Supply: 5V AC Adapter (included), 3 x D Batteries (not included)
- Number of Meals: Up to 6 meals per day
- Voice Recording: Up to 10 seconds
- Care Instructions: Hand wash only for removable parts. Wipe main unit.
- Special Features: Programmable feeding schedule, dual power, voice recorder, anti-clog design, secure lid, non-slip base.
10. Warranty and Support
Miaosical products are manufactured with quality and performance in mind. For warranty information or technical support, please refer to the contact details provided with your purchase or visit the official Miaosical website. Keep your purchase receipt as proof of purchase.
For any issues not covered in this manual, please contact customer service for assistance.


