
1. Introduction
Thank you for choosing the Trygoal 48-inch Floating Bathroom Vanity with Sink. This manual provides essential information for the safe and efficient installation, operation, and maintenance of your new bathroom vanity. Please read these instructions carefully before assembly and retain them for future reference.
2. Safety Information
Important Safety Warnings:
- Wall-mounting requires secure installation to prevent falling. Ensure the mounting surface is structurally sound and capable of supporting the vanity's weight. Professional installation is recommended.
- Ensure faucet and drain stopper compatibility for safe water use. A faucet with a spout height of at least 9 inches and a drain stopper without overflow are recommended for optimal use.
- Always turn off the main water supply before performing any maintenance or installation procedures.
- Avoid using harsh chemicals or abrasive cleaners on the sintered stone countertop or ceramic basin, as this may damage the surfaces.
- Keep small children and pets away from the installation area to prevent accidents.
3. Package Contents
Please verify that all components are present and undamaged before beginning assembly. If any parts are missing or damaged, contact customer support immediately.
- Floating Bathroom Vanity Cabinet (Brown Oak, 48-inch)
- Sintered Stone Countertop (Carrara White)
- Marble-Pattern Ceramic Vessel Basin
- Mounting Hardware (screws, anchors, brackets)
- Installation Guide
Note: Faucet, drain stopper, and P-trap are not included and must be purchased separately.
4. Setup and Installation
This section outlines the general steps for installing your floating bathroom vanity. For detailed, step-by-step instructions, please refer to the separate Installation Guide included in your package.
4.1 Pre-Installation Checks
- Ensure the wall where the vanity will be mounted is capable of supporting its weight. Reinforcement may be necessary.
- Verify the location of existing plumbing and electrical lines.
- Confirm that the faucet hole (1.38") accommodates your chosen single-handle faucet.
4.2 Mounting the Cabinet
The vanity is designed for wall-mounted installation. Use the provided mounting hardware to securely attach the cabinet to the wall studs. Accurate leveling is crucial for proper function and appearance.
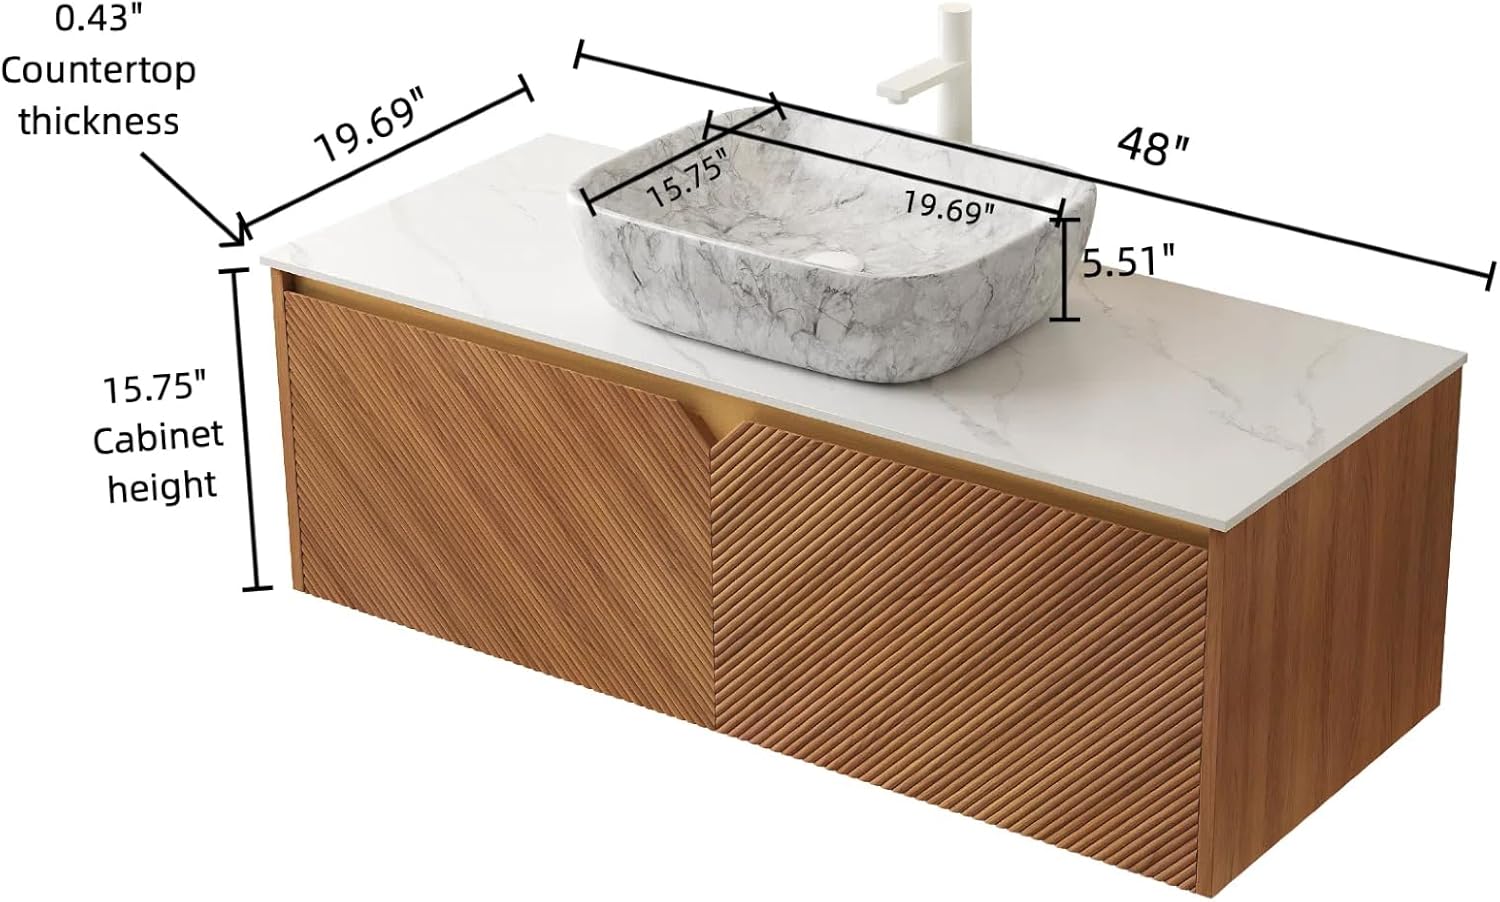
Figure 1: Vanity Dimensions for Installation Planning
4.3 Installing the Countertop and Basin
Carefully place the sintered stone countertop onto the cabinet. Position the marble-pattern ceramic vessel basin on the countertop, ensuring proper alignment with the pre-drilled faucet hole and drain opening. Apply a suitable sealant as per the Installation Guide to secure the basin and prevent water leaks.

Figure 2: Interior Storage and Ceramic Vessel Basin
4.4 Plumbing Connections
Connect the faucet and drain stopper according to their respective manufacturer's instructions. Ensure all connections are watertight before turning on the water supply. Check for any leaks after installation.
5. Operation
Your Trygoal floating bathroom vanity is designed for ease of use and efficient storage.
5.1 Cabinet Doors
The vanity features two twill pattern doors equipped with quiet soft-close mechanisms. To open, gently pull the door. The soft-close hinges will ensure a smooth and silent closing action, preventing slamming and protecting the cabinet structure.

Figure 3: Trygoal Floating Bathroom Vanity
5.2 Storage
The interior of the cabinet provides ample space for storing bathroom essentials such as toiletries, towels, and cleaning supplies. Organize items to maximize space and maintain accessibility.
6. Maintenance and Care
Proper care will ensure the longevity and appearance of your vanity.
6.1 Sintered Stone Countertop
- Clean daily with a soft cloth and mild, non-abrasive cleaner.
- Wipe up spills immediately to prevent staining.
- Avoid placing hot items directly on the surface without protection.
6.2 Ceramic Basin
- Clean with a soft sponge or cloth and a non-abrasive bathroom cleaner.
- Rinse thoroughly after cleaning to remove all cleaner residue.
- Avoid dropping heavy objects into the basin to prevent chipping or cracking.
6.3 Wood Cabinet
- Wipe the wood surfaces with a soft, damp cloth. Dry immediately to prevent water damage.
- Avoid prolonged exposure to moisture.
- Do not use abrasive cleaners or solvents, as these can damage the finish.
7. Troubleshooting
Refer to this section for common issues and their solutions.
| Problem | Possible Cause | Solution |
|---|---|---|
| Water Leakage | Loose plumbing connections; improper sealant application. | Check and tighten all plumbing connections. Reapply sealant around the basin if necessary. |
| Cabinet Doors Not Closing Smoothly | Hinge misalignment; obstruction. | Adjust the soft-close hinges according to the manufacturer's instructions. Remove any obstructions. |
| Vanity Feels Unstable | Improper wall mounting; loose anchors. | Ensure the vanity is securely fastened to wall studs. Re-tighten mounting screws or reinforce wall if needed. Consult a professional. |
8. Specifications
| Feature | Detail |
|---|---|
| Brand | Trygoal |
| Model Name | Floating Bathroom Vanity with Sink |
| Model Number | 2 Twill Pattern Doors |
| Color | Brown Oak |
| Size | 48" |
| Product Dimensions (D x W x H) | 19.69"D x 48.03"W x 21.69"H |
| Item Weight | 99.09 Pounds |
| Material | Ceramic, Sintered Stone, Solid Wood |
| Top Material Type | Sintered Stone, Ceramic |
| Mounting Type | Wall Mount |
| Number of Doors | 2 |
| Door Style | Twill Pattern |
| Additional Features | Scratch Resistant |
| Required Assembly | Yes |
9. Warranty and Support
This product comes with a standard manufacturer's warranty. For specific warranty details, please refer to the documentation included with your purchase or contact Trygoal customer support.
If you encounter any issues or have questions regarding your Trygoal Floating Bathroom Vanity, please contact our customer support team for assistance. Please have your model number and purchase date available when contacting support.
Customer Support: Refer to your purchase documentation for contact information.