1. Introduction
This manual provides essential information for the safe and efficient operation, assembly, and maintenance of your OTD DS1 Electric Bike. Please read this manual thoroughly before your first ride and retain it for future reference. Understanding your e-bike's features and functions will ensure a safe and enjoyable riding experience.
2. Product Overview
The OTD DS1 Electric Bike is designed for versatile use, including commuting, off-road trails, and general recreation. It combines pedal power with electric assistance for an enhanced riding experience.
Key Features:
- Motor: 800W Peak brushless motor for powerful acceleration and hill climbing.
- Battery: Removable 48V 13AH (624Wh) lithium-ion battery.
- Top Speed: Up to 28 MPH in electric-only throttle mode.
- Range: Up to 45 miles in pedal-assist mode, 28 miles in electric mode.
- Tires: 26x2.1 inch thickened tires for stability and traction.
- Suspension: Thickened spring shock absorbers on the front fork.
- Gears: 7-speed Shimano transmission system.
- Display: LCD panel showing current power, speed, total mileage, and gear position.
- Safety: UL2849 certified for electrical safety.
Included Components:
- OTD DS1 Electric Bike
- User Manual
- Battery Keys (x2)
- Mobile Phone Holder
- Charger
- Multifunction Open-End Wrench
- 3mm Allen Key
- 5mm Allen Key and Cross Screwdriver
- Pedals (x2)
- Reflectors (x2)
- LCD Display
- Headlight
- Front Wheel Quick Release Lever
- Kickstand
3. Safety Information
Your OTD DS1 Electric Bike is UL2849 certified, meeting high U.S. safety standards for e-bikes. Always prioritize safety during operation.
- Always wear a helmet and appropriate safety gear.
- Familiarize yourself with local e-bike regulations and traffic laws.
- Perform a pre-ride safety check before each use (brakes, tires, battery, lights).
- Do not operate the e-bike under the influence of alcohol or drugs.
- Adjust your speed to suit road conditions, weather, and your riding ability.
- Ensure all components are securely fastened before riding.
4. Setup and Assembly
The OTD DS1 Electric Bike arrives 85% pre-assembled. The following steps detail the final assembly process. Refer to the included tools for assistance.
4.1 Unpacking and Initial Inspection
Carefully remove the bike and all components from the packaging. Inspect for any damage during transit. Keep the packaging materials until you are satisfied with the product.
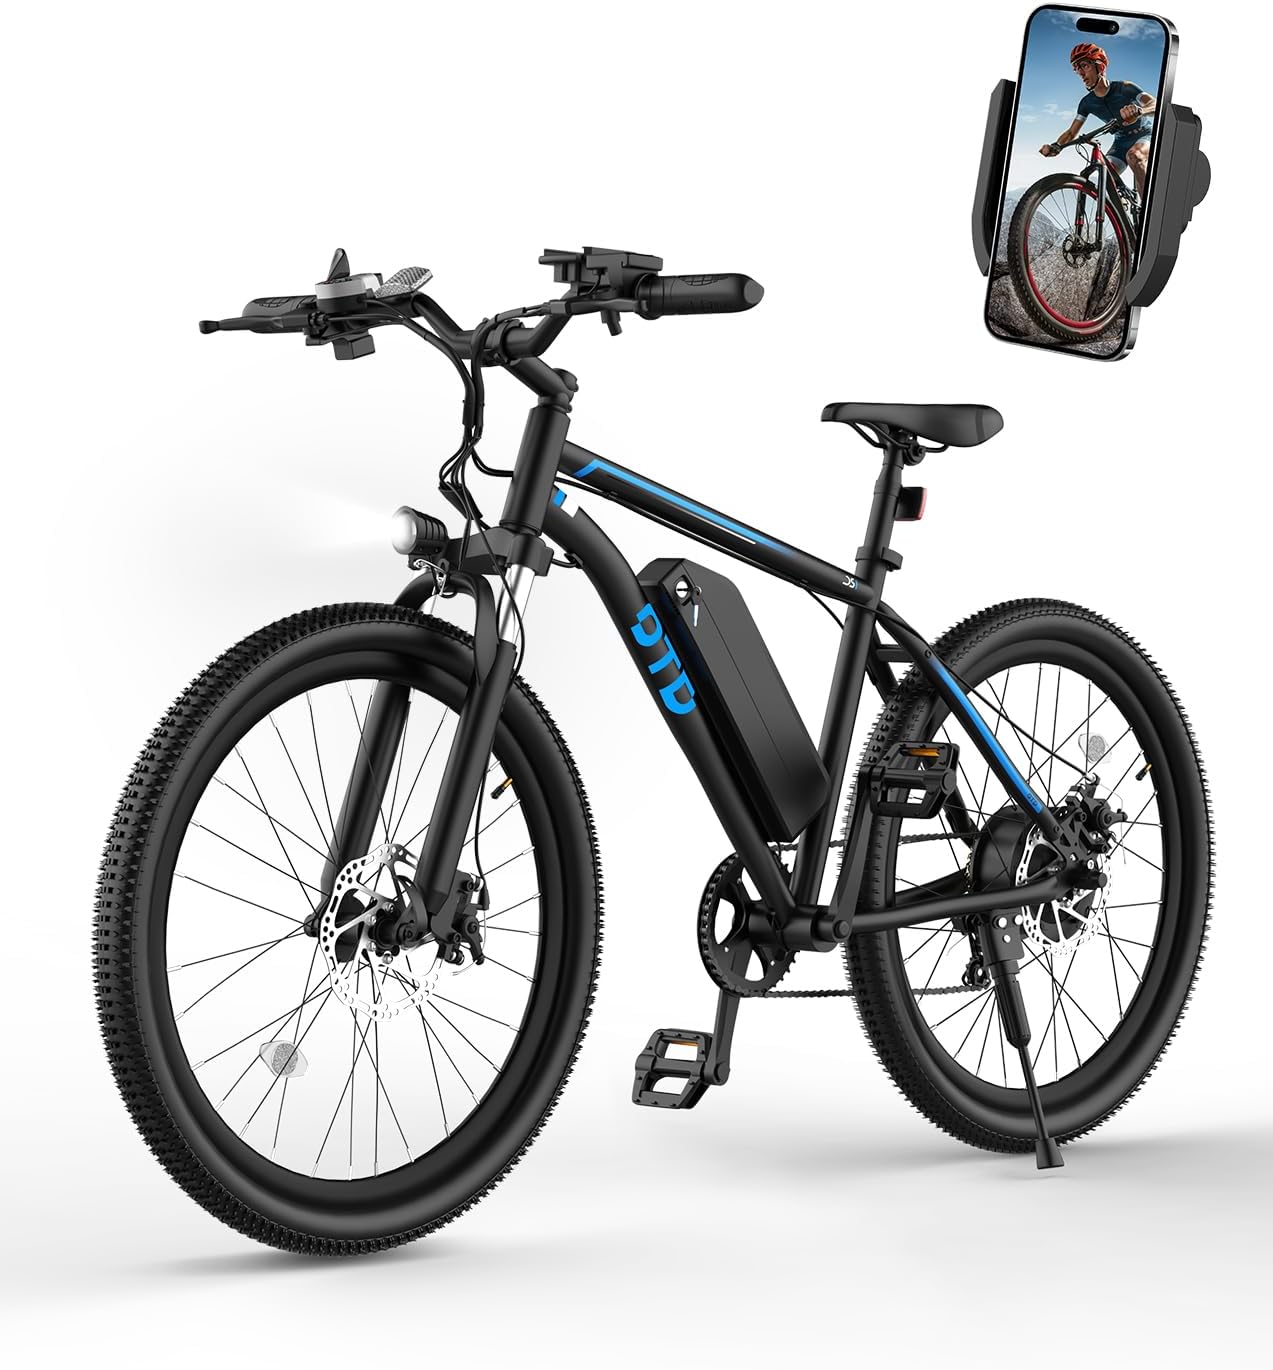
Image: All components of the OTD DS1 Electric Bike laid out after unpacking, including the frame, wheels, seat, and accessories.
4.2 Installing the Kickstand
Attach the kickstand to the designated mounting points on the bike frame using the provided wrench and bolts. Ensure it is securely tightened.
Video: Detailed instructions on how to install and secure the kickstand on an electric bike using an Allen wrench. The video shows the kickstand being aligned and secured with a wrench.
4.3 Attaching the Handlebar
Loosen the handlebar stem bolts, position the handlebar, and then tighten the bolts securely. Ensure the handlebar is centered and aligned with the front wheel.
Video: Detailed instructions on how to install and secure the handlebar of an electric bike using an Allen wrench. The video highlights tightening the bolts for stability.
4.4 Installing the Front Wheel
Align the front wheel with the fork, ensuring the disc brake rotor is correctly positioned within the caliper. Insert the quick-release lever and secure it firmly. Test the wheel rotation for smooth movement and check for any brake rub.

Image: Close-up of the OTD DS1 Electric Bike's LCD display and mobile phone holder mounted on the handlebar, showing digital readouts.
4.5 Attaching Pedals
Identify the left (L) and right (R) pedals. Screw them into the corresponding crank arms. Remember that the left pedal tightens counter-clockwise. Use the provided wrench to ensure they are tight.
4.6 Adjusting the Seat Post
Insert the seat post into the frame. Adjust the height to your comfort level, ensuring your feet can touch the ground when stopped. Secure the quick-release clamp.

Image: A person riding the OTD DS1 Electric Bike uphill on a rocky terrain, highlighting the powerful motor and climbing ability.
4.7 Installing Fenders and Reflectors
Attach the front and rear fenders to their respective mounting points. Install the front and rear reflectors for increased visibility.
Video: A comprehensive assembly guide for the OTD 26 Inch Electric Bike, showing step-by-step installation of various components.
5. Operating Instructions
5.1 Powering On/Off
To power on the e-bike, press and hold the power button on the LCD display for 3 seconds. To power off, repeat the process.
5.2 LCD Display Functions
The LCD display provides real-time information:
- Battery Level: Indicates remaining battery charge.
- Speed: Shows current riding speed (MPH).
- Mileage: Displays total distance traveled (ODO) and trip distance (TRIP).
- Gear Position (PAS Level): Adjust pedal-assist levels (0-5) using the "+" and "-" buttons.
5.3 Riding Modes
The OTD DS1 offers three distinct riding modes:
- Electric Mode: Utilize the twist throttle for full electric power without pedaling.
- Pedal-Assist Mode: The motor provides assistance as you pedal, with adjustable levels (PAS 1-5) for varying support.
- Pedal Mode: Ride the bike like a traditional bicycle with no electric assistance.
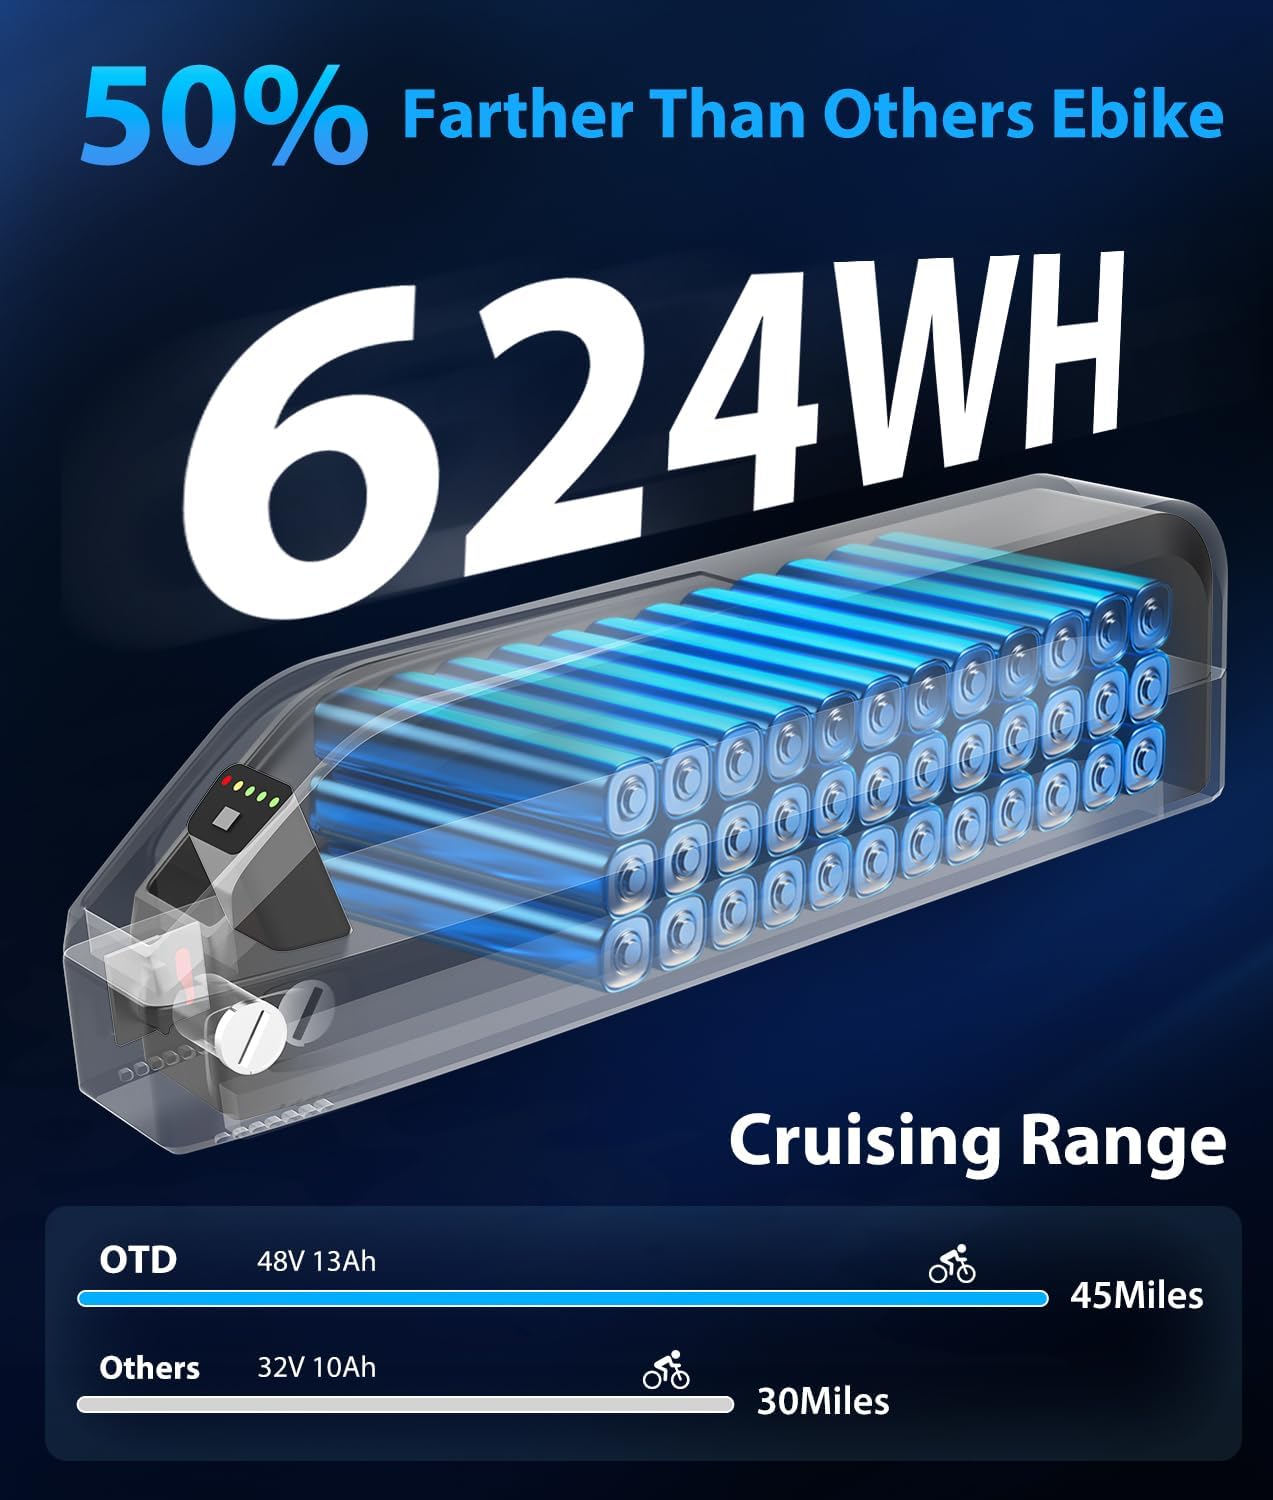
Image: Illustration of the three riding modes (Electric, Pedal-Assist, Classic) available on the OTD DS1 Electric Bike.
5.4 Gear Shifting
Use the Shimano 7-speed shifter on the handlebar to change gears. Adjust the speed transmission while riding to match terrain and desired effort.
5.5 Headlight and Horn
The e-bike is equipped with a front headlight and an electronic horn for safety. Use the dedicated buttons on the handlebar to operate them.
6. Maintenance
6.1 Battery Care and Charging
The 48V 13AH lithium-ion battery is removable for convenient indoor charging. A full charge typically takes 5-6 hours. Always use the original charger provided. Do not expose the battery to extreme temperatures or moisture.

Image: An illustration comparing the 624Wh battery capacity of the OTD DS1 Electric Bike to a smaller capacity battery, highlighting its extended cruising range.
6.2 Brake Adjustment
Regularly check the mechanical disc brakes for proper function. If you experience any brake rub or reduced braking performance, adjust the caliper screws to center the disc rotor. Ensure the brake pads have sufficient clearance on both sides of the rotor.
6.3 General Maintenance
- Keep the e-bike clean and dry.
- Regularly check tire pressure and inflate to recommended levels.
- Inspect all bolts and fasteners for tightness periodically.
- Lubricate the chain as needed.
7. Troubleshooting
This section addresses common issues you might encounter with your OTD DS1 Electric Bike.
- E10 Error on Display: This typically indicates a display issue. If the bike still operates, contact customer support for a replacement display.
- Brake Disc Rub: If the brake disc rubs, use an Allen key to adjust the caliper screws until the disc is centered and rotates freely without contact.
- Reduced Range: Ensure the battery is fully charged. Riding in higher pedal-assist levels or full electric mode will reduce the overall range. Consider mixing pedaling with electric assist for extended range.
8. Specifications
| Feature | Detail |
|---|---|
| Bike Type | Electric Bike |
| Model Name | DS1 |
| Brand | OTD |
| Motor | 800W Peak Brushless Motor |
| Top Speed | 28 MPH |
| Battery | 48V 13AH (624Wh) Removable Lithium-ion |
| Max Range | 45 Miles (Pedal Assist), 28 Miles (Electric) |
| Wheel Size | 26 Inches |
| Tire Width | 2.1 Inches (Thickened non-slip) |
| Frame Material | Aluminum |
| Suspension Type | Front (Thickened Spring Shock Absorbers) |
| Number of Speeds | 7 (Shimano) |
| Brake Style | Disc |
| Maximum Weight Recommendation | 265 Pounds |
| Minimum User Height | 5.3 Feet |
| Item Weight | 57.1 Pounds |
| Safety Certification | UL2849 |
9. Warranty and Support
The OTD DS1 Electric Bike comes with a 365-day (1 Year) limited warranty. For any assembly or ride-related questions, please utilize the easy online support provided by OTD EBIKE. If you are unsure about returning the product, please retain the original packaging.
For further assistance, visit the OTD Store on Amazon.


