Onforu BDV100G-2
Onforu 2-Head Motion Sensor Outdoor Flood Light Instruction Manual
Model: BDV100G-2
Introduction
This manual provides detailed instructions for the installation, operation, and maintenance of your Onforu 2-Head Motion Sensor Outdoor Flood Light. Please read this manual thoroughly before installation and use to ensure proper function and safety.
The Onforu motion sensor outdoor light fixture is designed for outdoor use, offering customizable lighting with PAR38 E26 base bulbs (not included). It features advanced PIR motion detection, an adjustable auto-shutoff timer, and a dusk-to-dawn mode for energy efficiency and enhanced security. The adjustable twin PAR38 bulb holders allow for precise light direction.
Video: Overview of the Onforu Motion Sensor Outdoor Lights Fixture.

Image: Overview of the flood light highlighting features like easy installation, adjustable design, durability, motion sensor, dusk-to-dawn mode, and IP65 waterproof rating.
Package Contents
Verify that all components are present before beginning installation:
- Motion Sensor Light Fixture (2 units)
- Mounting Bracket
- Machine Screws (8 pieces)
- Wire Nut (1 piece)
- Eva Gasket (1 piece)
- Silicone Gasket (1 piece)
- Instruction Manual
Note: PAR38 E26 base bulbs are not included and must be purchased separately (max 150 watts per bulb).

Image: Illustration showing the E26 base for PAR38 bulbs and indicating a maximum of 150W per bulb. Bulbs are not included.
Safety Information
- Always turn off power at the circuit breaker before installation or servicing.
- Consult a qualified electrician if you are unsure about the installation process.
- Ensure all wiring connections are secure and comply with local electrical codes.
- Do not exceed the maximum wattage of 150 watts per bulb.
- This fixture is designed for outdoor, hardwired installation only. Do not attempt to use with solar or battery power.
Setup and Installation
The Onforu flood light is designed for quick and straightforward hardwired installation. Follow these steps carefully:
- Prepare the Installation Area: Turn off power at the circuit breaker. Ensure the mounting surface is stable and can support the fixture.
- Attach Mounting Bracket: Secure the mounting bracket to the junction box using the provided machine screws. Ensure the bracket is oriented correctly for wall or soffit mounting.
- Wire Connections: Connect the fixture's wires to your household wiring using the wire nuts. Typically, black to black (Live), white to white (Neutral), and green/bare copper to ground.
- Mount the Fixture: Align the fixture with the mounting bracket and secure it with the remaining screws. Ensure the Eva gasket and silicone gasket are properly seated to maintain waterproof integrity.
- Install Bulbs: Screw in two PAR38 E26 base bulbs (max 150W each) into the bulb holders.
- Restore Power: Turn on power at the circuit breaker.

Image: Step-by-step diagram for hardwired installation, showing bracket attachment, wiring, and fixture mounting.

Image: Visual guide for easy installation, detailing components and the four main steps.

Image: Examples of soffit mounted and wall mounted installations.
Operating Instructions
Adjusting Light Heads and Sensor
The twin PAR38 bulb holders can be swiveled 180° vertically and 360° horizontally to direct light precisely where needed. The motion sensor can be tilted up and down to adjust its detection area.

Image: Diagram illustrating the 180° vertical and 360° horizontal adjustment of the light heads, and the vertical adjustment of the motion sensor.

Image: Close-up showing the 360° adjustable light heads. Note that the motion detector adjusts only up and down.
Motion Sensor Mode
The integrated PIR motion sensor detects movement within a 180° range and a distance of 19-72 feet. The light will activate when motion is detected and remain on for an adjustable duration (1-10 minutes).

Image: Diagram showing the motion sensor's 180° detection angle and 19-72 ft sensing distance from an 8ft height.

Image: Depiction of the motion sensor light activating when a person and dog are detected at night.
Dusk-to-Dawn Mode
In Dusk-to-Dawn mode, the fixture automatically turns on at dusk/night and turns off at dawn, providing continuous illumination throughout the night without motion activation.

Image: Illustration showing the light automatically turning on at dusk and off at dawn.

Image: Example of the flood light providing continuous illumination in Dusk-to-Dawn mode for a driveway at night.
Control Settings
The motion sensor unit features three adjustable dials for customizing operation:
- LUX (Light Sensitivity): Adjusts the ambient light level at which the motion sensor becomes active. Set to "sun" for day and night operation, or "moon" for night-only operation.
- TIME (Duration): Sets how long the light remains on after motion is detected, ranging from 1 to 10 minutes.
- SENS (Sensitivity): Controls the detection distance of the motion sensor, from 19 feet to 72 feet.
- TEST Mode: A setting that turns the light on for 5 seconds when motion is detected, regardless of day or night, for easy testing of the sensor's range and angle.
- D2D Mode: Activates the Dusk-to-Dawn function, where the light turns on at dusk and off at dawn.

Image: Close-up of the motion sensor unit showing the adjustable dials for LUX, Time, and Sensitivity, along with descriptions for Test Mode and D2D Mode.
Maintenance
- Cleaning: Periodically clean the fixture with a soft, damp cloth. Do not use abrasive cleaners or solvents.
- Bulb Replacement: Ensure power is off at the circuit breaker before replacing bulbs. Use only PAR38 E26 base bulbs, not exceeding 150 watts per bulb.
- Inspection: Regularly inspect the fixture for any signs of damage, loose wiring, or wear. Address any issues promptly.
- Weather Resistance: The fixture is IP65 waterproof, heat-resistant, cold-resistant, dust-proof, and anti-rust, designed to withstand various outdoor conditions.

Image: Illustration highlighting the IP65 waterproof rating, indicating resistance to various weather conditions.

Image: Diagram showing the efficient heat dissipation design, which helps extend the product's service life.
Troubleshooting
| Problem | Possible Cause | Solution |
|---|---|---|
| Light does not turn on. | No power; loose wiring; faulty bulb; LUX setting too low (for motion mode). | Check circuit breaker; verify wiring connections; replace bulb; adjust LUX setting. |
| Light stays on continuously. | Motion sensor continuously triggered; TIME setting too long; D2D mode active. | Adjust sensor angle/sensitivity to avoid false triggers; reduce TIME setting; ensure D2D mode is off if motion mode is desired. |
| Light turns on during the day. | LUX setting too high (set to "sun"); D2D mode not functioning correctly. | Adjust LUX setting to "moon" for night-only operation; check D2D mode settings. |
| Motion sensor range is poor. | Sensor angle incorrect; SENS setting too low; obstructions. | Adjust sensor angle (up/down); increase SENS setting; clear any obstructions. |
Specifications
| Brand | Onforu |
| Model Number | BDV100G-2 |
| Material | Plastic |
| Color | White |
| Power Source | Corded Electric |
| Voltage | 120 Volts |
| Max Wattage (per bulb) | 150 watts |
| Bulb Base | E26 (PAR38 compatible) |
| Motion Detection Range | 19-72 ft |
| Motion Detection Angle | 180° |
| Auto-Shutoff Timer | 1-10 minutes |
| Water Resistance Level | IP65 Waterproof |
| Mounting Type | Wall Mount & Soffit Mount |
| Item Dimensions (L x W x H) | 6.9"L x 5.4"W x 5.8"H |
| Included Components | Motion Sensor Light Fixture |
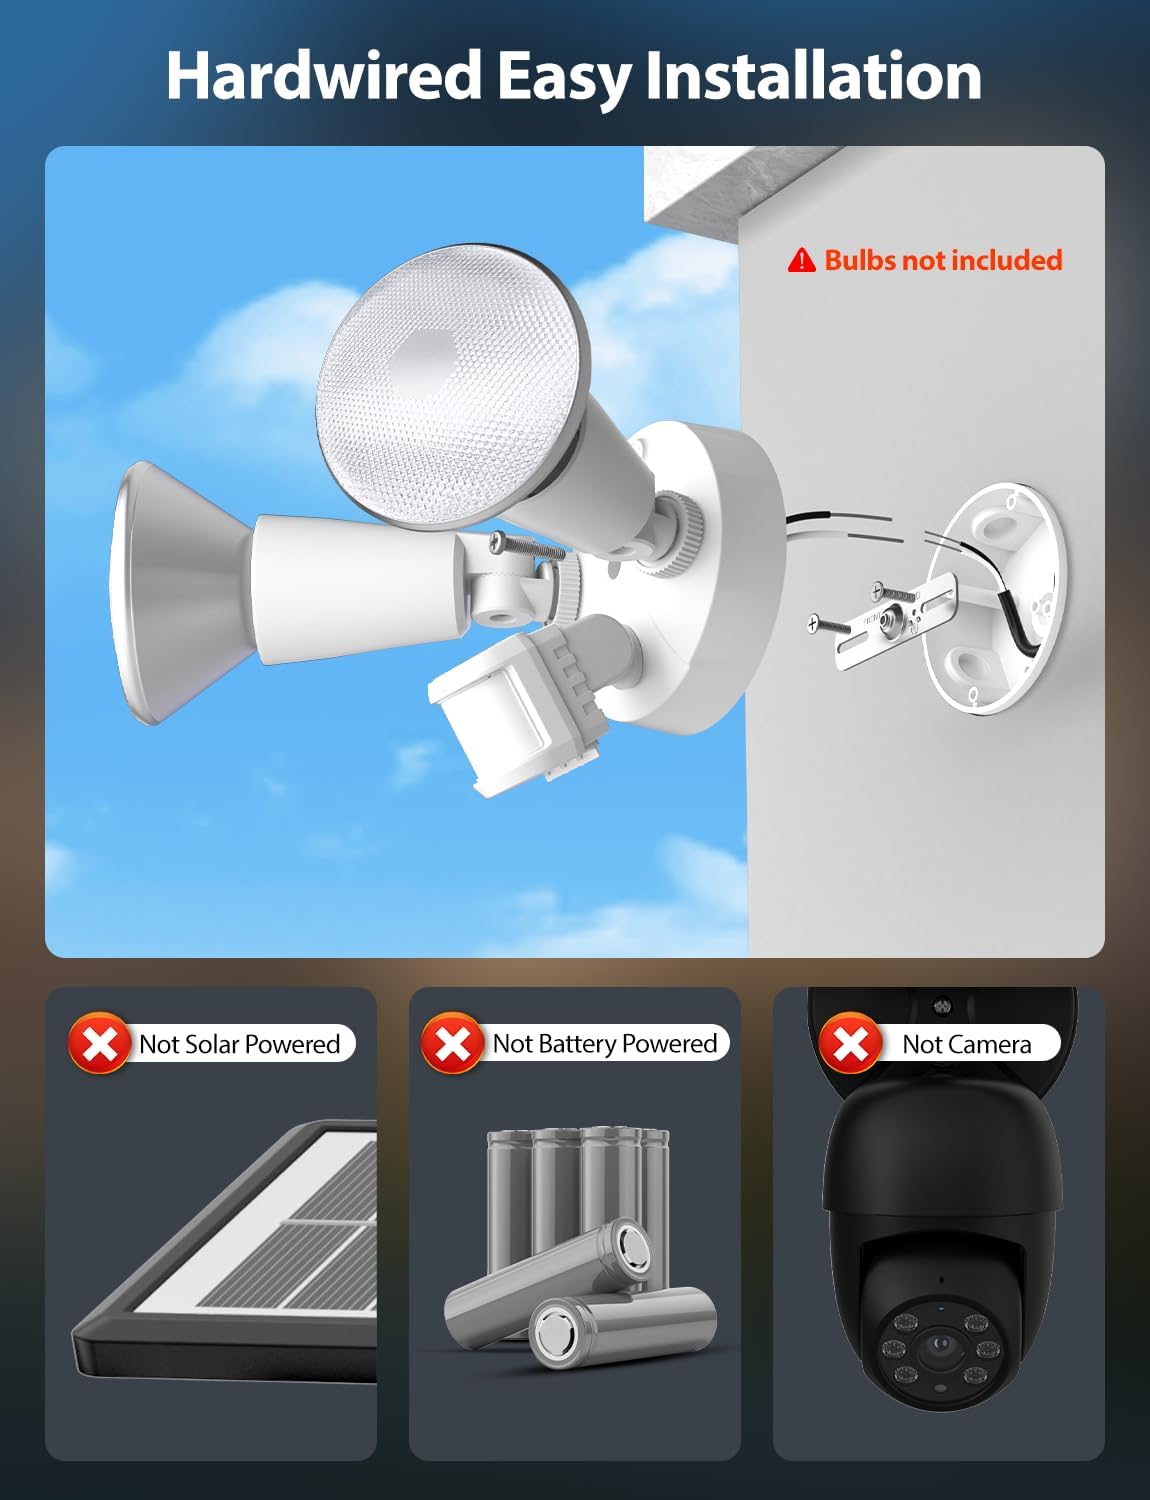
Image: Technical drawing showing the dimensions of the flood light fixture.
Warranty
This Onforu product is covered by a 2-year limited manufacturer's warranty. Please retain your proof of purchase for warranty claims. The warranty covers defects in materials and workmanship under normal use.
For specific warranty terms and conditions, please refer to the official Onforu website or contact customer support.
Customer Support
If you encounter any issues or have questions regarding your Onforu 2-Head Motion Sensor Outdoor Flood Light, please contact Onforu customer support.
- Manufacturer: Onforu
- Website: Visit the Onforu Store on Amazon (for general product information)
- For direct support, please refer to the contact information provided on the product packaging or the official Onforu website.
Ask a question about this manual
Ask about setup, troubleshooting, compatibility, parts, safety, or missing instructions. Manuals+ will review the question and use this page’s manual context to help answer it.