1. Introduction
This manual provides detailed instructions for the setup, operation, and maintenance of your SIKUING SEM400 Wireless In-Ear Monitor System. Designed for professional audio monitoring, this system delivers clear and stable sound for musicians, singers, bands, and performers in various environments, including live stages, church worship, and studio recording. Please read this manual thoroughly before using the product to ensure optimal performance and longevity.
2. Product Features
- Professional Wireless IEM System: Delivers clear and stable sound, suitable for stage, worship, and studio applications.
- Versatile Monitoring Options: Supports both stereo and mono in-ear monitoring modes, designed to minimize latency, feedback, and ambient noise.
- Extended Wireless Range: Offers a wireless transmission range of up to 250 feet (approximately 76 meters), providing freedom of movement for performers.
- 100 Selectable UHF Frequencies: Operates within the 550–579.25 MHz UHF band, allowing for easy switching between 100 channels. Utilizes Phase-Locked Loop (PLL) technology for stable and reliable signal transmission, avoiding interference in multi-user environments.
- Compact Beltpack Receiver: Lightweight and portable, featuring an LCD display for real-time monitoring of battery level, RF signal strength, and pairing status.
- High-Quality Earphones: Equipped with in-ear earphones designed to deliver full-range, dynamic, and crystal-clear sound.
- Easy Setup and Rack-Mountable Transmitter: The transmitter can be securely rack-mounted using the included brackets. The front panel includes a 1/4-inch headphone output, while the rear panel offers a 6.35 mm combo input and independent audio input jacks for flexible connectivity.
3. Package Contents
Please check the package contents upon unboxing to ensure all items are present:
- 1 x SIKUING SEM400 Transmitter Unit
- 1 x SIKUING Beltpack Receiver
- 1 x Pair of In-Ear Earphones
- 1 x Power Adapter
- 2 x Rack-mount Brackets
- 1 x User Manual (this document)
4. Setup Guide
4.1 Transmitter Setup
- Placement: Position the transmitter unit in a stable location, ideally within line of sight of the performance area. For permanent installations, use the provided rack-mount brackets to secure the transmitter in a standard equipment rack.
- Power Connection: Connect the included power adapter to the DC IN (12V-18V) port on the rear panel of the transmitter. Plug the adapter into a suitable power outlet.
- Audio Input: Connect your audio source (e.g., mixer, audio interface) to the transmitter's audio input jacks. The rear panel features a 6.35 mm combo input and independent audio input jacks (Left/Right). Ensure the input levels are appropriate to avoid distortion.
- Antenna Connection: Screw the antenna securely into the ANTENNA port on the rear panel. Ensure the antenna is positioned vertically for optimal signal transmission.
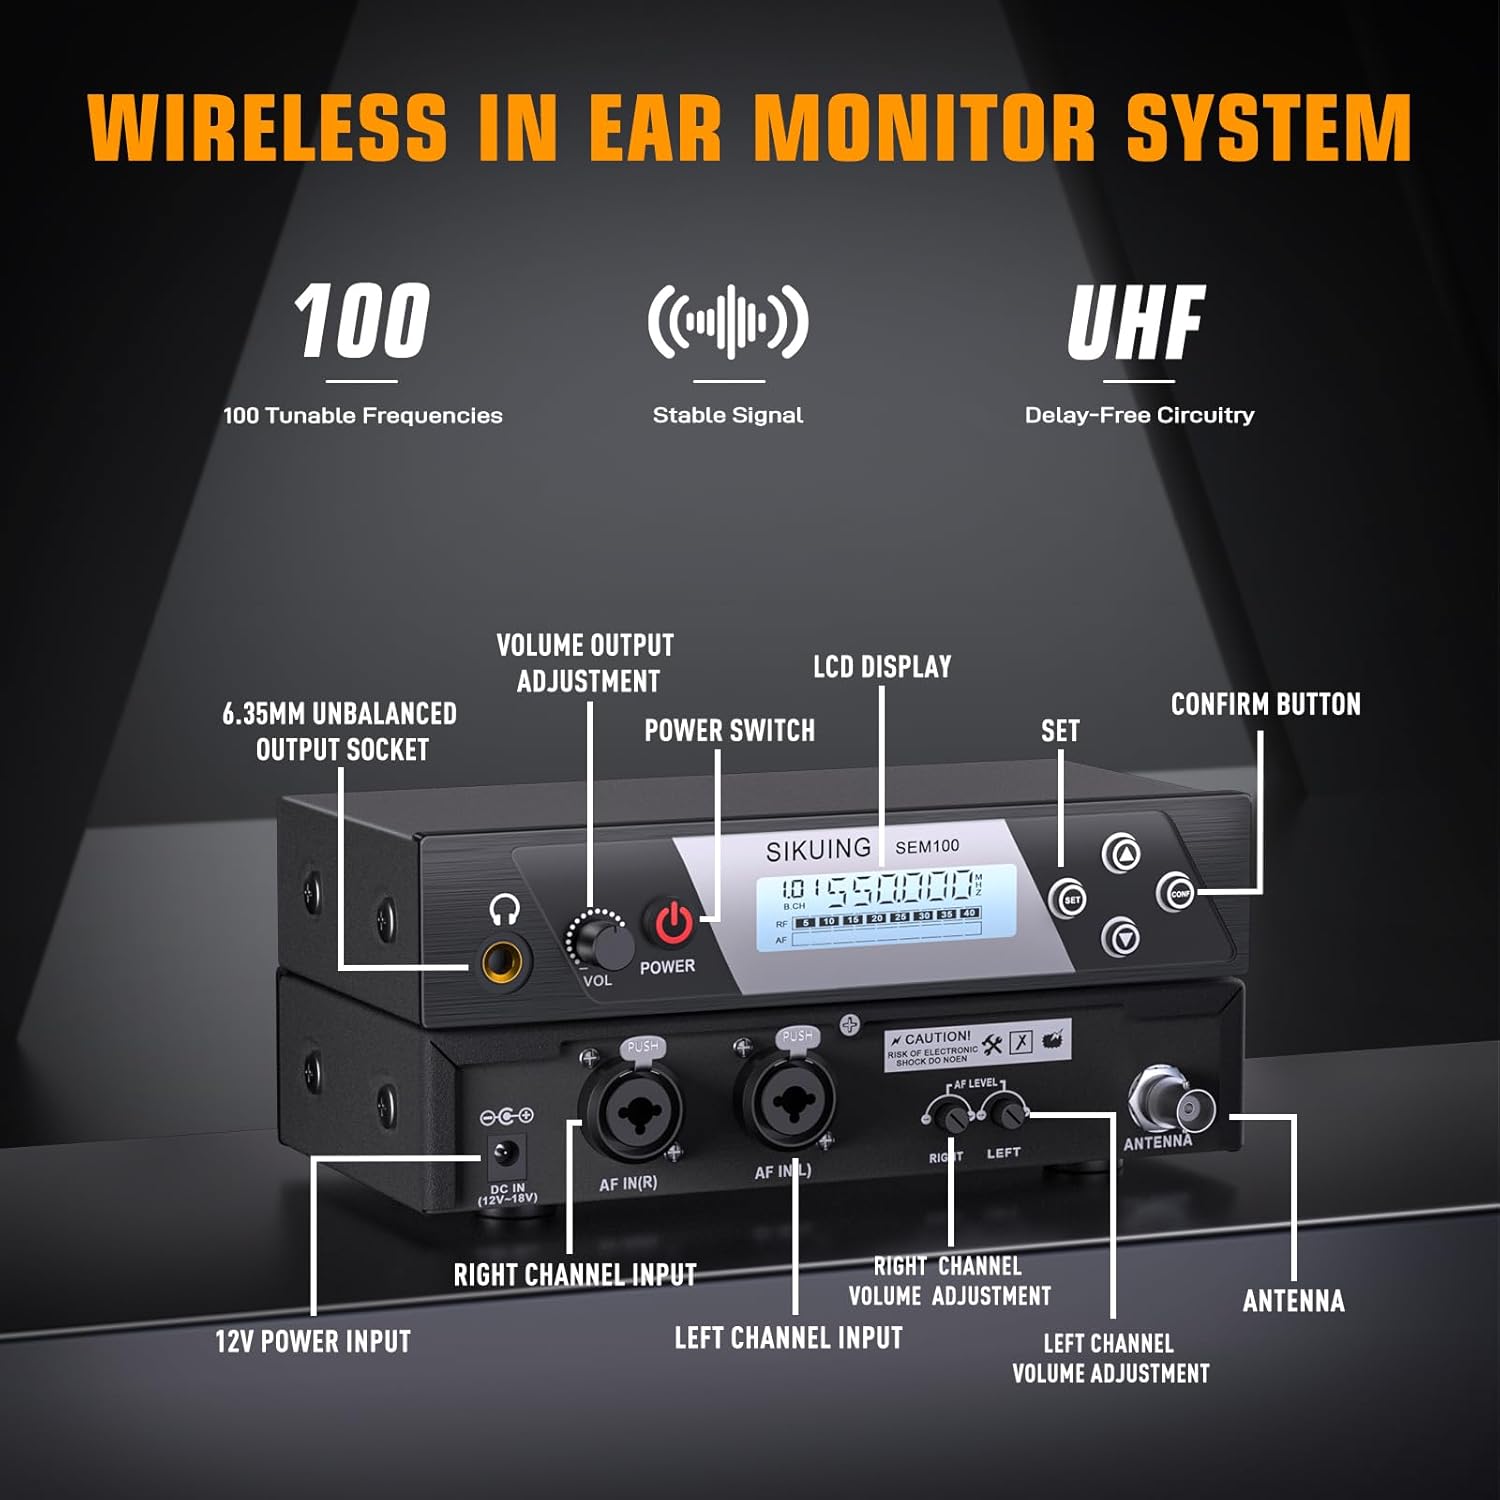
Image: Detailed view of the SIKUING SEM400 transmitter unit, highlighting the 6.35mm unbalanced output socket, volume output adjustment, power switch, LCD display, SET button, confirm button, 12V power input, right channel input, left channel input, right channel volume adjustment, left channel volume adjustment, and antenna port.
4.2 Beltpack Receiver Setup
- Battery Installation: Open the battery compartment on the beltpack receiver. Insert two AA batteries (not included), ensuring correct polarity.
- Earphone Connection: Plug the included in-ear earphones into the headphone jack on the beltpack receiver.
- Wearing the Receiver: Use the integrated clip to attach the beltpack receiver to your belt, clothing, or instrument strap for comfortable and secure placement.

Image: Close-up of the SIKUING SEM400 beltpack receiver, showing the display, frequency selection button, menu options, hold switch, antenna, headphone jack, and power/volume button. The battery compartment is also visible.
4.3 Initial Pairing and Channel Selection
- Power On: Turn on both the transmitter and the beltpack receiver.
- Select Frequency: On the transmitter, use the control buttons to select an available UHF frequency. The LCD display will show the current frequency.
- Sync Receiver: On the beltpack receiver, use the frequency selection button to match the frequency displayed on the transmitter. The receiver's LCD will indicate successful pairing and RF signal strength.
- Audio Check: Play audio through your connected source and adjust the volume on both the transmitter and receiver to a comfortable listening level.

Image: Illustration demonstrating the 100 selectable channels feature of the SIKUING SEM400 system, showing various frequency displays on the transmitter and receiver units, emphasizing precision and interference-free operation.
5. Operating Instructions
5.1 Power On/Off
- Transmitter: Press the POWER button on the front panel to turn the unit on or off.
- Receiver: Press and hold the POWER/VOLUME button on the beltpack receiver to turn it on or off.
5.2 Volume Adjustment
- Transmitter: Use the VOLUME OUTPUT ADJUSTMENT knob on the transmitter to control the overall output level. Individual left and right channel volume adjustments are also available on the rear panel.
- Receiver: Rotate the POWER/VOLUME button on the beltpack receiver to adjust the listening volume through your earphones.
5.3 Frequency Selection
If you experience interference, you can change the operating frequency:
- On the transmitter, press the SET button to enter frequency selection mode.
- Use the UP/DOWN buttons to cycle through the available 100 UHF frequencies.
- Once a desired frequency is selected, press the CONFIRM button to save.
- On the beltpack receiver, use the FREQUENCY SELECTION BUTTON to match the new frequency. The receiver will automatically sync.
5.4 Monitoring Modes (Stereo/Mono)
The system supports both stereo and mono monitoring. Refer to the transmitter's menu options (if available) or the specific audio input configuration to switch between these modes. Stereo mode provides a spatial sound experience, while mono mode combines both channels for a focused mix.
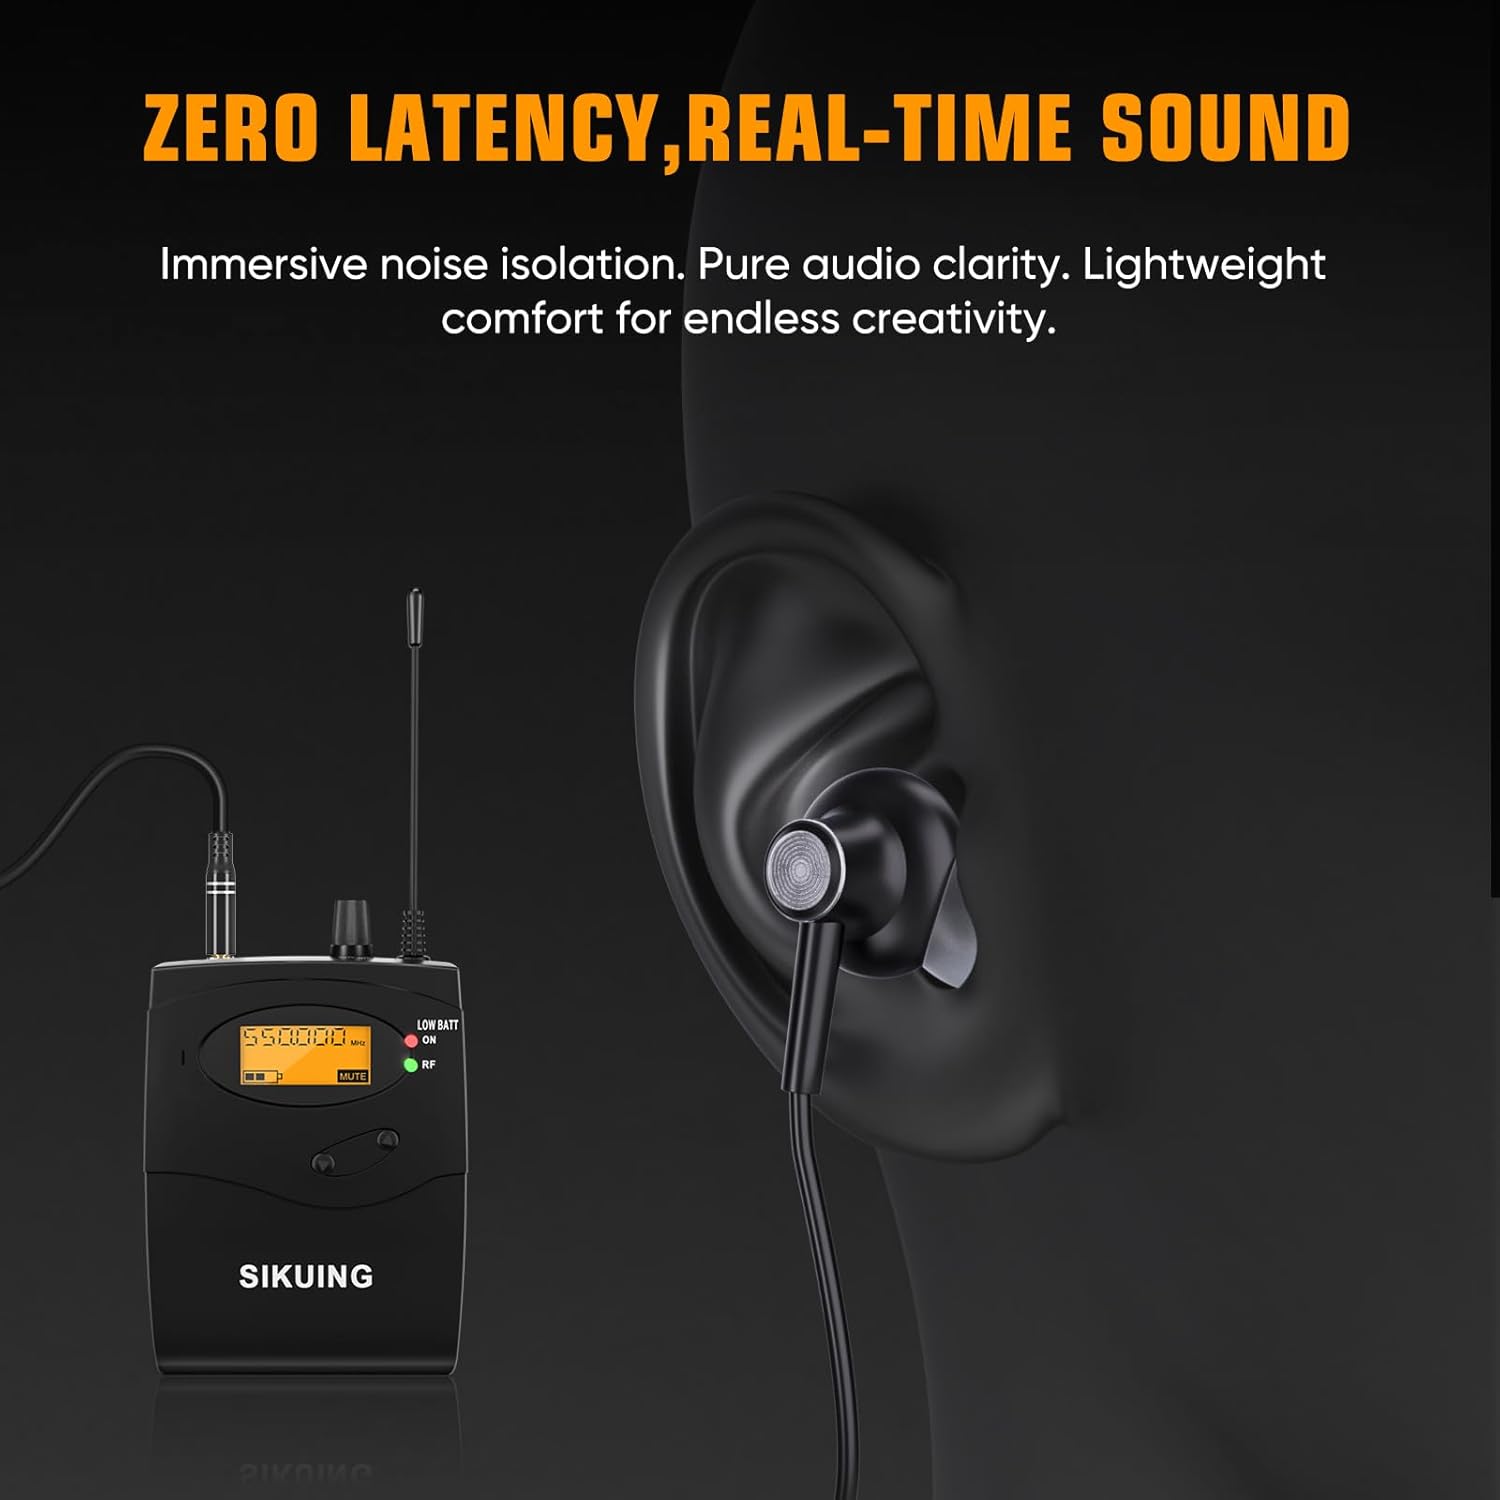
Image: Depiction of the SIKUING SEM400 beltpack receiver and an ear, illustrating the concept of zero latency and real-time sound for immersive noise isolation and pure audio clarity.
6. Maintenance
- Cleaning: Use a soft, dry cloth to clean the surfaces of the transmitter and receiver. Avoid using liquid cleaners or solvents, which may damage the finish or internal components.
- Battery Replacement: Replace the AA batteries in the beltpack receiver when the low battery indicator appears on the LCD. Always use fresh batteries for optimal performance.
- Storage: When not in use for extended periods, store the system in a cool, dry place away from direct sunlight and extreme temperatures. Remove batteries from the receiver if storing for a long time to prevent leakage.
- Antenna Care: Handle the antennas carefully. Ensure they are securely attached but do not overtighten. Avoid bending or damaging them, as this can affect signal quality.
7. Troubleshooting
If you encounter issues with your SIKUING SEM400 system, refer to the following troubleshooting tips:
- No Sound:
- Ensure both the transmitter and receiver are powered on.
- Check all audio cable connections to the transmitter.
- Verify that the volume levels on both the transmitter and receiver are turned up.
- Confirm that the transmitter and receiver are tuned to the same frequency.
- Check the earphones for proper connection and functionality.
- Static or Interference:
- Change the operating frequency on both the transmitter and receiver to an unused channel. The system offers 100 selectable UHF frequencies to find a clear signal.
- Ensure the transmitter antenna is fully extended and positioned vertically.
- Reduce the distance between the transmitter and receiver.
- Check for other wireless devices operating on similar frequencies nearby.
- Short Wireless Range:
- Ensure the transmitter antenna is unobstructed and properly positioned.
- Replace the batteries in the beltpack receiver if they are low.
- Minimize physical obstructions (walls, large metal objects) between the transmitter and receiver.
- Distorted Audio:
- Adjust the input level on the transmitter to prevent clipping.
- Lower the volume on the receiver if the sound is overdriven.
- Ensure the audio source is not sending a distorted signal.

Image: Diagram illustrating the stable signal and long-range reach of the SIKUING SEM400 system, showing the transmitter and receiver maintaining connectivity up to 250 feet.
8. Specifications
| Model | SEM400 |
| Brand | SIKUING |
| Frequency Band | UHF 550–579.25 MHz |
| Selectable Channels | 100 |
| Wireless Range | Up to 250 feet (approx. 76 meters) |
| Connectivity Technology | Wireless |
| Transmitter Inputs | 6.35 mm Combo Input, Independent Audio Input Jacks (L/R) |
| Transmitter Outputs | 1/4-inch Headphone Output |
| Receiver Headphone Jack | Standard 3.5mm (for included earphones) |
| Receiver Power | 2 x AA Batteries (not included) |
| Transmitter Power | 12V-18V DC Adapter (included) |
| Material | Metal (Transmitter), Durable Plastic (Receiver) |
| Product Dimensions | 7.1 x 28.3 x 46 cm (packaging/system dimensions); 1.73 kg (total weight) |
| Compatible Devices | Laptops, Music Production Equipment, Mixers, Amplifiers |
9. Warranty and Support
The SIKUING SEM400 Wireless In-Ear Monitor System is designed for reliability and performance. For technical assistance, troubleshooting beyond this manual, or inquiries regarding warranty coverage, please contact SIKUING customer support. Keep your purchase receipt as proof of purchase for warranty claims.