1. Important Safety Information
Before assembling or operating the VEVOR Leverage Gym, please read this entire manual carefully. Failure to follow these instructions may result in serious injury or equipment damage. Keep this manual for future reference.
- Consult a Physician: Before starting any exercise program, consult with a healthcare professional to ensure it is appropriate for your physical condition.
- Adult Supervision: This equipment is intended for adult use. Keep children and pets away from the machine during operation.
- Proper Assembly: Ensure all parts are correctly assembled and tightened according to the instructions. Regularly check all bolts and nuts for tightness.
- Stable Surface: Place the gym on a flat, stable, and non-slip surface. Ensure adequate clearance around the equipment for safe operation.
- Weight Capacity: Do not exceed the maximum load capacity of 265 lbs (120 kg) for the entire system. When using individual lever arms, distribute weight evenly and do not exceed the recommended individual arm limits (e.g., 165 lbs per dumbbell column, 100 lbs per wire rope side). Uneven loading can cause instability.
- Inspect Before Use: Before each workout, inspect the equipment for any signs of wear, damage, or loose components. Do not use if damaged.
- Proper Form: Always use proper exercise form to prevent injury. If you experience pain or discomfort, stop immediately.
- Moving Parts: Keep hands, feet, and clothing clear of all moving parts during operation.
2. What's in the Box
Carefully unpack all components and verify that you have received all items listed below. If any parts are missing or damaged, please contact VEVOR customer support.
- 1 x Leverage Gym System
- 1 x User Manual
- 1 x Blister Parts Pack (containing various bolts, washers, and nuts)
- 1 x Lat Pulldown Rope
- 2 x Ankle Straps
- 6 x Large Barbell Plate Clips
- 6 x Small Barbell Plate Clips
- 1 x Upper Pull Bar
- 1 x Lower Pull Bar
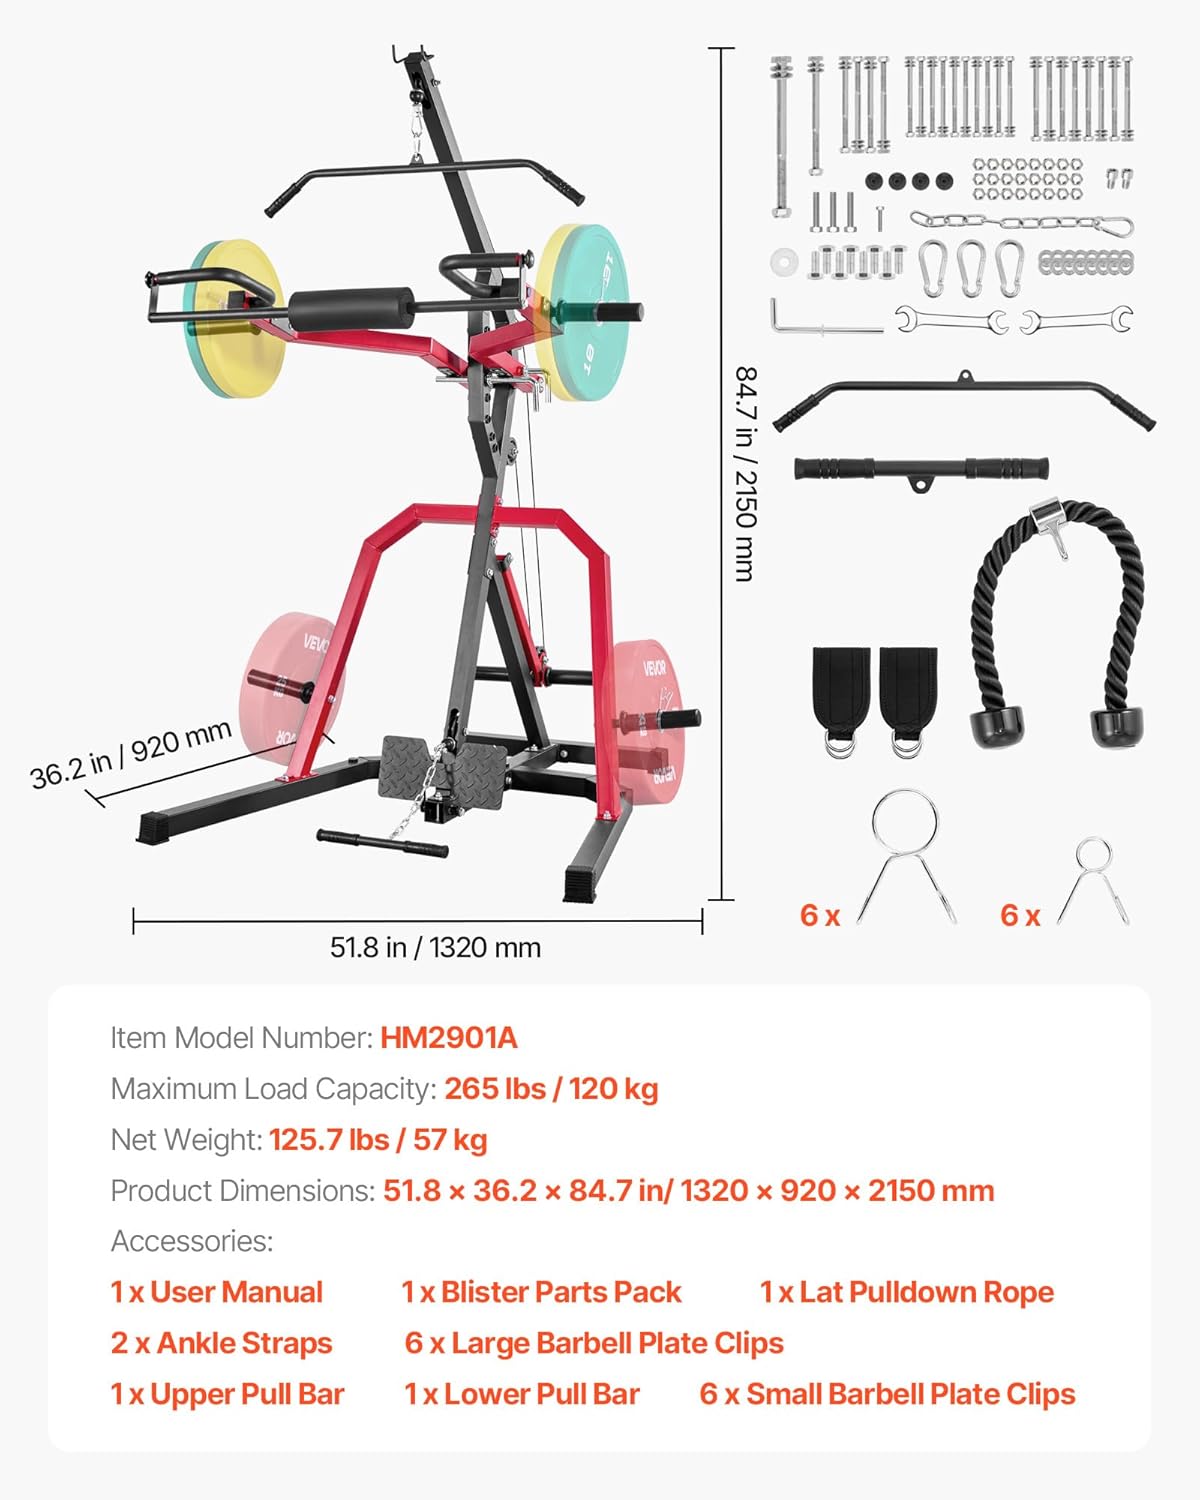
Image: Included components and dimensions of the VEVOR Leverage Gym.
3. Assembly Instructions
Follow these step-by-step instructions to assemble your VEVOR Leverage Gym. Refer to the assembly video for visual guidance.
Video: Official VEVOR Leverage Gym assembly video, demonstrating step-by-step installation.
- Step 1: Assemble the Base Frame
Begin by connecting the main base components (A, B, C, D, E) using the specified bolts, washers, and locknuts. Ensure the footboard (E) is securely attached to the central support (A) and the side frames (C, D) are connected to the front crossbar (B) and central support (A). Refer to the diagram in the video at 0:07-0:14 for visual guidance on part placement and hardware.
- Step 2: Attach the Main Upright and Lever Arm Pivot
Mount the main upright support (F) to the assembled base. Then, attach the lower lever arm pivot assembly (G, H, I, J, K) to the upright. This involves securing the red lever arm support (H) and the weight plate sleeve (I) using the appropriate bolts and washers. The video demonstrates this from 0:15-0:25.
- Step 3: Install the Side Support Frames
Attach the two red side support frames (L, M) to the main base and the upright structure. These frames provide stability and support for the lever arms. Ensure all connection points are firmly secured with bolts and locknuts. The video shows this step from 0:26-0:34.
- Step 4: Mount the Upper Lever Arm Supports
Install the upper lever arm supports (K, J, I, P) to the top of the main upright. These components will house the pulleys and provide the attachment points for the upper cables. Pay close attention to the orientation of the parts as shown in the video from 0:35-0:40.
- Step 5: Attach the Lever Arms and Handles
Connect the adjustable lever arms (Q, R, S, T, U, V, W, X1, X2) to the pivot points. Install the various handles and grips, including the squat bar, and ensure they are securely fastened. This step involves multiple smaller components and is detailed in the video from 0:41-0:48.
- Step 6: Install the Pulley System and Accessories
Finally, install the upper and lower pulley systems (Y1, Y2, Y3, Y4) and attach the lat pulldown bar and lower pull bar. Ensure the cables run smoothly through all pulleys. Secure any remaining accessories like ankle straps and barbell clips. The video concludes with this step from 0:49-0:52.
After assembly, double-check all bolts and nuts to ensure they are tight. Perform a light test of the machine's movements before applying heavy weights.
4. Operating Instructions
The VEVOR Leverage Gym is designed for a wide range of strength training exercises. Always maintain proper form and control during your workouts.
General Operation
- Loading Weights: Place standard Olympic weight plates onto the weight storage posts on the lever arms. Secure them with the provided barbell plate clips.
- Adjusting Resistance: The resistance is determined by the weight plates loaded onto the lever arms. The 2:1 ratio lat pulldown/low row system means that if you load 100 lbs, the effective resistance is 50 lbs.
- Smooth Movement: Ensure all movements are smooth and controlled. Avoid jerky motions that can strain muscles or damage the equipment.
Key Exercises
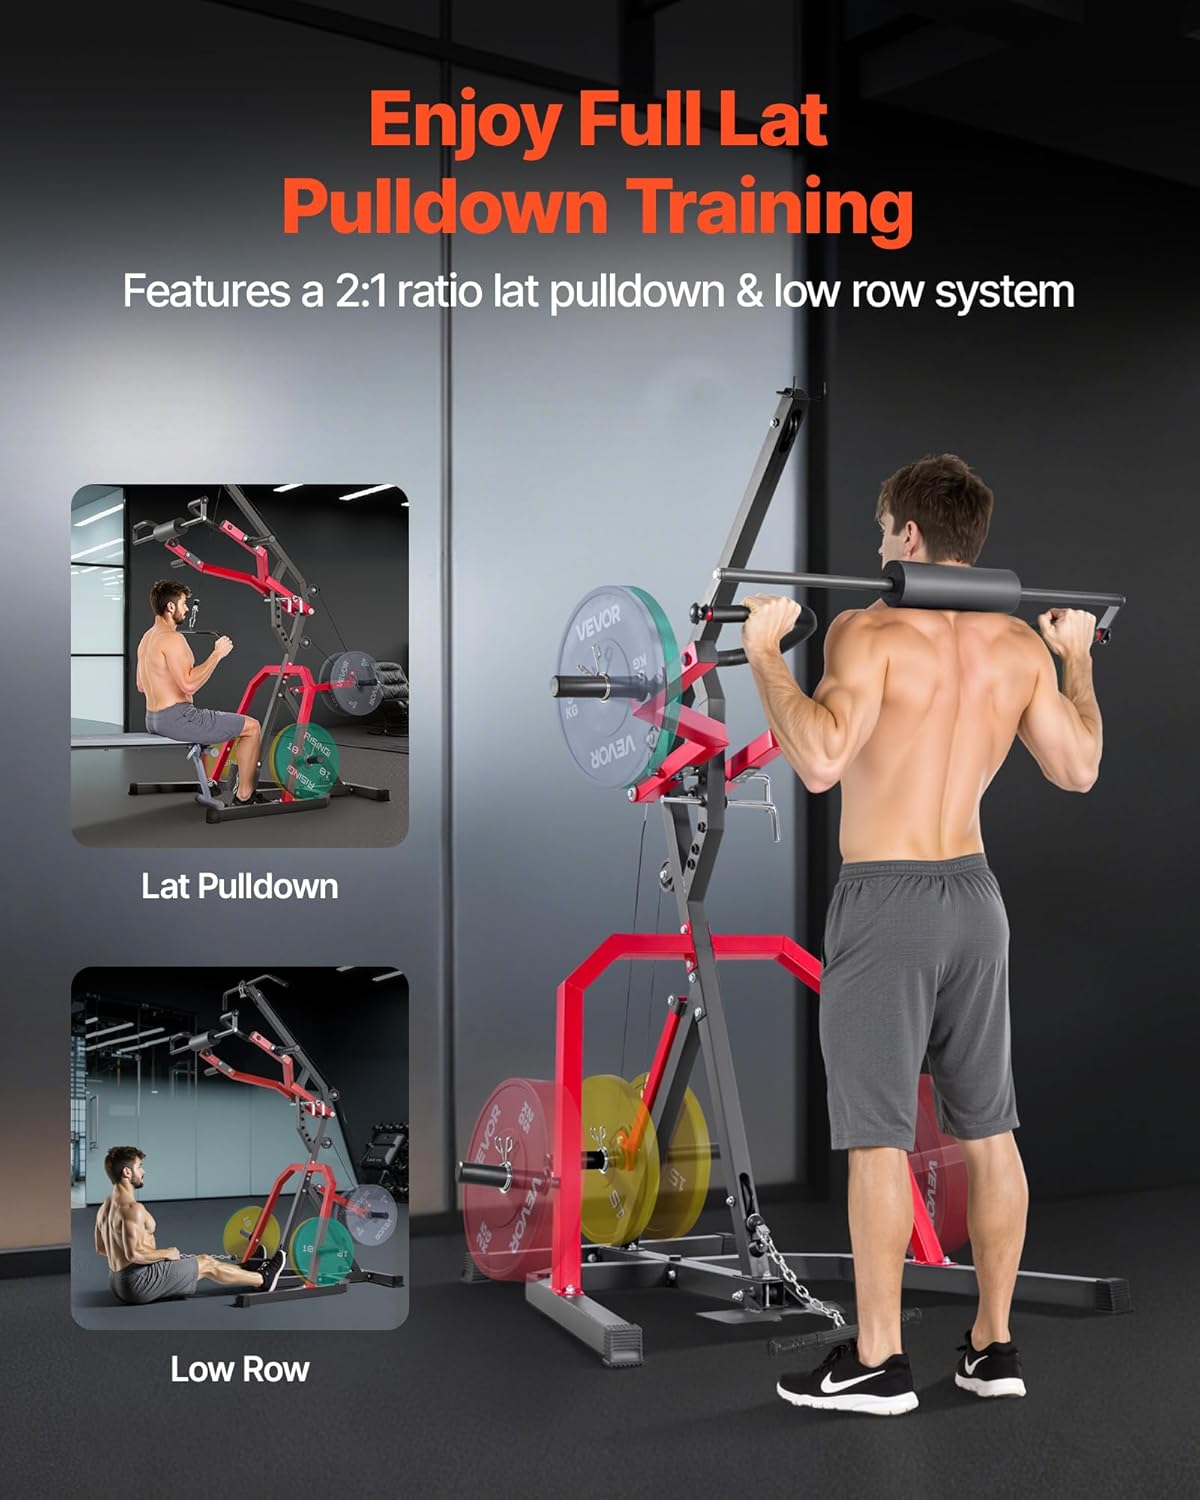
Image: Examples of Lat Pulldown, Low Row, and Squat exercises.
- Lat Pulldown: Attach the lat pulldown bar to the high pulley system. Sit on a bench (not included) facing the machine, grasp the bar with an overhand grip, and pull it down towards your upper chest, squeezing your shoulder blades. Control the return movement.
- Low Row: Attach the lower pull bar to the low pulley system. Sit on the floor or a low bench with your feet against the footboard. Grasp the bar and pull it towards your abdomen, keeping your back straight. Control the return.
- Squats: Position the squat bar on your upper back/shoulders. Adjust the lever arms to a comfortable starting height. Perform squats by lowering your hips as if sitting in a chair, keeping your chest up and back straight. Push through your heels to return to the starting position.
- Deadlifts: With the squat bar at a low position, stand with your feet hip-width apart. Hinge at your hips and bend your knees to grasp the bar. Lift the weight by extending your hips and knees, keeping your back straight. Lower with control.
- Bench Press: Use a separate weight bench (not included). Position the bench under the lever arms. Adjust the height of the lever arms to align with your chest. Lie on the bench, grasp the handles, and press the weight upwards.
- Bicep Curls: Attach the short straight bar or triceps rope to the low pulley. Stand facing the machine, grasp the handle, and curl the weight upwards towards your shoulders, keeping your elbows tucked in.
- Dips: The adjustable shoulder pad can be configured to allow for dips. Grasp the handles and lower your body by bending your elbows, keeping your torso upright. Push back up to the starting position.
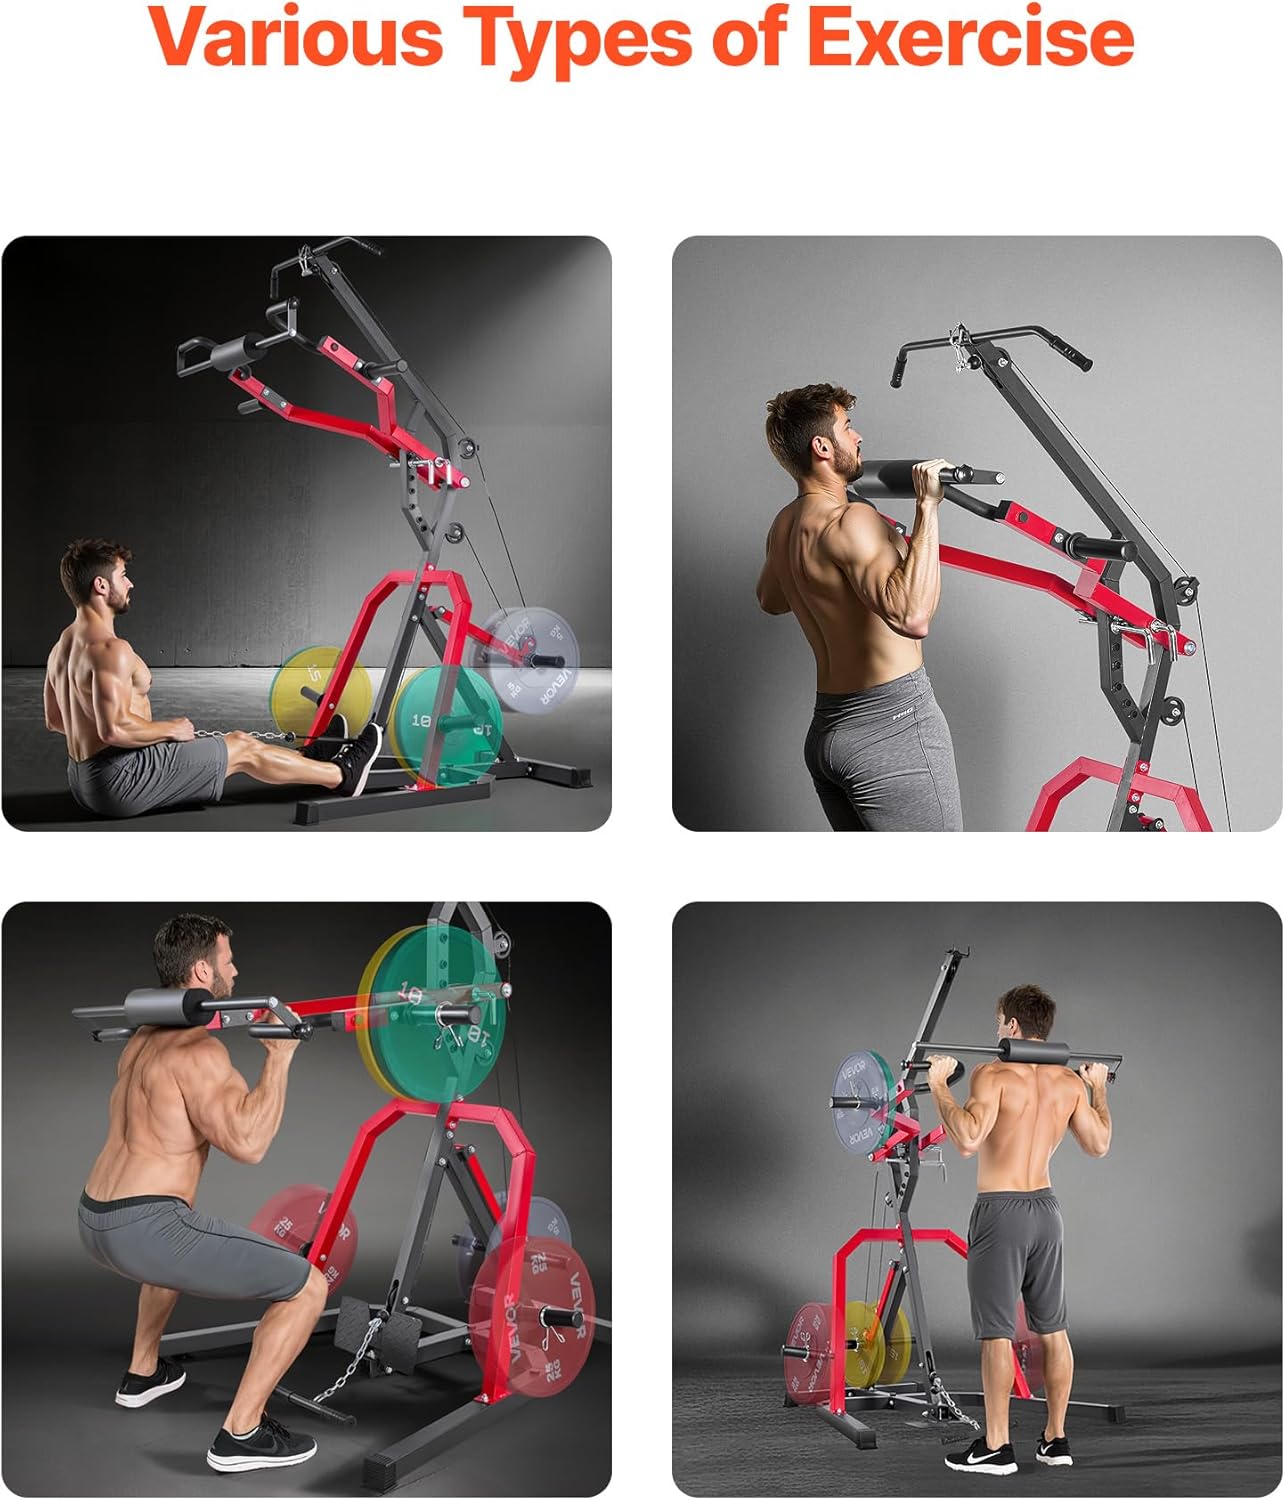
Image: Various exercise demonstrations on the VEVOR Leverage Gym.
5. Adjustments
The VEVOR Leverage Gym offers several adjustment points to customize your workout experience.
Adjustable Shoulder Pad / Lever Arm Height
The main lever arms feature a 7-level adjustable shoulder pad system. This allows you to set the starting height for exercises like squats, bench press, and dips to suit your height and the specific exercise.
- To adjust, locate the spring-lock system and locking pins on the main upright.
- Pull out the locking pin, slide the lever arm assembly to the desired height, and re-insert the pin, ensuring it is fully engaged.
- Always ensure both sides of the lever arm are adjusted to the same height and securely locked before use.
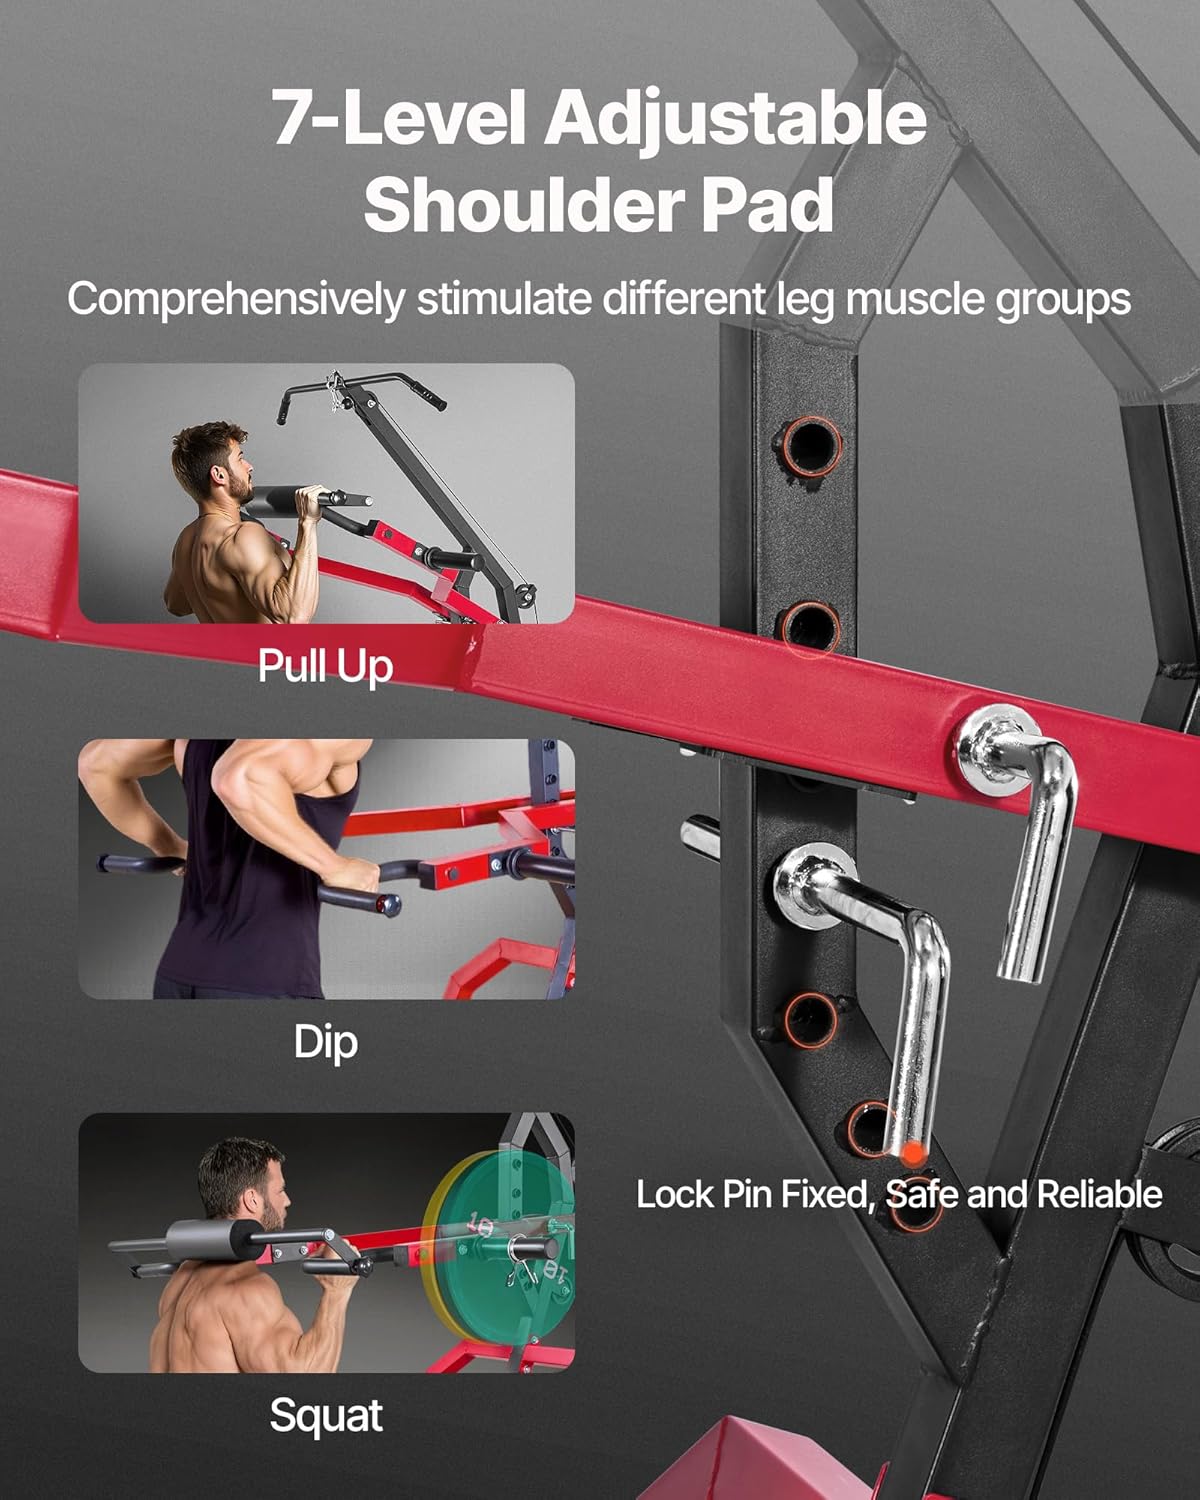
Image: Close-up of the 7-level adjustable shoulder pad and spring-lock system.
Independent Lever Arms
The dual independent lever arms allow for unilateral training, where each side of your body works independently. This can help address muscle imbalances. Ensure even weight distribution or adjust your technique when performing single-arm exercises.
6. Maintenance
Regular maintenance will prolong the life of your VEVOR Leverage Gym and ensure safe operation.
- Cleaning: Wipe down the equipment with a damp cloth after each use to remove sweat and dust. Avoid abrasive cleaners.
- Lubrication: Periodically apply a silicone-based lubricant to the pulley wheels and cable pathways to ensure smooth operation.
- Hardware Check: Every 1-2 months, inspect all bolts, nuts, and connection points. Tighten any loose hardware.
- Cable Inspection: Regularly check the cables for fraying, kinks, or any signs of wear. Replace damaged cables immediately.
- Pad Inspection: Check the padding on the squat bar and handles for tears or excessive wear.
7. Troubleshooting
If you encounter issues with your VEVOR Leverage Gym, refer to the following common problems and solutions.
- Difficulty during Assembly:
- Ensure you are using the correct hardware for each step. Refer to the included Blister Parts Pack and the assembly video for detailed diagrams and part identification.
- Do not fully tighten all bolts until the entire section is assembled, allowing for minor adjustments. Tighten all hardware firmly once the section is complete.
- Missing or Damaged Parts:
- If any components are missing or damaged upon arrival (e.g., plastic bushings for pulleys), contact VEVOR customer support immediately for assistance and replacement parts. Provide your order number and clear photos of the issue.
- Machine Wobbles or is Unstable:
- Ensure the gym is placed on a completely flat and level surface.
- Check that all bolts and nuts are securely tightened. Loose connections can cause instability.
- Verify that the weight is evenly distributed on the weight posts, especially during exercises involving both lever arms.
- Rough or Sticking Cable Movement:
- Inspect the cables for any signs of fraying or damage. Replace if necessary.
- Ensure the cables are correctly routed through all pulleys as per the assembly instructions.
- Apply a silicone-based lubricant to the pulley axles and cable paths.
- Lever Arms Not Adjusting Smoothly:
- Ensure the locking pins are fully disengaged before attempting to adjust the height.
- Check for any obstructions in the adjustment holes or along the sliding mechanism.
8. Specifications
| Feature | Specification |
|---|---|
| Brand | VEVOR |
| Model Number | HM2901A |
| Item Weight | 116.8 Pounds (53 kg) |
| Color | Black+Red |
| Material | Alloy Steel (Q235A Steel Frame) |
| Product Dimensions (D x W x H) | 53.5"D x 53.5"W x 84.7"H (1320 x 920 x 2150 mm) |
| Maximum Load Capacity | 265 lbs (120 kg) |
| Dumbbell Column Capacity (each post) | 165 lbs |
| Wire Rope Capacity (each side) | 100 lbs |
| Grip Size | Medium |
| Strap Type | Cable/Pulley straps, Ankle straps, Triceps rope |
| Included Components | Leverage Gym System, User Manual, Blister Parts Pack, Lat Pulldown Rope, Ankle Straps, Barbell Plate Clips, Upper Pull Bar, Lower Pull Bar |
Note: Product dimensions are approximate and may vary slightly.

Image: Labeled product details and components.
9. Warranty and Support
VEVOR is committed to providing high-quality products and customer satisfaction. For specific warranty information, please refer to the warranty card included with your product or visit the official VEVOR website.
If you have any questions, require technical assistance, or need to order replacement parts, please contact VEVOR customer support through their official channels. Have your product model number (HM2901A) and purchase information ready when contacting support.
You can typically find support contact information on the VEVOR website or within your purchase documentation.