1. Introduction
Thank you for choosing the Grundig GDH 9564 Dryer. This manual provides essential information for the safe and efficient operation, installation, and maintenance of your appliance. Please read this manual thoroughly before using your dryer and keep it for future reference.
2. Safety Information
For your safety and to ensure correct usage, please observe the following precautions:
- Always read the instructions before use.
- This appliance is intended for domestic use only.
- Do not allow children to play with the appliance.
- Ensure the dryer is properly earthed.
- Do not dry unwashed items in the tumble dryer.
- Items that have been soiled with substances such as cooking oil, acetone, alcohol, petrol, kerosene, spot removers, turpentine, waxes, and wax removers should be washed in hot water with an extra amount of detergent before being dried in the tumble dryer.
- Remove all objects from pockets such as lighters and matches.
- Always clean the lint filter after every drying cycle.
- Do not block the ventilation openings.
3. Product Overview
Familiarize yourself with the main components of your Grundig GDH 9564 Dryer.
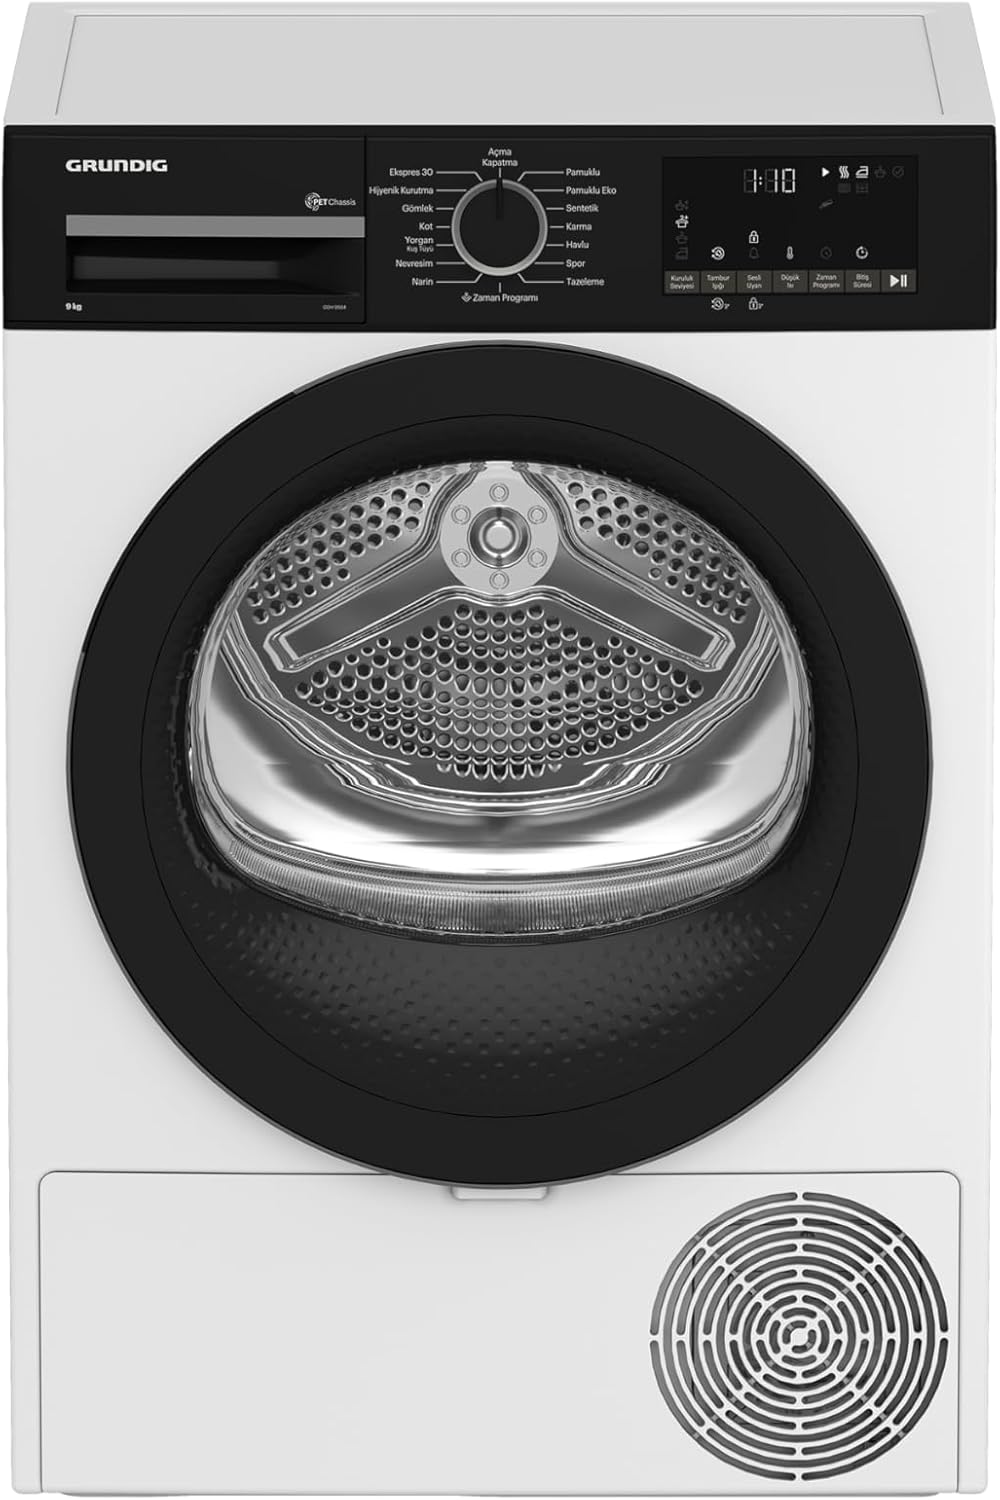
Figure 3.1: Front view of the Grundig GDH 9564 Dryer. This image displays the front of the Grundig GDH 9564 dryer, showing the main door, control panel, and the overall design.

Figure 3.2: Front view of the Grundig GDH 9564 Dryer with the door open. The dryer is shown with its loading door open, revealing the drum interior and the lint filter housing.

Figure 3.3: Control panel of the Grundig GDH 9564 Dryer. A comprehensive view of the dryer's control panel, displaying all program options, function buttons, and the digital display.

Figure 3.4: Lint filter inside the Grundig GDH 9564 Dryer. This image provides a clear view of the multi-layered lint filter, located just inside the dryer door, essential for maintenance.

Figure 3.5: Drum interior of the Grundig GDH 9564 Dryer. A detailed shot of the stainless steel drum interior, showing the paddles that tumble clothes during the drying cycle.
4. Setup
4.1. Unpacking
Carefully remove all packaging materials. Ensure no parts are missing or damaged. Keep packaging materials away from children.
4.2. Placement
- Place the dryer on a stable, level surface.
- Ensure adequate ventilation around the appliance. Do not install it in a confined space.
- Avoid placing the dryer near heat sources or in direct sunlight.
4.3. Electrical Connection
- Connect the dryer to a grounded power outlet that meets the specifications listed in this manual.
- Do not use extension cords or multiple socket adapters.
4.4. Water Drainage (Condenser Dryers)
This dryer collects water in a tank. Ensure the water tank is correctly inserted. For continuous drainage, you may connect a drain hose (if provided) to a suitable drain point according to the installation instructions.
5. Operating Instructions
5.1. Before Each Use
- Check and clean the lint filter.
- Empty the water collection tank.
- Ensure laundry is properly spun in a washing machine to remove excess water.
5.2. Loading Laundry
- Open the dryer door and load laundry loosely into the drum. Do not overload.
- Close the door firmly.
5.3. Program Selection
Turn the program selection dial (refer to Figure 3.3) to choose the desired drying program. Available programs include:
- Cotton: For durable cotton items.
- Eco Cotton: Energy-efficient drying for cottons.
- Synthetics: For synthetic and blended fabrics.
- Mixed: For mixed loads of cotton and synthetics.
- Towels: Specific program for towels.
- Sportswear: For sports clothing.
- Refresh: To air and refresh clothes without heat.
- Time Program: Allows manual setting of drying time.
- Delicates: Gentle drying for delicate items.
- Duvet/Bedding: For larger items like duvets and bedding.
- Duvet/Feather: For items with feather filling.
- Jeans: For denim items.
- Shirts: For shirts, reducing wrinkles.
- Hygiene Dry: For hygienic drying, often at higher temperatures.
- Express 30: Quick drying program for small loads.
5.4. Starting a Cycle
After selecting the program, press the 'Start/Pause' button to begin the drying cycle. The display will show the estimated remaining time.
5.5. End of Cycle
The dryer will signal the end of the cycle. Remove laundry promptly to minimize wrinkling. Clean the lint filter and empty the water tank.
6. Maintenance
Regular maintenance ensures optimal performance and extends the life of your dryer.
6.1. Cleaning the Lint Filter
The lint filter (Figure 3.4) must be cleaned after every drying cycle. Pull out the filter, open it, and remove all lint. Rinse under running water if necessary and ensure it is completely dry before reinserting.
6.2. Emptying the Water Tank
The water tank collects condensed water. Empty it after every cycle. Pull out the tank, pour out the water, and reinsert it securely.
6.3. Cleaning the Condenser
For condenser dryers, the condenser should be cleaned periodically (e.g., every few months or as indicated by the appliance). Refer to your dryer's specific instructions for condenser access and cleaning. Ensure the appliance is unplugged before cleaning.
6.4. Cleaning the Exterior
Wipe the exterior surfaces with a soft, damp cloth. Do not use abrasive cleaners or solvents.
7. Troubleshooting
If you encounter issues with your dryer, consult the following table before contacting service.
| Problem | Possible Cause | Solution |
|---|---|---|
| Dryer does not start | No power supply; Door not closed properly; Program not selected. | Check power plug and fuse; Close door firmly; Select a program and press Start. |
| Clothes are not drying properly | Lint filter clogged; Water tank full; Overloaded; Incorrect program selected. | Clean lint filter; Empty water tank; Reduce load size; Select appropriate program. |
| Dryer makes unusual noise | Foreign objects in drum; Appliance not level. | Check drum for objects; Adjust leveling feet. |
| Water leaks from dryer | Water tank not inserted correctly; Drain hose (if used) loose or blocked. | Reinsert water tank properly; Check drain hose connection and clear blockages. |
8. Specifications
| Brand | Grundig |
| Model Number | GDH 9564 (Manufacturer Product Number: 7188310570) |
| Product Dimensions (W x D x H) | 60 cm x 61 cm x 85 cm |
| Product Weight | 500 Grams (Note: This weight seems unusually low for a dryer and may be a data entry error. Please refer to the product label for accurate weight.) |
| Manufacturer | GRUNDIG |
| First Available Date | September 30, 2025 |
9. Warranty and Support
For warranty information, please refer to the warranty card provided with your appliance or visit the official Grundig website. For technical support or service, please contact Grundig customer service with your model number and purchase details.
You can find more information and support on the Grundig Store on Amazon.


