1. Introduction
This manual provides detailed instructions for the operation and maintenance of your SMARTKLIK 4K 44MP Digital Camera, Model KP03. Please read this manual thoroughly before using the camera to ensure proper function and to maximize your user experience. Keep this manual for future reference.
2. Product Overview
The SMARTKLIK KP03 is a compact and lightweight digital camera designed for ease of use, featuring 4K video recording and 44MP photo capabilities. It includes an advanced CMOS image sensor, autofocus, 16x digital zoom, and a 2.4-inch LCD screen.

Image: Front and back view of the SMARTKLIK KP03 Digital Camera, showing the 32GB SD card and battery.
2.1 Package Contents
- SMARTKLIK Digital Camera (Model KP03)
- Rechargeable Lithium-ion Battery (x2)
- USB Cable
- User Manual
- 32GB SD Card
- Cleaning Cloth
- Strap
- Storage Bag
2.2 Camera Components
Refer to the diagram in the included printed manual for a detailed layout of buttons and ports. Key components include:
- Lens: Captures images and videos.
- Flash/Fill Light: Provides illumination in low-light conditions.
- LCD Screen (2.4 inches): Displays live view, menus, and playback.
- Power Button: Turns the camera on/off.
- Shutter Button: Takes photos or starts/stops video recording.
- Zoom Buttons (W/T): Adjusts digital zoom.
- Menu Button: Accesses camera settings.
- Playback Button: Views captured photos and videos.
- USB Port: For charging and data transfer.
- SD Card Slot: For memory card insertion.
- Battery Compartment: Holds the rechargeable battery.
3. Setup
3.1 Installing the Battery
- Open the battery compartment cover located on the bottom of the camera.
- Insert the rechargeable Lithium-ion battery, ensuring the correct orientation according to the polarity indicators.
- Close the battery compartment cover securely.
3.2 Charging the Battery
Connect the camera to a power source using the provided USB cable. The charging indicator light will illuminate. Charging is complete when the light turns off or changes color (refer to the camera's indicator for specific behavior).
3.3 Inserting the SD Card
The camera supports SD cards up to 32GB. A 32GB SD card is included.
- Locate the SD card slot on the side of the camera.
- Insert the SD card with the metal contacts facing the front of the camera until it clicks into place.
- To remove, gently push the card until it springs out, then pull it out.
4. Basic Operation
4.1 Power On/Off
Press and hold the Power Button to turn the camera on or off.
4.2 Taking Photos (44MP)

Image: The camera capturing a high-resolution 44MP photo.
- Turn on the camera.
- Frame your shot using the LCD screen.
- Press the Shutter Button halfway to activate autofocus.
- Press the Shutter Button fully to take the photo.
4.3 Recording Videos (4K)
- Turn on the camera.
- Switch to video mode (if applicable, refer to menu settings).
- Press the Shutter Button to start recording. A timer will appear on the screen.
- Press the Shutter Button again to stop recording.
4.4 Digital Zoom (16x)

Image: The camera's 16x digital zoom feature, showing different magnification levels.
Use the W/T buttons (Wide/Telephoto) to adjust the 16x digital zoom. Press 'T' to zoom in and 'W' to zoom out.
4.5 Autofocus and Face Recognition
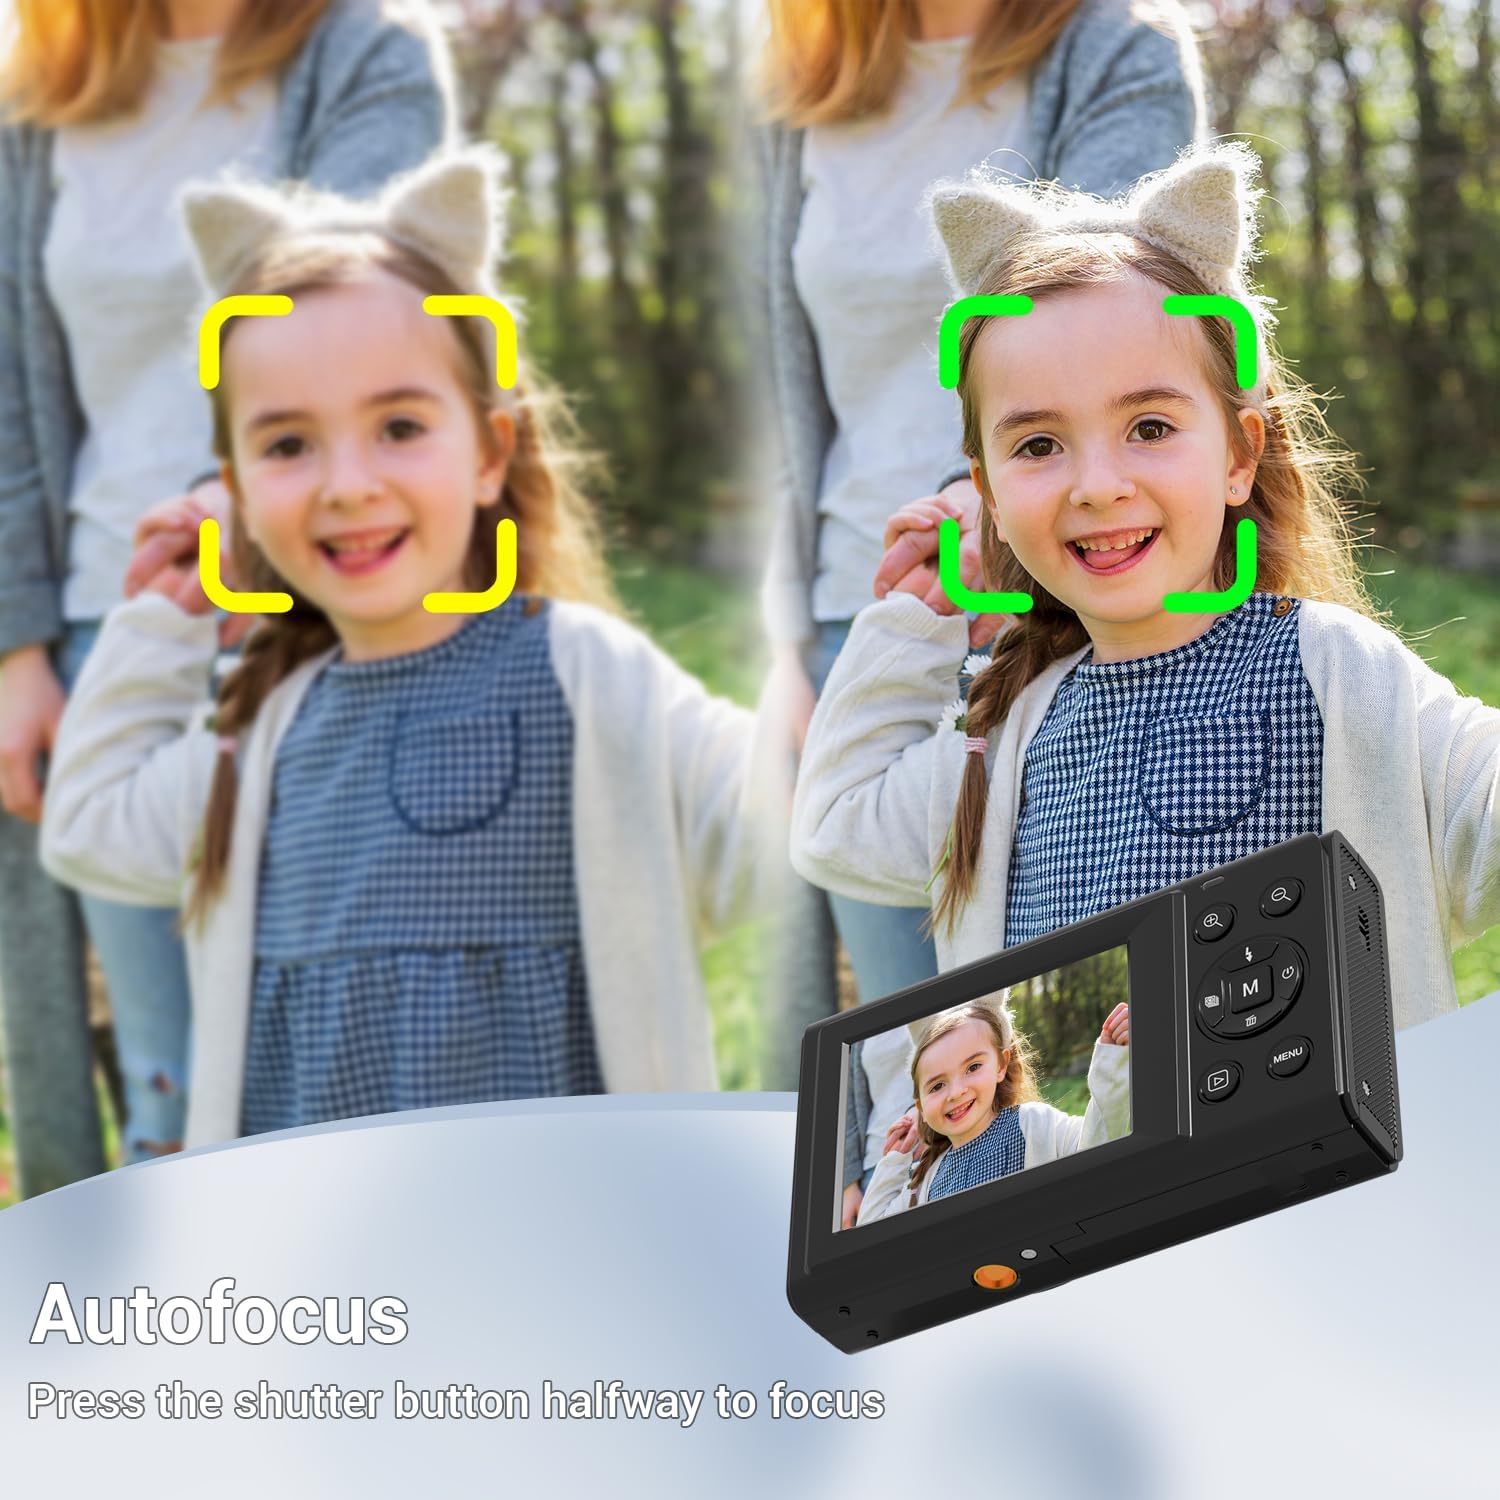
Image: The camera's autofocus system highlighting a detected face.
The camera features face recognition and autofocus to ensure subjects are sharp and clear. Press the shutter button halfway to allow the camera to focus before fully pressing to capture the image.
4.6 Creative Features
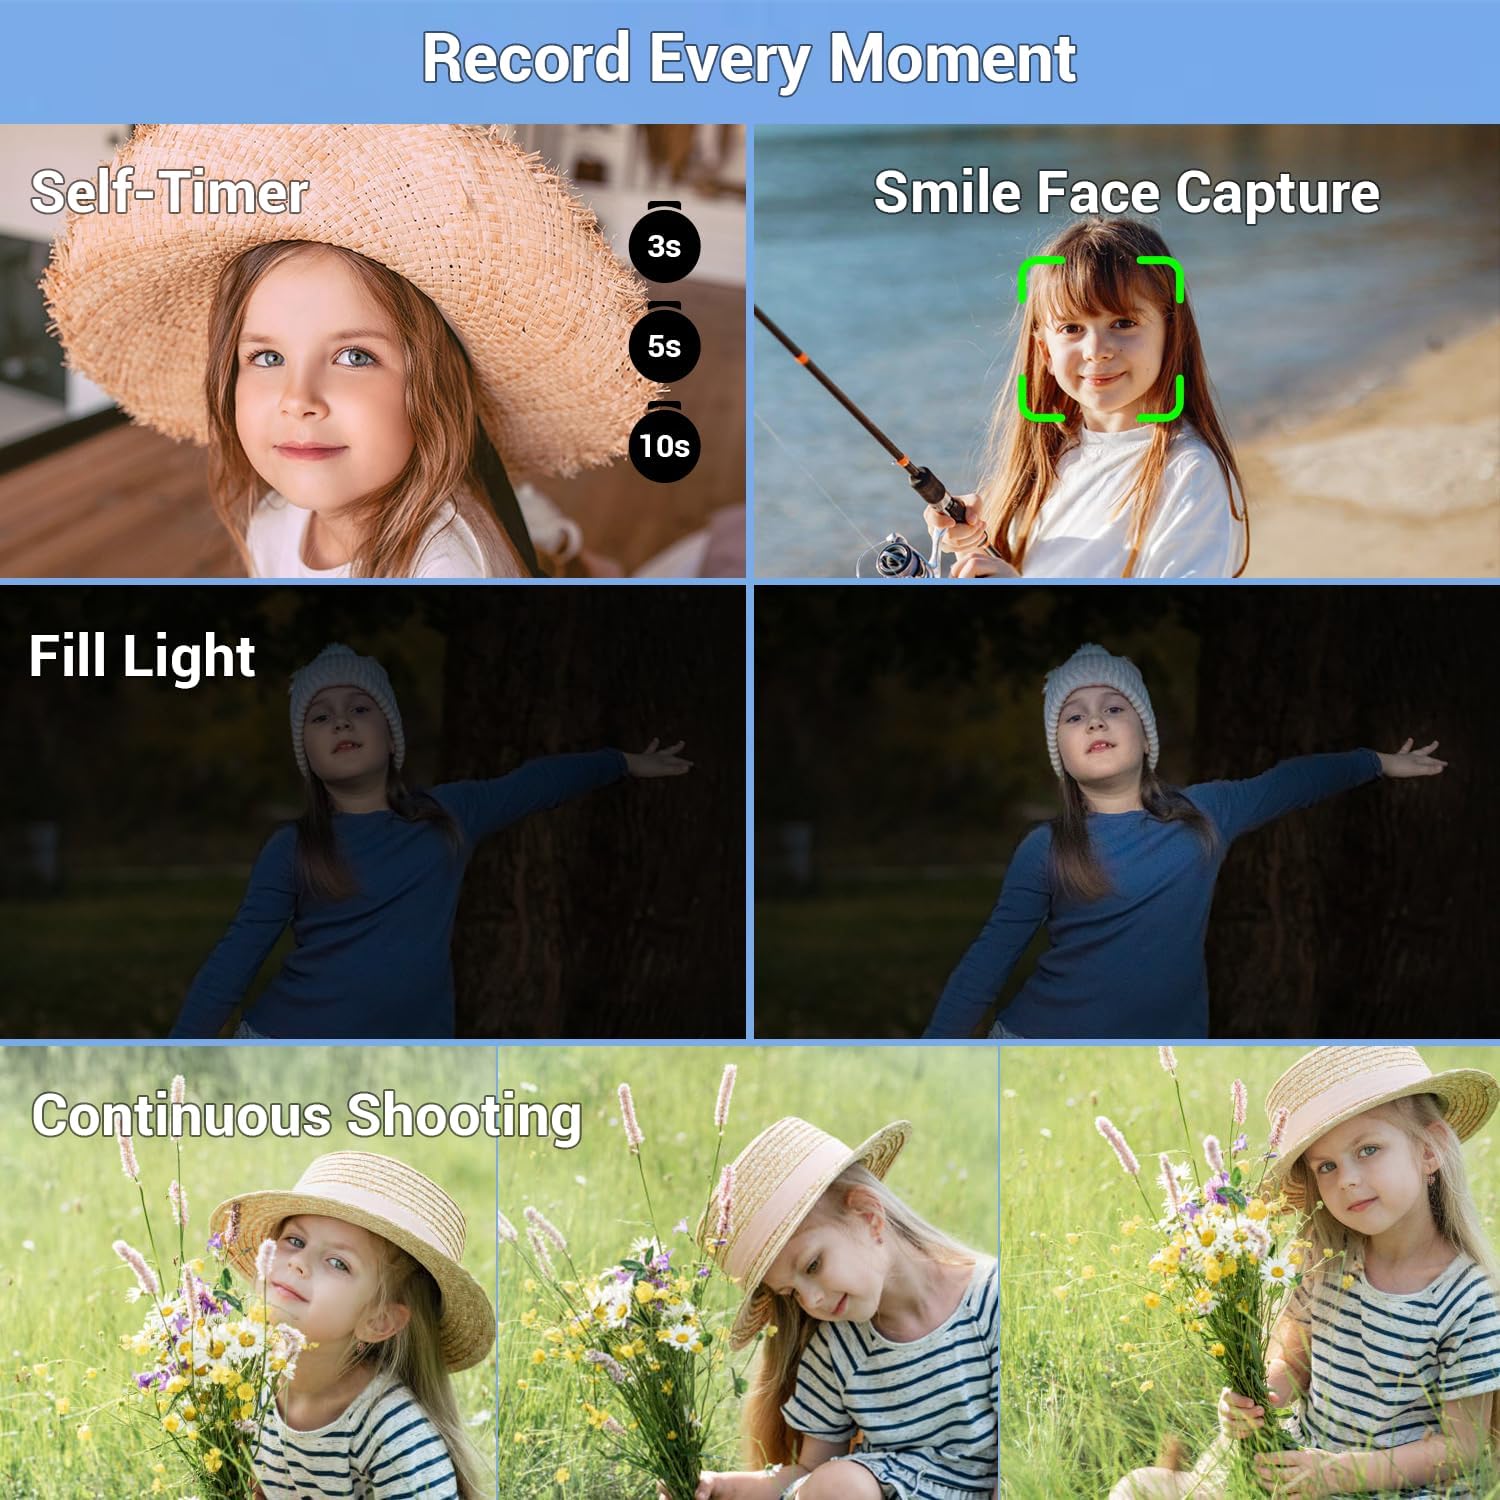
Image: Visual representation of Self-Timer, Smile Face Capture, Fill Light, and Continuous Shooting modes.

Image: Examples of creative filters available on the camera, including Gray, Blue, Green, and Red tones.
- Filters: Access various fun filters through the camera's menu to add creative effects to your photos.
- Self-Timer: Set a delay of 2, 5, or 10 seconds for self-portraits or group shots.
- LED Fill Light: Activate the built-in LED light for brighter images in dark environments.
- Continuous Shooting: Capture a rapid sequence of photos.
- Smile Face Capture: The camera can automatically detect and capture a photo when a smile is detected.
5. Advanced Features
5.1 Webcam Functionality

Image: The camera connected via USB to a laptop, demonstrating its use as a live webcam.
The camera can function as a real-time webcam. Connect the camera to your computer using the USB cable and select 'PC camera mode' from the camera's menu (if prompted) or your computer's device settings. This allows for smooth video calls.
5.2 Recording While Charging
The camera supports recording videos even when connected to a power source and charging, extending usage time for longer sessions.
6. Data Transfer
To transfer photos and videos to your computer:
- Connect the camera to your computer using the provided USB cable.
- Select 'USB mode' or 'Mass Storage' on the camera's screen (if prompted).
- Your computer will recognize the camera as a removable disk.
- Open the camera's folder and copy the desired files to your computer.
Alternatively, you can remove the SD card from the camera and insert it into a compatible card reader connected to your computer.
7. Maintenance
- Cleaning: Use the provided cleaning cloth to gently wipe the lens and LCD screen. Do not use liquid cleaners or abrasive materials.
- Storage: When not in use, store the camera in the provided storage bag in a cool, dry place, away from direct sunlight and extreme temperatures.
- Battery Care: Remove the battery if the camera will not be used for an extended period. Recharge batteries periodically to maintain their lifespan.
- Automatic Shutdown: The camera features an automatic shutdown function when idle to conserve battery life.
8. Troubleshooting
8.1 Camera Does Not Turn On
- Ensure the battery is correctly inserted and fully charged.
- Press and hold the power button for a few seconds.
8.2 Cannot Take Photos/Record Videos
- Check if the SD card is inserted correctly and has sufficient free space.
- Ensure the battery has enough charge.
- Verify that the camera is not in playback mode.
8.3 Images Are Blurry
- Ensure the lens is clean.
- Allow the autofocus to engage by pressing the shutter button halfway before fully pressing it.
- Ensure there is adequate lighting.
8.4 Computer Does Not Recognize Camera
- Ensure the USB cable is securely connected to both the camera and the computer.
- Try a different USB port on your computer.
- Select 'USB mode' or 'Mass Storage' on the camera if prompted.
- Restart both the camera and the computer.
9. Specifications
| Feature | Specification |
|---|---|
| Brand | SMARTKLIK |
| Model Number | KP03 |
| Image Resolution | 44 Megapixels |
| Video Resolution | 4K |
| Zoom | 16x Digital Zoom |
| Screen Size | 2.4 inches |
| Sensor Technology | CMOS |
| Autofocus | Contrast Detection |
| Shutter Speed | 0.033 seconds |
| Continuous Shooting Speed | 30 FPS |
| Image Stabilization | Digital |
| Battery Type | Lithium-ion |
| Supported File Formats | JPEG (for photos) |
| Dimensions | 11.4 x 8.41 x 7.39 cm |
| Weight | 99.79 g |
10. Safety Information
- Do not expose the camera to water or moisture.
- Avoid dropping the camera or subjecting it to strong impacts.
- Keep the camera away from extreme temperatures and direct sunlight.
- Do not attempt to disassemble or repair the camera yourself. Contact customer support for assistance.
- Use only approved accessories and chargers.
11. Warranty and Support
For warranty information and customer support, please refer to the contact details provided on the product packaging or the official SMARTKLIK website. Keep your purchase receipt as proof of purchase.