JZ.CAFE JZ-109-3
JZ.CAFE Espresso Machine User Manual
Model: JZ-109-3
1. Important Safety Instructions
- Read all instructions before using the appliance.
- Do not immerse the appliance, power cord, or plug in water or other liquids.
- Close supervision is necessary when any appliance is used by or near children.
- Unplug from outlet when not in use and before cleaning. Allow to cool before putting on or taking off parts, and before cleaning the appliance.
- Do not operate any appliance with a damaged cord or plug, or after the appliance malfunctions or has been damaged in any manner.
- The use of accessory attachments not recommended by the appliance manufacturer may result in fire, electric shock, or injury to persons.
- Do not use outdoors.
- Do not let the cord hang over the edge of a table or counter, or touch hot surfaces.
- Do not place on or near a hot gas or electric burner, or in a heated oven.
- Always attach plug to appliance first, then plug cord into the wall outlet. To disconnect, turn any control to "off", then remove plug from wall outlet.
- Do not use appliance for other than intended use.
- Scalding may occur if the water tank lid is removed during brewing cycles.
2. Product Overview
2.1 Key Features
- 20-Bar Professional Pressure & Pre-Infusion: Ensures optimal flavor extraction for rich espresso with crema.
- Rapid Cold Brew & Hot Coffee Options: Patented cold technology for smooth, low-acidity cold brew and traditional hot coffee functions.
- One-Touch Steam Wand: Creates silky microfoam for lattes and cappuccinos with precise temperature control.
- Physical Button Panel: Provides intuitive control and simplifies operation.
- Easy Cleaning: Features a removable water tank and drip tray for convenient maintenance.
- Compact Design, Large Capacity: Space-saving design with a 41oz water tank.
2.2 Components
The JZ.CAFE Espresso Machine includes the following main components:
- Espresso Machine Unit
- Portafilter with Handle
- Single Shot Filter Basket
- Double Shot Filter Basket
- Steam Wand
- Removable Water Tank (41oz capacity)
- Drip Tray
- Measuring Scoop/Tamper

Image: Front view of the JZ.CAFE Espresso Machine, showing the main unit, portafilter, and a glass of iced coffee on the drip tray.
3. Initial Setup
- Unpacking: Carefully remove all packaging materials and ensure all components are present.
- Placement: Place the machine on a stable, flat, heat-resistant surface, away from water sources and heat.
- Cleaning: Before first use, wash the water tank, portafilter, and filter baskets with warm soapy water. Rinse thoroughly and dry. Wipe the exterior of the machine with a damp cloth.
- Fill Water Tank: Remove the water tank from the back of the machine. Fill it with fresh, cold water up to the MAX line. Replace the tank securely.
- First Use Cycle (Priming):
- Ensure the water tank is filled.
- Place a large cup under the portafilter and another under the steam wand.
- Plug in the machine and press the power button. The indicator lights will flash as the machine heats up.
- Once the lights are solid, turn the control knob to the "ON" position for hot water/steam.
- Allow water to flow through the portafilter and steam wand for approximately 30 seconds to prime the pump and remove any air.
- Turn the control knob to "OFF" and then press the power button to turn off the machine.
- The machine is now ready for use.

Image: Step-by-step visual guide for priming the machine before first use, showing filling the water tank, turning the knob, and running water through the system.
4. Operating Instructions
4.1 Making Hot Espresso
- Prepare Coffee Grounds: Use fresh, finely ground coffee. For a single shot, use 7-9g; for a double shot, use 14-18g. Distribute evenly in the filter basket and tamp firmly.
- Insert Portafilter: Attach the portafilter to the group head by aligning it and twisting firmly to the right until secure.
- Place Cup: Place your espresso cup(s) on the drip tray directly under the portafilter spouts.
- Brew Espresso: Press the "Hot Espresso Brewing" button (cup icon). The machine will begin extracting espresso.
- Stop Extraction: Press the "Hot Espresso Brewing" button again to stop the flow once the desired volume is reached (typically 25-30ml for a single shot, 50-60ml for a double shot).
- Remove Portafilter: Carefully remove the portafilter by twisting it to the left. Discard used coffee grounds.

Image: A close-up view of espresso flowing into a cup, highlighting the rich crema, indicating proper extraction.

Image: A visual guide to the control panel, indicating the "Hot Espresso Brewing" button (cup icon) and "Cold Espresso Brewing" button (snowflake icon).
4.2 Making Cold Brew / Iced Coffee
- Fill Water Tank with Ice: Ensure the water tank is filled with cold water and ice cubes.
- Prepare Coffee Grounds: Use medium-coarse ground coffee for cold brew. For a double cup filter, use 12-14g of coffee beans.
- Insert Portafilter: Attach the portafilter with prepared grounds to the group head.
- Prepare Ice-Filled Cup: Place a cup filled with ice under the portafilter.
- Brew Cold Brew: Press the "Cold Espresso Brewing" button (snowflake icon). The machine will extract cold brew at a lower temperature and pressure (approx. 6-9 bar).
- Stop Extraction: Press the "Cold Espresso Brewing" button again to stop the flow once the desired volume is reached.
Video: This video demonstrates the process of making iced coffee using the JZ.CAFE Espresso Machine, including grinding coffee, adding ice to the water tank, and extracting into an ice-filled cup. Creator: Kaska Household Appliances (Seller).

Image: The espresso machine actively brewing cold coffee into a glass filled with ice, showcasing the cold brew function.

Image: A visual representation of the cold brew process, emphasizing the use of ice and low-pressure immersion extraction technology.
4.3 Milk Frothing with Steam Wand
- Prepare Milk: Fill a stainless steel frothing pitcher with cold milk (dairy or non-dairy) to just below the spout.
- Activate Steam: Turn the control knob to the "ON" position for hot water/steam. Wait for the steam indicator light to become solid.
- Purge Steam Wand: Briefly open the steam valve to release any condensed water. Close it immediately.
- Froth Milk: Immerse the steam wand tip just below the surface of the milk. Open the steam valve. Angle the pitcher to create a swirling motion. As the milk heats and expands, lower the pitcher slightly to keep the tip just below the surface.
- Stop Steaming: Once the milk reaches the desired temperature (around 140-150°F / 60-65°C) and texture, close the steam valve and remove the pitcher.
- Clean Steam Wand: Immediately wipe the steam wand with a damp cloth to prevent milk residue from drying. Briefly open the steam valve again to clear any milk from inside the wand.
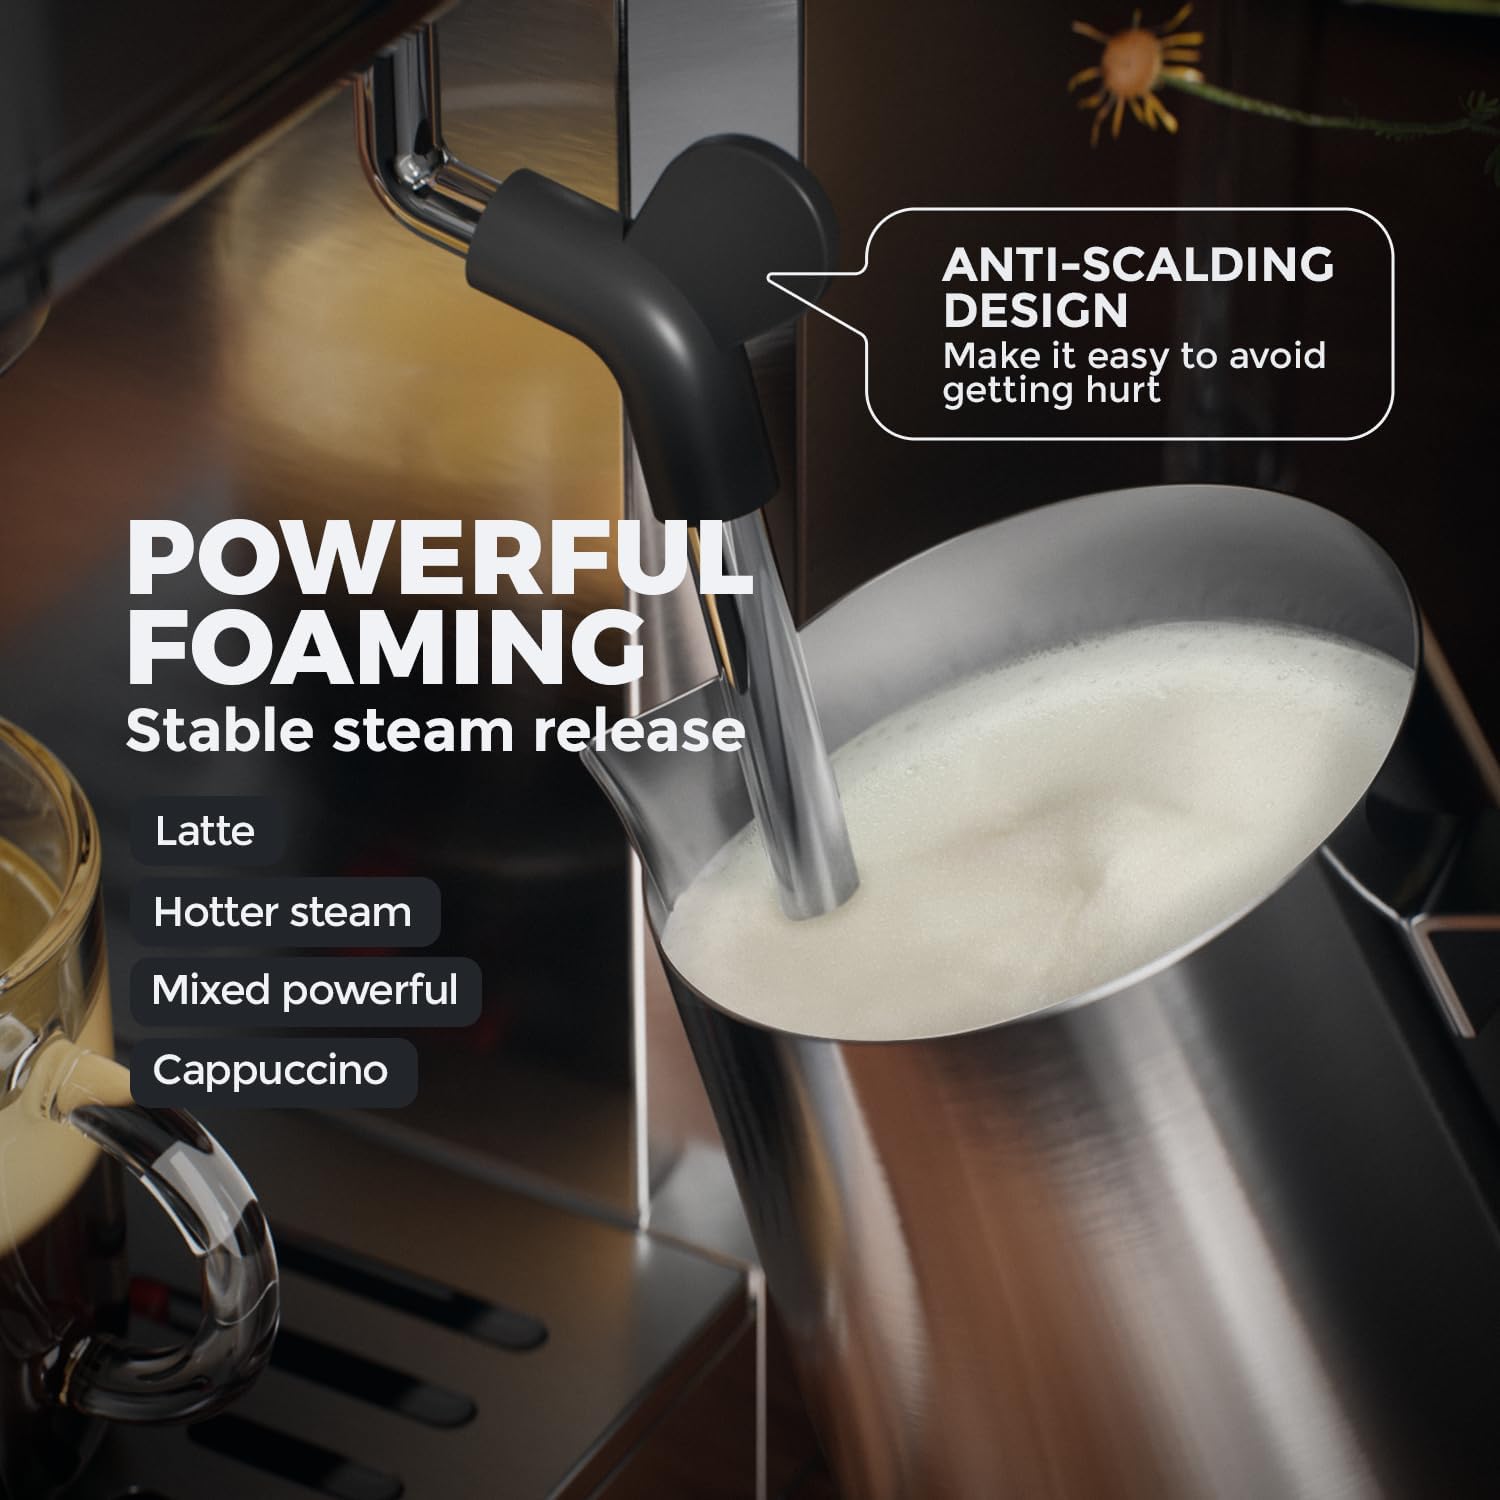
Image: A close-up of the steam wand in action, frothing milk in a metal pitcher, highlighting its powerful foaming capability and anti-scalding design.

Image: A visual demonstrating the steam wand's ability to froth milk for latte art and its 360-degree rotational flexibility.
5. Maintenance and Cleaning
5.1 Daily Cleaning
- Drip Tray: Empty and rinse the drip tray daily.
- Portafilter and Filter Baskets: After each use, remove the portafilter, discard grounds, and rinse the portafilter and filter basket under hot water.
- Steam Wand: Always wipe the steam wand immediately after frothing milk and purge it to prevent blockages.
- Water Tank: Rinse the water tank daily and refill with fresh water.
- Exterior: Wipe the exterior of the machine with a soft, damp cloth. Do not use abrasive cleaners or scouring pads.
5.2 Descaling
Depending on water hardness, descaling should be performed every 2-3 months to remove mineral buildup. Use a commercial descaling solution specifically designed for espresso machines and follow the manufacturer's instructions. Alternatively, a solution of white vinegar and water (1:1 ratio) can be used.
- Empty the water tank and fill it with the descaling solution.
- Place a large container under the portafilter and steam wand.
- Run several cycles of hot water through the portafilter and steam wand until the tank is empty.
- Rinse the water tank thoroughly and refill with fresh water.
- Run several cycles of fresh water through the machine to rinse out any descaling solution.
6. Troubleshooting
| Problem | Possible Cause | Solution |
|---|---|---|
| No coffee dispenses. | Water tank empty; machine not primed; coffee too finely ground or tamped too hard; clogged filter. | Fill water tank; prime the machine; use coarser grind or lighter tamp; clean filter basket. |
| Espresso brews too quickly. | Coffee too coarsely ground; not enough coffee; tamped too lightly. | Use finer grind; increase coffee dose; tamp more firmly. |
| Espresso brews too slowly or drips. | Coffee too finely ground; too much coffee; tamped too hard; machine needs descaling. | Use coarser grind; reduce coffee dose; tamp lighter; descale the machine. |
| Steam wand not producing steam. | Steam wand clogged; machine not heated to steam temperature. | Clean steam wand with a pin; wait for steam indicator light to be solid. |
| Water leaking from machine. | Water tank not seated correctly; drip tray full; seal issues. | Ensure water tank is properly installed; empty drip tray; contact customer support if seals are damaged. |
7. Specifications
| Feature | Detail |
|---|---|
| Brand | JZ.CAFE |
| Model Name | JZ-109-3 |
| Color | Silver |
| Product Dimensions | 12.2"D x 6.1"W x 12.4"H |
| Item Weight | 7.9 pounds |
| Special Feature | Cold Brew, Milk Frother |
| Coffee Maker Type | Espresso Machine, Cold Brew Coffee Maker |
| Coffee Input Type | Ground Coffee |
| Water Tank Capacity | 41oz |
| Pressure | 20 Bar (Espresso), 6-9 Bar (Cold Brew) |
8. Warranty and Support
For warranty information and customer support, please refer to the warranty card included with your product or contact JZ.CAFE customer service directly. Keep your purchase receipt as proof of purchase.
Contact information for support can typically be found on the manufacturer's website or on the product packaging.
Related Documents - JZ-109-3
 |
Trox Beépítőkeret: Gyors és Egyszerű Beépítés Visszacsapó és Nyomáscsökkentő Csappantyúkhoz A Trox Beépítőkeret visszacsapó és nyomáscsökkentő légcsappantyúk falakba és födémekbe történő gyors, pontos és egyszerű beépítését teszi lehetővé. Kiváló minőségű acélból készült, különböző típusokhoz elérhető. |
 |
ColdPerk Café 2 User Manual: Assembly, Setup, and Brewing Guide Comprehensive guide for the ColdPerk Café 2 coffee extract system. Learn how to assemble, set up, brew, and clean your ColdPerk for delicious coffee creations. Includes tips and warranty information. |
 |
Takeya Cold Brew Coffee Maker: Instructions for Use and Brewing Guide Detailed instructions on how to use the Takeya Cold Brew Coffee Maker to create delicious cold brew coffee at home. Includes brewing ratios and serving suggestions for hot and iced coffee. |
 |
Brewed for Summer: Coffee Drink Recipes from Mission Coffee Works Explore a collection of refreshing coffee drink recipes perfect for summer from Mission Coffee Works. Discover iced, spiked, fizzy, and non-alcoholic coffee cocktails and beverages designed to beat the heat. |
 |
Ninja Hot & Iced Coffee Maker CM360 & CM371 Owner's Guide Comprehensive owner's guide for the Ninja Hot & Iced Coffee Maker (models CM360 and CM371), covering setup, operation, safety instructions, cleaning, and troubleshooting. |
 |
Ninja Hot & Iced XL Coffee Maker with Rapid Cold Brew Quick Start Guide Quick start guide for the Ninja Hot & Iced XL Coffee Maker with Rapid Cold Brew, including setup instructions, brew styles, and four irresistible coffee recipes. |
Ask a question about this manual
Ask about setup, troubleshooting, compatibility, parts, safety, or missing instructions. Manuals+ will review the question and use this page’s manual context to help answer it.