1. Important Safety Information
Read all instructions carefully before using this product. Failure to follow these instructions may result in electric shock, fire, and/or serious injury.
- Electrical Safety: This device operates on 12V DC power. Ensure your vehicle's 12V outlet is clean and functional. Do not expose the inflator to rain or wet conditions.
- Pressure Safety: Do not exceed the maximum recommended pressure for the item being inflated. Over-inflation can cause items to burst, leading to injury. Always check the manufacturer's recommended PSI.
- Overheating: The inflator may become hot during prolonged use. Allow it to cool down between inflation cycles to prevent damage. Do not touch hot surfaces.
- Children and Pets: Keep the inflator out of reach of children and pets. This is not a toy.
- Ventilation: Operate the inflator in a well-ventilated area.
- Storage: Store the inflator in a dry, secure location when not in use.
2. Product Overview
The CRAFTSMAN 12V Portable Tire Inflator is designed for convenient and efficient inflation of various items. It features a digital display, automatic shut-off, and an integrated LED light for use in low-light conditions.
2.1 Key Features
- 12V DC Power: Plugs into your vehicle's cigarette lighter socket.
- 150 PSI Maximum Pressure: Suitable for a wide range of inflation tasks.
- Automatic Shut-Off: Prevents over-inflation by stopping automatically at the preset pressure.
- Digital LCD Display: Provides clear readings of current and target pressure.
- Integrated LED Light: Offers three modes (Normal, SOS, Flashing) for visibility and emergencies.
- Compact and Portable: Lightweight design with built-in cord and hose storage.
2.2 Package Contents
Verify that all items are present in the package:
- CRAFTSMAN 12V Portable Tire Inflator
- Carry Bag
- Presta Valve Adapter
- Inflatable Adapter
- Ball Needle
- Extra Fuse
- User Manual (this document)

Figure 2.1: Front view of the CRAFTSMAN 12V Portable Tire Inflator with key components labeled, including the digital display, LED light, carrying handle, and hose organizer.
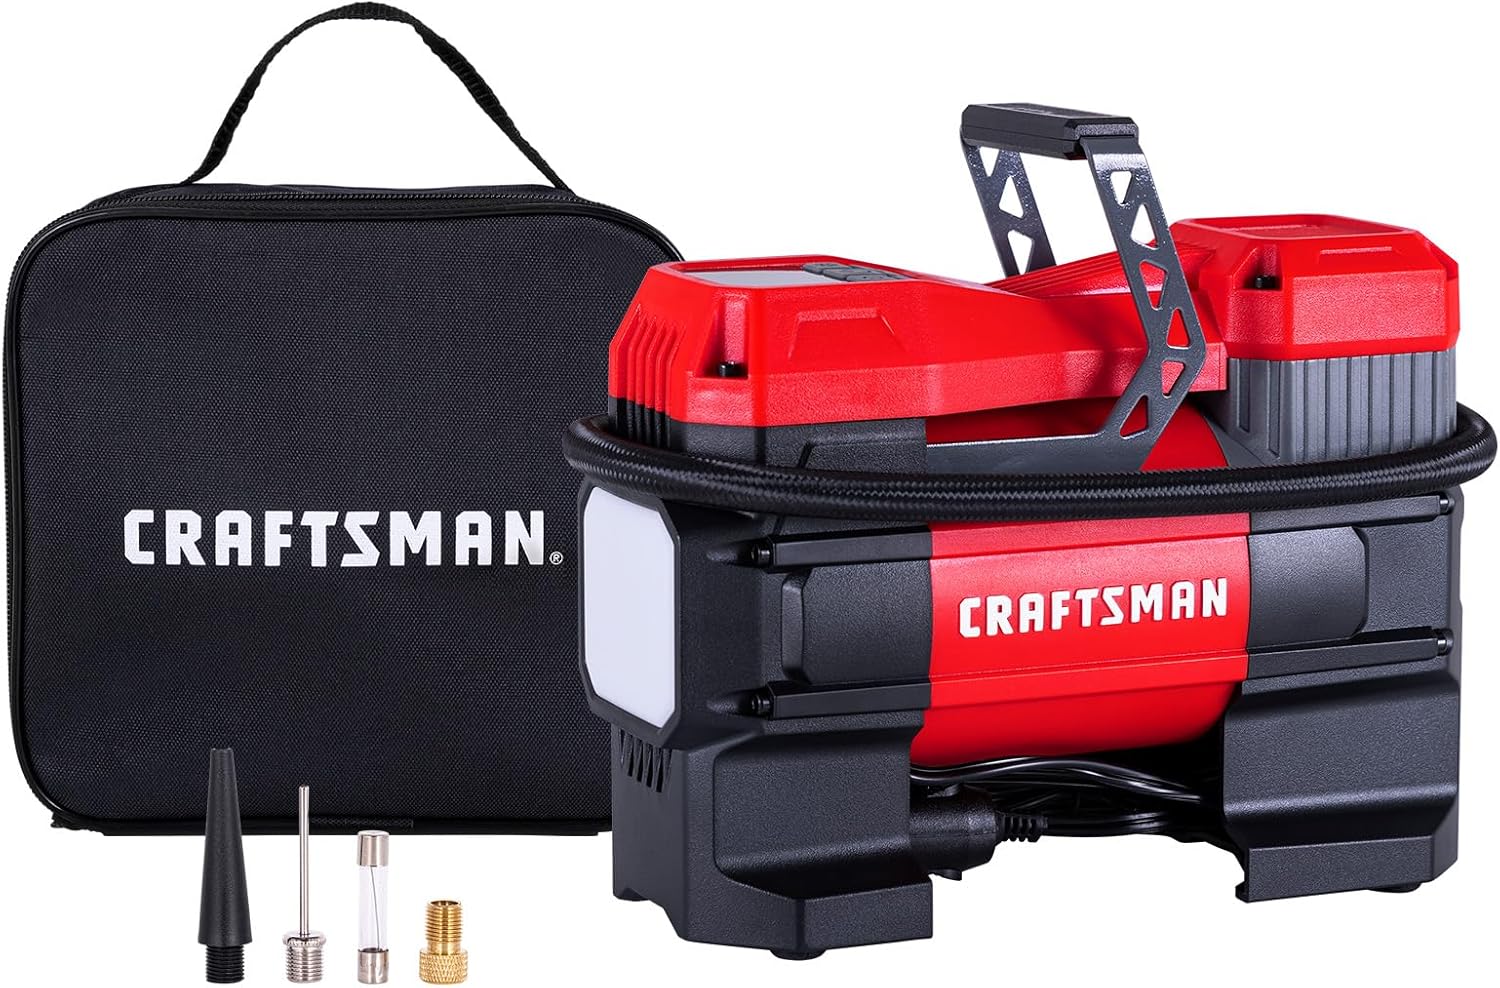
Figure 2.2: The CRAFTSMAN 12V Portable Tire Inflator shown with its carry bag and the included adapters (Presta valve, inflatable, and ball needle).
3. Setup
Before operating the tire inflator, ensure your vehicle is parked safely and the engine is running to provide stable power.
- Connect to Power: Insert the 12V car accessory plug firmly into your vehicle's 12V DC outlet.
- Prepare the Hose: Uncoil the air hose from its storage compartment on the inflator.
- Select Adapter: Choose the appropriate nozzle adapter for the item you intend to inflate.
- For standard car/motorcycle tires: Use the direct screw-on valve connector.
- For bicycle tires (Presta valve): Attach the Presta valve adapter.
- For inflatable toys or air mattresses: Attach the inflatable adapter.
- For sports balls: Attach the ball needle.
- Attach to Item: Securely attach the air hose connector (or chosen adapter) to the valve stem of the item to be inflated. Ensure a tight seal to prevent air leakage.
4. Operating Instructions
Follow these steps to inflate items using your CRAFTSMAN 12V Portable Tire Inflator.
4.1 Inflation Process
- Power On: Once connected to the 12V outlet, the digital display will illuminate, showing the current pressure of the connected item.
- Select Pressure Unit: Press the 'R' button to cycle through pressure units: PSI, BAR, KPA, kg/cm². Select the desired unit.
- Set Target Pressure: Use the '+' and '-' buttons to set your desired target pressure. Refer to the item's manufacturer recommendations for correct pressure.
- Start Inflation: Press the power button (usually marked with a 'play' or 'start' symbol) to begin inflation. The inflator will automatically stop once the preset target pressure is reached.
- Disconnect: Once inflation is complete, disconnect the air hose from the valve stem and unplug the 12V car accessory plug.

Figure 4.1: The digital display showing various preset modes for different items (car, motorcycle, bicycle, ball, custom) and selectable pressure units (PSI, BAR, KPA, kg/cm²).
4.2 Using the LED Light
The built-in LED light provides illumination for night use or emergencies.
- Press the light button once for Normal illumination.
- Press the light button a second time for SOS flashing mode.
- Press the light button a third time for Flashing warning light mode.
- Press the light button a fourth time to turn the light off.

Figure 4.2: The inflator demonstrating its LED light in normal illumination mode (top) and SOS/flashing red light mode (bottom) for emergency situations.
5. Maintenance
Proper maintenance ensures the longevity and optimal performance of your tire inflator.
- Cleaning: Wipe the exterior of the inflator with a damp cloth. Do not use harsh chemicals or abrasive cleaners. Ensure the unit is unplugged before cleaning.
- Storage: After use, allow the inflator to cool completely. Coil the air hose and power cord neatly into their designated storage areas. Store the unit and its accessories in the provided carry bag in a dry, cool place, away from direct sunlight and extreme temperatures.
- Fuse Replacement: If the inflator stops working, check the fuse located in the 12V car accessory plug. To replace, unscrew the tip of the plug, remove the old fuse, and insert the new one (an extra fuse is included). Ensure the replacement fuse has the correct amperage rating.
6. Troubleshooting
Refer to this section for common issues and their solutions.
| Problem | Possible Cause | Solution |
|---|---|---|
| Inflator does not turn on. | No power from 12V outlet; Blown fuse in 12V plug; Loose connection. | Ensure vehicle engine is running. Check 12V outlet for power (e.g., by plugging in another device). Replace fuse in the 12V plug. Ensure the plug is fully inserted. |
| Inflator runs but no air comes out or inflation is slow. | Air hose not securely attached; Valve stem blocked; Leak in hose/adapter. | Ensure the hose connector is tightly screwed onto the valve stem. Check for obstructions in the valve stem. Inspect hose and adapters for damage or leaks. |
| Pressure reading is inaccurate. | Sensor calibration issue; External factors. | While the inflator's gauge is generally accurate, it is recommended to cross-reference with a separate, calibrated tire pressure gauge for critical applications. Readings may vary slightly. |
| Inflator gets hot during use. | Normal operation during prolonged use; Overuse. | This is normal. Allow the unit to cool down for 10-15 minutes after every 5-10 minutes of continuous operation to prevent overheating and extend product life. |
7. Specifications
| Model Number | CMXPTXA1202 |
| Power Source | 12V DC (Vehicle Accessory Outlet) |
| Maximum Pressure | 150 PSI |
| Noise Level | 78 Decibels |
| Air Hose Length | 2.17 Feet (approx. 66 cm) |
| Power Cord Length | 10 Feet (approx. 305 cm) |
| Item Weight | 1.13 Kilograms (approx. 2.49 lbs) |
| Dimensions (Approx.) | Compact design, refer to product images for visual scale. |
| Included Adapters | Presta Valve, Inflatable, Ball Needle |
8. Warranty and Support
For detailed warranty information, please refer to the warranty card included with your product or visit the official CRAFTSMAN website. Keep your purchase receipt as proof of purchase.
If you encounter any issues or have questions not covered in this manual, please contact CRAFTSMAN customer support:
- Website: www.craftsman.com/support (Example link, actual link may vary)
- Phone: Refer to the CRAFTSMAN website or product packaging for regional support numbers.


