1. Introduction
This document provides comprehensive instructions for the installation, operation, and maintenance of the LIBODD Hybrid Solar Inverter. This multi-function inverter/charger integrates an inverter, a solar charger, and a battery charger to deliver uninterrupted power. It features a user-friendly LCD display and accessible buttons for configuring settings such as battery charging current, AC/solar charger priority, and acceptable input voltage. The integrated MPPT solar charging module efficiently tracks the maximum power point of the PV array to maximize solar energy harvesting and outputs a pure sine wave for DC to AC conversion.
2. Key Features
- Pure sine wave solar inverter for stable power output.
- Capable of inverter operation without a connected battery.
- One-key restoration function to factory settings.
- Built-in automatic activation for lithium batteries.
- MPPT (Maximum Power Point Tracking) technology with a maximum power of 6500W for the 6.2KW model.
- Wide PV input voltage range (90~450VDC).
- Integrated anti-dusk kit for enhanced durability in challenging environments.
- Smart battery charge design to optimize battery lifespan.
- Dual output capability.
- User-friendly operation for easy configuration.
- Flexible and compatible design suitable for various applications.
- High reliability and durability with integrated protection functions for safe and stable system operation.
- High-performance solar inverter with advanced conversion technology and efficiency.
- Environmentally friendly and energy-efficient design to maximize energy efficiency and reduce electricity consumption.
3. System Overview
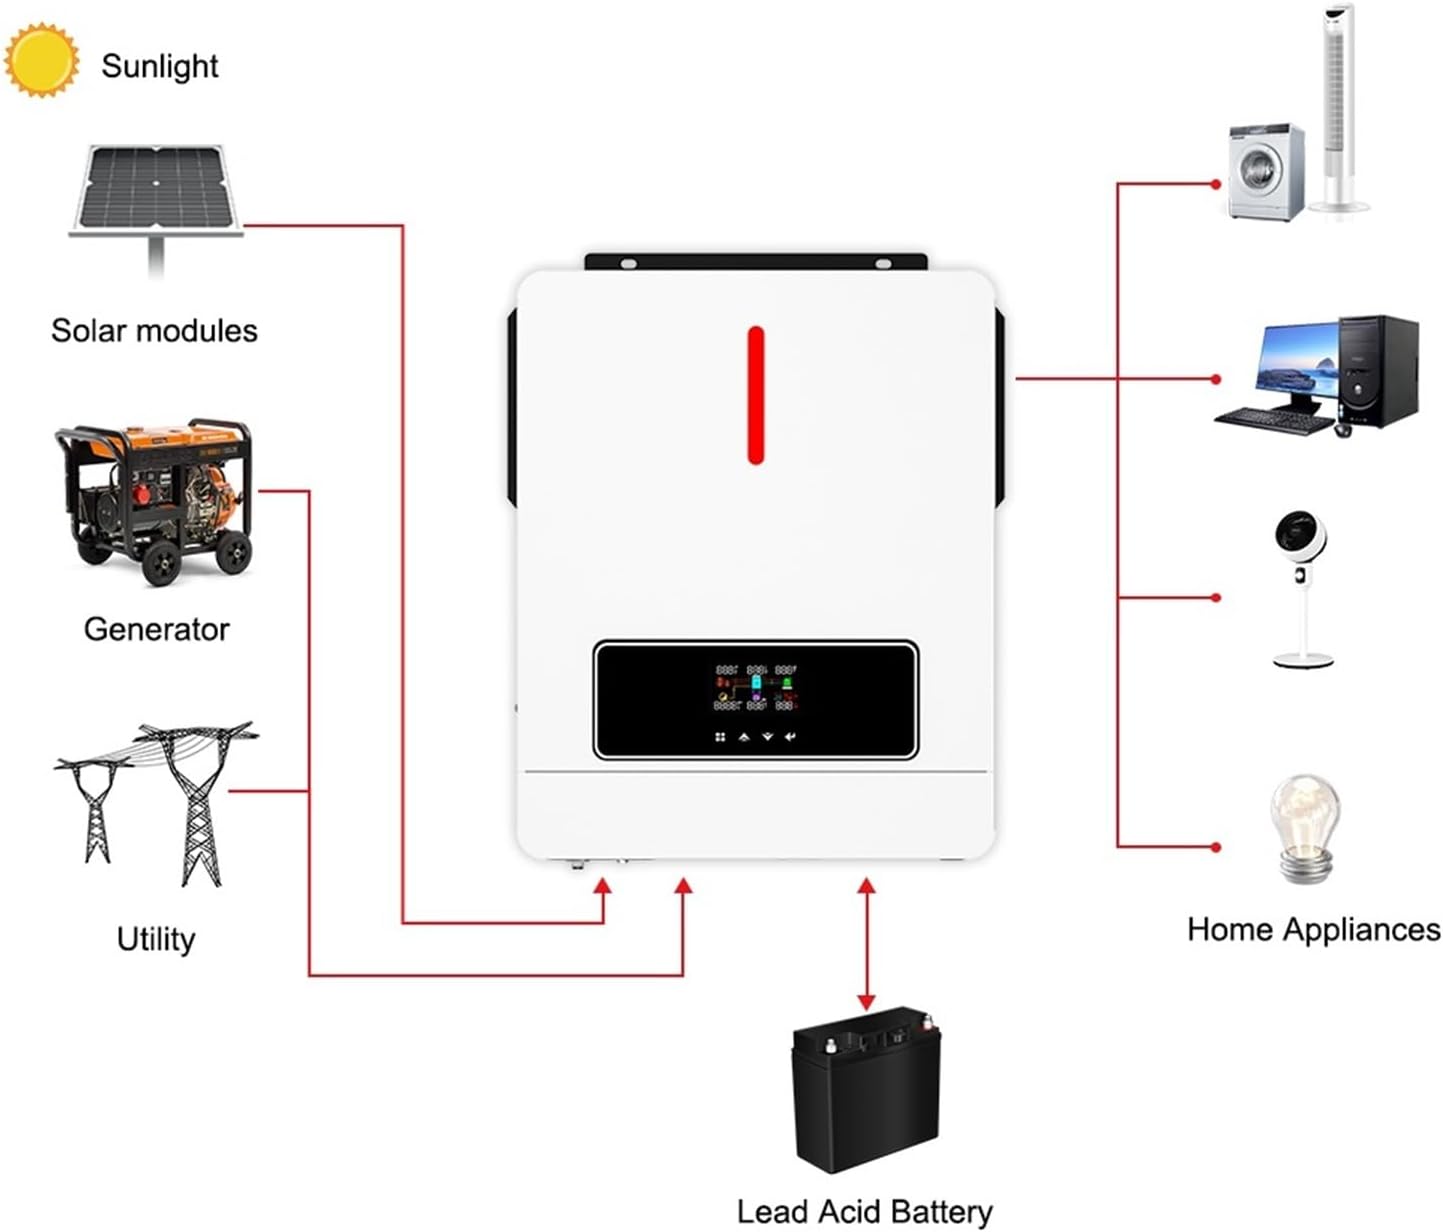
Figure 3.1: System connection diagram. This diagram illustrates how the LIBODD Hybrid Solar Inverter integrates with solar modules, a utility grid, a generator, a lead-acid battery, and various home appliances to provide a comprehensive power solution.
The LIBODD Hybrid Solar Inverter acts as the central component in a solar power system, managing power flow from multiple sources. It can draw power from solar modules, the utility grid, or a generator, store excess energy in a battery, and supply power to connected home appliances. This intelligent management ensures a stable and reliable power supply, optimizing energy usage and minimizing reliance on the grid.
4. Setup and Installation
4.1 Safety Precautions
- Ensure all power sources are disconnected before installation.
- Installation must be performed by qualified personnel.
- Wear appropriate personal protective equipment (PPE).
- Do not operate the inverter if it is damaged.
- Ensure proper grounding of the inverter.
4.2 Unpacking and Inspection
- Carefully remove the inverter from its packaging.
- Inspect the unit for any physical damage that may have occurred during transit.
- Verify that all accessories listed in the packing list are present.
4.3 Mounting the Inverter
Choose a suitable location for mounting the inverter. The location should be:
- Indoors, protected from direct sunlight, rain, and dust.
- Well-ventilated to ensure proper heat dissipation.
- On a solid surface capable of supporting the inverter's weight.
- Away from flammable materials.
Mount the inverter vertically using appropriate screws and anchors. Ensure sufficient clearance around the unit for airflow.

Figure 4.1: Inverter views showing connection points. This image displays the different sides of the inverter, highlighting the AC input, AC output, battery terminals, PV input, and communication ports.
4.4 Wiring Connections
Follow the wiring diagram provided in the full product manual for detailed connection instructions. Ensure all connections are secure and correctly polarized.
- Battery Connection: Connect the battery bank to the inverter's battery terminals. Observe correct polarity (+ to + and - to -).
- PV Array Connection: Connect the solar panel array to the PV input terminals. Ensure the PV input voltage and current are within the inverter's specifications (90-450VDC).
- AC Input Connection: Connect the utility grid or generator AC input to the designated AC input terminals.
- AC Output Connection: Connect your loads (home appliances) to the AC output terminals.
- Grounding: Connect the inverter to a reliable ground source.
4.5 Initial Power-Up
- After all connections are verified, switch on the battery breaker.
- Switch on the PV array breaker.
- Switch on the AC input breaker (if connected to utility/generator).
- Finally, switch on the inverter's power button.
- Observe the LCD display for initial status and any error messages.
5. Operating Instructions
5.1 LCD Display and Control Buttons
The inverter features a comprehensive LCD display that provides real-time system status, operational parameters, and error codes. User-configurable settings can be accessed and adjusted using the buttons located next to the display. Refer to the full manual for a detailed explanation of each display icon and menu option.
5.2 Configuration Settings
Key user-configurable settings include:
- Battery Charging Current: Adjust the charging current for the connected battery bank.
- AC/Solar Charger Priority: Select whether the AC input or solar power takes priority for charging the battery.
- Acceptable Input Voltage Range: Set the acceptable voltage range for the AC input.
- Output Source Priority: Configure the inverter to prioritize solar, battery, or utility power for supplying loads.
- Battery Type: Select the type of battery connected (e.g., Lead-Acid, Lithium). The inverter supports automatic activation for lithium batteries.
Navigate through the menu using the UP/DOWN buttons and confirm selections with the ENTER button.
6. Maintenance
6.1 Regular Cleaning
- Periodically clean the inverter's exterior with a dry, soft cloth.
- Ensure ventilation openings are free from dust and debris to maintain proper airflow.
- Do not use liquid cleaners or solvents.
6.2 System Inspection
- Regularly check all wiring connections for tightness and signs of corrosion.
- Inspect the battery terminals for corrosion and clean if necessary.
- Monitor the LCD display for any warning or error messages.
- Ensure the operating environment remains within specified temperature and humidity ranges.
7. Troubleshooting
This section provides solutions to common issues. For more complex problems, contact technical support.
| Problem | Possible Cause | Solution |
|---|---|---|
| Inverter not powering on | Battery disconnected or low voltage; DC breaker off; Inverter power button off. | Check battery connections and voltage; Ensure DC breaker is on; Press inverter power button. |
| No AC output | Overload; Short circuit; AC output breaker off; Inverter in fault mode. | Reduce load; Check for short circuits; Turn on AC output breaker; Check LCD for error codes and clear fault. |
| Battery not charging from PV | PV input voltage too low/high; PV array disconnected; MPPT fault. | Check PV array connections and voltage; Ensure sufficient sunlight; Consult error codes on LCD. |
| Battery not charging from AC | AC input disconnected; AC input voltage out of range; Charger priority set to solar only. | Check AC input connections; Verify AC input voltage; Adjust charger priority settings on LCD. |
| Unusual noise or smell | Internal component failure; Overheating. | Immediately disconnect all power sources. Do not attempt to repair. Contact technical support. |
8. Specifications

Figure 8.1: Physical dimensions of the inverter. This image provides the length, width, and height of the LIBODD Hybrid Solar Inverter in both millimeters and inches.
| Specification | Value |
|---|---|
| Model | 1005005557990057 (6.2KW 48V) |
| Brand | LIBODD |
| Type | Hybrid Solar Inverter with Built-in MPPT Solar Controller |
| Rated Power | 6.2KW |
| Battery Voltage | 48VDC |
| MPPT Max Power | 6500W |
| PV Input Voltage Range | 90~450VDC |
| Output Waveform | Pure Sine Wave |
| Item Weight | 0.353 ounces (Note: This seems incorrect for an inverter, likely a data entry error in source. Actual weight is likely much higher, typically 10-20kg for such devices. User should refer to physical product or manufacturer for accurate weight.) |
| Package Dimensions | 0.39 x 0.39 x 0.39 inches (Note: This seems incorrect for an inverter, likely a data entry error in source. Actual dimensions are shown in Figure 8.1.) |
| Physical Dimensions (L x W x H) | 423mm x 334mm x 110mm (16.6in x 13.1in x 4.3in) |
| Batteries Required | No (External battery bank required for battery operation) |
Note: Some weight and package dimension values from the source data appear to be placeholder or incorrect. Please refer to the physical product or manufacturer's official documentation for precise measurements.
9. Warranty and Support
For warranty information and technical support, please refer to the documentation included with your product or contact LIBODD customer service. Keep your purchase receipt as proof of purchase.
Protection plans may be available for extended coverage. Please check with your retailer for details on available protection plans.