1. Introduction
This instruction manual provides detailed guidance for the installation, operation, and maintenance of the SOSODBBM N52-2068 Smart Energy Power Meter. This device is designed to measure and display AC voltage, AC current, active power, power factor, frequency, and electric energy. It features remote monitoring capabilities via a 2.4G network connection and a mobile application.
2. Safety Information
- Ensure all electrical connections are made by a qualified electrician.
- Disconnect power before installation or maintenance to prevent electric shock.
- Do not operate the device in wet or damp conditions.
- Verify the voltage and current ratings of your electrical system are within the meter's specifications.
3. Package Contents
Upon unpacking, please verify that the following items are included:
- 1 x SOSODBBM N52-2068 Smart Energy Power Meter (Built-in CT)
4. Product Overview
The N52-2068 Smart Energy Power Meter features a clear digital display and integrated current transformer for easy installation and monitoring.
4.1 Front View and Display

Figure 4.1: Front view of the N52-2068 meter, displaying various electrical parameters such as wattage, kilowatt-hours, voltage, frequency, amperage, and power factor. A 'CONFIG' button and Wi-Fi indicator are also visible.
4.2 Rear View and Connections
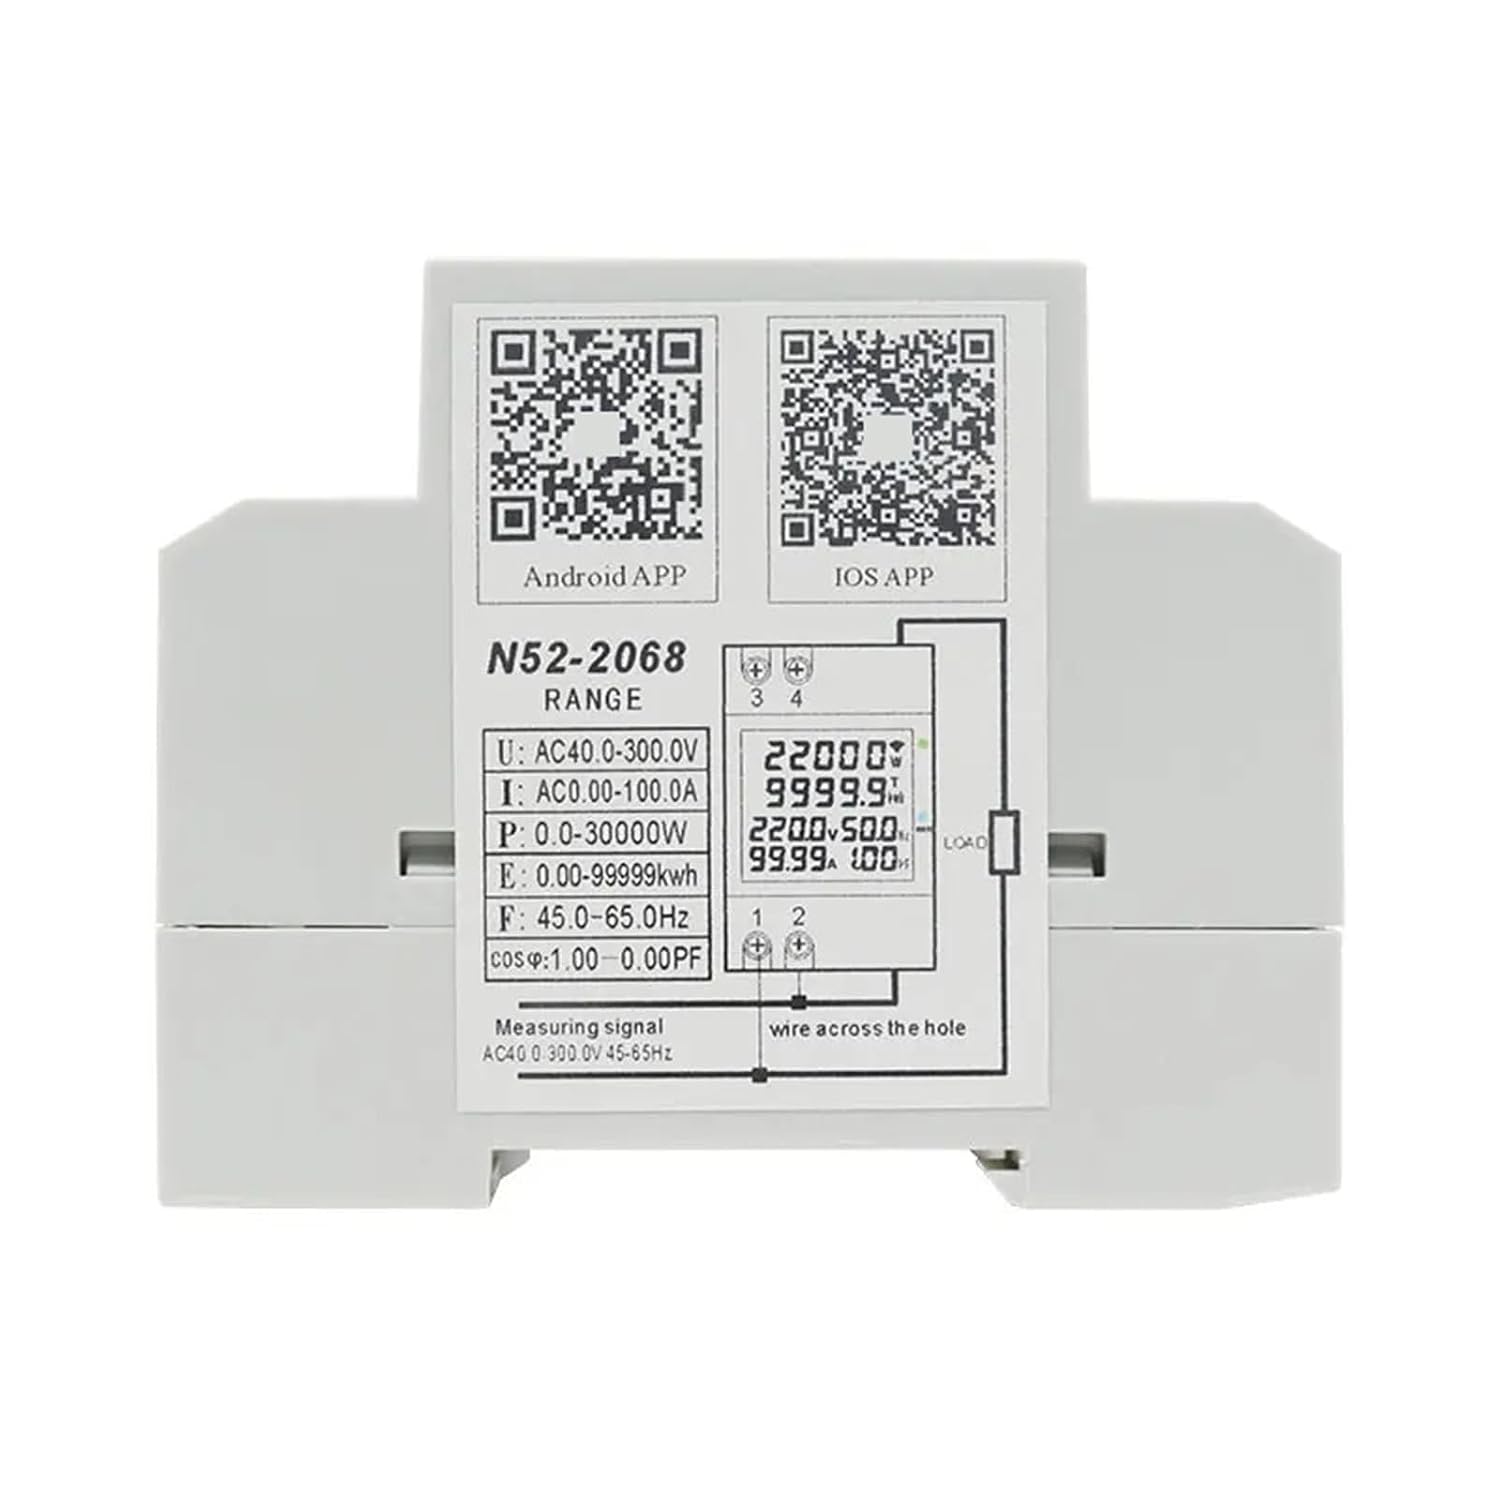
Figure 4.2: Rear view of the N52-2068 meter, illustrating the wiring terminals (1, 2, 3, 4) for power input and current transformer connection. QR codes for Android and iOS app downloads are also present.
5. Setup
5.1 Physical Installation
- Mount the N52-2068 meter onto a standard DIN rail in a suitable electrical enclosure.
- Ensure adequate ventilation around the meter.
5.2 Wiring Instructions
Refer to Figure 4.2 for a visual guide to the wiring terminals.
- Terminals 1 & 2: Connect these terminals to the AC power supply (40-300V). These are the voltage measurement input and power supply for the meter.
- Terminals 3 & 4: These terminals are for the built-in current transformer (CT). Pass the load wire (the wire carrying the current you wish to measure) through the hole between terminals 3 and 4. Ensure the direction of current flow is consistent with any markings on the meter for accurate readings.
Important: Ensure all connections are secure and insulated properly. Incorrect wiring can damage the device or pose a safety hazard.
5.3 Mobile Application Installation
To utilize the remote monitoring features, download the companion mobile application:
- For Android: Scan the Android QR code shown in Figure 4.2 or visit https://www.pgyer.com/Opt5Wf.
- For iOS: Scan the iOS QR code shown in Figure 4.2 or visit https://apps.apple.com/app/%E6%99%BA%E6%8E%A7%E7%94%B5%E4%BB%AA/id1661619489.
Follow the on-screen instructions to install the application on your smartphone.
6. Operating Instructions
6.1 Powering On and Initial Display
Once correctly wired and power is supplied, the meter's digital display will illuminate, showing real-time electrical parameters.
6.2 Displayed Parameters
The meter simultaneously displays the following:
- AC Voltage (V)
- AC Current (A)
- Active Power (W)
- Power Factor (PF)
- Frequency (Hz)
- Electric Energy (kWh)
6.3 Network Connection (Wi-Fi)
- Ensure your smartphone is connected to a 2.4GHz Wi-Fi network. The meter only supports 2.4GHz networks.
- Open the installed mobile application.
- Follow the in-app instructions to add a new device. This typically involves putting the meter into pairing mode (often by pressing and holding the 'CONFIG' button) and entering your Wi-Fi network credentials into the app.
- Once connected, the Wi-Fi indicator on the meter's display will show a stable connection.
6.4 Mobile Application Usage
The mobile application allows you to:
- View all electrical parameters remotely from anywhere.
- Access historical data and statistics for daily, monthly, and yearly electric energy consumption.
- Configure certain meter settings (if available in the app).
7. Maintenance
- Keep the meter clean and free from dust. Use a soft, dry cloth for cleaning.
- Do not use abrasive cleaners or solvents.
- Periodically check wiring connections for tightness and signs of wear.
- Ensure the operating environment remains within specified temperature and humidity ranges.
8. Troubleshooting
- Meter not powering on: Check the AC power supply connection to terminals 1 and 2. Ensure power is active.
- Incorrect readings: Verify the load wire is correctly passed through the built-in CT (between terminals 3 and 4). Ensure the current direction is correct.
- Cannot connect to Wi-Fi:
- Ensure your Wi-Fi network is 2.4GHz. The meter does not support 5GHz networks.
- Check Wi-Fi signal strength at the meter's location.
- Verify correct Wi-Fi password entry in the app.
- Restart the meter and your router, then attempt pairing again.
- App not displaying data: Ensure the meter is successfully connected to Wi-Fi and the app is logged in to the correct account. Check your internet connection.
9. Specifications
| Parameter | Specification |
|---|---|
| Model Number | N52-2068 |
| Measurement Accuracy | 1% ± 2 words |
| Sample Frequency | 2 per second |
| AC Voltage Range | 40-300V |
| AC Current Range | 0.00 - 100.0A |
| Real Power Range | 0-30000W |
| Electric Energy Range | 0-99999kWh (Unlimited in app) |
| Frequency Range | 50Hz (Measurement: 45.0Hz-65.0Hz) |
| Power Factor Range | 0.00-1.00PF |
| Installation Size | 54 × 48 × 80 mm |
| Display Type | Digital Only |
| Phase | Single phase |
| Power Supply | AC |
10. Warranty and Support
For warranty information and technical support, please refer to the product packaging or contact your retailer. Keep your purchase receipt for warranty claims.