1. Introduction
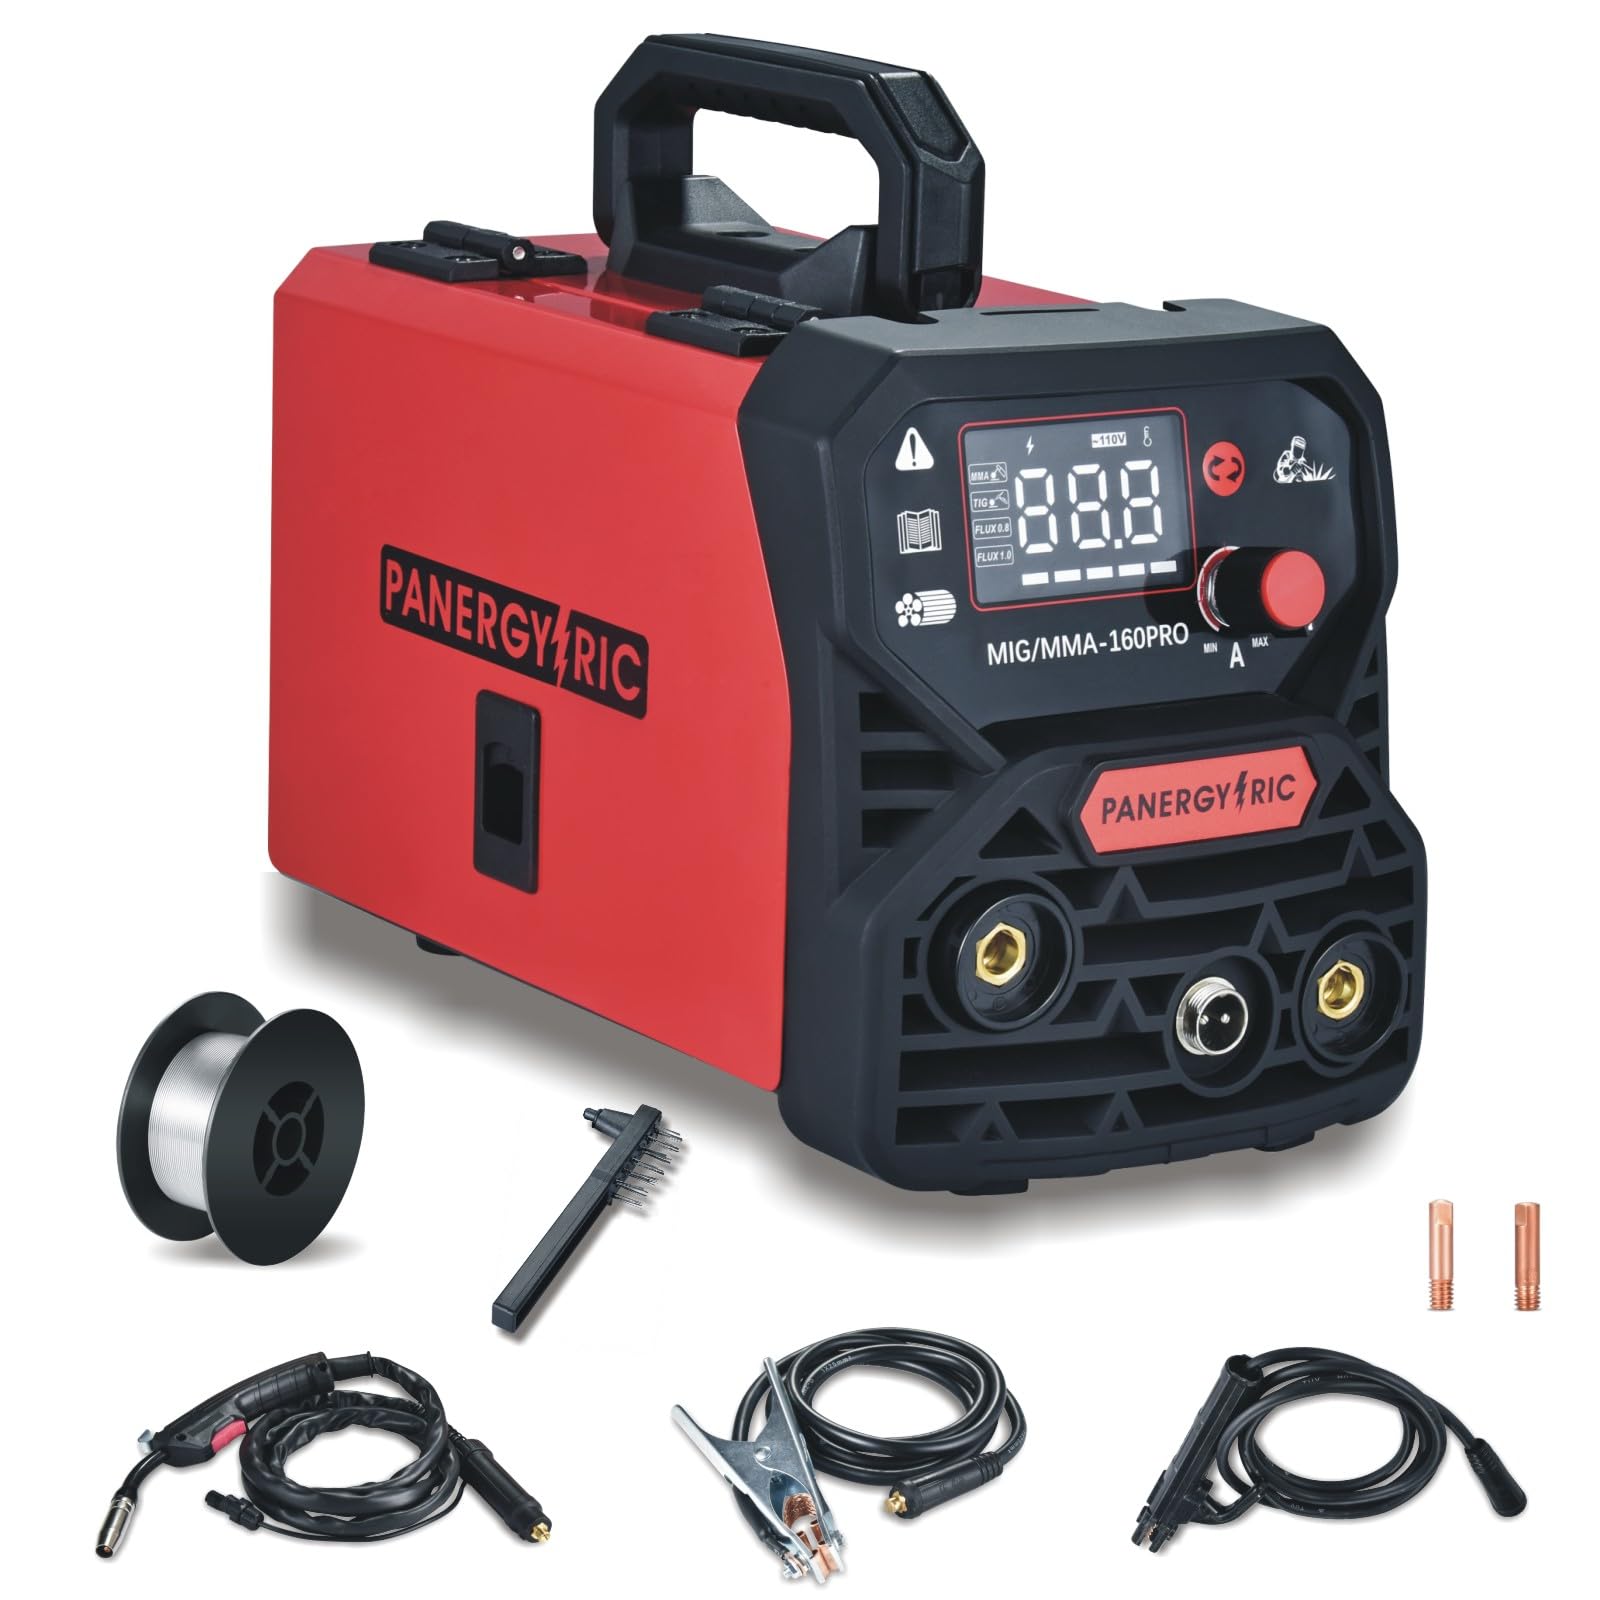
The PANERGYRIC MIGMMA-160 PRO is a versatile 3-in-1 welding machine designed for various welding applications. It supports Gasless Flux-Cored MIG, Lift TIG, and Stick (MMA) welding modes, offering a maximum output current of 160 amps. This machine is suitable for welding stainless steel, carbon steel, and thicker steel, making it ideal for machinery repair, yard work, home repairs, and DIY metal crafts. It features a large LED digital display for clear readings and synergistic control technology for intelligent voltage and wire feed speed matching.
2. Package Contents
Verify that all items listed below are included in your package. If any items are missing or damaged, please contact customer support.
- 1x MIG Welder Machine (MIGMMA-160 PRO)
- 1x 14AK MIG Torch
- 1x Earth Clamp
- 1x Stick Holder
- 1x Flux Core Wire (0.5kg, 1.0mm)
- 2x Conductive Nozzles (0.8mm, 1.0mm)
- 1x Brush/Hammer
- 1x User Manual
- 1x Basic Welding Mask
- 1x 110V Power Plug (pre-installed)
- 1x 220V Adapter Plug

3. Safety Information
Always prioritize safety when operating welding equipment. Failure to follow safety precautions can result in serious injury or death.
- Electric Shock: Can kill. Do not touch live electrical parts. Wear dry, insulating gloves and protective clothing. Ensure the workpiece is properly grounded.
- Fumes and Gases: Can be hazardous to your health. Keep your head out of the fumes. Use enough ventilation, exhaust at the arc, or both, to keep fumes and gases away from your breathing zone and the general area.
- Arc Rays: Can injure eyes and burn skin. Wear a welding helmet with a proper shade of filter to protect your face and eyes when welding or watching. Wear approved safety glasses with side shields under your helmet. Wear protective clothing made from durable, flame-resistant material.
- Fire and Explosion: Welding can cause fire or explosion. Remove all flammables within 35 feet (10 meters) of the welding area. Have a fire extinguisher readily available.
- Hot Parts: Can cause severe burns. Do not touch hot parts with bare hands. Allow cooling time before handling.
- Noise: Excessive noise can damage hearing. Wear approved ear protection.
Always read and understand the entire instruction manual before operating the welder.
4. Product Overview
The PANERGYRIC MIGMMA-160 PRO features a user-friendly interface and robust construction. Familiarize yourself with the main components and controls:

Front Panel:
- Digital Display: Shows current welding parameters (voltage, amperage, wire thickness).
- Mode Selection Button: Cycles through MIG, Lift TIG, and Stick (MMA) welding modes.
- Parameter Adjustment Knobs: Adjust welding current (amperage) and voltage.
- MIG Torch Connection: For the 14AK MIG torch.
- Positive (+) and Negative (-) Terminals: For connecting the earth clamp and stick holder, depending on the welding mode.
Rear Panel:
- Power Switch: Turns the machine ON/OFF.
- Power Input: Connects to 110V AC power supply. Includes a 220V adapter.
- Cooling Fan: Ensures proper ventilation and prevents overheating.
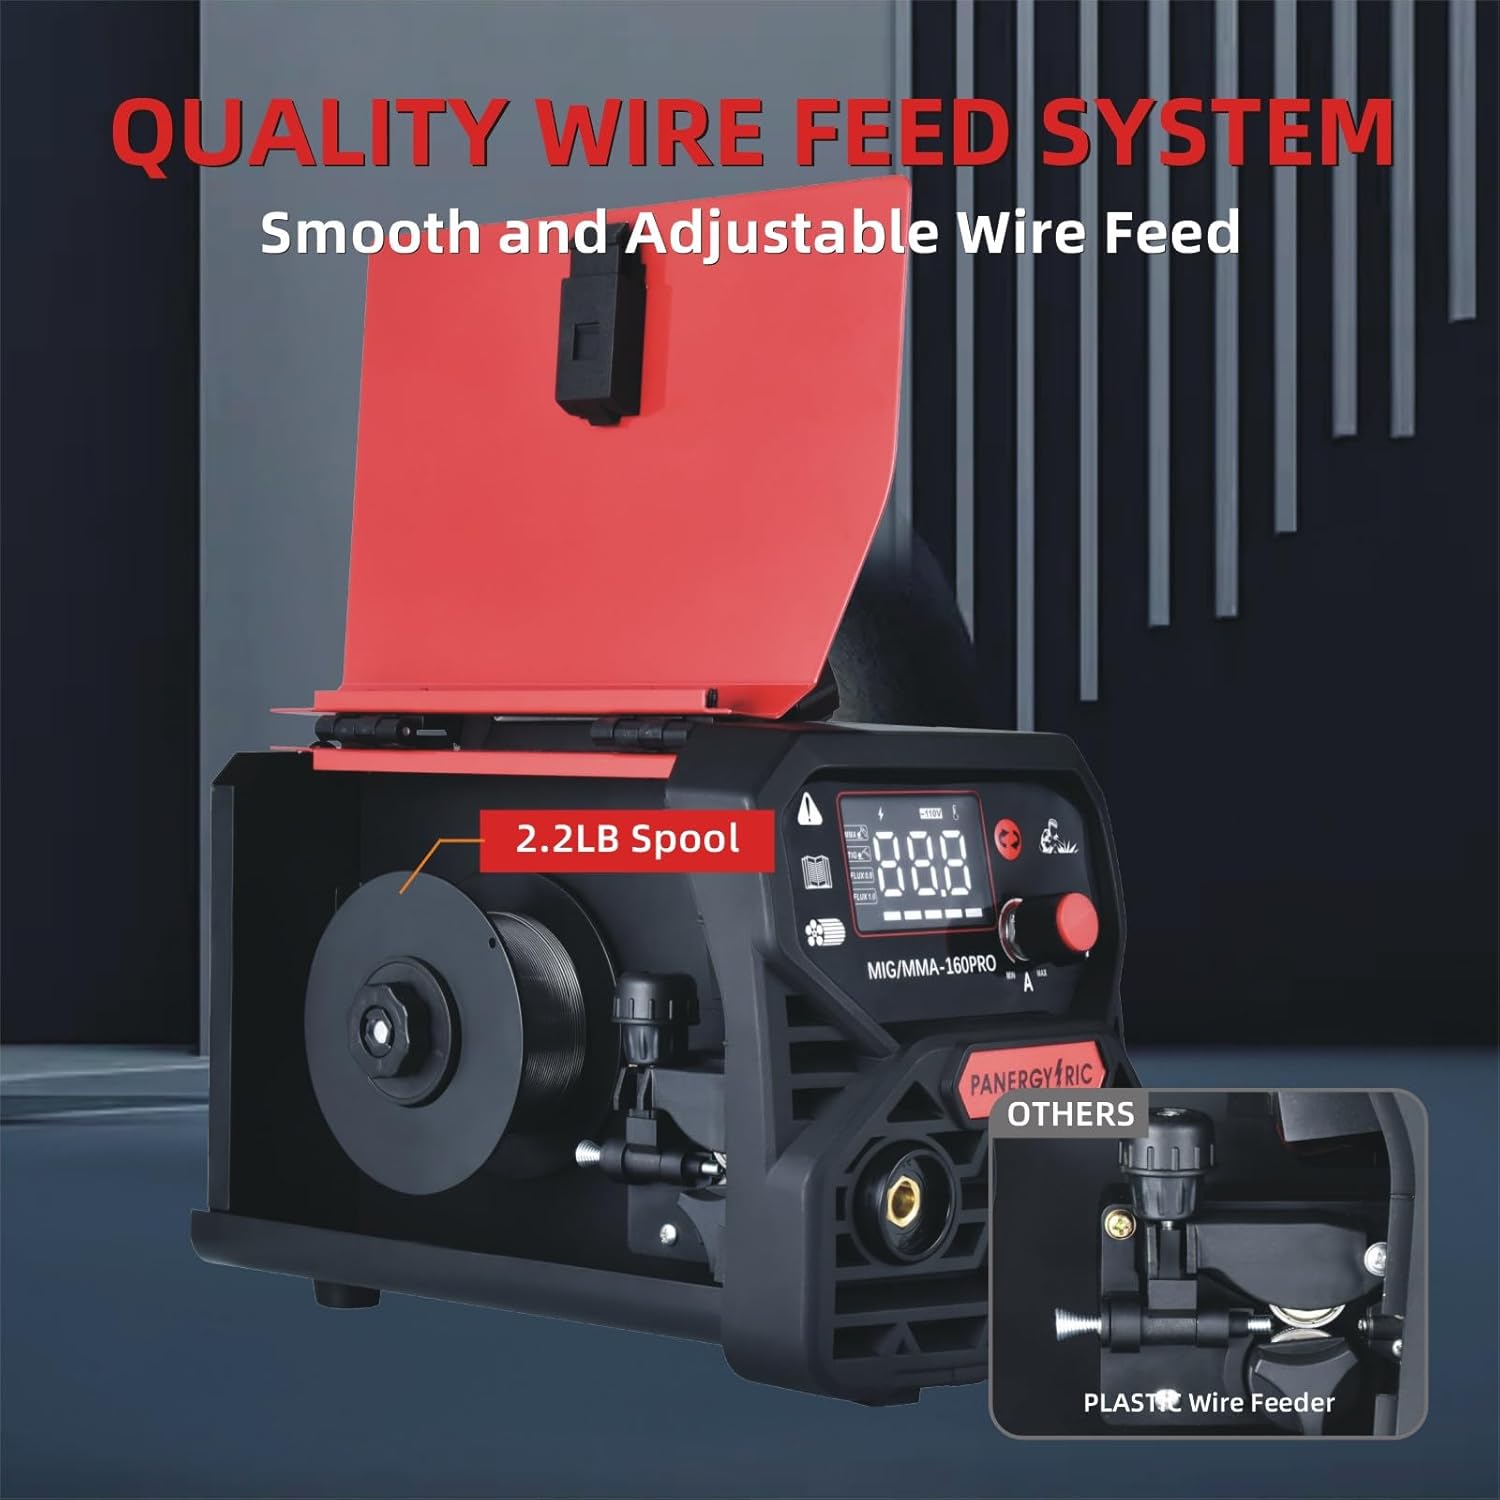
Wire Feed Compartment:
Located behind a side door, this compartment houses the wire spool and the wire feeding mechanism.
5. Setup
- Power Connection:
- Ensure the welder's power switch is in the OFF position.
- Connect the power cord to a suitable 110V AC outlet. If using a 220V supply, attach the provided adapter to the power cord and then plug into the 220V outlet.
- Wire Spool Installation (for MIG welding):
- Open the side door of the wire feed compartment.
- Place the flux-cored wire spool onto the spool holder. Ensure it rotates freely.
- Feed the wire through the guide tube and into the wire feed mechanism. Secure the wire feed roller tension.
- Close the side door.
- Torch and Clamp Connections:
- MIG Welding: Connect the 14AK MIG torch to the designated MIG torch connection on the front panel. Connect the earth clamp to the negative (-) terminal.
- Lift TIG Welding: (Requires optional TIG torch, not included). Connect the TIG torch to the negative (-) terminal and the earth clamp to the positive (+) terminal.
- Stick (MMA) Welding: Connect the stick holder to the positive (+) terminal and the earth clamp to the negative (-) terminal.
- Welding Mask Assembly:
- Insert the welding glass into the provided basic welding mask.
- Attach the handle to the mask.
6. Operating Instructions
- Power On: Flip the power switch on the rear panel to the ON position. The digital display will illuminate.
- Select Welding Mode: Press the mode selection button on the front panel to cycle through MIG, Lift TIG, and MMA modes. The corresponding indicator on the display will light up.
- Adjust Parameters:
- Use the parameter adjustment knobs to set the desired welding current (amperage) and voltage. The digital display will show the current settings.
- For MIG welding, the synergic control feature will intelligently suggest voltage and wire feed speed based on the selected wire diameter (0.8mm or 1.0mm) and amperage.
- Prepare Workpiece: Ensure the workpiece is clean, dry, and free of rust, paint, or grease. Secure the earth clamp firmly to the workpiece or a clean, bare metal part of the welding table.
- Begin Welding:
- Wear appropriate personal protective equipment (welding helmet, gloves, protective clothing).
- Position the torch/electrode at the starting point of the weld.
- Initiate the arc according to the selected welding process (trigger for MIG, scratch/lift for TIG, tap for MMA).
- Maintain a consistent travel speed and arc length for optimal weld quality.
- Power Off: After welding, turn the power switch to the OFF position.

7. Maintenance
Regular maintenance ensures the longevity and optimal performance of your welding machine.
- Cleaning: Regularly clean the exterior of the machine with a dry cloth. Use compressed air to blow out dust and debris from the cooling vents.
- Wire Feed System: Inspect the wire feed rollers and guide tubes for wear or blockages. Clean any accumulated debris. Replace worn contact tips and nozzles on the MIG torch as needed.
- Cable Inspection: Check all welding cables, including the MIG torch, earth clamp, and stick holder cables, for cuts, fraying, or damaged insulation. Replace damaged cables immediately.
- Storage: Store the welder in a clean, dry environment, away from moisture and extreme temperatures.
8. Troubleshooting
Refer to the table below for common issues and their potential solutions.
| Problem | Possible Cause | Solution |
|---|---|---|
| No Arc / Weak Arc | Poor earth clamp connection, incorrect settings, worn contact tip, power supply issue. | Ensure good contact for earth clamp. Adjust amperage/voltage. Replace contact tip. Check power outlet. |
| Wire Feed Issues (MIG) | Incorrect wire tension, clogged liner, wrong size contact tip, tangled wire spool. | Adjust wire tension. Clean or replace liner. Use correct contact tip for wire size. Untangle wire. |
| Overheating Indicator On | Exceeded duty cycle, blocked cooling vents, high ambient temperature. | Allow machine to cool down. Clear any obstructions from vents. Operate in a cooler environment. |
| Poor Weld Quality | Incorrect settings, improper technique, contaminated workpiece. | Adjust settings according to material and thickness. Practice technique. Clean workpiece thoroughly. |
9. Specifications
Key technical specifications for the PANERGYRIC MIGMMA-160 PRO welder:
- Manufacturer: PANERGYRIC
- Model Number: MIGMMA-160 PRO
- Item Weight: 9.15 pounds
- Package Dimensions: 12.37 x 11.12 x 8.25 inches
- Input Voltage: 110V (with 220V adapter included)
- Max Output Current: 160 Amps
- Welding Modes: Gasless Flux-Cored MIG, Lift TIG, Stick (MMA)
- Control: IGBT Inverter, Synergic Control
- Display: Big LED Digital Display
10. Warranty and Support
For warranty information, technical support, or to inquire about replacement parts, please refer to the contact details provided with your purchase documentation or visit the official PANERGYRIC website. Additional protection plans (e.g., 3-Year, 4-Year, or monthly Complete Protect plans) may be available for purchase to extend coverage beyond the standard manufacturer's warranty.