1. Introduction
This instruction manual provides essential information for the proper setup, operation, and maintenance of your UNCLE BRICK 9-in-1 Motor Power Function Set. This set is designed to enhance building block creations by adding dynamic movement and lighting, compatible with UNCLE BRICK products and other major building block brands. Please read this manual thoroughly before use to ensure optimal performance and longevity of your product.
2. Package Contents
Verify that all the following components are included in your package:
- 1 x Speed Control Remote Control
- 1 x Power Supply Box
- 1 x Receiver
- 1 x Transfer Switch
- 2 x M Motors (Medium Motors)
- 1 x L Motor (Large Motor)
- 1 x Extension Cord
- 1 x LED Light Module
- 1 x Screwdriver (for battery compartment)
3. Component Overview
3.1 Speed Control Remote Control
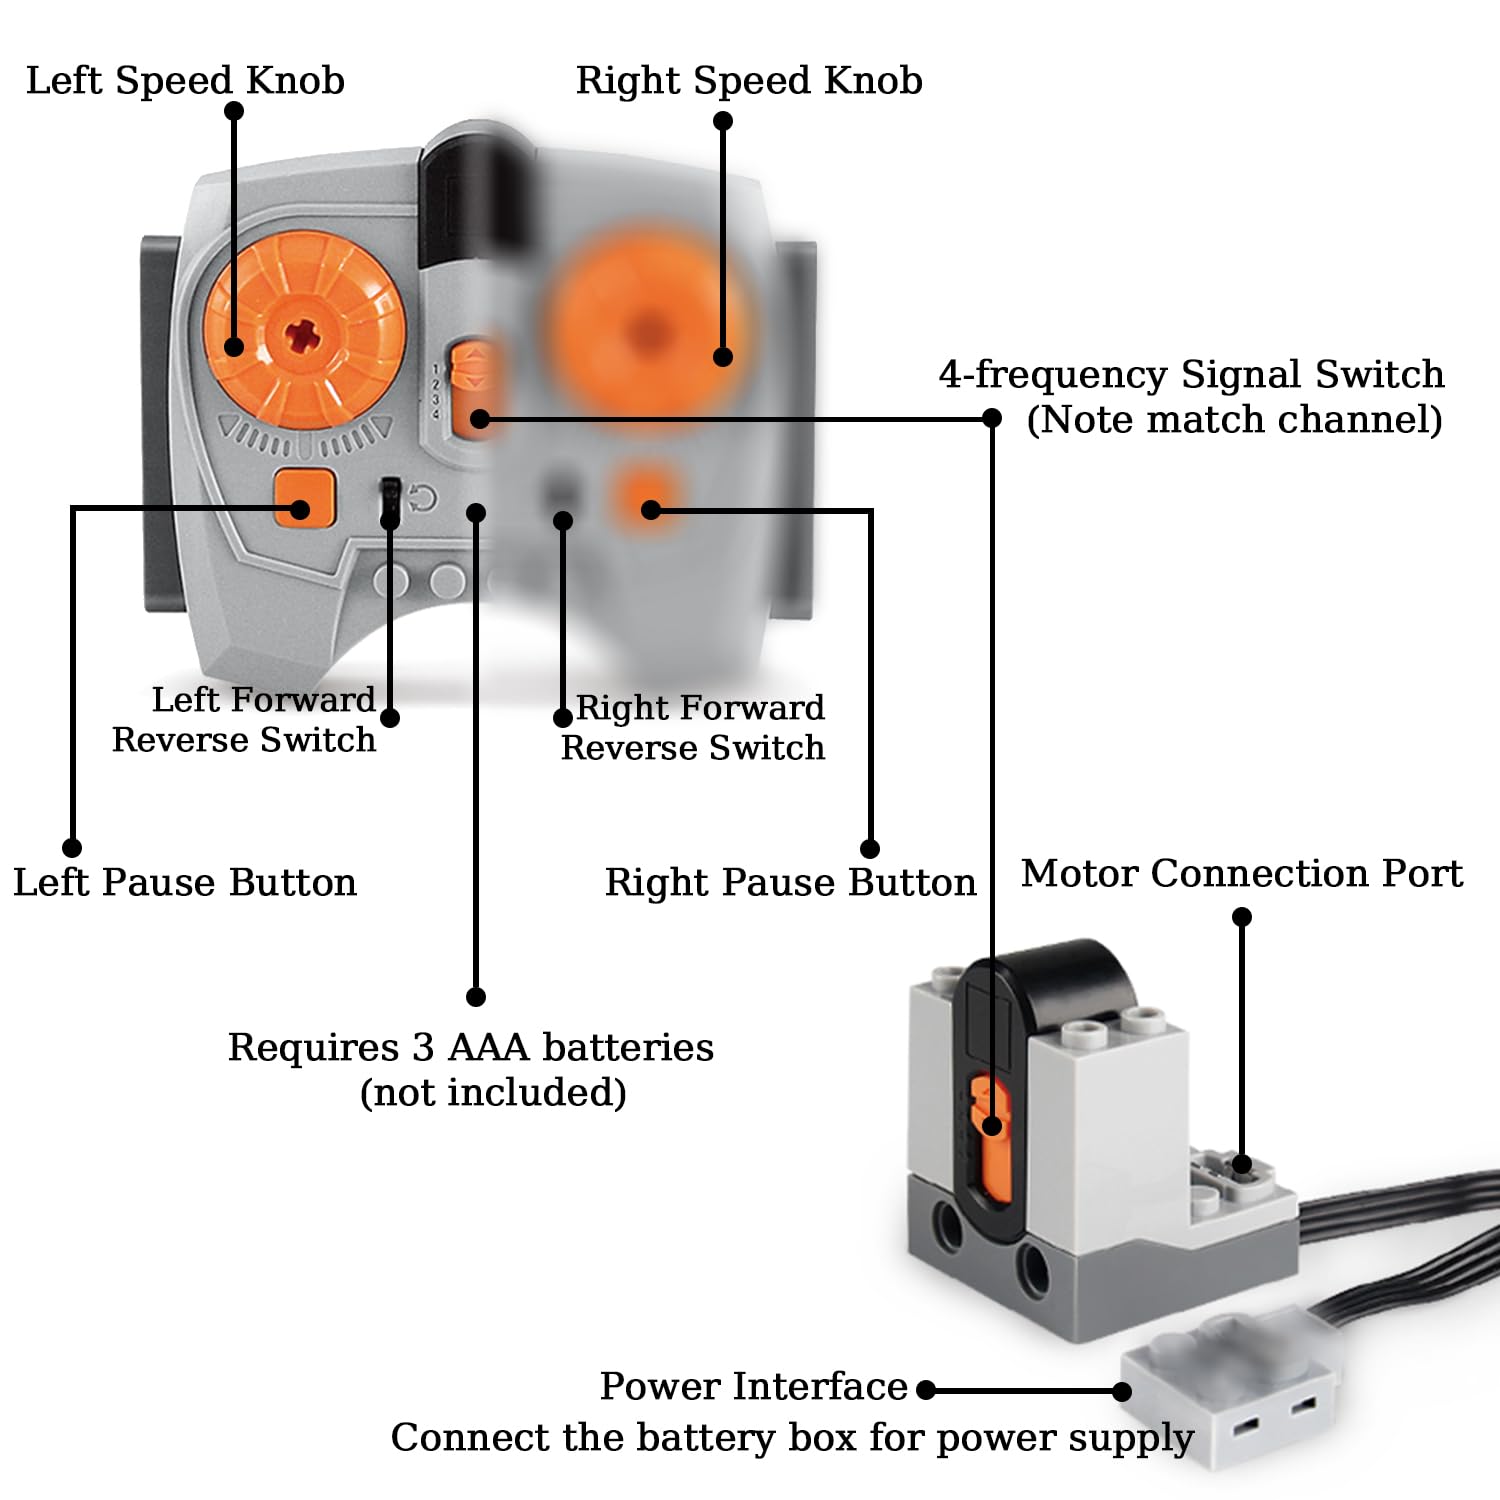
Figure 1: Speed Control Remote Control Diagram
The remote control allows for precise operation of connected motors. It features:
- Left/Right Speed Knobs: Adjust motor speed.
- Left/Right Forward/Reverse Switches: Control motor direction.
- Left/Right Pause Buttons: Stop motor operation.
- 4-Frequency Signal Switch: Selects the operating channel (A, B, C, D) to match the receiver.
- Requires 3 AAA batteries (not included).
3.2 Power Supply Box
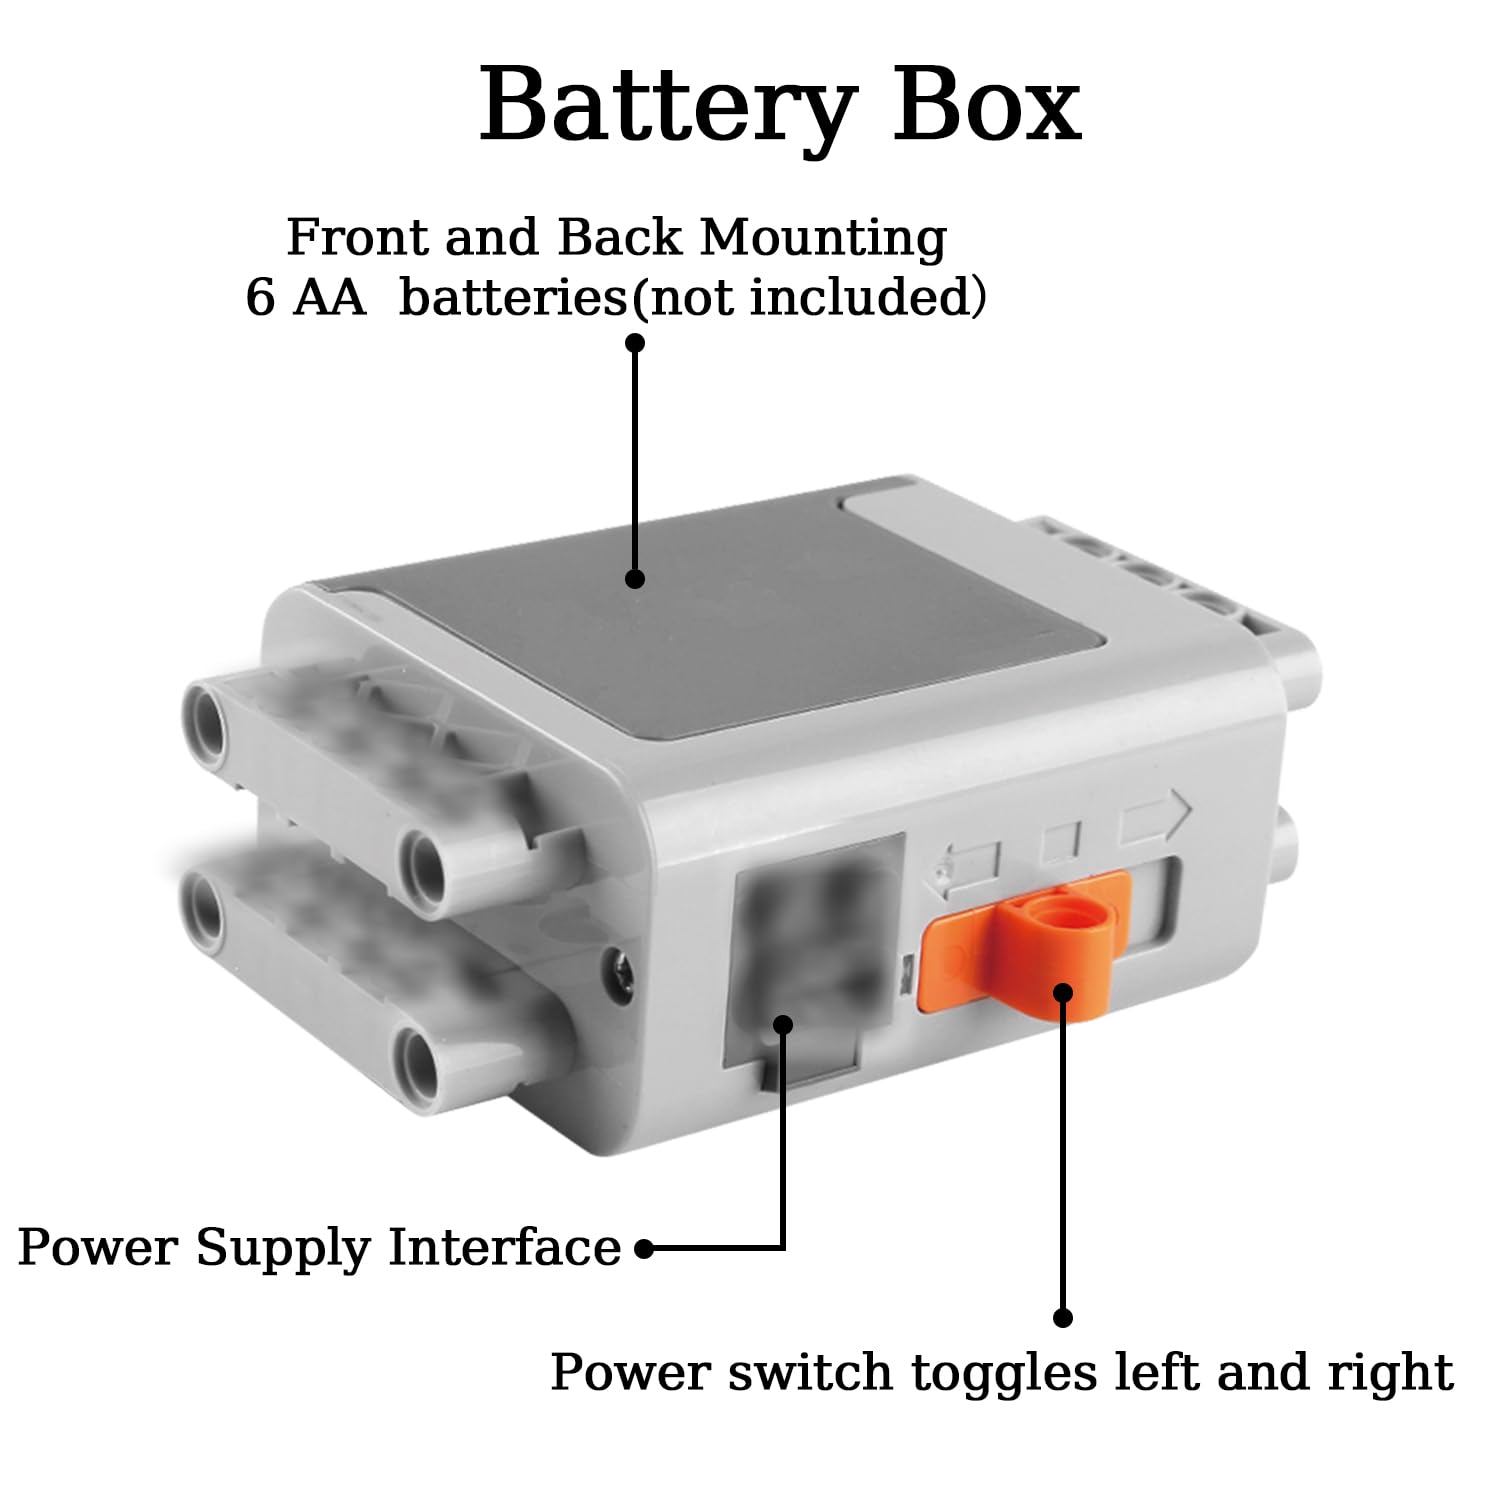
Figure 2: Power Supply Box Diagram
The Power Supply Box provides power to the connected components. It features:
- Power Supply Interface: Connects to motors, lights, or the receiver.
- Power Switch: Toggles power on and off.
- Requires 6 AA batteries (not included).
- Designed for front and back mounting on building blocks.
3.3 M & L Motors

Figure 3: Motor Socket Description
The set includes M (Medium) and L (Large) motors, each with distinct characteristics:
- M Motors: Generally run faster, suitable for applications requiring higher speed.
- L Motors: Provide more powerful torque, ideal for heavier loads or applications requiring stronger rotational force.
- Each motor has a Power Cord and a Power Interface for connection, along with a Motor Shaft Connector for attaching gears or other building block elements.
3.4 Receiver
The receiver acts as an intermediary between the remote control and the motors/lights. It has two connectors for power function components, corresponding to the two sides of the remote control. The receiver must be turned on for the remote to function.
3.5 Transfer Switch, Extension Cord, and LED Light Module
- Transfer Switch: Used to direct power or control signals.
- Extension Cord: Provides flexibility in component placement.
- LED Light Module: Adds illumination to your building block creations.
4. Setup and Installation
4.1 Battery Installation
- Remote Control: Use the provided screwdriver to open the battery compartment. Insert 3 AAA batteries, ensuring correct polarity (+/-). Close the compartment securely.
- Power Supply Box: Open the battery compartment. Insert 6 AA batteries, ensuring correct polarity (+/-). Close the compartment securely.
4.2 Connecting Components
- Connect the Power Supply Box to the Receiver using a power interface cable.
- Connect motors (M or L) and the LED Light Module to the available ports on the Receiver. The Receiver has two ports, each controlled independently by one side of the remote.
- Use the Extension Cord if components need to be placed further apart.
- The Transfer Switch can be used to manage power flow to multiple components from a single port.
4.3 Channel Matching
For the remote control to communicate with the receiver, their channels must match. Use the 4-Frequency Signal Switch on the remote control to select a channel (A, B, C, or D) and ensure the receiver is set to the same channel. This allows for controlling multiple receivers independently with a single remote by assigning different channels.
5. Operation
5.1 Powering On
- Ensure all batteries are correctly installed.
- Turn on the Power Supply Box using its power switch.
- Ensure the Receiver is also powered on and its channel matches the remote control.
5.2 Using the Remote Control
- Speed Control: Rotate the Left or Right Speed Knobs to adjust the speed of the corresponding motor. Turning the knob to the right typically increases speed.
- Direction Control: Use the Left or Right Forward/Reverse Switches to change the direction of motor rotation.
- Pause Function: Press the Left or Right Pause Buttons to temporarily stop the corresponding motor. Once activated, the function remains on until paused or reversed.
5.3 Motor Capacity
The Power Supply Box can power multiple components. For optimal performance, it is recommended not to exceed the following limits from a single Power Functions Battery Box:
- Up to 2 XL-Motors
- Up to 3 Train Motors
- Up to 4 M-Motors
When combining different types of motors or adding lights, consider the total power draw. Less power-intensive units like LED lights can be stacked in higher quantities.
6. Compatibility
The UNCLE BRICK 9-in-1 Motor Power Function Set is designed for broad compatibility. It can be used with UNCLE BRICK brand products and is also compatible with approximately 97% of other major building block brands on the market. This allows for extensive integration into existing building block collections.
7. Maintenance
7.1 Battery Replacement
Replace batteries in the remote control and power supply box when performance degrades. Always use new batteries of the specified type (AAA for remote, AA for power box) and dispose of old batteries responsibly.
7.2 Component Care
- Handle all components, especially the power cords, with care to prevent damage. Avoid excessive pulling or bending of wires.
- Keep the components clean and free from dust and debris. Use a soft, dry cloth for cleaning.
- Store the set in a dry place away from direct sunlight and extreme temperatures.
8. Troubleshooting
If you encounter issues with your UNCLE BRICK Power Function Set, refer to the following common problems and solutions:
| Problem | Possible Cause | Solution |
|---|---|---|
| Motors or lights do not respond. | Low or dead batteries; incorrect connections; remote/receiver channel mismatch; power switch off. | Replace batteries; check all cable connections; ensure remote and receiver are on the same channel; turn on power switches. |
| Motor runs slowly or weakly. | Low batteries; motor overloaded; too many motors connected to one port. | Replace batteries; reduce load on the motor; distribute motors across multiple receiver ports or use a separate power source if possible. |
| Remote control does not work. | Dead AAA batteries; receiver not powered on or channel mismatch. | Replace remote batteries; ensure receiver is on and channel matches. |
| Cords appear damaged. | Rough handling. | Handle cords carefully. If wires are exposed, discontinue use to prevent short circuits or injury. Contact support for replacement options. |
| One component is faulty upon receipt. | Manufacturing defect. | Contact UNCLE BRICK customer support immediately for assistance or replacement. |
9. Specifications
| Feature | Detail |
|---|---|
| Brand | UNCLE BRICK |
| Model Name | UP2511 |
| Motor Speed | 580 RPM |
| Voltage | 7400 Millivolts |
| Horsepower | 1313.95 Watts |
| Material | Acrylonitrile Butadiene Styrene (ABS) |
| Item Weight | 0.74 Pounds (approximately 11.8 ounces) |
| Package Dimensions | 7.24 x 6.42 x 1.54 inches |
10. Safety Information
- This product is suitable for children over 8 years old and adults.
- Keep small parts away from young children to prevent choking hazards.
- Do not mix old and new batteries, or different types of batteries.
- Always insert batteries with correct polarity.
- Remove batteries from the product if it will not be used for an extended period.
- Do not short-circuit battery terminals.
- Do not expose components to water or extreme temperatures.
11. Warranty and Support
Warranty information for the UNCLE BRICK 9-in-1 Motor Power Function Set is not explicitly provided in this manual. For details regarding warranty coverage, returns, or technical support, please refer to the product listing on the retailer's website or contact UNCLE BRICK customer service directly through their official channels. You can often find support information on the UNCLE BRICK brand store page on Amazon.


