Introduction
Thank you for choosing the PetsCosset Outdoor Garage Cabinet. This manual provides detailed instructions for the assembly, operation, and maintenance of your new storage cabinet. Please read all instructions carefully before assembly and use to ensure safe and proper functionality.
Safety Information
Always follow the assembly instructions carefully. Use appropriate tools and be cautious when handling heavy components. Keep the lock away from children to prevent accidental injury.
- Ensure all parts are present before beginning assembly.
- Assemble on a flat, stable surface.
- Do not overtighten screws to avoid damaging materials.
- Secure the cabinet to a wall or ground using appropriate anchors if in a windy area (anchors may not be included).
- Do not overload shelves; distribute weight evenly.
- Keep children and pets away from the assembly area.
Package Contents
Please verify that all components listed below are included in your package. If any parts are missing or damaged, please contact customer support.
- Back Panel(s)
- Side Panels (Left & Right)
- Front Down Rods
- Front Upper Rods
- Front Pillars
- Roof Panel
- Connecting Rods
- Back Down Rods
- Bottom Panels
- Shelf Panels
- Doors with Handles
- Foot Pads
- Screws and Hardware (various types)
- Angle Irons (for securing)
Setup and Assembly
Follow these step-by-step instructions for assembling your PetsCosset Outdoor Garage Cabinet. It is recommended to have at least two people for assembly.
Step 1: Prepare the Base
Lay the back panel on a flat surface. Attach the back down rods to the back panel using screws. Ensure the rods are securely fastened.
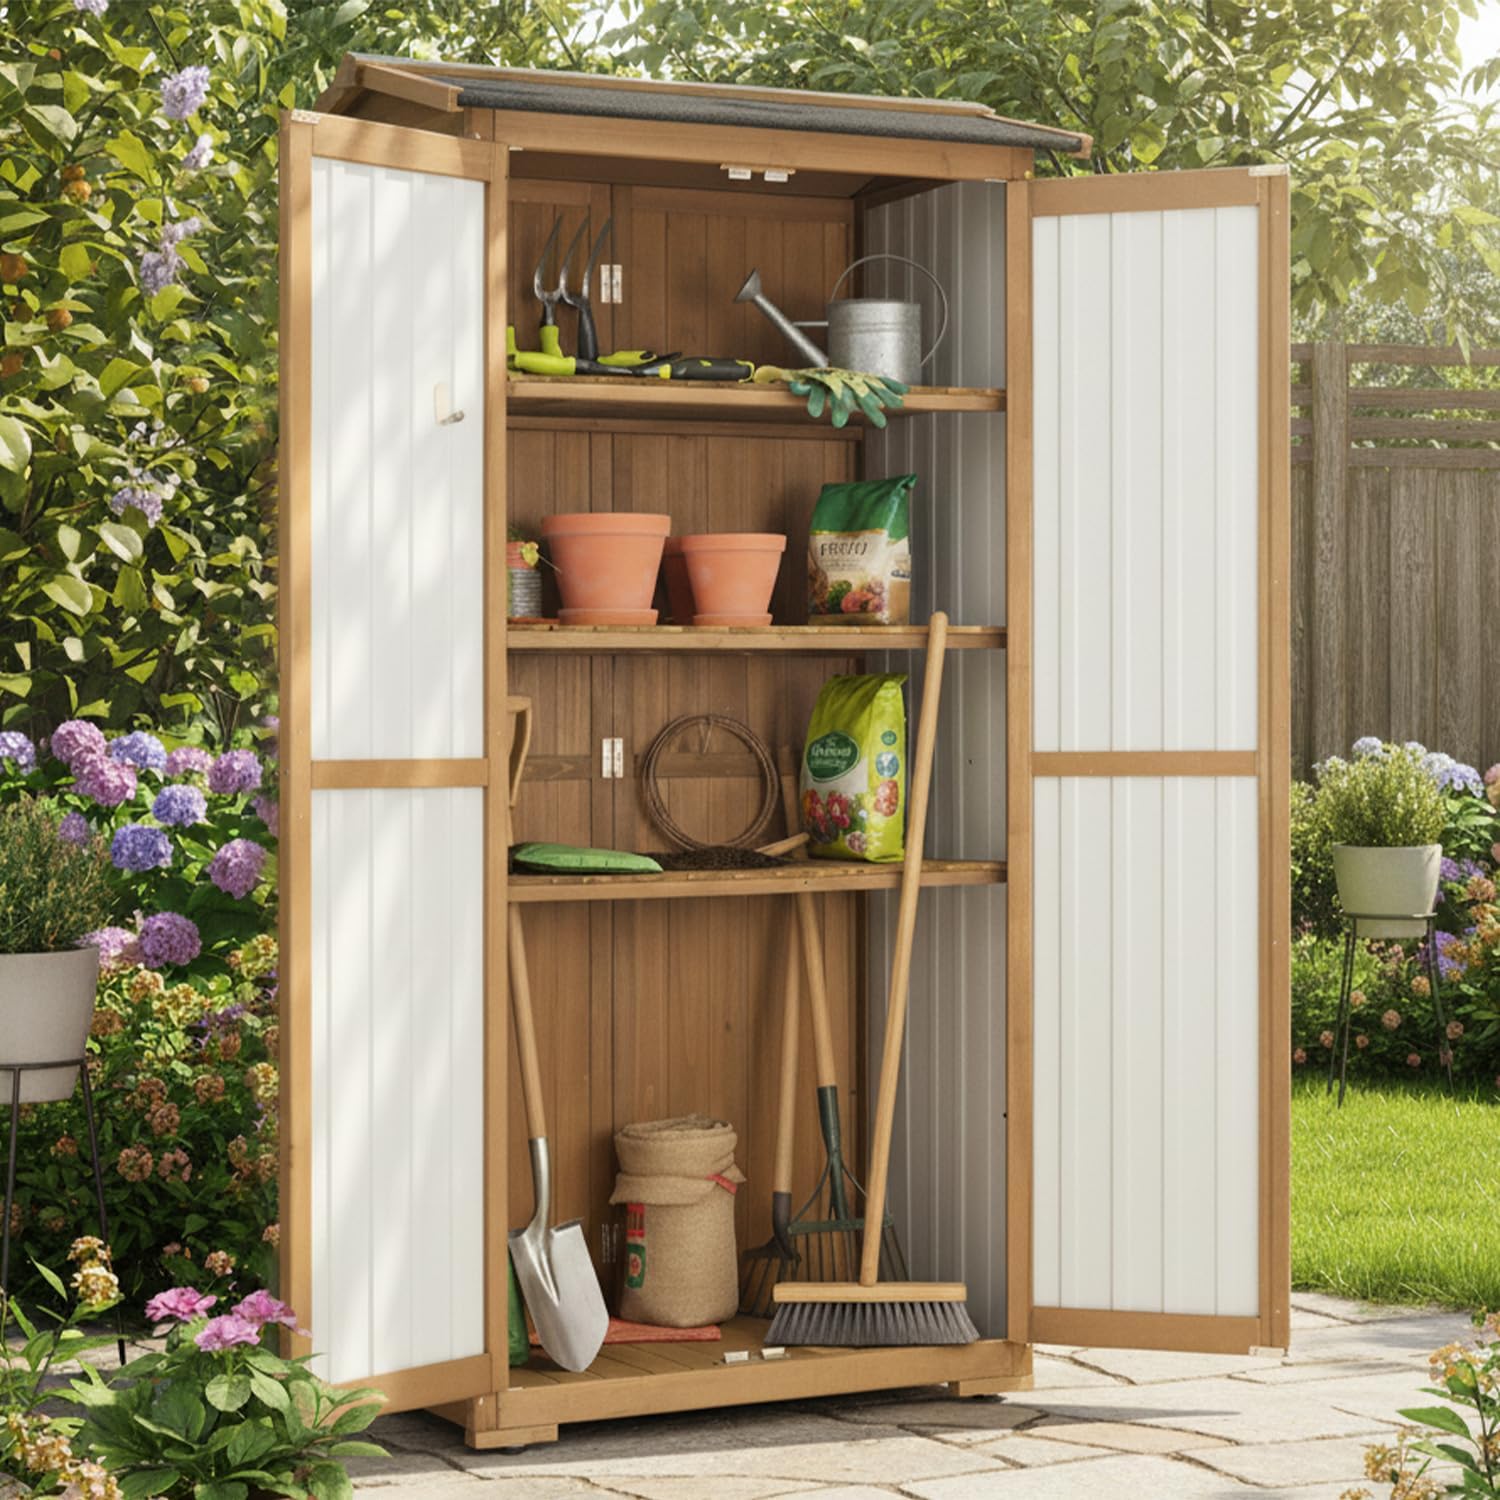
Image: The back panel of the cabinet with wooden back down rods being screwed into place.
Step 2: Assemble Side Panels
Attach the left and right side panels to the back panel. Secure them with screws. Then, attach the front down rods and front pillars to form the basic frame.

Image: A person using a power drill to attach the side panels to the back panel, forming the initial structure of the cabinet.
Step 3: Install Foot Pads
Attach the foot pads to the bottom of the back, left, and right panels. These provide stability and slight elevation.
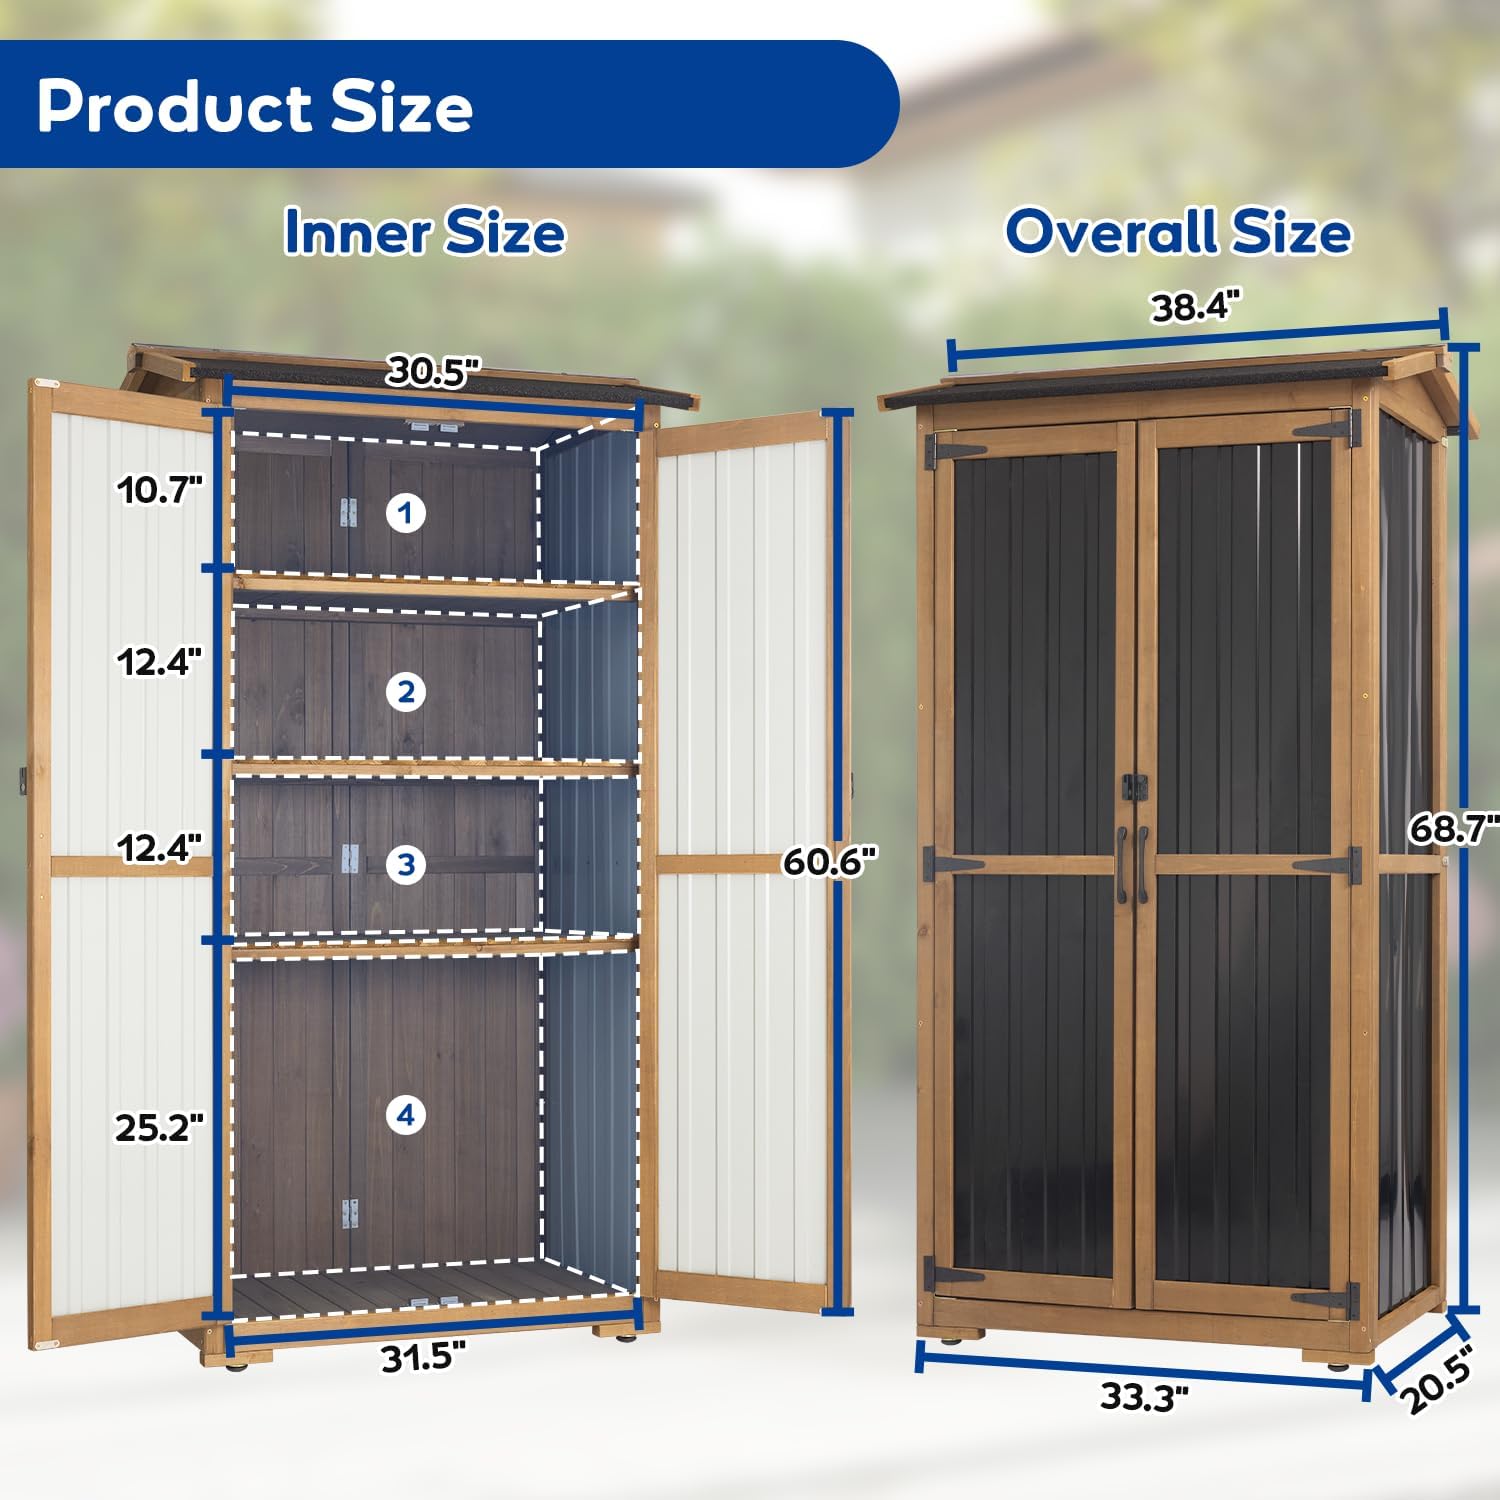
Image: A close-up of a person screwing a black foot pad onto the wooden base of the cabinet.
Step 4: Insert Bottom and Shelf Panels
Place the bottom panels into the cabinet frame. Then, insert the shelf panels and secure them using the connecting rods and screws. The shelves are adjustable to suit your storage needs.

Image: A person installing a wooden shelf panel into the cabinet, demonstrating the adjustable shelving feature.
Step 5: Attach Doors
Fix the handles to the doors. Then, attach the doors to the front panels using the provided screws and hinges. Ensure the doors open and close smoothly.

Image: A person attaching the black and wood doors to the cabinet frame, securing them with hinges.
Step 6: Install the Roof
Place the roof panel on top of the cabinet and secure it with screws. Ensure it is properly aligned for weather resistance.

Image: A person securing the asphalt-covered roof panel to the top of the assembled cabinet.
Step 7: Secure to Ground (Optional but Recommended)
For added stability, especially in outdoor environments, fix the angle irons to the back, left, and right panels with screws, then use nails to secure them to the ground with a hammer.
Assembly Videos
3D Assembly Video of Outdoor Cabinet-GF37
Description: A detailed 3D animation demonstrating the step-by-step assembly process for the PetsCosset Outdoor Garage Cabinet, Model GF37.
Live Assembly Video
Description: A live demonstration of the assembly process for the PetsCosset Outdoor Garage Cabinet, showing practical steps and tips.
Operating Instructions
Adjusting Shelves
The cabinet features three adjustable shelves. To adjust a shelf, carefully lift it from its current position and place it onto the desired support brackets. Ensure it is level and securely seated before placing items on it.

Image: An open cabinet showcasing its adjustable shelves and magnetic door closures, highlighting its versatile storage options.
Lockable Doors
The cabinet doors are equipped with magnetic closures for easy access and lockable holes for added security. To secure your belongings, align the holes on the doors and insert a padlock (not included). Ensure the padlock is properly engaged.
Maintenance
- Cleaning: Wipe down the cabinet surfaces with a damp cloth and mild soap. Avoid harsh chemicals that may damage the wood or metal finish.
- Wood Care: Periodically inspect the wood components for signs of wear or weather damage. Applying a wood sealant or stain annually can help prolong its lifespan and maintain its weather-resistant properties.
- Metal Components: Check hinges and latches for rust or corrosion. Lubricate moving parts as needed.
- Roof Inspection: Ensure the asphalt roof remains intact and free of damage to maintain its waterproof capabilities.
- Stability: Regularly check that all screws and fasteners are tight. Re-secure ground anchors if the cabinet shows signs of instability.
Troubleshooting
- Doors not closing properly: Check hinges for alignment or damage. Ensure the cabinet is on a level surface. Adjust foot pads if necessary.
- Shelves are wobbly: Ensure shelves are correctly seated on all support brackets. Tighten any loose screws on the connecting rods.
- Water leakage: Inspect the roof for cracks or gaps. Ensure all panels are tightly joined and sealed. Apply a waterproof sealant if needed.
- Cabinet feels unstable: Verify that the cabinet is on a firm, level surface. Utilize the provided angle irons and ground anchors to secure it firmly.
Specifications
| Feature | Detail |
|---|---|
| Brand | PetsCosset |
| Model Number | G-F37-NEW |
| Product Dimensions | 20.5"D x 33.3"W x 69"H |
| Material | Wood, Alloy Steel |
| Color | Black |
| Item Weight | 38 Pounds |
| Water Resistance Level | Waterproof |
| Shelves | 3 Adjustable Shelves |
| Door Style | Single Hinged Door with Magnetic Closure and Lockable Feature |
Image: The PetsCosset Outdoor Garage Cabinet with key dimensions highlighted, showing its overall size and internal layout.
Warranty and Support
This product comes with a standard manufacturer's warranty against defects in materials and workmanship. For specific warranty details, claims, or technical support, please contact PetsCosset customer service through their official website or the retailer where the product was purchased.
For further assistance, please visit the PetsCosset Store on Amazon.


