1. Introduction
This manual provides comprehensive instructions for the safe and efficient operation, assembly, maintenance, and troubleshooting of your EILKOS JS2306 Cold Press Juicer Machine. Designed for extracting juice from a variety of fruits and vegetables, this slow masticating juicer is engineered for high juice yield and nutrient retention.

Image 1.1: The EILKOS JS2306 Cold Press Juicer, showcasing its design and the fresh ingredients it processes.

Image 1.2: Overview of the EILKOS Masticating Juicer's high-performance features.
2. Important Safety Information
Please read all safety instructions carefully before operating the appliance. Failure to follow these instructions may result in injury or damage to the appliance.
- Always ensure the juicer is properly assembled and all components are securely locked in place before operation.
- Do not operate the juicer if the lid is not closed or if components are misaligned. The machine features an automatic safety sensor that prevents operation under these conditions.
- Keep hands and utensils away from the feed chute during operation. Use the provided food pusher to guide ingredients.
- Unplug the juicer from the power outlet before cleaning, disassembling, or when not in use.
- Do not immerse the motor base in water or any other liquid.
- This appliance is for household use only. Do not use outdoors.
- Supervise children when the appliance is in use.

Image 2.1: The juicer's automatic safety sensor, which stops operation if the lid is opened.

Image 2.2: Diagram illustrating the security mechanisms and proper alignment for starting the juicer.
3. Setup and Assembly
Before first use, wash all detachable parts thoroughly. Ensure the juicer is placed on a stable, flat surface.
- Attach Juicing Body and the Base: Place the juicing body onto the motor base, aligning the arrows or indicators.
- Attach Filter and Then Auger: Insert the filter into the juicing body, followed by the auger. Ensure they fit snugly.
- Attach Feed Chute: Place the feed chute assembly onto the juicing body, twisting until it locks into position.
- Align the Handle with the Button: For the juicer to operate, the handle on the feed chute must be aligned with the corresponding button or marking on the base. Incorrect installation will prevent the juicer from starting.

Image 3.1: Visual guide for the 3-step assembly process of the juicer.
4. Operating Instructions
4.1 Preparing Ingredients
- Wash all fruits and vegetables thoroughly.
- The juicer features a wide feed chute, allowing you to process whole apples, cucumbers, and other large produce without extensive pre-cutting. For very fibrous vegetables like celery, it is recommended to cut them into shorter pieces to prevent tangling.
- Remove hard pits from fruits (e.g., peaches, plums) and thick skins that are not edible (e.g., pineapple, melon).

Image 4.1: The juicer's large feed chute, designed to accommodate whole fruits and vegetables.
4.2 Juicing Process
- Ensure the juicer is correctly assembled and plugged into a power outlet.
- Place a juice collection cup under the juice spout and a pulp collection container under the pulp spout.
- Turn the control knob to the "ON" position to begin continuous juicing. The 350W motor operates at a slow 70 RPM, ensuring thorough extraction and minimal noise (below 60dB).
- Gradually feed prepared ingredients into the wide feed chute. Use the food pusher only if necessary to gently guide ingredients. Avoid forcing ingredients.
- The slow masticating process, featuring a dual-force spiral and 360° toothed press, extracts juice efficiently, resulting in high yield and nutrient-dense juice.
- Once juicing is complete, turn the control knob to the "OFF" position and unplug the appliance.

Image 4.2: The control knob for simple operation, including ON for continuous juicing and REVERSE for clearing blockages.

Image 4.3: Illustration of the juicer's high juice yield capability, showing efficient extraction.

Image 4.4: The juicer's quiet operation, with noise levels below 60dB.
4.3 Reverse Function
If ingredients become jammed or the juicer stops, turn the control knob to the "REV" (Reverse) position. This will rotate the auger in the opposite direction to clear any blockages. After clearing, return the knob to "OFF" and then "ON" to resume juicing.
5. Maintenance and Cleaning
Regular cleaning ensures optimal performance and longevity of your juicer. Clean the appliance immediately after each use.
- Disassemble: Unplug the juicer. Disassemble the feed chute, auger, filter, and juicing body from the motor base.
- Rinse: Rinse all detachable parts under running water to remove pulp residue. Use the cleaning brush (if included) for the filter mesh.
- Clean: All detachable components are dishwasher-friendly and BPA-free. For optimal longevity, hand washing with mild soap and water is also recommended. Do not wash the motor base in the dishwasher or immerse it in water. Wipe the motor base with a damp cloth.
- Dry: Allow all parts to air dry completely before reassembling or storing.

Image 5.1: Illustration of the easy cleaning process by rinsing detachable parts.

Image 5.2: The juicer's detachable parts are dishwasher-safe for convenient cleaning.
6. Troubleshooting
| Problem | Possible Cause | Solution |
|---|---|---|
| Juicer does not start. |
|
|
| Juicer stops during operation. |
|
|
| Low juice yield or wet pulp. |
|
|
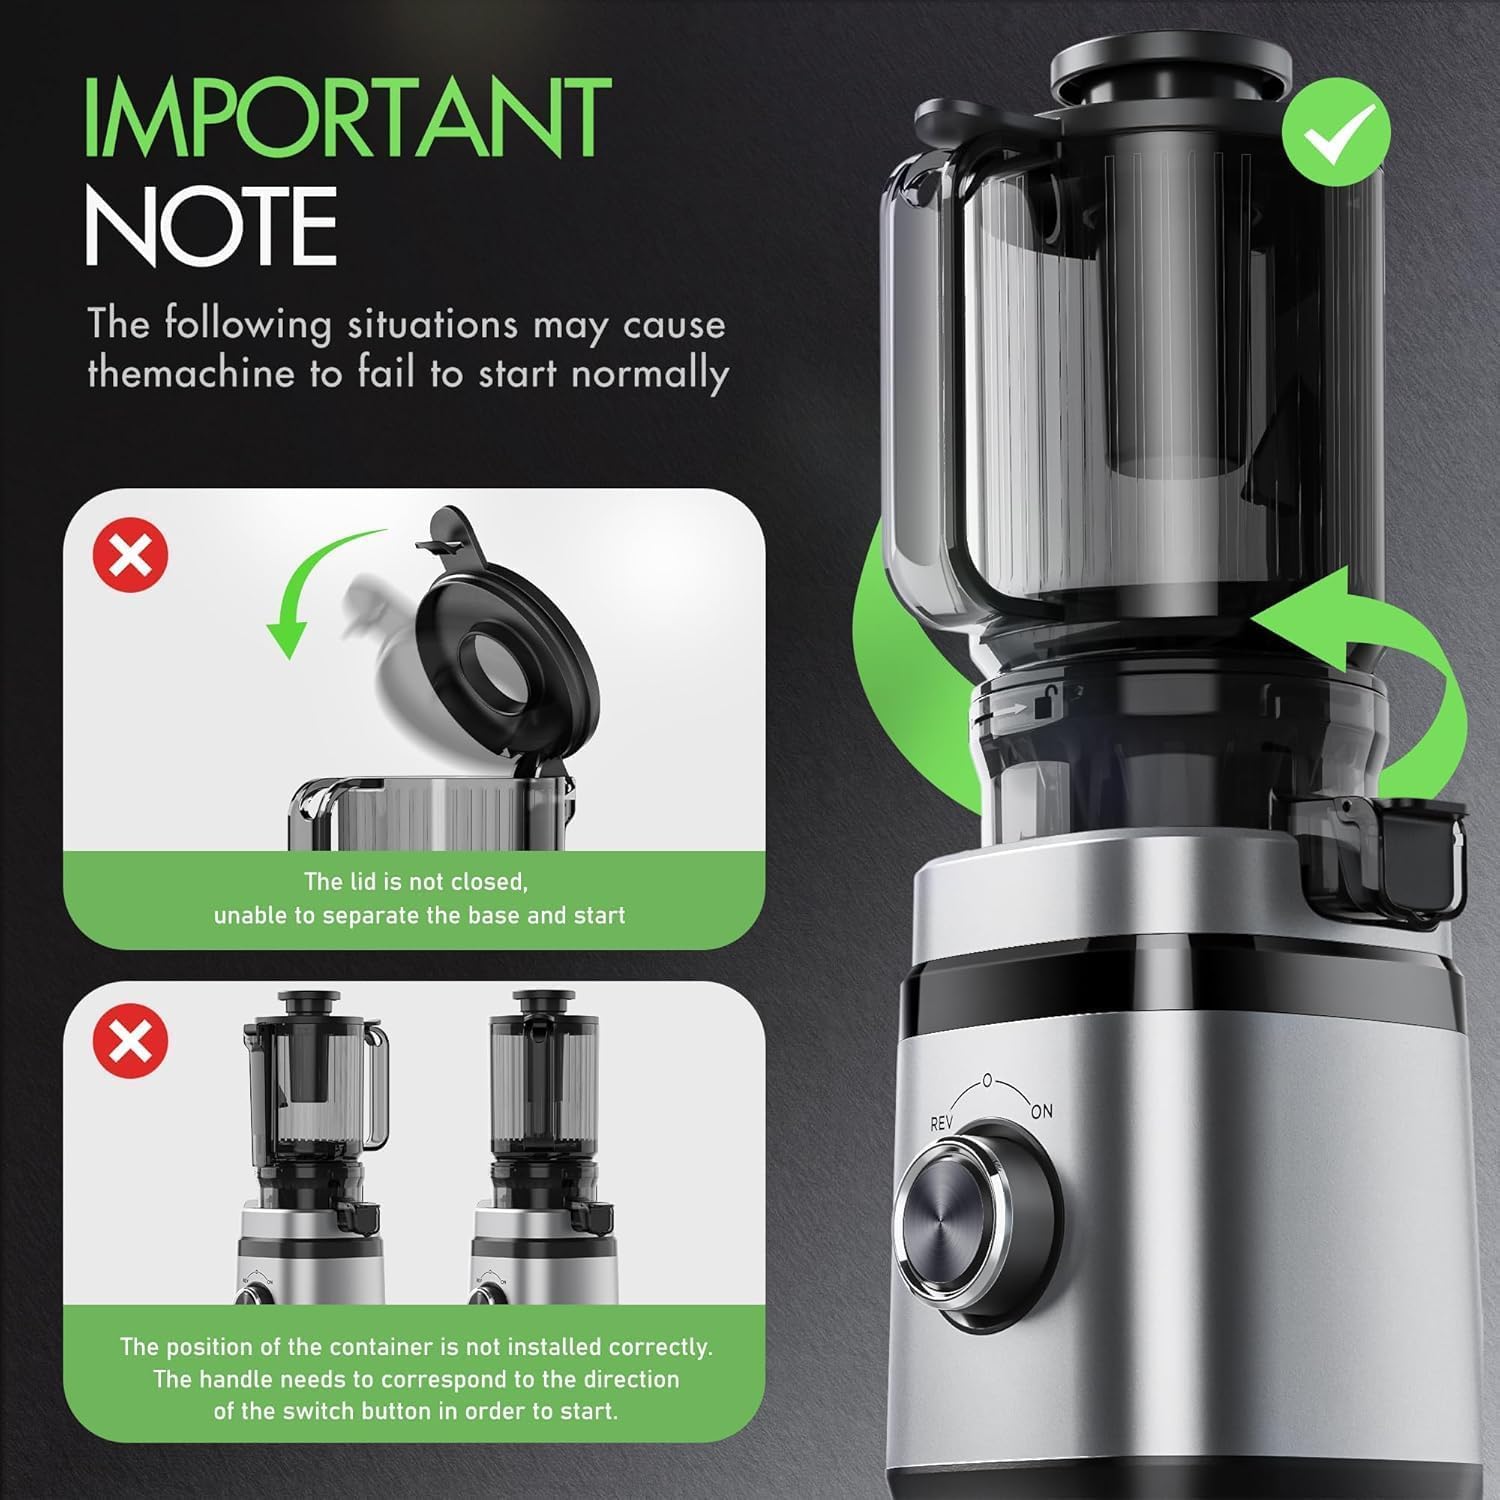
Image 6.1: Visual guide on common reasons for the juicer failing to start, emphasizing correct assembly and lid closure.
7. Specifications
- Brand: EILKOS
- Model Name: Cold Press Juicer
- Item Model Number: JS2306
- Color: Silver
- Special Feature: Cold Press
- Product Dimensions: 8.5"D x 6.7"W x 16.5"H
- Finish Type: Polished
- Recommended Uses: Juicing Fruits, Juicing Vegetables, Making Fresh Juice
- Capacity: 3.8 Pounds (approximate ingredient capacity)
- Maximum Power: 350 Watts
- Power Source: Electric
- Blade Material: Stainless Steel
- Voltage: 120 Volts
- Number of Speeds: 1
- Item Weight: 4.7 pounds
8. Warranty and Support
Your EILKOS JS2306 Cold Press Juicer is designed for reliable performance. For detailed warranty information, please refer to the product packaging or the official EILKOS website.
EILKOS provides 24/7 customer support for any questions or assistance you may need. Digital recipes are also available to help you get started with your juicing journey.
For further assistance, please visit the official EILKOS store: EILKOS Store on Amazon