1. Introduction
Thank you for choosing the NoteBuddy Selfie Monitor Screen Phone. This device is designed to enhance your mobile photography and videography experience, particularly when using your phone's rear camera for selfies, vlogging, and live streaming. This manual provides essential information on setting up, operating, and maintaining your monitor to ensure optimal performance.
2. Package Contents
Please verify that all items are present in your package:
- NoteBuddy Selfie Monitor Screen Phone
- Wireless Bluetooth Remote Control
- Magnetic Iron Sheet (for non-MagSafe compatible phones)
- Type-C Charging Cable
- User Manual (this document)

Image 2.1: Contents of the NoteBuddy Selfie Monitor package, including the monitor, remote, magnetic ring, and charging cable.
3. Product Overview
The NoteBuddy Selfie Monitor features a 4-inch HD display, magnetic attachment, and wireless connectivity to your mobile phone. It allows you to view your phone's rear camera feed in real-time, ensuring precise framing for high-quality photos and videos.
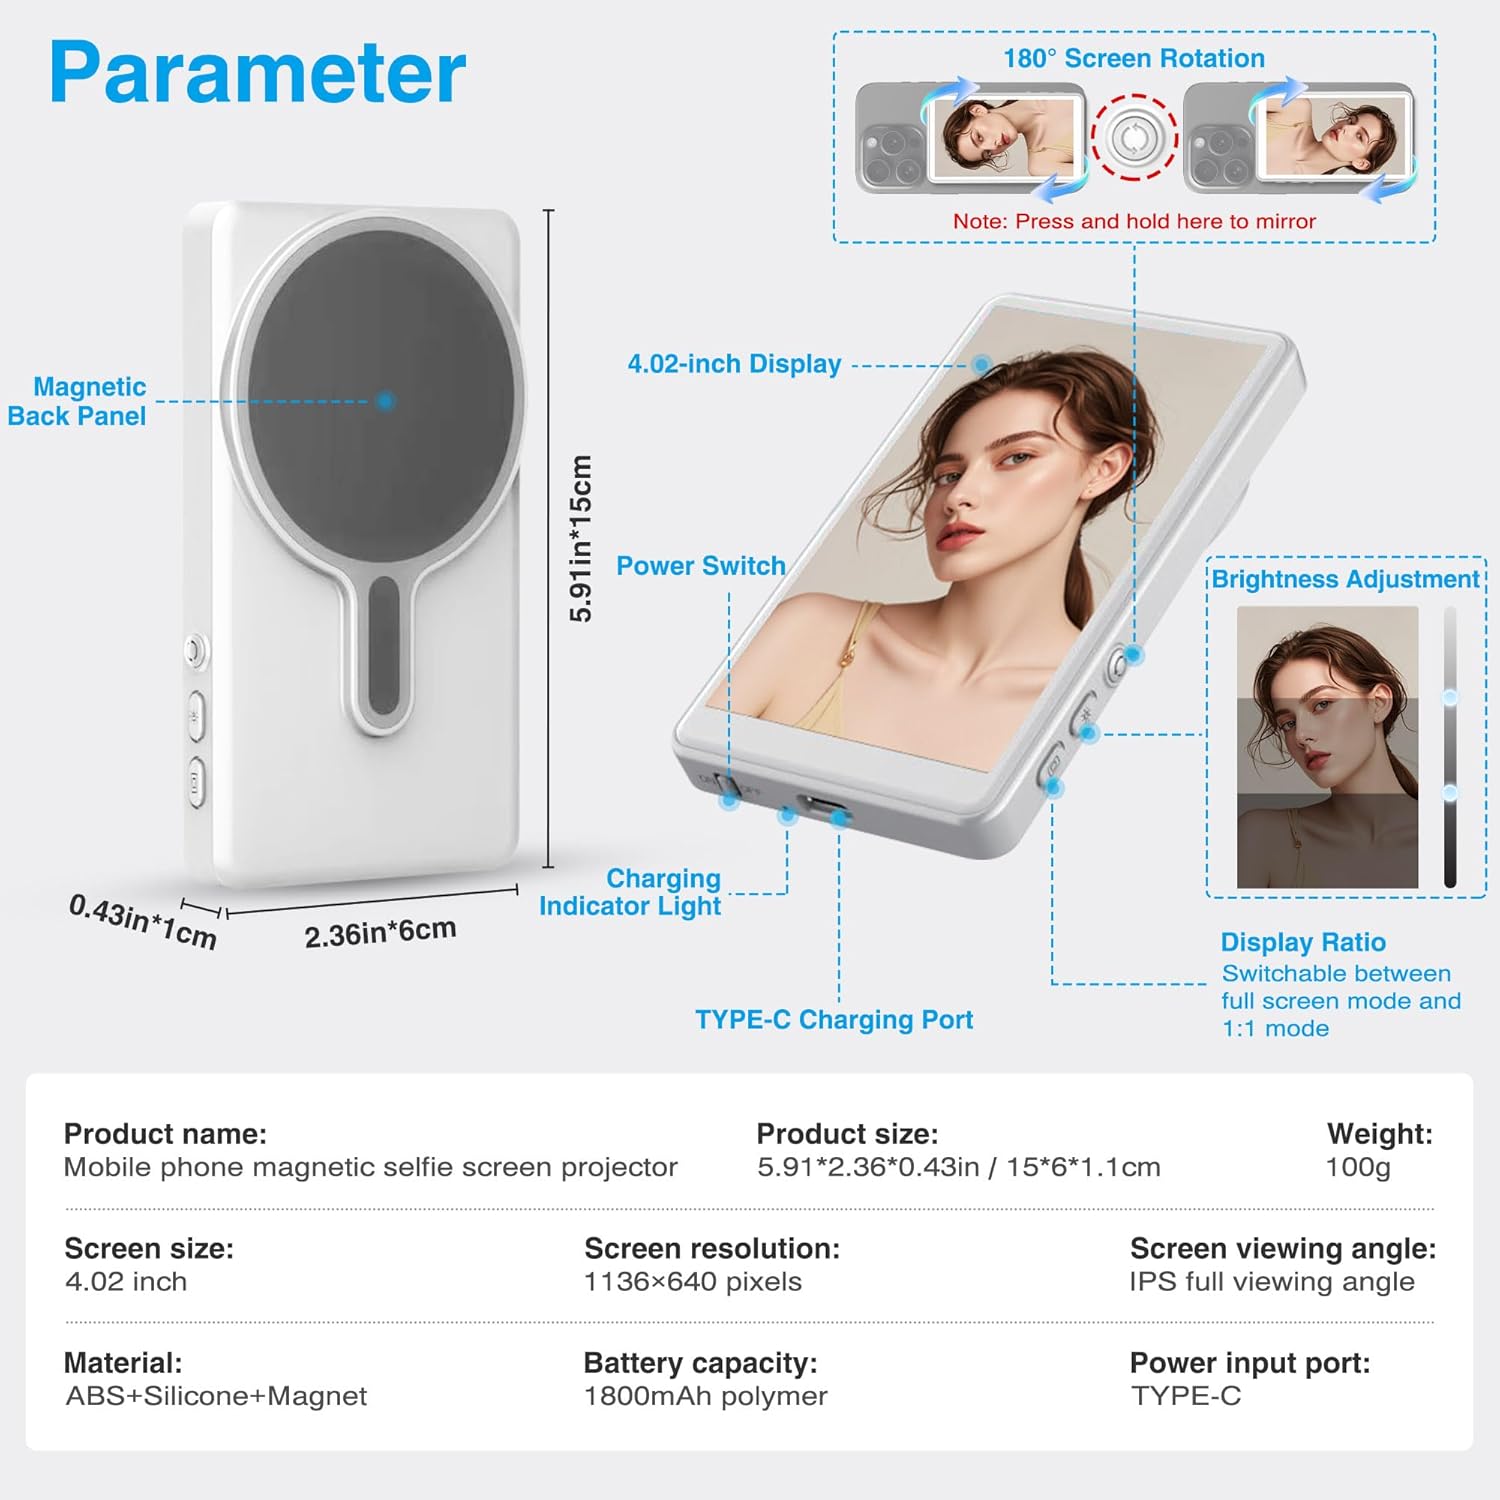
Image 3.1: Detailed diagram of the NoteBuddy Selfie Monitor, highlighting the magnetic back panel, power switch, charging indicator light, Type-C charging port, 4.02-inch display, and brightness adjustment buttons.
Key Features:
- 4-inch HD Display: Provides a clear 1136x640 pixel view of your phone's camera feed.
- Magnetic Attachment: Securely attaches to MagSafe-compatible phones or via the included magnetic iron sheet.
- Wireless Connectivity: Connects wirelessly to your mobile phone for real-time screen sharing with ultra-low latency.
- Bluetooth Remote Control: Enables remote photo and video capture from up to 30 feet away.
- Screen Flip Function: One-click screen rotation to adjust display orientation.
- Adjustable Brightness: Three levels of brightness for optimal viewing in various lighting conditions.
- Portable Design: Compact and lightweight (approx. 100g) for easy transport.
- 1800mAh Battery: Offers extended usage time on a single charge.
4. Setup
4.1 Charging the Monitor
- Connect the provided Type-C charging cable to the monitor's charging port.
- Connect the other end of the cable to a compatible USB power source (e.g., wall adapter, power bank, laptop).
- The charging indicator light will illuminate during charging and turn off when fully charged.
4.2 Attaching to Your Phone
- For MagSafe-compatible phones (iPhone 12 series and newer): Simply align the monitor's magnetic back panel with the back of your phone. The strong magnets will secure it in place.
- For other phones (including Android and older iPhones):
- Clean the back surface of your phone or phone case thoroughly.
- Peel off the protective film from the adhesive side of the magnetic iron sheet.
- Carefully center and press the magnetic iron sheet onto the back of your phone or case. Ensure it is firmly attached.
- Once the magnetic iron sheet is applied, the monitor can be magnetically attached to it.
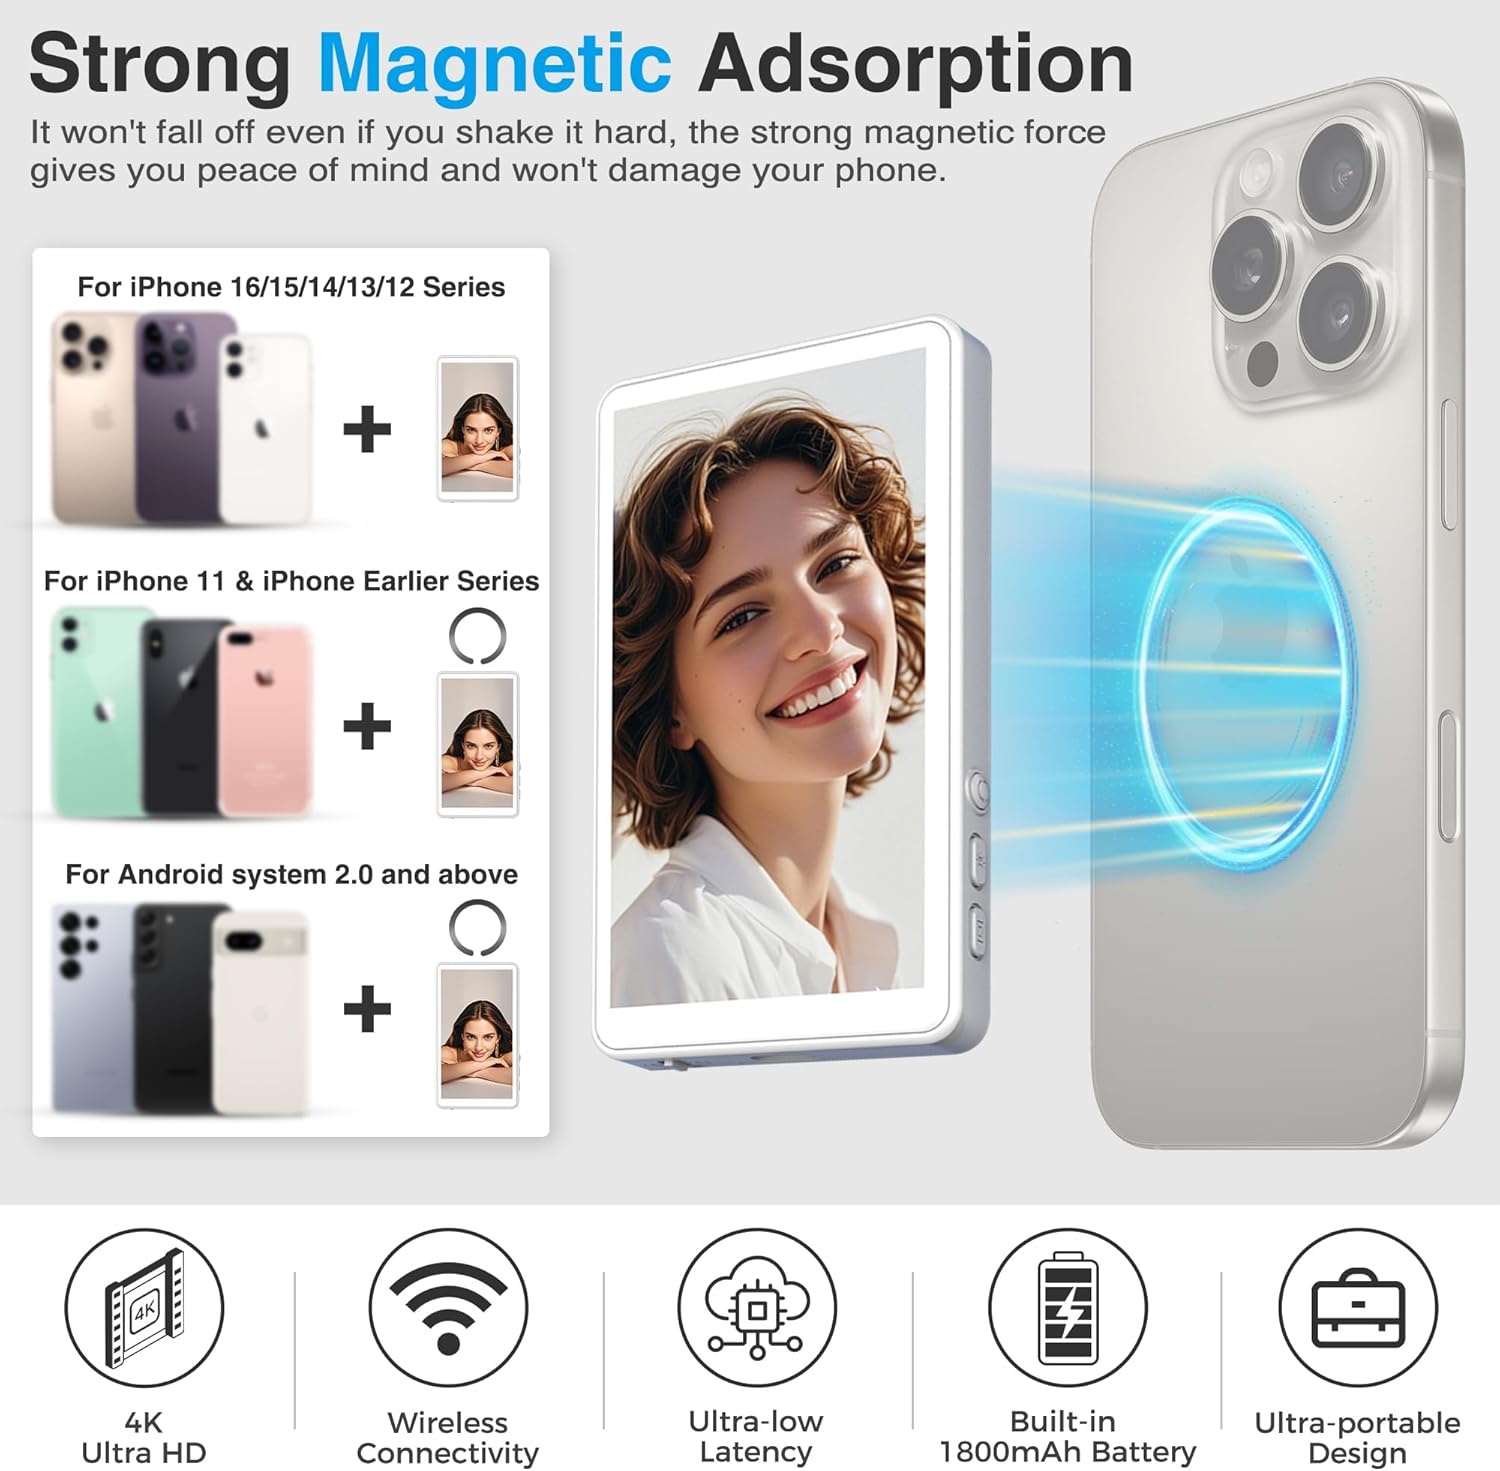
Image 4.1: Illustration of the NoteBuddy Selfie Monitor's strong magnetic adsorption to a smartphone, demonstrating secure attachment.
4.3 Connecting to Your Mobile Phone (Wireless)
- Power on the NoteBuddy Selfie Monitor using the power switch.
- On your mobile phone, navigate to your Wi-Fi settings.
- Look for a Wi-Fi network named "iScreen_P2P" and connect to it. No password is typically required.
- Once connected, your phone's screen will be mirrored onto the NoteBuddy monitor.
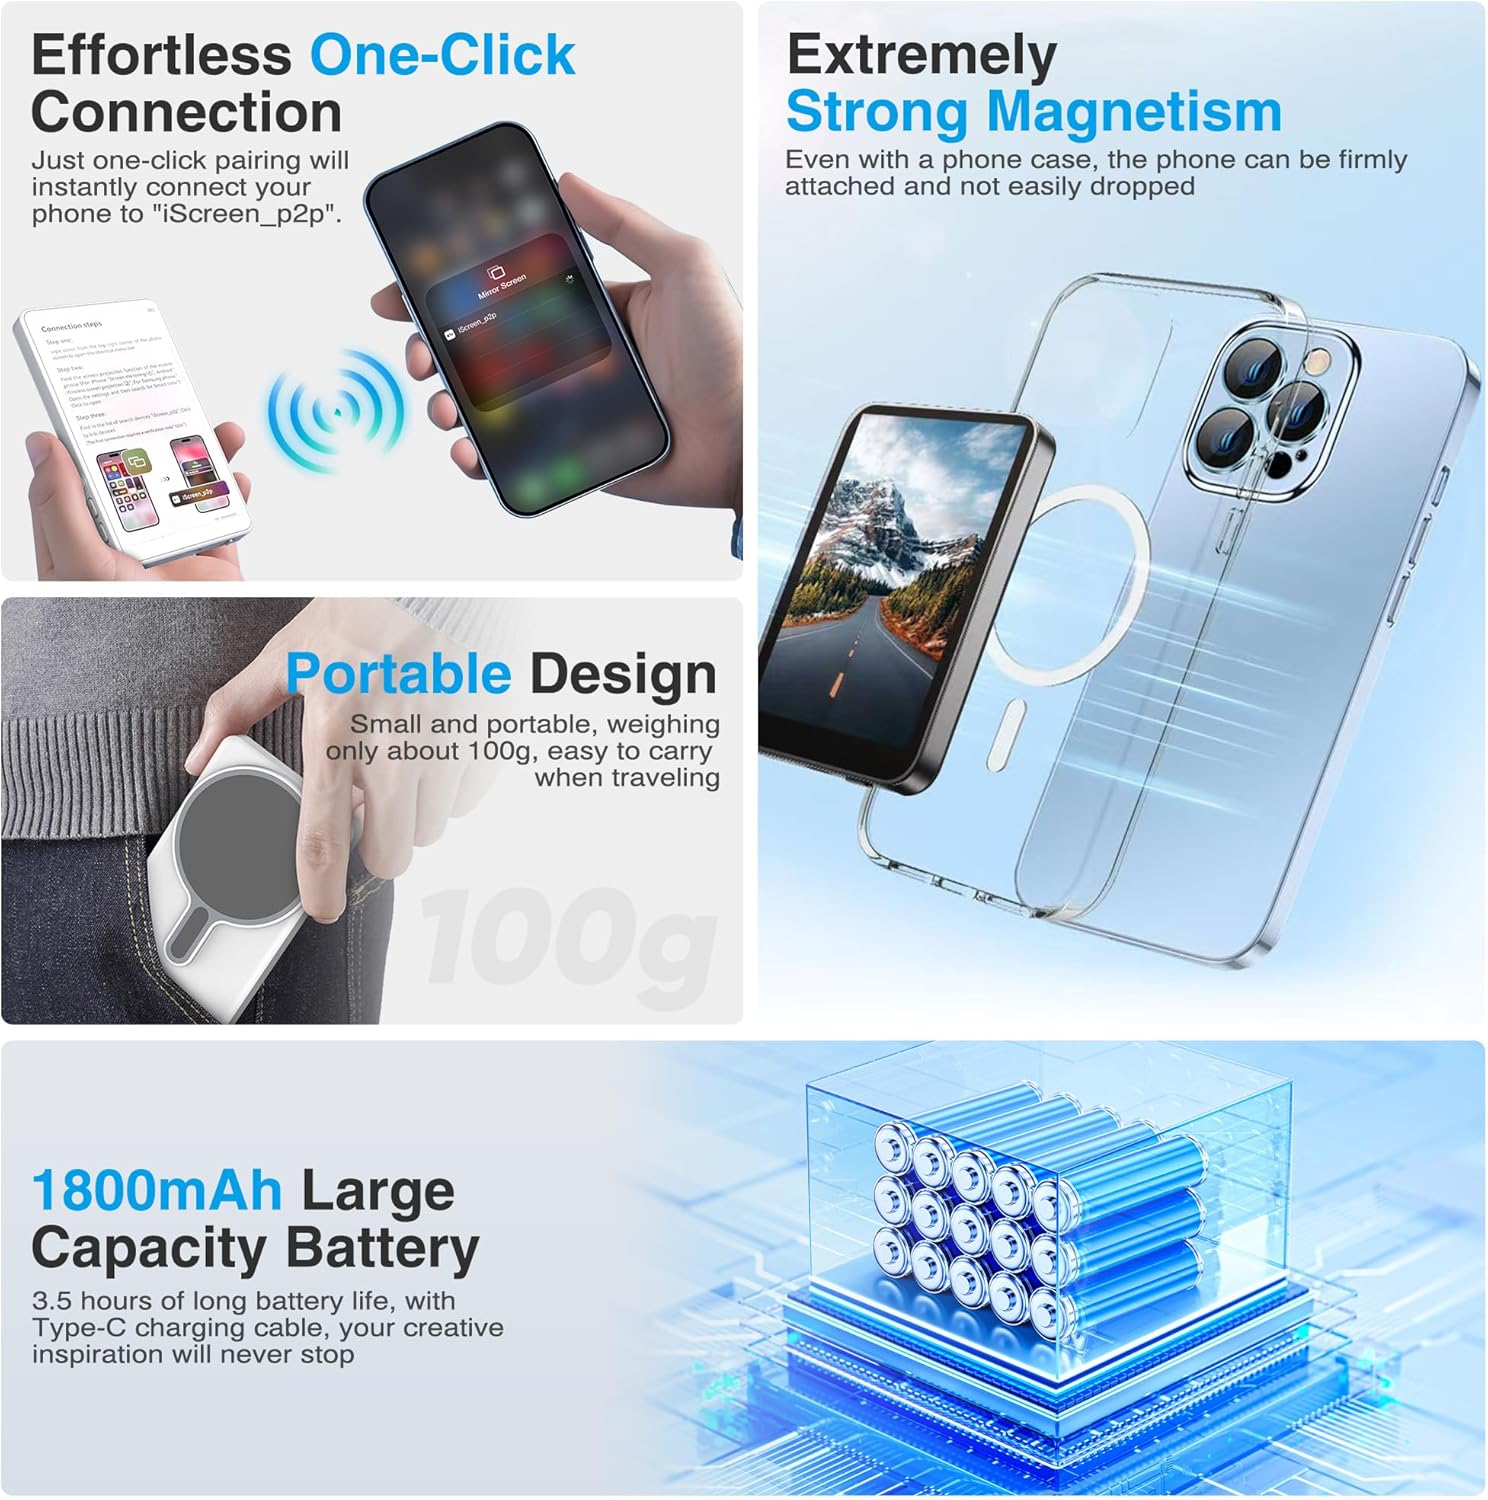
Image 4.2: Visual representation of the one-click connection process, showing a phone connecting to the "iScreen_P2P" network for wireless display mirroring.
4.4 Pairing the Bluetooth Remote Control
- Ensure the remote control has a working battery.
- On your mobile phone, enable Bluetooth and go to Bluetooth settings.
- Press and hold the button on the remote control until its indicator light starts flashing, indicating pairing mode.
- Select the remote control from the list of available devices on your phone to pair.
- Once paired, the remote control can be used to trigger your phone's camera shutter.

Image 4.3: A person using the Bluetooth remote control to capture content with a phone mounted on a tripod, illustrating the 30-foot effective range.
5. Operating Instructions
5.1 Power On/Off
- To power on, press and hold the power switch until the screen illuminates.
- To power off, press and hold the power switch until the screen turns off.
5.2 Using the Rear Camera for Selfies/Vlogging
Once the monitor is connected and mirroring your phone's screen, open your phone's camera application. Switch to the rear camera. The monitor will display the rear camera's live feed, allowing you to frame your shots accurately and capture higher-quality content.

Image 5.1: Comparison showing the improved clarity and detail when using the phone's rear camera for selfies with the NoteBuddy monitor, compared to a front camera selfie.
5.3 Screen Flip Function
The monitor features a one-click screen flip function. Press the designated button (refer to Image 3.1 for location) to rotate the display 180 degrees. This is useful if the screen orientation appears inverted due to your phone's camera app or mounting position.
5.4 Adjusting Brightness
The monitor offers three levels of adjustable brightness. Use the brightness adjustment buttons (refer to Image 3.1) to cycle through the brightness settings to suit your environment, especially for outdoor use.
5.5 Using the Bluetooth Remote Control
After pairing the remote control (Section 4.4), you can use it to remotely trigger your phone's camera shutter button. This allows for hands-free photo and video capture, ideal for group shots, vlogging, or when your phone is mounted on a tripod.

Image 5.2: Examples of how the NoteBuddy Selfie Monitor can be used for live streaming, fitness videos, travel vlogging, and social event photography.
6. Maintenance
- Cleaning: Use a soft, dry, lint-free cloth to clean the monitor screen and body. Do not use liquid cleaners or abrasive materials.
- Storage: Store the monitor in a cool, dry place away from direct sunlight and extreme temperatures.
- Battery Care: To prolong battery life, avoid fully discharging the battery frequently. Charge the device regularly, even if not in use for extended periods.
- Magnetic Attachment: Ensure the magnetic surfaces are clean and free of debris to maintain strong adhesion.
7. Troubleshooting
| Problem | Possible Cause | Solution |
|---|---|---|
| Monitor does not power on. | Low battery. | Charge the monitor using the provided Type-C cable. |
| No display or screen mirroring. | Not connected to "iScreen_P2P" Wi-Fi network. | Ensure the monitor is powered on and connect your phone to the "iScreen_P2P" Wi-Fi network in your phone's settings. |
| Screen display is inverted. | Incorrect screen orientation. | Press the screen flip button on the monitor to rotate the display 180 degrees. |
| Bluetooth remote control not working. | Remote not paired or battery low. | Re-pair the Bluetooth remote control with your phone (refer to Section 4.4). Check or replace the remote's battery. |
| Magnetic attachment is weak. | Dirty magnetic surfaces or incorrect placement of magnetic iron sheet. | Clean the magnetic surfaces on both the monitor and your phone/case. Ensure the magnetic iron sheet is properly centered and firmly attached. |
8. Specifications
| Feature | Detail |
|---|---|
| Model Name | selfie-Wrey |
| Screen Size | 4.02 Inches (11 cm diagonal) |
| Screen Resolution | 1136 x 640 pixels |
| Battery Capacity | 1800mAh Polymer |
| Charging Port | Type-C |
| Material | ABS + Silicone + Magnet |
| Item Weight | Approx. 100g (0.22 lbs) |
| Package Dimensions | 5 x 3.66 x 1.34 inches (12.7 x 9.3 x 3.4 cm) |
| Product Dimensions | 5.91 x 2.36 x 0.43 inches (15 x 6 x 1.1 cm) |
| Wireless Connectivity | Wi-Fi (iScreen_P2P) |
| Remote Control | Bluetooth (up to 30ft/9m range) |
9. Warranty and Support
NoteBuddy products are designed for reliability and performance. For warranty information, please refer to the warranty card included with your purchase or visit the official NoteBuddy website. If you encounter any issues or have questions regarding your NoteBuddy Selfie Monitor, please contact our customer support team through the retailer where you purchased the product or via the contact information provided on our website.
Please retain your proof of purchase for warranty claims.


