1. Introduction
Thank you for choosing VIANIS Motion Sensor Outdoor Lights. This manual provides detailed instructions for the safe installation, operation, and maintenance of your new wall mount and ceiling lights. Please read this manual thoroughly before installation and keep it for future reference.
These outdoor lights feature advanced PIR motion sensing technology and photocell sensors, offering intelligent lighting solutions for various outdoor areas. The system includes both a wall-mounted lantern and a ceiling-mounted fixture, both controllable via a remote.
2. Important Safety Information
Always follow basic safety precautions when installing or working with electrical products to reduce the risk of fire, electric shock, and personal injury.
- Disconnect Power: Always turn off the power at the circuit breaker or fuse box before installation, servicing, or changing bulbs.
- Qualified Electrician: If you are unsure about the installation process, consult a qualified electrician.
- Grounding: Ensure the fixture is properly grounded to avoid potential electrical shock.
- Wiring: All wiring connections must be in accordance with local and national electrical codes.
- Bulb Type: Use only dimmable LED bulbs or incandescent bulbs with the standard E26 socket to ensure compatibility and prevent flickering. Bulbs are not included.
- Outdoor Use: These fixtures are designed for outdoor use and are weather-resistant. However, ensure all connections are sealed properly to prevent water ingress.
3. Product Overview and Components
Your VIANIS outdoor lighting system includes a wall-mounted lantern and a ceiling-mounted fixture, both equipped with motion and dusk-to-dawn sensors, and a remote control for convenient adjustments.

Figure 1: Wall Mount Lantern Details. This image shows the dimensions (12.6 inches height, 5.9 inches width, 5.9 inches depth, 4.4 inches wall plate width) and key features of the wall mount lantern, including clear water glass, black finish with gold trim, crossbar mount plate, and a standard E26 socket. It highlights integrated dusk-to-dawn and motion sensors, 100% aluminum anti-rust and waterproof construction, unique water ripple glass shade, and auto on/off & dim for energy saving.

Figure 2: Ceiling Light Dimensions and Features. This image displays the dimensions of the ceiling light (11 inches / 28 cm width and depth, 5.2 inches / 13.2 cm height). It also shows the remote control, which requires 2x AAA batteries (not included). Key features include a UV-coated metal body, tempered clear glass, a high-sensitivity PIR motion sensor, and a sealed design for lasting cleanliness.
4. Specifications
| Feature | Description |
|---|---|
| Brand | VIANIS |
| Model | V81011KG-V8901-PIR-BK-P1 |
| Material | 100% Aluminum (Anti-Rust) |
| Sensor Type | PIR Motion Sensor, Photocell (Dusk-to-Dawn) |
| Motion Sensor Range | Up to 40 ft distance, 220 degrees (adjustable 6-26 feet for ceiling light) |
| Bulb Socket | Standard E26 (Bulbs not included) |
| Compatible Bulbs | Dimmable LED bulbs or Incandescent bulbs |
| Weather Resistance | Waterproof, Sunproof, Snowproof, Stormproof |
| Remote Control | Included, requires 2x AAA batteries (not included) |
5. Installation and Setup
The VIANIS outdoor lanterns are designed for quick installation and come pre-assembled. No self-assembly of the fixture body is required.
5.1 Before Installation
- Ensure the power supply is turned off at the main circuit breaker.
- Unpack the fixture carefully and inspect for any damage.
- Prepare necessary tools: screwdriver, wire strippers, electrical tape, ladder (if installing at height).
- Ensure you have compatible E26 dimmable LED or incandescent bulbs (not included).
5.2 Wiring Instructions
- Turn off power at the circuit breaker.
- Mount the crossbar mount plate to the junction box using the provided screws.
- Connect the fixture's wires to your house wiring:
- Connect the black wire (Live) from the fixture to the black wire from the junction box.
- Connect the white wire (Neutral) from the fixture to the white wire from the junction box.
- Connect the green or bare copper wire (Ground) from the fixture to the ground wire from the junction box.
- Carefully tuck all wires into the junction box.
- Attach the fixture body to the crossbar mount plate, securing it with the provided screws.
- Install the E26 bulb(s) into the socket(s). The open bottom design allows for easy bulb replacement without tools.
- Restore power at the circuit breaker.
5.3 Remote Control Setup
- Open the battery compartment on the back of the remote control.
- Insert 2x AAA batteries (not included), ensuring correct polarity.
- Close the battery compartment.

Figure 3: Installed Lights Application. This image illustrates both the wall mount and ceiling lights installed on the exterior of a house, showcasing their aesthetic and functional integration into an outdoor living space. It highlights the 5 working modes, remote control, dimmable feature, weather resistance, and quick install.
6. Operating Instructions
The VIANIS outdoor lights feature intelligent motion and dusk-to-dawn sensors, along with a remote control for customized settings.
6.1 Automatic Sensor Operation (Default)
- Dusk-to-Dawn (Photocell): The lights will automatically turn ON at sunset and OFF at dawn.
- Motion Activation: When set to an automatic mode, the lights will respond to detected motion.
6.2 Remote Control Functions
The remote control allows for easy adjustment of various settings without needing to physically access the light fixtures.
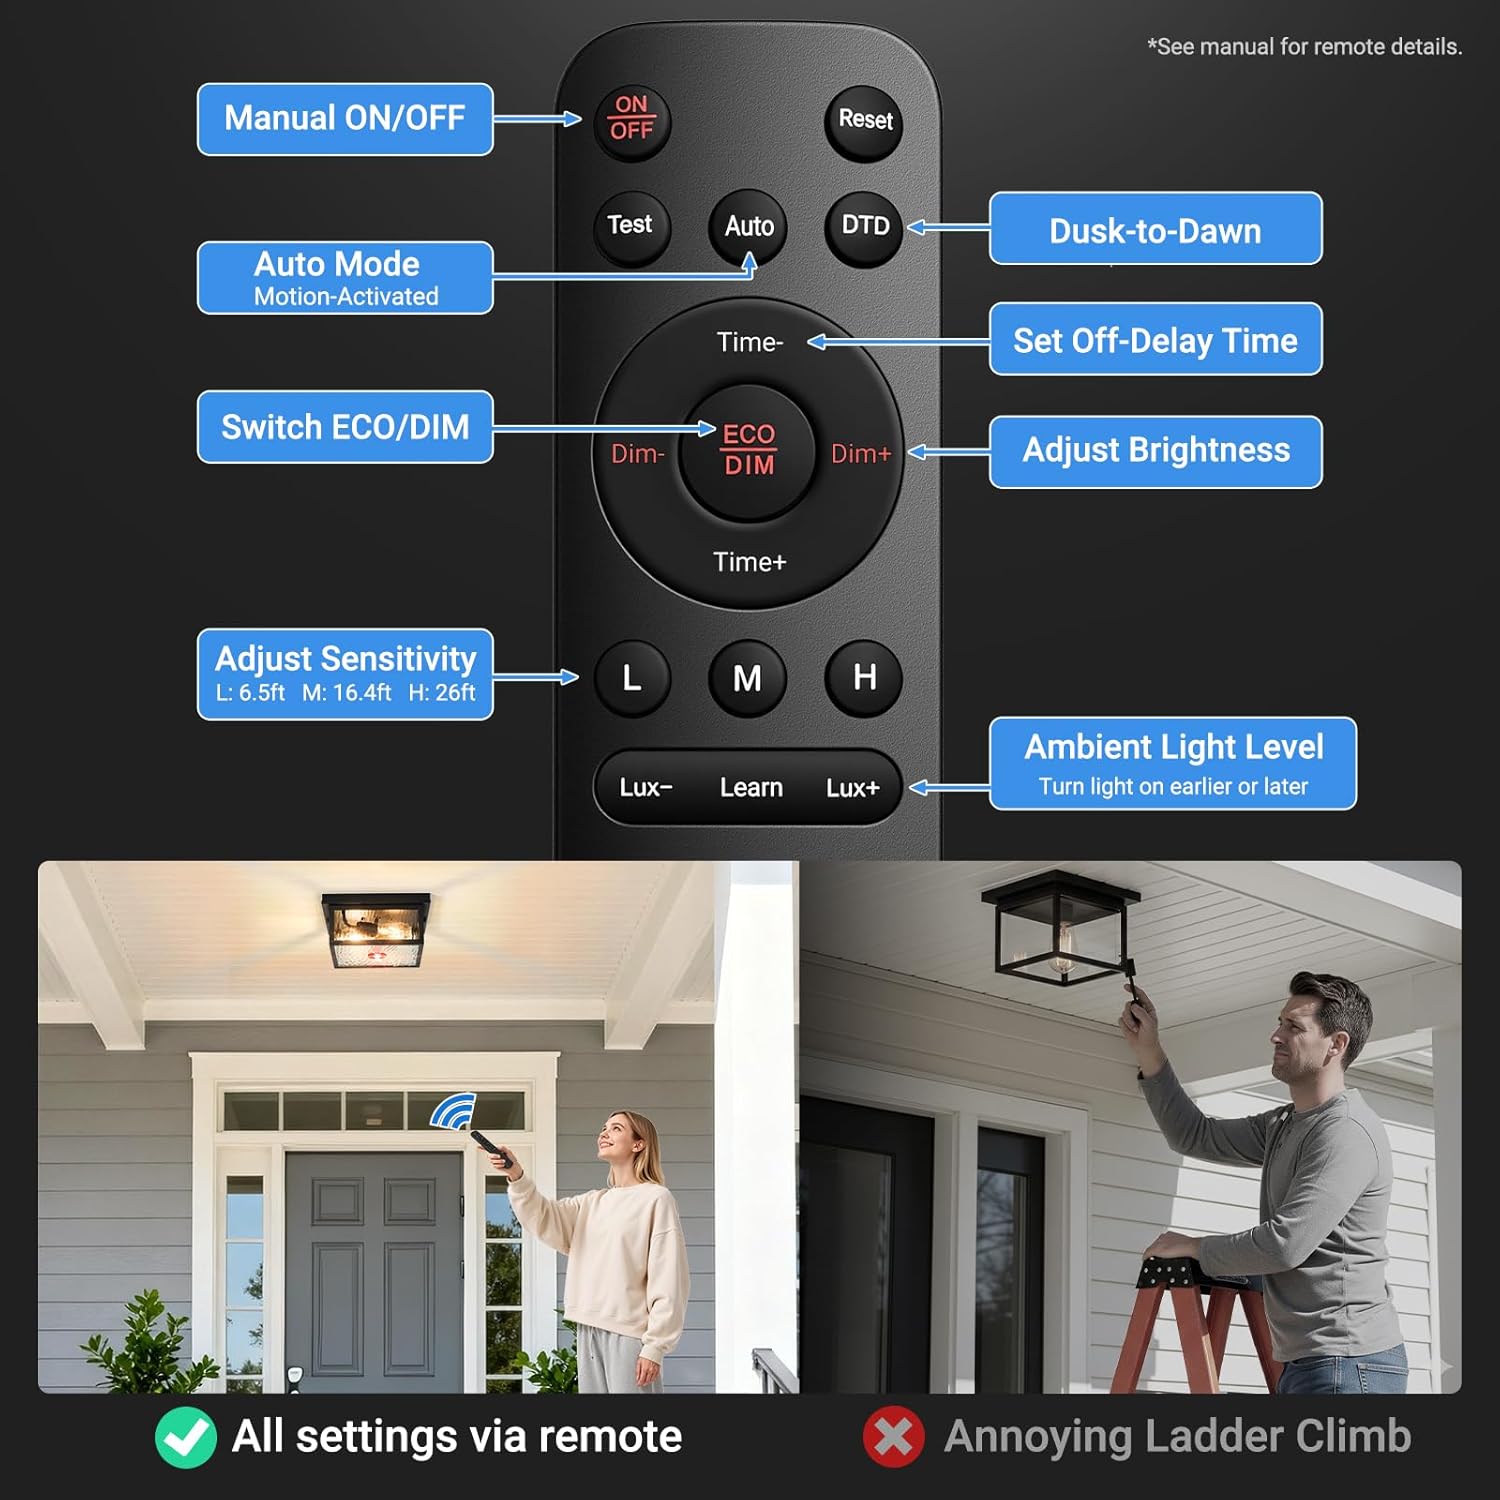
Figure 4: Remote Control Overview. This diagram details the functions of each button on the remote control. It includes Manual ON/OFF, Auto Mode (Motion-Activated), Dusk-to-Dawn (DTD), Set Off-Delay Time (Time+/-), Switch ECO/DIM, Adjust Brightness (Dim+/-), Adjust Sensitivity (L, M, H for 6.5ft, 16.4ft, 26ft respectively), and Ambient Light Level (Lux-/Lux+ to turn light on earlier or later). The image also shows a user operating the remote, emphasizing that all settings are via remote, avoiding ladder climbs.
Remote Buttons and Their Functions:
- ON/OFF: Manual control to turn the lights on or off.
- Test: Activates a test mode for motion sensor functionality.
- Auto: Engages the motion-activated mode.
- DTD (Dusk-to-Dawn): Activates the dusk-to-dawn sensor.
- Time+/-: Adjusts the duration the light stays on after motion detection (off-delay time).
- Dim/ECO: Toggles between DIM mode and ECO mode.
- Dim+/-: Adjusts the brightness level in DIM mode or the initial dim level.
- L/M/H (Sensitivity): Adjusts the motion sensor sensitivity (L: 6.5ft, M: 16.4ft, H: 26ft).
- Lux-/Lux+ (Ambient Light Level): Adjusts the ambient light threshold for the dusk-to-dawn sensor, allowing the light to turn on earlier or later.
- Reset: Resets the remote settings to default.
6.3 Lighting Modes
The lights offer several operational modes, primarily controlled via the remote.

Figure 5: Remote-Controlled Modes. This image illustrates three primary lighting modes: DIM Mode, where the light stays at 10-30% brightness when idle and switches to full brightness upon motion detection; ECO Mode, where the light is completely off when unoccupied and turns on at night when motion is detected; and DTD Mode, which ensures the light automatically turns off at dawn and on at dusk.
- DIM Mode:
- At sunset, the light turns on at a dim level (e.g., 30% brightness).
- When motion is detected, the light activates to 100% brightness.
- After 2 minutes without motion, it reverts to the dim level.
- ECO Mode:
- The light remains off when no motion is detected.
- At night, when motion is detected, the light turns on to 100% brightness.
- After a set period without motion, the light turns off completely.
- DTD (Dusk-to-Dawn) Mode:
- The light automatically turns on at dusk and off at dawn.
- This mode typically works in conjunction with motion sensing, or can be set for continuous illumination.
- Manual Override Mode:

Figure 6: Manual Override Mode. This image depicts a house with its outdoor lights illuminated, demonstrating the manual override mode. To activate, turn the light OFF and then ON within 2 seconds. In this mode, the lights stay on at 100% brightness for 8 hours, then turn off at dawn and return to AUTO mode.
- To activate: Turn the light OFF and then ON again within 2 seconds using the wall switch.
- The light will stay on at 100% brightness for 8 hours.
- After 8 hours, or at dawn, the light will turn off and return to the previously set AUTO mode.
6.4 Ceiling Light Specific Controls
The ceiling light offers additional customizable solutions via the remote:
- Adjustable Detection Range: Set between 6-26 feet to minimize false triggers.
- Adjustable Brightness: Choose between 20% (soft light), 70% (animal deterrence), or 100% (maximum security illumination).
- Preset Continuous Illumination Duration: Set for 1-10 minutes to adapt to various activities.
7. Maintenance
Regular maintenance ensures optimal performance and longevity of your VIANIS outdoor lights.
7.1 Cleaning
- Disconnect Power: Always turn off power at the circuit breaker before cleaning.
- Fixture Exterior: Wipe the fixture with a soft, damp cloth. Do not use abrasive cleaners or solvents, as they may damage the finish.
- Glass Panels: Clean glass panels with a mild glass cleaner and a soft cloth.
- Sensors: Ensure the motion sensor and photocell lens are clean and free from obstructions (dirt, leaves, spiderwebs) for proper operation.
7.2 Bulb Replacement
- Disconnect Power: Turn off power at the circuit breaker.
- Cool Down: Allow the bulb to cool completely before touching it.
- Remove Old Bulb: Unscrew the old E26 bulb. The open bottom design of the fixtures makes this process tool-free.
- Install New Bulb: Screw in a new E26 dimmable LED or incandescent bulb.
- Restore Power: Turn power back on at the circuit breaker.
7.3 Weather Resistance
The fixtures are constructed from 100% aluminum and are designed to be waterproof, sunproof, snowproof, and stormproof, ensuring durability in various weather conditions.

Figure 7: Ceiling Light Weather Resistance. This image highlights the weather-resistant properties of the ceiling light, indicating it is waterproof, sunproof, snowproof, and stormproof.

Figure 8: Wall Light Weather Resistance. This image highlights the weather-resistant properties of the wall mount light, indicating it is waterproof, sunproof, snowproof, and stormproof, and made from 100% anti-rust aluminum.
8. Troubleshooting
If you encounter issues with your VIANIS outdoor lights, refer to the following common problems and solutions:
| Problem | Possible Cause | Solution |
|---|---|---|
| Light does not turn on. | No power; faulty bulb; sensor obstructed; incorrect wiring. | Check circuit breaker. Replace bulb. Clean sensor lens. Verify wiring connections. |
| Light flickers. | Incompatible bulb type (non-dimmable LED); loose bulb. | Ensure a dimmable LED or incandescent bulb is used. Tighten bulb. |
| Motion sensor not working or too sensitive. | Sensor obstructed; incorrect sensitivity setting; ambient light interference. | Clean sensor lens. Adjust sensitivity (L/M/H) via remote. Adjust Lux setting via remote. |
| Light stays on continuously. | Manual override mode active; continuous motion detected; incorrect mode setting. | Check if manual override is active (turn OFF/ON wall switch). Ensure no constant motion. Check remote mode settings. |
| Remote control not responding. | Dead batteries; out of range; signal obstruction. | Replace AAA batteries. Ensure you are within range. Remove obstructions between remote and light. |
9. Warranty and Support
For warranty information or technical support, please refer to the product packaging or contact VIANIS customer service directly. Contact details are typically available on the manufacturer's website or through your purchase platform.
Please retain your proof of purchase for any warranty claims.