Introduction
This manual provides detailed instructions for the safe and effective operation of your YIYEIE Digital Torque Adapter, Model Y0095-98. Please read this manual thoroughly before using the device to ensure proper function and to prevent damage or injury. Keep this manual for future reference.
Safety Information
- Always wear appropriate personal protective equipment, such as safety glasses, when using torque tools.
- Ensure the adapter is securely attached to your drive tool and socket before applying torque.
- Do not exceed the maximum torque capacity of the adapter (12.5-250 Ft-lb / 17-340 Nm).
- Avoid dropping the device, as this may affect its accuracy and functionality.
- When installing batteries, ensure correct polarity. Remove batteries if the device will not be used for an extended period to prevent leakage and potential damage.
- Keep the device away from water, extreme temperatures, and corrosive substances.
Package Contents
Verify that all items are present in your package:
- YIYEIE Digital Torque Adapter (Model Y0095-98)
- 1/2" Adapter to 1/4" Adapter
- 1/2" Adapter to 3/8" Adapter
- Storage Case
- User Manual
- Batteries (Alkaline)
- Small Screwdriver for battery compartment

Product Overview
The YIYEIE Digital Torque Adapter converts any standard ratchet or breaker bar into a precision digital torque wrench. It features a clear digital display, multiple measurement units, and audible/visual alerts for reaching target torque values.
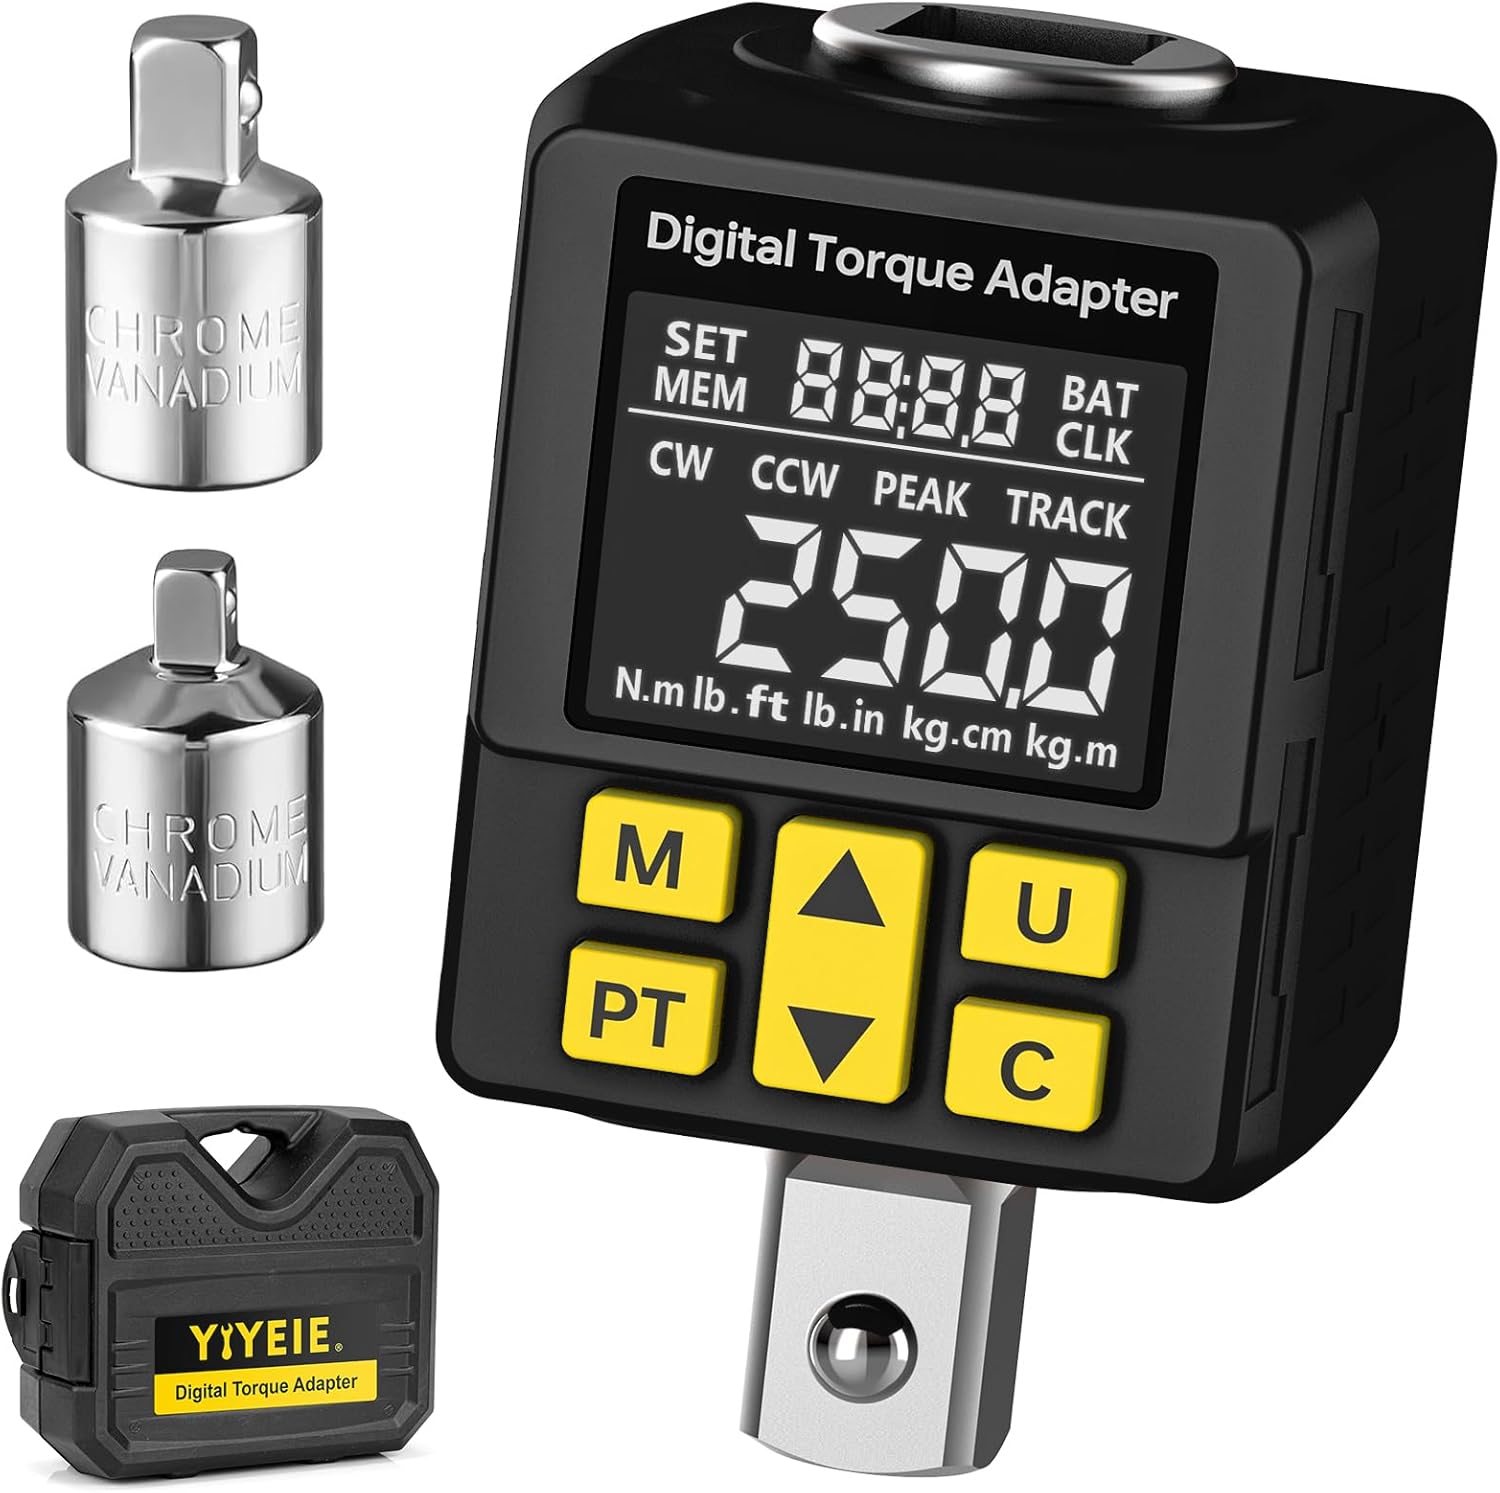
Key Features:
- Torque Range: 12.5-250 Ft-lb / 17-340 Nm
- Accuracy: ±2%
- Drive Size: 1/2-Inch (with 1/4" and 3/8" adapters included)
- Measurement Units: N.m, lb.ft, lb.in, kg.cm, kg.m
- Operating Modes: Peak Hold (PEAK) and Track (TRACK)
- Alerts: Buzzer and LCD color alarm (Green, Blue, Red)
- Data Storage: 30 Preset Values, 500 Groups of Stored Data

Button Functions:
- M (Memory) Button: Torque save confirmation / Stored data query.
- PT (Mode Switch) Button: Switches between Peak Hold and Track modes.
- Up Arrow Button: Increases value / Navigates up.
- Down Arrow Button: Decreases value / Navigates down.
- U (Unit) Button: Switches torque units.
- C (Power/Clear/Confirm) Button: Power on/off / Clear current reading / Confirm selection.
Setup
1. Battery Installation:
- Locate the battery compartment cover on the back of the adapter.
- Use the provided small screwdriver to open the battery compartment.
- Insert the batteries, ensuring correct polarity (+/-).
- Close the battery compartment cover and secure it with the screw.
2. Attaching to a Drive Tool:
The adapter has a 1/2-inch square drive. It can be used with a 1/2-inch ratchet or breaker bar. For smaller drive sizes, use the included 1/4-inch or 3/8-inch adapters.

Operating Instructions
1. Power On/Off:
- To power on, press the C button.
- To power off, press and hold the C button for a few seconds. The device will also automatically power off after a period of inactivity.
2. Unit Selection:
Press the U button to cycle through the available torque units: N.m, lb.ft, lb.in, kg.cm, kg.m.

3. Mode Selection (Peak Hold / Track):
Press the PT button to switch between Peak Hold (PEAK) and Track (TRACK) modes.
- Peak Hold (PEAK) Mode: Displays the maximum torque value applied during the tightening process. The display will hold this maximum value until reset.
- Track (TRACK) Mode: Displays the real-time torque value as it is being applied.

4. Setting Target Torque (Preset Mode):
To set a target torque value (P Mode), follow these steps:
- Power on the device.
- Press the PT button until "PtOP" (Preset Torque Operation) or "P Mode" is displayed.
- Use the Up and Down arrow keys to adjust the desired target torque value.
- Press the C button to confirm the setting.
Video Guide: Torque Measurement Operation
Video: This video demonstrates how to power on the device, switch to torque measurement mode, select units, set a target torque value in P Mode, and interpret the alarm prompts during torque application.
5. Torque Application and Alerts:
When applying torque in Preset Mode, the adapter provides visual and audible alerts:
- Green Light / Slow Beep: Torque is below 80% of the target value.
- Blue Light / Quicker Beep: Torque is between 80% and 99% of the target value.
- Red Light / Constant Beep: Torque has reached 100% of the target value. Stop applying force immediately.

Video Guide: Smart Color Screen Alert
Video: This video demonstrates the smart color screen alerts and audible feedback as torque is applied, showing the display changing from green to blue to red as the target torque is approached and reached.
6. Memory and Data Storage:
The adapter can store up to 500 groups of data and allows for 30 preset values.
- To save a torque reading, press the M button after a measurement.
- To access stored data, press and hold the M button. Use the Up and Down arrow keys to navigate through the stored memory slots (MEM-001 to MEM-500).
- To set or recall one of the 30 preset values, use the PT button to enter preset mode, then use the Up/Down arrows to select a preset.

7. Tire Pressure Measurement (If Applicable):
While primarily a torque adapter, this device may also offer tire pressure measurement functionality. If your model supports this, follow these steps:
- Power on the device.
- Press the PT and C buttons simultaneously to switch to tire pressure measurement mode. The display will show tire pressure units (e.g., psi, kpa).
- To change tire pressure units, press the PT and M buttons simultaneously to cycle through kpa, bar, psi, kg/cm².
- Connect the adapter to the tire valve core and press down firmly to get a reading.
Video Guide: Tire Pressure Measurement Operation
Video: This video demonstrates how to switch the device to tire pressure measurement mode, select different pressure units, and take a tire pressure reading.
Maintenance
- Cleaning: Wipe the device with a soft, dry cloth. Do not use abrasive cleaners or solvents.
- Storage: Store the adapter in its protective case in a dry, cool place when not in use. Remove batteries if storing for extended periods.
- Calibration: This device is factory calibrated. For professional applications requiring certified calibration, consult a specialized service provider. User calibration is not recommended.
Troubleshooting
| Problem | Possible Cause | Solution |
|---|---|---|
| Device does not power on. | Dead or incorrectly installed batteries. | Check battery polarity. Replace batteries with new ones. |
| Inaccurate readings. | Adapter not properly seated, device dropped, or needs calibration. | Ensure secure connection. Avoid dropping. If issues persist, professional calibration may be required. |
| Buttons unresponsive or difficult to navigate. | Complex user interface or temporary software glitch. | Refer to the "Product Overview" and "Operating Instructions" sections for detailed button functions. Power cycle the device (turn off and on). |
| Display is dim or flickering. | Low battery power. | Replace batteries. |
Specifications
| Feature | Detail |
|---|---|
| Model Number | Y0095-98 |
| Torque Range | 12.5-250 Ft-lb / 17-340 Nm |
| Accuracy | ±2% |
| Drive Size | 1/2-Inch Square Drive |
| Measurement Units | N.m, lb.ft, lb.in, kg.cm, kg.m |
| Operating Modes | Peak Hold (PEAK), Track (TRACK) |
| Data Storage | 30 Preset Values, 500 Groups of Stored Data |
| Power Source | Alkaline Batteries (Included) |
| Item Weight | 531 g |
| Dimensions | 15.49 x 12.8 x 6.4 cm (Parcel Dimensions) |
Warranty and Support
For warranty information, technical support, or service inquiries, please refer to the product packaging or contact YIYEIE customer service through the retailer where the product was purchased. Keep your purchase receipt as proof of purchase.