1. Safety Information
Please read all instructions carefully before assembly and use. Keep this manual for future reference.
- Always wear appropriate safety gear, including gloves, during assembly to prevent injuries from sharp edges.
- Assembly requires at least two people due to the size and weight of components.
- Ensure the assembly area is clear and well-lit.
- Do not attempt to assemble the cabinet in strong winds or adverse weather conditions.
- Place the cabinet on a firm, level surface. Anchoring the cabinet to the ground or a concrete slab is recommended for stability, especially in areas prone to strong winds.
- Do not overload shelves. Each shelf has a maximum weight capacity of 150 lbs. The total weight capacity for the cabinet is 450 lbs.
- Keep children and pets away from the assembly area.
- Safety warnings related to handling heavy components and proper assembly are included with the product packaging.
2. Package Contents
Before beginning assembly, verify that all parts listed in the packing list are present and undamaged. If any parts are missing or damaged, contact customer support immediately.
3. Setup and Assembly
The AECOJOY outdoor storage cabinet is designed for straightforward installation. Follow the detailed instructions provided in the included manual. Remote assistance from our technical team is available if needed.
3.1 Preparation
- Choose a flat, level, and stable location for the cabinet.
- Unpack all components and lay them out. Identify each part using the provided parts list.
- Remove any protective plastic film from the metal panels carefully.
3.2 Assembly Steps
- Base Assembly: Assemble the base frame according to the diagrams in your manual. Ensure all connections are secure.
- Wall Panel Installation: Attach the side and back wall panels to the base frame. Pay attention to the orientation of each panel.
- Roof Installation: Secure the roof panels to the top of the wall structure. Ensure a tight fit to maintain waterproof integrity.
- Door Installation: Install the four individually operable hinged doors. Ensure they align correctly and can open and close smoothly.
- Shelf Installation: Insert the adjustable shelves into the desired positions. Refer to the 'Operating Instructions' section for details on shelf adjustment.
- Final Checks: Verify all screws and bolts are tightened. Ensure the cabinet is stable and the doors close and lock properly.

Image: The cabinet with its four hinged doors open, revealing the adjustable interior shelves.

Image: This image highlights the three adjustable shelves, demonstrating how they can be configured to store various items.
4. Operating Instructions
4.1 Adjusting Shelves
The storage cabinet features three adjustable-height shelves. To adjust a shelf:
- Empty the shelf of all contents.
- Carefully lift the shelf and reposition its support brackets to the desired height.
- Ensure both sides of the shelf are securely seated in the brackets before placing items back on it. One shelf can also be chosen as a floor if desired.
4.2 Using Lockable Doors
The cabinet is equipped with lockable handles on both the upper and lower sections to ensure security for your stored items.
- To lock, ensure the doors are fully closed and aligned. Insert your lock (not included) through the designated holes on the handles.
- To unlock, remove your lock.

Image: A detailed view of the lockable handles on both the upper and lower sections of the cabinet doors.
5. Maintenance
Regular maintenance will prolong the life and appearance of your storage cabinet.
- Cleaning: Clean the cabinet periodically with a mild soap and water solution. Avoid abrasive cleaners or harsh chemicals that could damage the powder coating. Rinse thoroughly and dry to prevent water spots.
- Inspection: Annually inspect all screws, bolts, and connections to ensure they remain tight. Re-tighten if necessary.
- Corrosion Check: Although the cabinet features a corrosion-resistant and rust-resistant eco-friendly powder coating, regularly check for any signs of wear or damage to the coating, especially in areas exposed to moisture. Touch up any scratches to prevent rust.
- Door Alignment: Periodically check that the doors open and close smoothly and align correctly. Adjust hinges if needed.

Image: This image illustrates the cabinet's rust-resistant, corrosion-resistant, waterproof, and sturdy features.
6. Troubleshooting
- Doors do not close or align properly:
- Ensure the cabinet is placed on a perfectly level surface. Uneven ground can cause misalignment.
- Check that all assembly screws are tightened evenly. Over-tightening or under-tightening in certain areas can warp the frame.
- Inspect hinges for any damage or bending. Gently adjust if necessary.
- Water ingress:
- Verify that all roof and wall panels are correctly installed and sealed.
- Ensure the cabinet is on a level surface to prevent water pooling around the base.
- Check for any gaps or unsealed areas, especially around the door frames. Additional sealant may be applied if needed.
- Bent or flimsy parts:
- Handle all components with care during assembly.
- If a part is slightly bent, it may be gently reshaped before assembly. If a part is significantly damaged, contact customer support for a replacement.
- Missing parts:
- Double-check the packaging and assembly area. Small parts can be easily overlooked.
- Refer to the parts list in your manual. If parts are genuinely missing, contact customer support.
7. Specifications
| Feature | Detail |
|---|---|
| Brand | AECOJOY |
| Model Number | 16330GR |
| Color | Dark Grey |
| Material | Metal (Galvanized, Powder Coated) |
| Product Dimensions (D x W x H) | 29.9" x 46.4" x 70" |
| Item Weight | 95 Pounds |
| Weight Capacity (Each Shelf) | 150 Pounds |
| Weight Capacity (Maximum Total) | 450 Pounds |
| Water Resistance Level | Waterproof |
| Door Style | Single Hinged, Lockable Metal Door |
| Required Assembly | Yes |
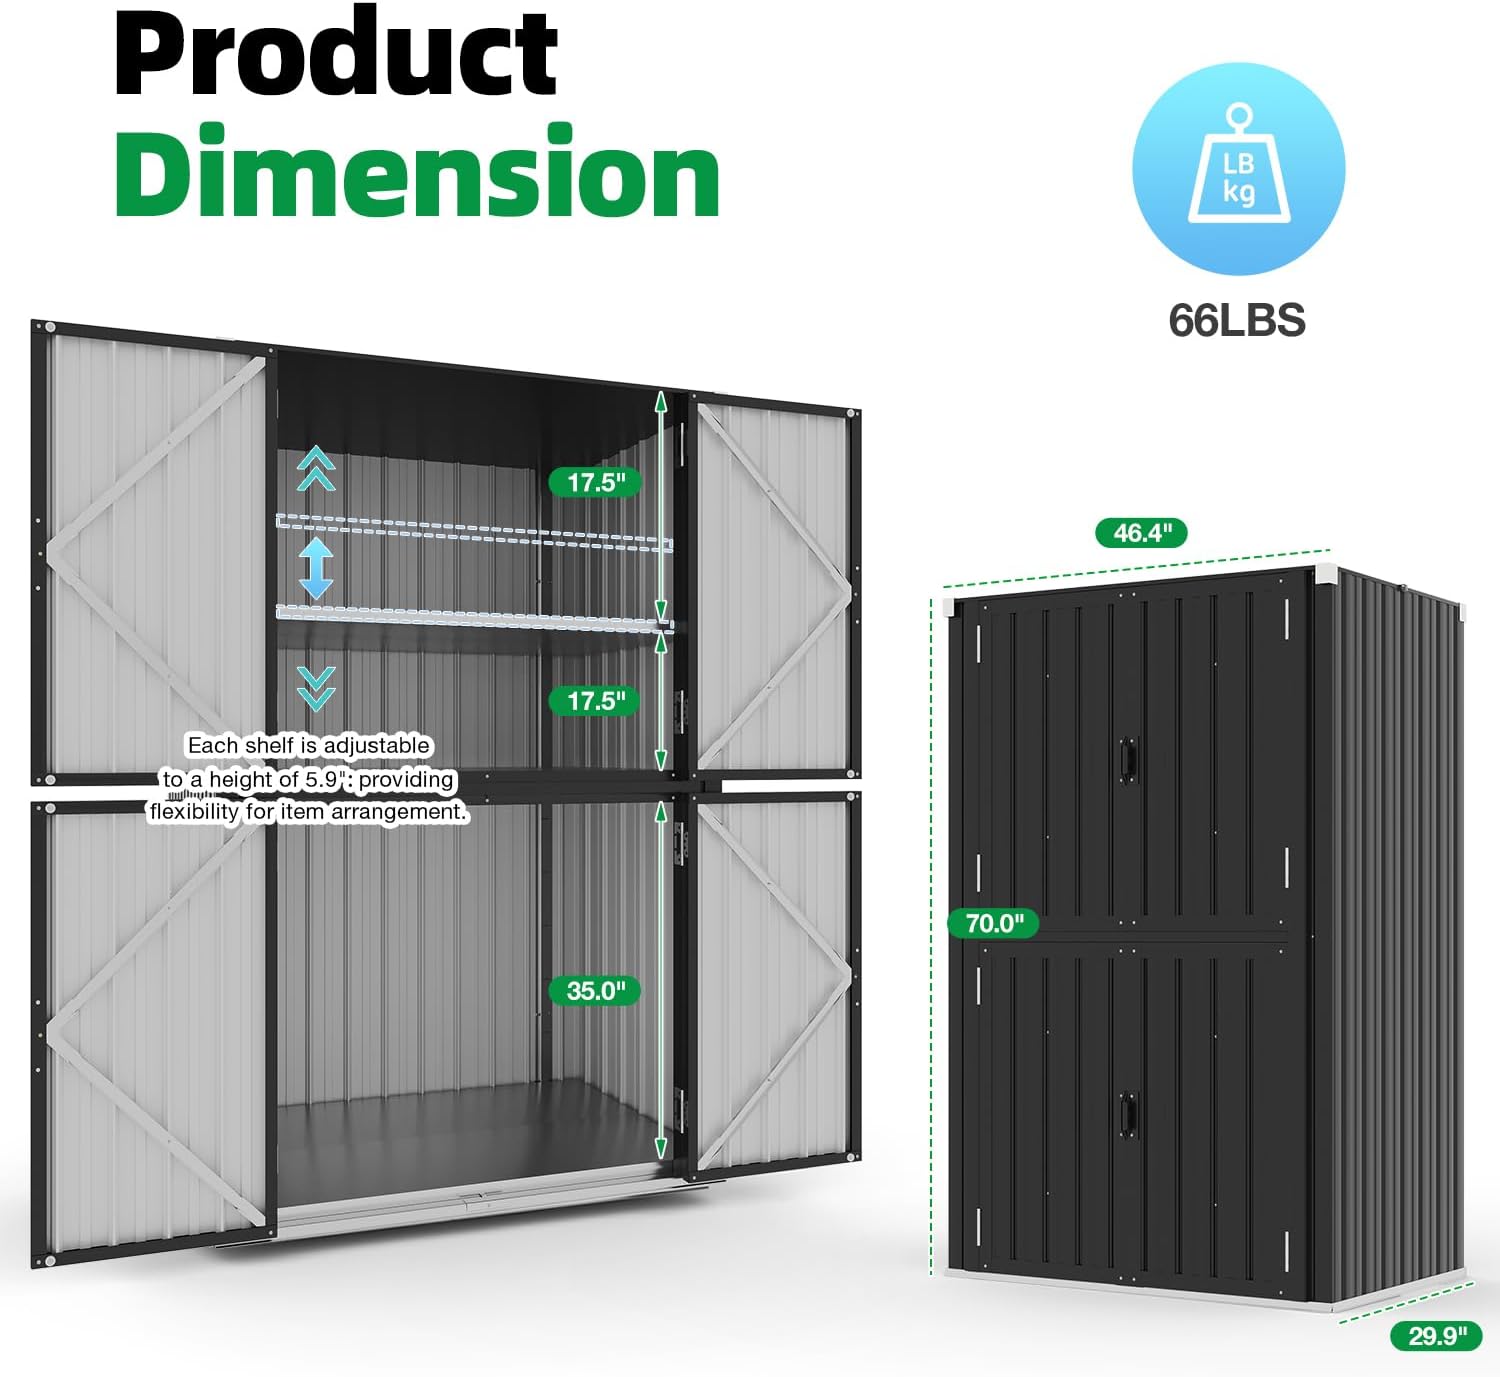
Image: This diagram illustrates the product dimensions and shelf adjustment details.
8. Warranty and Customer Support
AECOJOY provides exceptional customer support to ensure your satisfaction.
- Warranty: Enjoy a one-year warranty from the date of purchase. This warranty covers manufacturing defects under normal use.
- Customer Support: Round-the-clock customer support is available for ongoing assistance with installation, usage, and any other product-related inquiries.
- Technical Assistance: Our technical team offers remote assistance to ensure a smooth installation experience and to help resolve any issues you may encounter.
For support, please refer to the contact information provided with your product packaging or visit the official AECOJOY website.