1. Introduction
The Generic XH-W3001 is a versatile digital temperature controller designed for precise temperature regulation in various applications. It supports both heating and cooling modes, allowing users to maintain a desired temperature range from -50°C to 110°C. This unit features an easy-to-read digital display, intuitive controls, and a waterproof stainless steel probe for accurate temperature detection. This manual provides essential information for the safe and effective use of your XH-W3001 temperature controller.

Image 1.1: The XH-W3001 digital temperature controller can be used in a wide range of applications, such as controlling temperatures in incubators, greenhouses, pet enclosures, and industrial equipment like server racks.
2. Safety Information
- Ensure the power supply voltage matches the controller's specified voltage (DC12V, DC24V, or 110-220V AC). Connecting to an incorrect voltage can cause damage or fire.
- All wiring should be performed by a qualified individual or with extreme caution, following local electrical codes.
- Do not expose the main controller unit to water or excessive humidity. Only the stainless steel probe is waterproof.
- Keep the device away from flammable materials and heat sources.
- Do not attempt to disassemble or modify the controller. This will void the warranty and may lead to malfunction or electric shock.
- Ensure all connections are secure to prevent loose wiring, which can cause overheating or intermittent operation.
3. Product Overview
The XH-W3001 temperature controller features a compact design with a clear digital display and three control buttons. It includes a temperature detection probe connected via a cable.

Image 3.1: Key components of the XH-W3001 controller. The display shows the current temperature, the 'OUT' light indicates when the output is active, and the 'Up' and 'Down' buttons are used for setting parameters.
3.1. Components
- Digital Display: Shows the current temperature and parameter settings.
- Up Button (▲): Used to increase values or navigate menus.
- Down Button (▼): Used to decrease values or navigate menus.
- Set Button (implied by operation, usually long press Up/Down): Used to enter and confirm settings. (Note: The image labels only Up/Down, but setting requires a combination or long press).
- OUT Indicator Light: Illuminates when the heating or cooling output is active.
- Temperature Probe: Waterproof stainless steel sensor for temperature detection.
- Power Input Wires: Red and black wires for connecting to the power supply.
- Load Output Wires: Yellow and black wires for connecting to the heating or cooling device.
4. Specifications
| Feature | Specification |
|---|---|
| Model | XH-W3001 |
| Temperature Range | -50°C to 110°C |
| Measurement Accuracy | ±0.1°C |
| Control Accuracy | ±0.1°C |
| Power Supply Options | DC12V, DC24V, 110-220V AC (Please check your specific model) |
| Maximum Load Power | 1500W (for 110-220V AC model) |
| Output Type | Direct Output |
| Probe Type | Waterproof NTC Sensor (1 meter length) |
| Dimensions (approx.) | 5.97cm (L) x 4.47cm (W) x 3.1cm (H) |

Image 4.1: Approximate physical dimensions of the XH-W3001 controller.
5. Setup and Wiring
Before connecting, ensure the power supply is disconnected. Incorrect wiring can damage the device or cause electrical hazards.
5.1. Wiring Diagram

Image 5.1: Wiring connections for the XH-W3001. The red and black wires on the left are for power input, and the yellow and black wires on the right are for connecting to the controlled device.
- Power Input: Connect the red wire to the positive (+) terminal of your power supply and the black wire (from the same pair as red) to the negative (-) terminal. For AC models, connect to live and neutral. Ensure the voltage matches your controller's specification (DC12V, DC24V, or 110-220V AC).
- Load Output: Connect the yellow wire to one terminal of your heating or cooling device (e.g., heater, fan, compressor). Connect the black wire (from the same pair as yellow) to the other terminal of your device.
- Temperature Probe: The waterproof stainless steel probe is permanently attached. Place the probe in the area where you wish to measure and control the temperature.
5.2. Initial Power On
After ensuring all wiring is correct and secure, connect the power supply. The digital display will illuminate and show the current temperature detected by the probe.
6. Operating Instructions
The XH-W3001 operates by setting a 'Start Temperature' and a 'Stop Temperature'. The controller intelligently determines whether to operate in heating or cooling mode based on these settings.
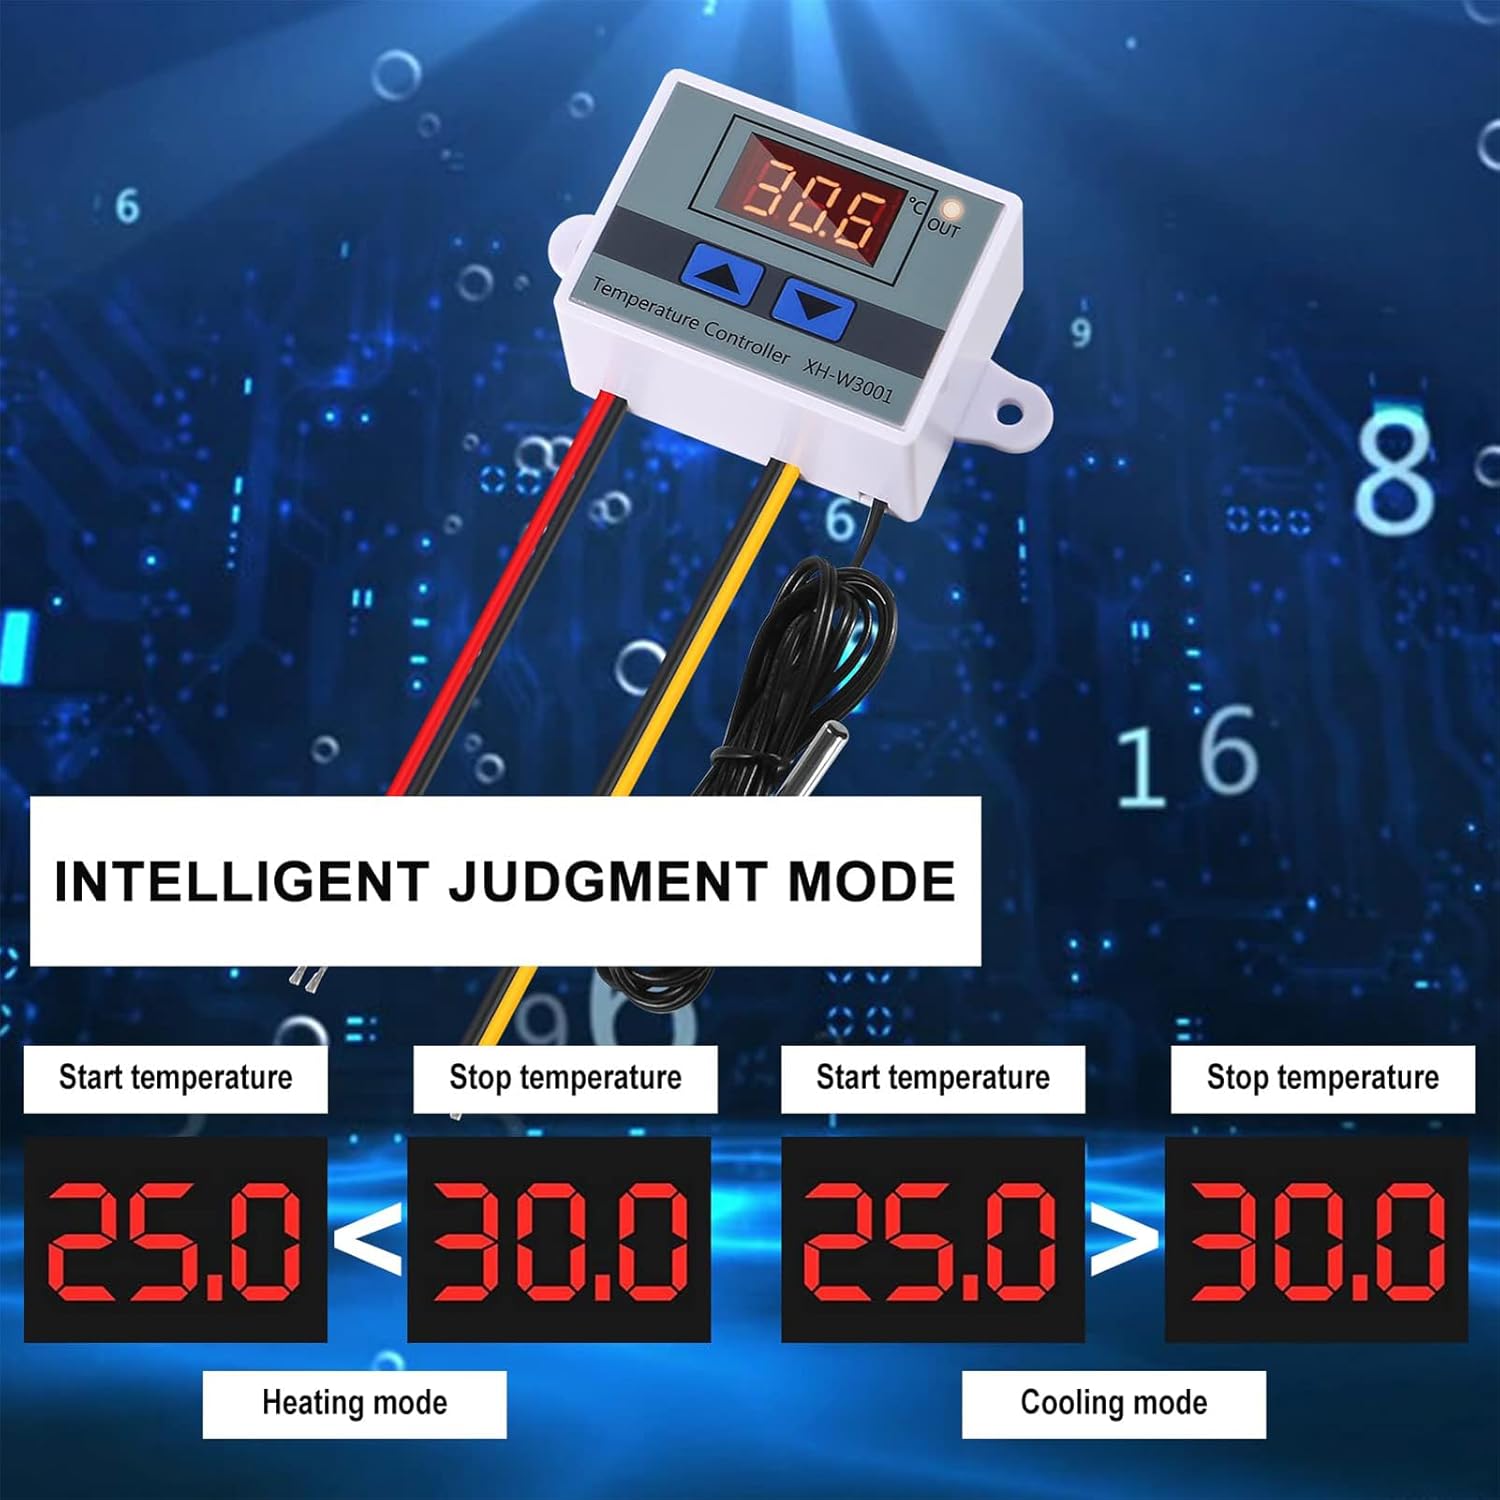
Image 6.1: The controller automatically switches between heating and cooling modes based on the relationship between the Start and Stop temperatures.
6.1. Setting the Start Temperature (P0)
- Press and hold the Up (▲) button for approximately 3 seconds. The display will flash, indicating you are in the setting mode for the Start Temperature.
- Use the Up (▲) or Down (▼) buttons to adjust the desired Start Temperature.
- Once set, wait for a few seconds without pressing any buttons, and the controller will automatically save the setting and return to displaying the current temperature.
6.2. Setting the Stop Temperature (P1)
- Press and hold the Down (▼) button for approximately 3 seconds. The display will flash, indicating you are in the setting mode for the Stop Temperature.
- Use the Up (▲) or Down (▼) buttons to adjust the desired Stop Temperature.
- Once set, wait for a few seconds without pressing any buttons, and the controller will automatically save the setting and return to displaying the current temperature.
6.3. Operating Modes
- Heating Mode: If the Start Temperature is set lower than the Stop Temperature (e.g., Start 25°C, Stop 30°C), the controller will activate the output (OUT light on) when the current temperature drops below the Start Temperature. It will deactivate the output when the temperature reaches the Stop Temperature.
- Cooling Mode: If the Start Temperature is set higher than the Stop Temperature (e.g., Start 30°C, Stop 25°C), the controller will activate the output (OUT light on) when the current temperature rises above the Start Temperature. It will deactivate the output when the temperature drops to the Stop Temperature.
6.4. Resetting to Factory Settings
To reset the controller to its factory default settings, power off the device. Then, press and hold both the Up (▲) and Down (▼) buttons simultaneously while powering the device back on. Hold until the display shows '888' or '---', then release. The device will restart with default settings.
7. Maintenance
- Cleaning: Wipe the controller's surface with a soft, dry cloth. Do not use abrasive cleaners or solvents. Ensure no liquids enter the device.
- Probe Care: The stainless steel probe is durable and waterproof. Periodically check the probe cable for any signs of damage or wear. Ensure the probe is clean for accurate readings.
- Connections: Periodically check all wiring connections to ensure they remain secure.
8. Troubleshooting
| Problem | Possible Cause | Solution |
|---|---|---|
| No display/No power | Incorrect voltage, loose wiring, power supply issue, damaged unit. | Verify power supply voltage matches controller. Check all power input wiring for secure connections. Test power supply. If still no power, unit may be faulty. |
| Temperature reading is inaccurate | Probe not properly placed, damaged probe, environmental interference. | Ensure probe is fully immersed or positioned correctly in the measurement area. Check probe cable for damage. Avoid placing probe near strong electromagnetic fields. |
| Output (heating/cooling) not activating | Incorrect Start/Stop temperature settings, load device faulty, wiring issue. | Review Start and Stop temperature settings to ensure they are configured for the desired mode (heating or cooling). Check load device wiring and functionality. Ensure the load device is within the controller's power rating. |
| Display shows 'LLL' or 'HHH' | Probe error (open circuit or short circuit), temperature out of range. | Check probe connection and cable for damage. If the probe is damaged, it may need replacement. Ensure the measured temperature is within the -50°C to 110°C range. |
9. Warranty and Support
Warranty information for the Generic XH-W3001 Digital Temperature Controller is typically provided by the seller or manufacturer at the time of purchase. Please refer to your purchase documentation or contact the retailer directly for specific warranty terms and conditions.
For technical support or further assistance, please contact the vendor or retailer from whom you purchased this product. They can provide guidance on troubleshooting, replacement parts, or warranty claims.