
1. Introduction
Thank you for choosing the YPMart AS-88B Digital Professional Multimeter. This device is a versatile, auto-ranging digital multimeter designed for accurate measurement of DC/AC voltage, DC/AC current, resistance, capacitance, and temperature. It features True RMS measurement, a 6000-count display, Non-Contact Voltage (NCV) detection, and an auto power-off function for energy efficiency. This manual provides essential information for safe and effective use of your multimeter.
2. Safety Information
To ensure safe operation and service of the multimeter, please read all instructions carefully before use. Failure to observe safety warnings can result in electric shock, fire, or damage to the meter.
- Always ensure the test leads are in good condition and properly connected before making any measurements.
- Do not attempt to measure voltages or currents exceeding the maximum specified limits of the meter.
- Exercise extreme caution when working with live circuits. High voltages can be dangerous.
- Never use the multimeter if it appears damaged or if the battery cover is not properly closed.
- Replace batteries immediately when the low battery indicator appears to ensure accurate readings.
- Do not operate the meter in explosive gas, vapor, or dusty environments.
- Always disconnect the test leads from the circuit before changing functions.
3. Product Overview
The YPMart AS-88B multimeter features a clear digital display and an intuitive function dial for selecting measurement modes. Below is an illustration of the device with its key components.
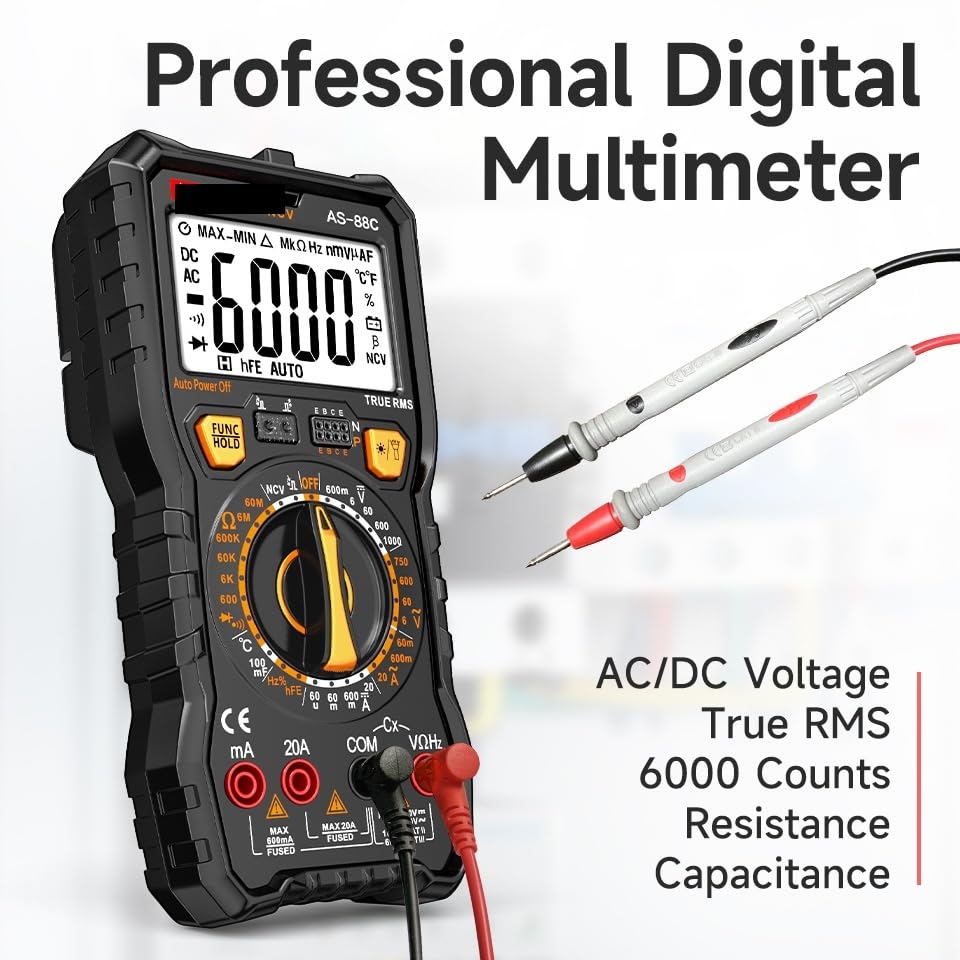
Key Components:
- LCD Display: Shows measurement readings, units, and function indicators.
- Function Dial: Used to select the desired measurement function (e.g., V~, V-, A~, A-, Ω, F, NCV, °C/°F).
- FUNC Button: Toggles between different functions within a single dial position (e.g., AC/DC, Diode/Continuity).
- HOLD Button: Freezes the current reading on the display.
- Input Jacks:
- COM Jack: Common terminal for all measurements (black test lead).
- VΩmA Jack: Input for voltage, resistance, capacitance, frequency, and small current measurements (red test lead).
- 20A Jack: Input for high current measurements up to 20A (red test lead).
4. Setup
4.1 Battery Installation
The YPMart AS-88B requires 4 x AAA 1.5V batteries for operation. Batteries are not included with the device.
- Ensure the multimeter is powered off and disconnect all test leads.
- Locate the battery compartment on the back of the multimeter.
- Unscrew the battery compartment cover and remove it.
- Insert 4 x AAA 1.5V batteries, observing the correct polarity (+ and -) as indicated inside the compartment.
- Replace the battery compartment cover and secure it with the screw.
4.2 Connecting Test Leads
Always connect the black test lead to the COM jack. Connect the red test lead to the appropriate input jack based on the measurement type:
- For voltage, resistance, capacitance, and frequency measurements, connect the red test lead to the VΩmA jack.
- For current measurements up to 20A, connect the red test lead to the 20A jack.
5. Operating Instructions
The AS-88B is an auto-ranging multimeter, simplifying operation by automatically selecting the appropriate measurement range.
5.1 Power On/Off
To power on the multimeter, rotate the function dial from the 'OFF' position to any desired measurement function. To power off, rotate the dial back to the 'OFF' position.
5.2 DC/AC Voltage Measurement (V-, V~)
- Connect the black test lead to the COM jack and the red test lead to the VΩmA jack.
- Rotate the function dial to the 'V~' (AC Voltage) or 'V-' (DC Voltage) position. The multimeter will automatically select the range.
- Connect the test leads in parallel to the circuit or component you wish to measure.
- Read the voltage value on the LCD display.
5.3 DC/AC Current Measurement (A-, A~)
Caution: Always connect the multimeter in series with the circuit when measuring current. Incorrect connection can blow the internal fuse or damage the meter.
- Connect the black test lead to the COM jack.
- For currents up to 20A, connect the red test lead to the 20A jack. For smaller currents, connect to the VΩmA jack.
- Rotate the function dial to the 'A~' (AC Current) or 'A-' (DC Current) position.
- Open the circuit where you want to measure current and connect the multimeter in series.
- Read the current value on the LCD display.
5.4 Resistance Measurement (Ω)
- Connect the black test lead to the COM jack and the red test lead to the VΩmA jack.
- Rotate the function dial to the 'Ω' (Resistance) position.
- Ensure the circuit is de-energized before measuring resistance. Connect the test leads across the component.
- Read the resistance value on the LCD display.
5.5 Capacitance Measurement (F)
- Connect the black test lead to the COM jack and the red test lead to the VΩmA jack.
- Rotate the function dial to the 'F' (Capacitance) position.
- Discharge the capacitor completely before measurement. Connect the test leads across the capacitor terminals.
- Read the capacitance value on the LCD display.
5.6 Non-Contact Voltage (NCV) Detection
- Rotate the function dial to the 'NCV' position.
- Move the top end of the multimeter close to the conductor being tested.
- If AC voltage is detected, the NCV indicator will light up and an audible alarm will sound.
5.7 Temperature Measurement (°C/°F)
The AS-88B model supports temperature measurement.
- Connect the temperature probe (if included) to the VΩmA and COM jacks, observing polarity.
- Rotate the function dial to the 'TEMP' position.
- Place the tip of the temperature probe on or near the object whose temperature you wish to measure.
- Read the temperature value on the LCD display. Use the FUNC button to switch between Celsius (°C) and Fahrenheit (°F).
5.8 Data Hold (HOLD)
Press the 'HOLD' button to freeze the current reading on the display. Press it again to release the hold function and resume live readings.
5.9 Backlight/Lighting
Press the backlight button (often combined with another function or a dedicated button) to turn on the display backlight for better visibility in low-light conditions. Press again to turn it off.
5.10 Auto Power Off
To conserve battery life, the multimeter will automatically power off after a period of inactivity. To reactivate, rotate the function dial or press any button.
6. Maintenance
6.1 Cleaning
Wipe the case with a damp cloth and a mild detergent. Do not use abrasives or solvents. Ensure the multimeter is completely dry before use.
6.2 Battery Replacement
When the low battery indicator appears on the display, replace the batteries as described in Section 4.1. Always use 4 x AAA 1.5V batteries.
6.3 Storage
If the multimeter is not used for an extended period, remove the batteries to prevent leakage. Store the device in a cool, dry place away from direct sunlight and extreme temperatures.
7. Troubleshooting
- No Display: Check if the batteries are correctly installed and have sufficient charge. Replace if necessary.
- Incorrect Readings:
- Ensure test leads are properly connected to the correct input jacks.
- Verify the function dial is set to the appropriate measurement mode.
- Check if the circuit or component is properly connected to the test leads.
- For current measurements, ensure the fuse is not blown.
- Meter Does Not Respond: Try turning the multimeter off and then on again. If the issue persists, replace the batteries.
8. Specifications
The following table outlines the key specifications for the YPMart AS-88B Digital Professional Multimeter.
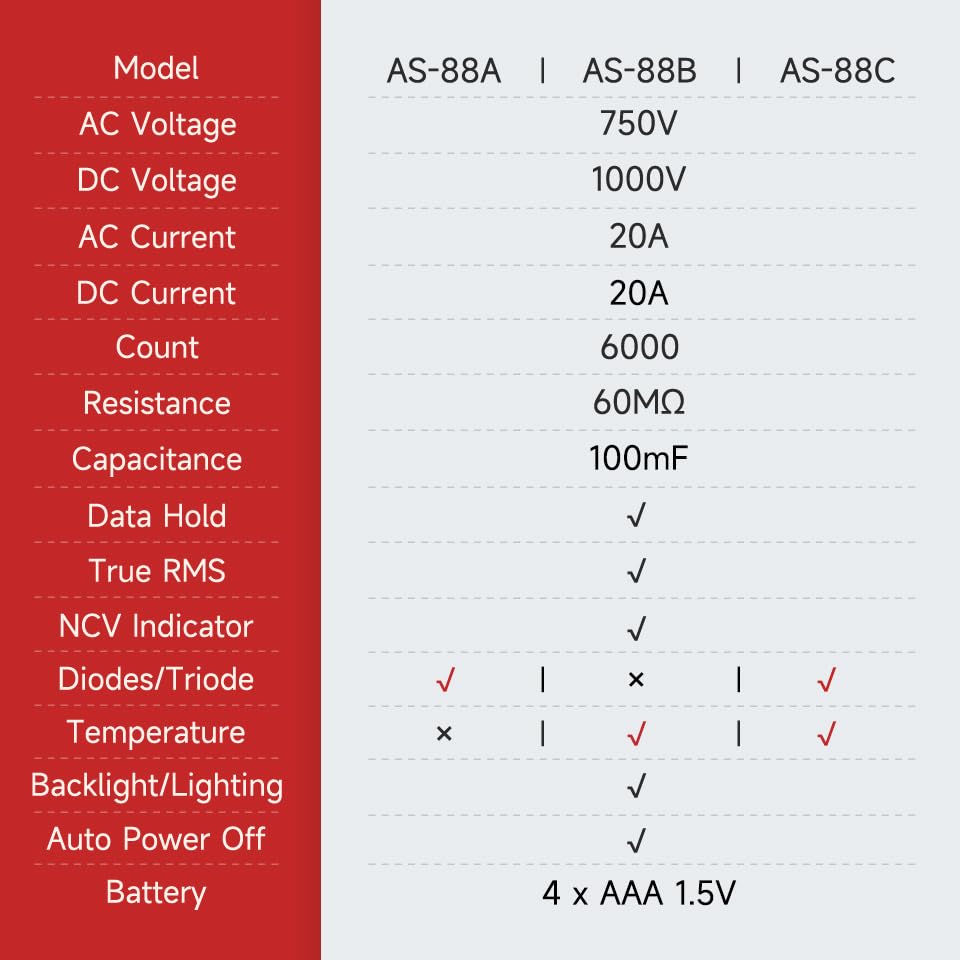
| Feature | Specification (AS-88B) |
|---|---|
| Display Count | 6000 Counts |
| Operating Mode | Auto Range |
| True RMS | Yes |
| DC Voltage Range | 0-1000V |
| AC Voltage Range | 0-750V |
| DC Current Range | 0-20A |
| AC Current Range | 0-20A |
| Resistance Range | 0-60MΩ |
| Capacitance Range | 0-100mF |
| NCV Indicator | Yes |
| Temperature Measurement | Yes |
| Diode/Triode Test | No |
| Backlight/Lighting | Yes |
| Auto Power Off | Yes |
| Battery Type | 4 x AAA 1.5V |
| Dimensions | 19.5 x 9.2 x 5.2 cm |
| Item Weight | 300 g |
9. Warranty and Support
For warranty information or technical support, please refer to the product packaging or contact your retailer. Keep your purchase receipt as proof of purchase.